RX II Series User Manual
Installation
2-11
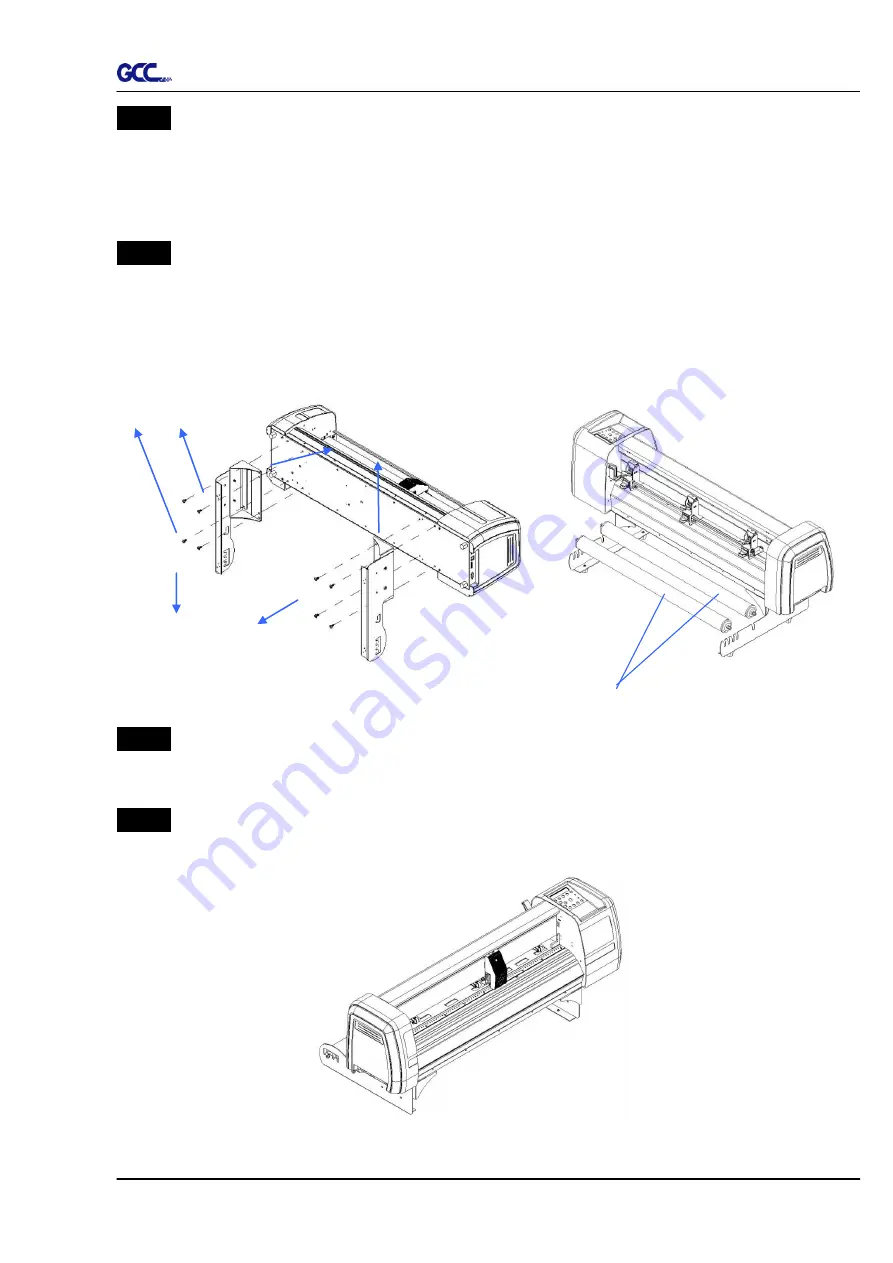
Step 3
Position the Desktop Support Brackets beside the Roll Holder Support and insert M6
screws into the Roll Holder Support and tighten them with M6 L-shape screw driver.
(Refer to Figure 2-14).
Step 4
Put the bottom of machine in lateral, and position the Roll Holder Assembly beside the
bottom of the machine. Then, insert the M6 screws into the holes of Roll Holder support
assembly and tighten them with M6 L-shape screwdriver. Like Figure 2-15.
Step 5
Place the two roll holders into the holes of Roll Holder Support (Figure 2-16).
Step 6
The complete Desktop Media Support System will be shown as in Figure 2-17.
Figure 2-3-2
Figure 2-17
M6 screws
Screw holes
Roll Holder Assembly
Figure 2-16
Roll Holders
Figure 2-15
Содержание RX II Series
Страница 1: ...V 24 2020 May RX II Series User Manual http www GCCworld com...
Страница 160: ...RX II User Manual GreatCut Plug In A 6 Step 5 Click output and the object will be sent to GCC Cutting Plotter...
Страница 174: ...RX II User Manual GreatCut Plug In A 6 Step 5 Press the button on the right of Jog marks...
Страница 179: ...RX II User Manual GreatCut Plug In A 6 Step 5 Click output and the object will be sent to GCC Cutting Plotter...
Страница 190: ...RX II User Manual GreatCut Plug In A 6 Step 11 Go to GreatCut window press Output button...
Страница 191: ...RX II User Manual GreatCut Plug In A 6...
Страница 205: ...RXII User Manual SignPal 12 Instruction A 6...
Страница 206: ...RXII User Manual SignPal 12 Instruction A 6 3 Select File Print Setup in SignPal Software and select the printer...
Страница 207: ...RXII User Manual SignPal 12 Instruction A 6 4 Select File Document Setup in SignPal and select paper size...
Страница 212: ...RXII User Manual SignPal 12 Instruction A 6...


