RX II series User Manual
Automatic-Aligning System
5-9
Step 2
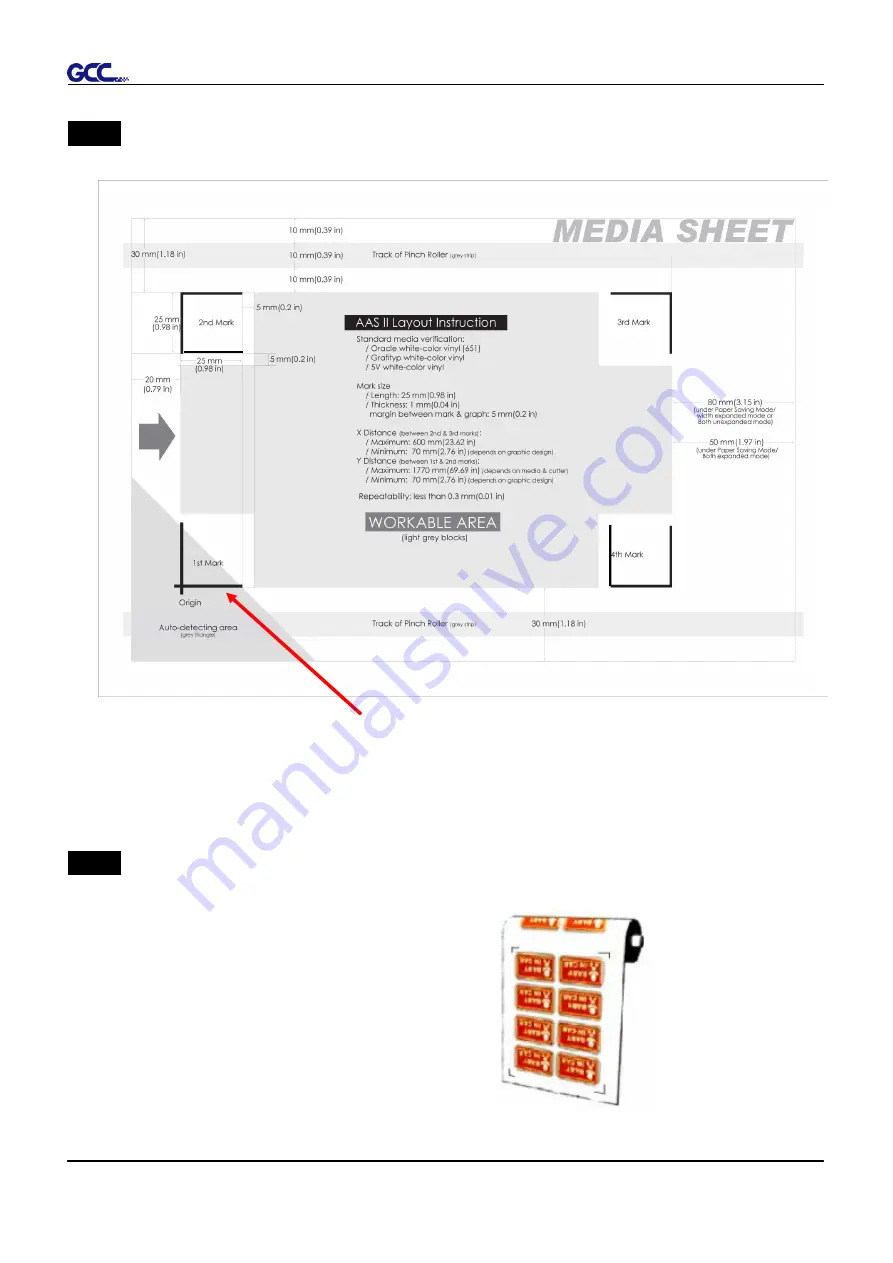
Placing the Registration Marks
The AAS Layout Instruction:
* Auto-detection function on the 1
st
mark covers the grey area
Suggested 30mm margin on both left and right sides of media sheet.
Suggested 20~30mm margin on top of media sheet, and at least 50mm margin on
the bottom edge to prevent sheets dropping or any error occurred while media sizing.
Step 3
Print the Graphics
■ Print the graphic and the marks with your printer
(Scaling = 100%).
■ When printing on a roll media, make sure the orientation as following:
Содержание RX II Series
Страница 1: ...V 24 2020 May RX II Series User Manual http www GCCworld com...
Страница 160: ...RX II User Manual GreatCut Plug In A 6 Step 5 Click output and the object will be sent to GCC Cutting Plotter...
Страница 174: ...RX II User Manual GreatCut Plug In A 6 Step 5 Press the button on the right of Jog marks...
Страница 179: ...RX II User Manual GreatCut Plug In A 6 Step 5 Click output and the object will be sent to GCC Cutting Plotter...
Страница 190: ...RX II User Manual GreatCut Plug In A 6 Step 11 Go to GreatCut window press Output button...
Страница 191: ...RX II User Manual GreatCut Plug In A 6...
Страница 205: ...RXII User Manual SignPal 12 Instruction A 6...
Страница 206: ...RXII User Manual SignPal 12 Instruction A 6 3 Select File Print Setup in SignPal Software and select the printer...
Страница 207: ...RXII User Manual SignPal 12 Instruction A 6 4 Select File Document Setup in SignPal and select paper size...
Страница 212: ...RXII User Manual SignPal 12 Instruction A 6...


