SS1807-N002
Instruction of System
-
65/106
3.2.3 NTP setup
Use NTP (Network Time Protocol) to synchronize the clocks of processor and server at startup.
Move the cursor to the desired item using the [↑] and [↓] keys, and press the [Enter] key.
In the displayed pop-up menu, select the desired setting using the [↑] and [↓] keys and then
press the [Enter] key to finalize the setting.
When manual data entry is required for an item, move the cursor to the item, press the [Enter]
key and then enter the desired value.
To cancel the entry, press the [ESC] key.
Menu item
Setting
Default
Description
Remarks
NTP s erver
IP
0.0.0.0
Specify the IP address of the NTP server.
Ping(NTP)
Confirm that IP communication to the access point setup is possible.
3.2.3.1
“Ping
(NTP)”
NTP check
Confirm that the times can be synchronized.
3.2.3.2
“NTP
check”
3.2.3.1 Ping
(
NTP
)
Move the cursor to the “Ping” and press the [Enter] key to confirm that IP communication to the
access point setup in the “NTP Server IP” in the “NTP Setup” is possible.
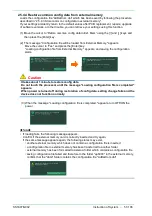
When communication is confirmed, a message
saying “Connection with the server is being
confirmed. Please wait a moment.” is displayed.
When confirmation is completed, the result is
displayed as a message.
3.2.3.2 NTP check
Move the cursor to the “NTP check” and press the [Enter] key to confirm that the time can be
synchronized.
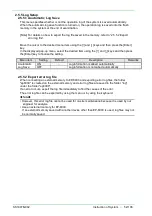
The message “Wait until the time has been
obtained” is displayed during confirmation.
When confirmation is completed, the result is
displayed as a message.
[Note]
When confirmation of the communication has failed, confirm that the network is correctly set up
and connected, and try again.
Содержание EP-6000
Страница 1: ...Processor EP 6000 FV693A Service Manual SR1807 N002 Ver 1 Oct 2018 ...
Страница 5: ...SS1807 N002 General Table of Contents 1 1 General Table of Contents ...
Страница 13: ...SS1807 N002 Caution in Safety 1 12 Caution in Safety ...
Страница 18: ...SS1807 N002 Caution in Safety 6 12 2 Label 2 1 EP 6000 Labeling Layout FV693A 2 1 1 Labeling chart D B A C ...
Страница 25: ...SS1807 N002 Product Specifications 1 11 Product Specifications ...
Страница 36: ...SS1807 N002 Instruction of System 1 106 Instruction of System ...
Страница 52: ...SS1807 N002 Instruction of System 17 106 In the case of Normal mode In the case of BLI BLI bright or LCI ...
Страница 131: ...SS1807 N002 Instruction of System 96 106 9 EP 6000 Description of Configuration 9 1 Block Diagram ...
Страница 133: ...SS1807 N002 Instruction of System 98 106 ELC PCB Patient PCB APC PCB APC PCB APC PCB DC Pump ...
Страница 139: ...SS1807 N002 Instruction of System 104 106 9 4 Outline of PCB roles ...
Страница 142: ...SS1807 N002 Failure Analysis 1 64 Failure Analysis ...
Страница 206: ...SS1807 N002 Checkup Replacement and Adjustment 1 137 Checkup Replacement and Adjustment ...
Страница 343: ...SS1807 N002 Service Parts List 1 19 Service Parts List ...
Страница 348: ...SS1807 N002 Service Parts List 6 19 6 13 13 16 18 17 17 6 18 14 15 6 9 10 6 12 7 6 11 8 6 5 1 4 3 2 ...
Страница 350: ...SS1807 N002 Service Parts List 8 19 13 12 14 11 14 17 7 7 2 6 15 7 2 3 4 1 5 2 10 9 17 7 7 8 18 12 13 16 ...
Страница 352: ...SS1807 N002 Service Parts List 10 19 2 2 2 4 1 3 3 2 3 3 6 5 ...
Страница 356: ...SS1807 N002 Service Parts List 14 19 1 3 3 4 1 2 1 3 X 4 1 3 3 4 3 3 ...
Страница 358: ...SS1807 N002 Service Parts List 16 19 3 1 2 1 ...
Страница 360: ...SS1807 N002 Service Parts List 18 19 Fig 09 5 4 2 3 1 ...
Страница 362: ...SS1807 N002 Periodical Maintenance 1 15 Periodical Maintenance ...
Страница 377: ...SS1807 N002 Installation 1 68 Installation ...
Страница 381: ...SS1807 N002 Installation 5 68 1 2 Installation onto the Cart Standard System Installation Example ...
Страница 445: ...SS1807 N002 ...


