background image

Contents/Precautions

21

To ensure waterproofness/dustproofness

To avoid water/dust ingress, be sure to observe the 
followings.

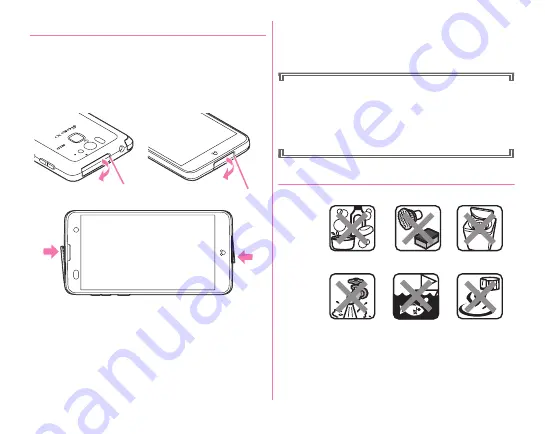
When attaching/removing docomo mini UIM card or using 
external connection jack, pull the cap with your fingertip by 
the groove to open (

a

). Then push the tab down and ensure 

that there are no gaps between the cap and the terminal (

b

). 

Close the jack cap and slot cap firmly. Even a fine obstacle 
(one hair, one grain of sand, tiny fiber, etc.) put between 
contact surfaces may allow water to enter.

Do not poke the stereo earphone jack, microphone, 
earpiece, speaker, temperature/humidity sensor or air vent 
with a sharp object.

Do not let the terminal fall. It may be scratched causing the 
waterproof/dustproof performance to degrade.

The rubber gaskets of the jack cap and slot cap play 
important roles for keeping waterproof/dustproof 
performance. Do not remove or scratch the rubber gaskets. 
Also, prevent dust from adhering to them.

To keep the terminal waterproofness/dustproofness, 
replacement of parts is recommended every 2 years 
regardless of whether the terminal appears normal or 
abnormal. DOCOMO takes the terminal to replace the 
parts as a chargeable service. Bring the terminal to a sales 
outlet such as a DOCOMO-specified repair office.

Important precautions

Do not perform actions shown in the illustrations below.

Groove

a

Groove

a

b

b

<Example>

Using Soap/

Detergent/Bath powder

Soaking in

ocean water

Using in

hot spring

Applying strong

water flow

Washing with
brush/sponge

Machine-washing

Содержание F-07E

Страница 1: ...INSTRUCTION MANUAL ...

Страница 2: ...on functions Unauthorized copying of parts of or this entire manual is prohibited The contents in this manual URL and contents are subject to change without prior notice Quick start guide in Japanese only This manual provides information about screens and operations of basic functions Instruction Manual application e manual installed in the terminal in Japanese only This manual provides informatio...

Страница 3: ...Contents Precautions 1 Other options P180 Basic package F 07E including warranty Desktop Holder F41 including warranty Smartphone pierce set sample including manual Quick start guide Japanese ...

Страница 4: ...ist NX Home 48 Task manager 52 Switching the home applications 53 docomo Palette UI 54 Home screen docomo Palette UI 54 Application list docomo Palette UI 56 Calling 58 Making a call 58 Receiving a call 60 Operation during a call 60 Recent calls 61 Phone memo 62 Call settings 62 Phonebook 64 Mail Browser 68 sp mode mail 68 SMS 68 Email 70 Gmail 73 Early warning Area Mail 74 Google Talk 75 Browser ...

Страница 5: ...166 External device connection 168 Connecting with a PC 168 Connecting with a Wi Fi printer 168 Connecting with DLNA device 169 Connecting with other devices 171 International roaming 174 Outline of international roaming WORLD WING 174 Available service overseas 174 Before using the terminal overseas 174 Settings for overseas use 176 Making Receiving a call in the country you stay 177 Setting inte...

Страница 6: ... data resulting from malfunction repair changing of the model or other handling of the terminal In the terminal as it is for a PC some applications that you install may give instability of the operation or may send your location information or personal information registered to the terminal to outside via the Internet and the information may be used improperly Please thoroughly check a provider an...

Страница 7: ...e For the information on the services provided by Google refer to the terms of use for Google Inc And for the details on other web services read terms of use for each service If your terminal is lost change your each account password using a PC to prevent other persons from using Google services such as Google Talk Gmail Google Play etc and Twitter Set the screen lock to ensure the security of you...

Страница 8: ... card 12 Handling mobile phones near electronic medical equipment 12 Material list 13 Precautions Always follow these directions DANGER This sign denotes that death or serious injury may directly result from improper use WARNING This sign denotes that death or serious injury may result from improper use CAUTION This sign denotes that minor injury or damage to property may result from improper use ...

Страница 9: ...to it May cause fire burns injuries electric shock Keep conductive materials metal pieces pencil lead etc from coming in contact with the charging terminal external connection jack or stereo earphone jack Do not put those materials inside the terminal May cause fire burns injuries electric shock Do not cover or wrap the terminal with a blanket etc while using or charging May cause fire or burns Tu...

Страница 10: ...hing or rash on your skin or it may result in low temperature burns depending on your constitution and or health condition Handling the terminal The internal battery for the terminal is as follows DANGER Do not throw the terminal into the fire May cause internal battery to ignite burst heat or leak Do not nail the terminal hit with a hammer or step on it May cause internal battery to ignite burst ...

Страница 11: ... you talk by setting handsfree or ring alert is sounding keep the terminal away from your ear And when connecting the earphone microphone etc to the terminal and play a game or music adjust the volume moderately Too loud volume may cause a hearing loss And if you cannot hear the sound around you clearly it may cause an accident If you have weak heart be careful when setting the incoming vibrate al...

Страница 12: ...our skin of face or hands May cause loss of sight or skin problems If the liquid crystal gets into your eyes or mouth rinse it with clean water and see a doctor immediately And if the liquid adheres to skin or clothing use alcohol etc to wipe it off then wash with soap Do not discard the old terminal together with other garbage May cause malfunction or damage Bring the old terminal into a sales ou...

Страница 13: ... or finger May cause fire burns electric shock Do not place heavy objects on the adapter cord May cause fire burns electric shock When you insert and remove the AC adapter from power outlet do not contact a metal strap or other metal objects with the jack May cause fire burns electric shock Do not touch the adapter cord desktop holder or outlet with wet hands May cause fire burns electric shock On...

Страница 14: ...rs of medical equipment such as implanted pacemakers or defibrillators must carry and use the terminal at least 15 cm away from the implanted device The terminal s signals may affect the performance of electronic medical equipment When electronic medical equipment other than implanted pacemakers or defibrillators are in use outside of medical facilities such as in home care settings check with the...

Страница 15: ...c resin UV hard coating IrDA lens PC resin UV hard coating Power key Volume key PC resin Acrylic UV curable coating Jack cap Slot cap PC resin Polyester elastomer resin Acrylic UV curable coating Stereo earphone jack PA resin Fingerprint sensor Sensor Epoxy resin Outer periphery Stainless steel Titanium coating Charging terminal PPS resin Stainless steel Gold plating Desktop Holder F41 Exterior ca...

Страница 16: ... be careful never to damage the jack when cleaning it Do not place the terminal near an air conditioner outlet The rapid change in temperature may cause condensation causing internal corrosion and malfunction When using be careful not to subject excessive force to the terminal If the terminal is crammed into a brimming bag or placed in a pocket and sat on display or internal PCBs may be damaged or...

Страница 17: ...cards floppy disks etc may be erased Do not bring magnetized objects close to the terminal Bringing strong magnetism close may cause a malfunction The internal battery is a consumable part Replace the internal battery if the terminal has extremely short operation time on a full charge though it may vary by operating conditions For details of replacement of the internal battery contact General Inqu...

Страница 18: ...t drop docomo mini UIM card or subject it to shocks May cause malfunction Do not bend docomo mini UIM card or place heavy objects on it May cause malfunction Do not install docomo mini UIM card into the terminal with a label or sticker put on May cause malfunction Bluetooth devices This terminal is equipped with the security features that are compliant with Bluetooth standards for communication vi...

Страница 19: ...ou are within an area where radio wave reaches On the other side if you communicate without appropriate security settings communications may be intercepted or hacked by malicious parties It is recommended to make necessary security settings on your judgement and responsibility Wireless LAN Do not use wireless LAN in a place where magnetized by electric products AV OA equipment etc or where electro...

Страница 20: ...hood 2 If this device generates harmful radio wave interference against in plant radio stations for identification of mobile objects change the using frequency promptly or stop using wireless LAN function and contact General Inquiries on the last page of this manual then consult about treatment for prevention of the interference for example installation of partitions etc 3 If this device generates...

Страница 21: ...the Technical Compliance Mark is depicted on the electronic nameplate of the terminal You can check the electronic nameplate in the terminal as follows From the Home screen Settings About phone Auth If you remodel the terminal by removing its screws your certification of technical standard conformance becomes invalid Do not use the terminal with its certification of technical standard conformance ...

Страница 22: ...h pressing and holding the jack cap and slot cap not to open wash the terminal with tap water without rubbing hard Do not apply water flow stronger than allowed P20 Do not use brush sponge soap detergent etc If mud or soil is adhered to the terminal eliminate the dirt first by shaking several times in tap water of wash basin and then wash the terminal with running water Drain water in the specifie...

Страница 23: ...terminal fall It may be scratched causing the waterproof dustproof performance to degrade The rubber gaskets of the jack cap and slot cap play important roles for keeping waterproof dustproof performance Do not remove or scratch the rubber gaskets Also prevent dust from adhering to them To keep the terminal waterproofness dustproofness replacement of parts is recommended every 2 years regardless o...

Страница 24: ...ause damage or malfunction Do not put the terminal in hot water use it in a sauna or apply hot airflow from a hair dryer etc to it Do not move the terminal in water or slam the terminal against the surface of water When you use the terminal in swimming pool obey rules of the facility The terminal does not float on water Do not leave water on the terminal May short circuit the power jacks or in a c...

Страница 25: ...irmly holding it until there is no more water splattering c Swing the terminal about 10 times against a dry clean cloth etc to wipe off water remaining in the stereo earphone jack microphone earpiece speaker keypad TV FM transmitter antenna or charging terminals air vent etc d Wipe off water drained from the terminal with dry clean cloth etc and dry naturally Water if any remaining in the terminal...

Страница 26: ...ssory desktop holder or opening the jack cap When you open the jack cap for charging close the cap firmly after charging It is recommended to use the desktop holder for charging to prevent water or dust from seeping inside from the external connection jack Do not use the AC adapter or desktop holder in a bathroom shower room kitchen lavatory or other highly humid area May cause fire or electric sh...

Страница 27: ... the sensor or covering the sensor with fingers may cause erroneous operation or incorrect sensing result g Earpiece h Indicator LED i In camera j Microphone k External connection jack MHL available l mark m Infrared data port n Bluetooth Wi Fi antenna section o Out camera p Rear microphone Use to reduce noise during a call Do not cover it q GPS Xi antenna section r Temperature Humidity sensor If ...

Страница 28: ...rd is not inserted to the terminal some functions such as making receiving calls and sending receiving SMS are not available For details on docomo mini UIM card refer to the docomo mini UIM card manual Installing Removing docomo mini UIM card Install remove after turning OFF the power For inserting docomo mini UIM card make sure to use the tray Inserting docomo mini UIM card without tray may cause...

Страница 29: ...ving inserting the tray from into the docomo mini UIM card slot do not remove or insert forcibly Doing so may damage the tray IMEI plate with IMEI number and bar code printed is inserted between microSD card slot and docomo mini UIM card slot Do not pull out the IMEI plate because it will be requested at a DOCOMO specified repair office when the terminal is damaged etc Please note the following If...

Страница 30: ... When charging starts with the battery empty the terminal may not be immediately activated after turning the power ON In this case charge the terminal while keeping it turned OFF and turn it ON after a while For charging time see Main specifications P196 Internal battery life The internal battery is a consumable part Each time it is charged time available with each charging reduces Talking on the ...

Страница 31: ...to connect It may cause damage c Push the terminal toward the lock of the Desktop Holder until it clicks b Check that the terminal is firmly fixed by the lock of the Desktop Holder d Insert the AC adapter s power plug into an outlet Indicator LED lights red while charging and turns off when charging is complete e When charging is complete remove the AC adapter s power plug from the outlet then lif...

Страница 32: ... into sleep mode according to the sleep settings You can show hide Theater mode or set application to be activated P133 Insert the Smartphone pierce set sample to the smartphone pierce attaching hole of the Desktop Holder The smartphone pierce lights when inserting removing the terminal into from the Desktop Holder Do not insert an object other than the included Smartphone pierce set sample into t...

Страница 33: ...wer ON for the first time After setting up Google account P156 and Setting my body My physical profile P153 make initial setting of docomo service Follow the onscreen instructions When a confirmation screen for sending terminal error information appears tap OK When a software update confirmation screen appears tap OK When the instruction guide appears tap Do not show this again or OK Turning power...

Страница 34: ...by sweat or water Operation under water Tap Double tap Tap Touch the screen lightly and release the finger quickly Double tap Tap twice quickly Touch and hold Touch the screen for a while Some operations can be operated by keeping touching the screen with a finger Drag Slide Swipe Pan Drag Touch an item or icon on the screen and move it to the desired position Slide Swipe Touch the screen with you...

Страница 35: ...and hold P and D at the same time 1 sec or more To check the image open the Notification panel and tap a notification for screenshot or from the Home screen Gallery Screenshot Enter characters using software keyboard displayed on the screen Entering characters with NX input is mainly described in this section Switching to other input method is available P36 You can connect an external keyboard to ...

Страница 36: ...Symbol Display symbol list 顔文字 Smiley Display list of smiley symbol pict D ATOKダイレクト ATOK direct Quote 電話帳 ATOKダ イレクト Phonebook ATOK direct input or Password manager 設定 Settings NX input and ATOK テーマ切り替え Change theme Change design of keypad Touch and hold Activate voice input Display characters assigned to a key in the reverse order f Move the cursor to left g Display a symbol list h Switch charac...

Страница 37: ...on that key Flick towards the desired character without releasing your finger from the screen To enter voiced semi voiced sound small geminate consonant characters tap once or twice after flicking Numeric keypad input Tap continuously a key assigned the character you want to enter until the desired character is displayed Gesture input If you tap and keep your finger on the key assigned the charact...

Страница 38: ...ap input Flick guide Flick Sensitivity Modifier key flick Alphabet key flick Numeric keypad input auto cursor Gesture input settings Multi tap input Gesture guide or Character delete key QWERTY keypad settings Set Direct alphanumeric input Show numeric keys vertical screen horizontal screen Handwritten input setting Set Overwrite handwritten input Numeric keypad QWERTY keypad Number of input boxes...

Страница 39: ...ry by application Copying Cutting texts Copying Cutting in the character entry field 1 Touch and hold a text Selected text is highlighted Slide knobs on the both end of text range to adjust selected range To select all tap SELECT ALL To deselect tap out of selected range 2 COPY CUT Copying text in a web page etc 1 Touch and hold a text Text range is highlighted Slide knobs on the both ends of text...

Страница 40: ...ppears 2 On the physical keyboard select a keyboard Set up keyboard layouts Mark a keyboard layout Select a keyboard layout You can set necessary items collectively for the first time to use the terminal Each setting can be changed anytime 1 From the Home screen Settings 2 Initial settings Set each item Slide in function Set a function which allows you to activate an application by sliding your fi...

Страница 41: ...play the moved schedule synchronize with the account on the moved location The last registered Google account is set as an account to move to On some mobile phones which do not support Easy data transfer support part of data cannot be moved About other initial settings Set the following items as required in addition to the initial setting items Google account setup etc P156 Email account settings ...

Страница 42: ...me You can locate application shortcuts widgets etc on the Home screen or change wallpaper or theme of the Home screen For adding a shortcut of application operate from the application list P48 Editing widgets or icons Adding widget to the Home screen Touch and hold a free area on the customize area Widgets Select a widget For some widgets the size can be changed by touching and holding and then r...

Страница 43: ... theme Select a thumbnail of Home theme Set to home theme A Home screen changes to the designed one according to the theme INFORMATION Alternatively from the Home screen Tap Wallpaper to select a wallpaper To change screens for pattern authentication fingerprint authentication outgoing incoming call or keyboard NX input set from Customize screen P47 Home setting Add Delete a home screen or make ho...

Страница 44: ...ouched and held Home screen loop setting Set whether to loop when the end of the Home screen is displayed 1 From the Home screen Home settings Home screen loop setting Loop Don t loop Icons on Navigation bar Operation icons appear on the navigation bar shown at the bottom of the screen Names and actions of icons are as follows Back icon Tap Return to the previous screen exit out of application Hom...

Страница 45: ...gain after it is switched to sleep mode Displaying the keyboard for character entry When illumination is linked to animation You can set whether to show hide slide display icon P133 Some screens cannot be slid such as lock screen or screen saver screen Icons on the status bar Various conditions can be checked with notification icons and status icons appearing on the status bar Main notification ic...

Страница 46: ...s ON Bluetooth device is connected blue NFC Osaifu Keitai lock is set to the terminal and docomo mini UIM card blue NFC Osaifu Keitai lock is set to the terminal or docomo mini UIM card red Omakase lock is set to the terminal and docomo mini UIM card red Omakase lock is set to the terminal or docomo mini UIM card Phone memo is set 10 phone memos are recorded Max Speaker phone is ON Microphone is m...

Страница 47: ...al or send SMS However when there are 2 or more missed calls they do not appear Closing the Notification panel 1 Drag the tab at the bottom of the Notification panel up or tap Changing setting switch Change setting switch allocations 1 Touch and hold a setting switch on the Notification panel Select a function from Select panel screen When screen is off When no operation is performed in a certain ...

Страница 48: ... panel can be displayed on the lock screen Widget on the lock screen Flick right on the lock screen to display a widget adding screen by default Also flick left on the lock screen to activate the camera You can add a widget screen from the widget adding screen or change the top screen of lock screen to a widget screen Adding widget screen On the widget adding screen Select a widget Added widget sc...

Страница 49: ...ime as the Slide in launcher 2 Perform target operations Capture Draw Capture displayed screen to edit as an image or share with other application Some screens may not be captured 1 Slide from the slide spot to the center of screen and then release your finger in Capture Draw area By default Capture Draw is set in the slide spot at the lower right of the screen 2 Select operation Images are saved ...

Страница 50: ...ns D Market Disney Market is a convenient portal site for providing various Disney apps or recommended information by Disney Check here for the latest information P80 Disney Cinema Disney Cinema is a premium video application for viewing the best video contents from popular live action movies to animation works Dlife Dlife is a video application for watching popular foreign dramas or programs from...

Страница 51: ...nce IC Tag Barcode Reader Read IC tags and barcodes iDアプリ iD application Make settings etc for use of electronic money iD P86 iコンシェル i concier An application for using i concier i concier is a service with which a mobile phone supports your life like a butler or concierge iチャネル i channel Use i channel KSfilemanager An application for managing data contents in the terminal microSD card etc NOTTV Wa...

Страница 52: ...he terminal operations by remote checking the display of your own terminal P187 Voice Search Just speak to the terminal to use Google Search Health Diary A health supporting service to design your body using a mobile phone and PC Disaster kit Check received early warning Area Mail make settings and record check messages on the docomo Disaster Message Board Infrared Send or receive data such as pho...

Страница 53: ...or add a category Sorting applications On the edit screen touch and hold an application Drag it to a destination or thumbnail at the bottom of the screen Done OK Adding a category On the edit screen Add page Add to left side Add to right side Enter a category name OK In other category touch and hold an application and then drag it to the added category Done OK If you end the operation without loca...

Страница 54: ...rt is set to By category hidden applications are located in Download Other category When the sort order is set to Customize hidden applications are located to right end screen App list loop setting Set whether to loop when end of the application screen is displayed 1 On the application list App list loop setting Loop Don t loop If you stop operation of an application by tapping etc the application...

Страница 55: ... the terminal 53 Change the screen Home screen displayed by pressing the home key 1 From the Home screen Settings Display Homescreen selector 2 Select a home application to switch to Switching the home applications ...

Страница 56: ...o Palette UI operation guide from Help Customizing Home screen docomo Palette UI You can locate desired application shortcuts widgets etc on the Home screen 1 Touch and hold blank area in the customize area 2 Shortcut Widget Folder Group Machi chara display setting Select or set items as required Touch and hold an item and drag it to move Some widgets can be changed in its size by touching and hol...

Страница 57: ...g home screen docomo Palette UI Up to 12 home screens can be set 1 From the Home screen Home screens For the first activation the instruction guide appears Tap Do not show this again or OK 2 Perform required operations Adding Sorting Touch and hold a thumbnail of home screen Drag to the position you want Deleting If any items are located a confirmation screen for deleting appears Alternatively you...

Страница 58: ... Uninstalling an application Touch and hold an application Uninstall OK Sorting Touch and hold an application or group Drag it to the destination Alternatively you can touch and hold an application then select Move to move the application Adding a group Add group Enter a group name OK Up to 50 groups can be set Editing group name Touch and hold a group Edit name Enter group name OK Changing group ...

Страница 59: ...ended application appears After confirmation tap おすすめアプリを見る View recommended applications 2 Select an application Follow the onscreen instructions to download Downloaded applications are displayed in Download Application group of the application list Some applications are displayed in DOCOMO Services group To check all recommended applications tap おすすめア プリをすべて見る View all recommended applications i...

Страница 60: ...d 2 second pause will be automatically inserted and then additional code will be sent Wait When the phone number is dialed the phone will wait automatically and a confirmation message for sending additional code appears When you tap Yes the additional code is sent 3 4 When a call is ended End INFORMATION If your face etc comes close to the proximity sensor during a call the display goes out It is ...

Страница 61: ...areas time for which the Emergency call location information is ready to be used vary depending on the preparatory state of each Emergency call acceptance organization When you call the Police 110 Fire Ambulance 119 or Maritime rescue 118 from the terminal clearly indicate that you are calling from a mobile phone then give your present location and mobile phone number Also make a point to call in ...

Страница 62: ... Declining call Activate Reject Quick reply Activate Reject call with SMS Select a message On hold On hold Recording phone memo Phone memo 3 When a call is ended End INFORMATION When you could not answer a call icon P43 appears on the status bar Open the Notification panel P45 to check missed calls dial or send SMS The following operations are possible in the screen during a call You can adjust ca...

Страница 63: ...r voice inaudible to the other party l Enable disable speaker phone Make the other party s voice audible from the speaker to talk on a handsfree phone Subscription to Call waiting is required You can check call history 1 From the Home screen Phone 2 Recent calls a Incoming button Display received call history only b All button Display all incoming and outgoing calls c Outgoing button Display diale...

Страница 64: ...essage and up to 10 messages can be recorded for Phone memo Enable phone memo Set ON OFF of Phone memo If number of saved phone memos exceeds the saving limit the terminal does not answer calls with Phone memo even when the setting is enabled Set answer time Set a ringing time for answering with Phone memo Set reply message Set reply message Make various settings for DOCOMO network services call a...

Страница 65: ...o suppress reverberant sound during a call in a place where voice sound echoes to make your voice clear to be heard Improved sound for IP calls Set whether to use sound improvement Sound quality of calls via application using Voice over IP technology may be inferior to ordinary phone calls due to network delay etc The function improves ease of hearing under noisy environment with the sound quality...

Страница 66: ...b Registration button Register a new phonebook entry c Group button Display groups of phonebook entries d Search button Display the phonebook search screen e Index button Display the index Phonebook list By tapping on the phonebook list you can delete make general settings etc Adding an entry to the phonebook 1 In the phonebook list Register Select an account if necessary Set required items Save C...

Страница 67: ...All No group Favorites and Google default groups Registering a contact to a group 1 In the phonebook list Groups 2 In the group list touch and hold a contact Drag drop it to a group to be registered Canceling group setting In the group list tap a group that a contact is registered Touch and hold the contact Drag drop it to the registered group INFORMATION Registering group can be set only in docom...

Страница 68: ...Tap to add to Favorites f SMS Tap to send an SMS g Sending Koe no Takuhaibin Tap to send a Koe no Takuhaibin Profile screen menu Tap on the profile screen to operate infrared communication sharing etc Importing Exporting phonebook entries 1 In the phonebook list Others Import Export Select an item Import from SIM card Phone numbers and type of mail addresses are imported as Others Import from SD c...

Страница 69: ...al data cannot be moved normally Use SD card backup application to back up and restore phonebook data and other data all at once For details see ドコモバックアップ docomo backup SD card backup P115 My profile You can check your own phone number You can also register or edit your own information 1 From the Home screen docomo phonebook 2 My profile Edit Set each item Save INFORMATION You can create your name...

Страница 70: ...alphanumerics addressed to a mobile phone number Creating and sending SMS 1 From the Home screen Messaging 2 To Enter a mobile phone number 3 Type message Enter a message INFORMATION SMS can be also sent to or received from the parties using overseas network operators For countries and overseas network operators available refer to Mobile Phone User s Guide International Services or DOCOMO Internat...

Страница 71: ...y space P82 139 Displaying sent received SMS 1 From the Home screen Messaging 2 Select a message thread Tap to dial Replying to SMS 1 From the Home screen Messaging 2 Select a message thread Type message Enter a message Forwarding SMS 1 From the Home screen Messaging 2 Select a message thread Touch and hold SMS Forward 3 To Enter a mobile phone number Deleting SMS 1 From the Home screen Messaging ...

Страница 72: ...eiving a message Vibrate Set vibration when receiving a message LED Set color of indicator LED when receiving a message Set mail accounts provided by mopera U or general providers to use Email Setting Email account Obtain the information required for setting up the mail account from your service provider in advance 1 From the Home screen Email 2 Email address Enter a mail address Password Enter a ...

Страница 73: ...ail cannot be sent Receiving Displaying emails 1 From the Home screen Email If you have several mail accounts tap account at the top of the screen to switch If you tap Combined view an inbox containing a mixture of emails for all mail accounts is displayed Each of the mail accounts is distinguished by a color bar on the right of email 2 To refresh the inbox 3 Select an email INFORMATION If Inbox c...

Страница 74: ...ype 1 From the Home screen Email 2 Settings 3 Select an account Set each item Account name Edit account name Your name Edit name Signature Register signature Quick responses Edit frequently inserting sentences when creating emails Default account Set whether to give priority to the account when creating an email Inbox check frequency Set check frequency for inbox Number of days to sync email Set n...

Страница 75: ...rver Remove account Delete an account Backing up Restoring emails 1 From the Home screen Email 2 Settings 3 Backup Restore Backup Restore Start OK Gmail is a Google online email service You can send and receive emails using Gmail on the terminal To use Gmail you need to set up a Google account on the terminal If a Google account is not yet set follow the onscreen instructions that are displayed wh...

Страница 76: ...By default the sound is emitted even in Manner mode You can set to disable the sound P74 Displaying received Area Mail 1 From the Home screen Disaster kit Early Warning Area Mail Select an Area Mail For the first activation read the ご利用にあたって Using this application and tap Agree Deleting Area Mail 1 From the Home screen Disaster kit Early Warning Area Mail 2 Mark Area Mail Delete OK To select all t...

Страница 77: ...ng website Switching web page in portrait landscape view Hold the terminal vertically or horizontally to switch the portrait landscape view Zooming in out on web page You can zoom in out on web page by the following operations Pinch out Pinch in Zoom in out Double tap Zoom in To return to the view before it is zoomed in double tap again The current magnification ratio is kept when you open a web p...

Страница 78: ...creen while a window opens in incognito tab INFORMATION Web pages opened in incognito tab are not recorded in the history If you close the incognito tab any record such as Cookie is also cleared However downloaded files and web page added to bookmarks are saved Displaying web page from history 1 When a web page is displayed Bookmarks HISTORY To display the history of frequently viewed web pages ta...

Страница 79: ...tion lines Depending on linked page this feature may not be available 1 When a web page is displayed slide the screen downward to display the top of the screen Yes The notification icon appears on the status bar If you open Notification panel while prefetching and tap prefetch prefetch stops INFORMATION Some pages cannot be displayed correctly when viewing prefetched links Prefetch caches are clea...

Страница 80: ...MATION You can check a saved file with Document Viewer Saving images displayed on a web page 1 When a web page is displayed select an image touch and hold Save image You can check a saved image in Gallery P105 Searching words on websites in dictionary Search words on a website in a dictionary Set Display balloon in General of browser setting to use P79 1 When a web page is displayed touch and hold...

Страница 81: ... Inverted rendering is marked Advanced Set search engine Open in background Enable JavaScript Allow multiple tabs per app Enable plug ins Website settings Prefetch priority PAGE CONTENT or Reset to default can be set If Prefetch priority in PREFETCH is marked action for JavaScript in a prefetched page and new communication refreshing information are partly restricted In this reason pages may not b...

Страница 82: ... charged ones You can obtain useful and interesting contents which meet your needs at dmarket 1 From the Home screen dmarket Top screen of dmarket appears Alternatively by default from the Home screen tap dmarket When the first activation for dmarket application appears mark Agree on dマーケットソフトウェア使 用許諾契約書 Terms of service for dmarket software and tap Start use For details on dmarket refer to NTT DO...

Страница 83: ...r 0570 00 1937 Business hours 10 00 to 17 00 Monday through Friday excluding national holidays new years holidays From a PHS part of IP phones outside of Japan 045 522 1098 Or contact from http disney jp dmd faq in Japanese only With Play Store you can access to Google Play to search convenient applications or fun games which you can download and install on the terminal Also movie contents can be ...

Страница 84: ...lay screen Help to refer 4 Check the download progress When installation is completed appears on the status bar INFORMATION Be sure to check the security of application then install it at your own risk The terminal may be infected with a virus and the data may be damaged NTT DOCOMO is not liable for malfunctions if any caused by the application you installed In such case the repair is charged even...

Страница 85: ...es outlet such as docomo Shop to use the iC transfer service For details on the iC transfer service refer to Mobile Phone User s Guide sp mode Precautions on using Osaifu Keitai compatible terminal Data in the IC card 1 and in the docomo mini UIM card 2 may be lost or modified because of the malfunction of the terminal when we repair your terminal etc as we cannot repair it with Osaifu Keitai data...

Страница 86: ...owering on the terminal is not necessary but if the terminal remains powered off for a long time or battery is low the function may not available For non subscriber to sp mode a part of Osaifu Keitai service may not be available Using かざしてリンク対応サービス Kazashite Link compatible service 1 From the Home screen Settings In WIRELESS NETWORKS More NFC Osaifu Keitai Settings If Lock NFC Osaifu Keitai is mar...

Страница 87: ...rom screen lock authentication or SIM card lock 1 From the Home screen Osaifu Keitai 2 Lock Settings For the first time setting a password is required Follow the onscreen instructions to set a password 3 Lock NFC Osaifu Keitai Authenticate Using fingerprint authentication Use fingerprint authentication Authenticate To use fingerprint authentication make fingerprint settings as security unlock pref...

Страница 88: ...fer to Mobile Phone User s Guide sp mode INFORMATION For obtaining displaying or updating ToruCa a packet communication charge may be applied Some ToruCa provided to i mode terminal may not be obtained displayed updated Depending on the settings of IP Information Provider the following functions may not be available Obtaining updating from the IC card reader sharing ToruCa moving copying to microS...

Страница 89: ... in Class 4 or higher is recommended Selecting storage can be set For MHL connection which allows you to view Mobacas on a TV screen see Displaying on a TV via MHL connection P172 Broadcast wave and service area The radio wave received via Mobacas differs from that of received via Xi FOMA service and 1Seg For this reason the signal cannot be received at places where the Mobacas broadcast does not ...

Страница 90: ...prove signal reception Optional Earphone adapter cable with antenna SH01 can be functioned as an antenna by connecting to the external connection jack of the terminal Changing the direction of the cable or turning away from a person may improve signal reception Watching Mobacas Watching programs contents 1 From the Home screen NOTTV NOTTV home screen appears For the first activation read the terms...

Страница 91: ...t available Searching programs contents You can search programs contents in the application by various methods Searching from program guide Real Time 1 On the NOTTV home screen 番組表 Program guide Real time program guide appears Tap シフトタイム Shift Time to show Shift Time program guide 2 Tap a program Select a program currently being broadcast to switch to the watching screen Searching by specifying co...

Страница 92: ...matic schedule for Shift Time When contents are not completely received because of the reception status of broadcast wave etc data is automatically complemented using packet communication シフトタイム の自動補完 Auto contents complement for Shift Time You can disable auto contents complement for Shift Time Scheduling receiving recording Real Time program 1 On the NOTTV home screen 番組表 Program guide 2 Tap a p...

Страница 93: ... because of the reception status of broadcast wave etc 利用ログ送信 Send log Set whether to send logs of watching broadcasting in real time style playing using broadcasting in storage style operations on applications etc 自動ライセンス取得 Auto license acquisition Set whether to automatically acquire licenses of contents ペアレンタルコントロール Parental control Restrict usage of programs contents according to age ブラウザ Brow...

Страница 94: ...voice and sound For details on NHK viewing fees contact NHK Available information in the area of data broadcasting is data broadcasting and data broadcast site information Data broadcasting information is carried in a broadcast together with images voice and sound and data broadcasting site information is used to access sites provided by the TV broadcaster broadcast station Packet communication ch...

Страница 95: ...eg or change channels due to characteristic of digital broadcasting Depending on the airwave condition video images or sounds may be interrupted or stopped Video can be played back using the video correction engine by marking Video correction when watching in 1Seg P136 Since 1Seg programs are prohibited from copying capturing watching screen is not available TV screen a TV watching area Tap to sho...

Страница 96: ...o show navigation bar on the right of the screen Show navigation bar and tap to display remote control or touch and hold the screen to fix screen orientation rotate screen Ending TV 1 On the 1Seg watching screen 終了 End TV link For some data broadcasting programs link information to related websites TV link is displayed Save TV links to display related websites directly Registering TV link 1 Select...

Страница 97: ...OFF the schedule will not be executed If a timer recording time arrives while you record another program manually the current recording is terminated and then the timer recording will be started Checking reservation Check your reservation 1 On the 1Seg watching screen 視聴予約 録画予約 Timer watching recording 録画予 約 Timer recording 視聴予約 Timer watching A reservation list appears 2 Tap a reserved item INFOR...

Страница 98: ...ition is stable A program may not be recorded in a place where the reception condition is unstable While recording you cannot change channel While you use heavy load functions such as recording and MTP transmission at the same time the recording may not be performed normally If you use data communication services while recording the recording may not be performed normally because 1Seg signal condi...

Страница 99: ...lay information when playing Display information when playing recorded program データ放送設定 Data broadcasting setting Settings on data broadcasting 放送用メモリ初期化 Initializing broadcasting data Delete information and TV links saved during data broadcasting バージョン情報 Version information Display version of this application Setting the channel Creating channel list 1 On the 1Seg watching screen チャンネル リスト Channel...

Страница 100: ...broadcasting program You can play digital terrestrial broadcasting programs in microSD card written with other device such as HDD recorder etc at home in VGA class image quality Digital terrestrial broadcasting taking out Depending on the device which wrote written files may not be played back 1 Recording a digital terrestrial broadcasting program to microSD card 2 Insert a microSD card to the ter...

Страница 101: ...the battery is low lighting volume for flash may be limited Shutter sound auto focus lock sound and count down sound for self timer when shooting still pictures are emitted regardless of the Manner mode Public mode settings and volume setting If you do not operate for 2 minutes during stand by Camera ends When you are 10 cm or more away from an object the camera automatically focuses on the object...

Страница 102: ... shot Main operations on the still image shooting screen Zooming Pinch in Pinch out the screen Pinch in pinch out to show a slide bar You can zoom in out using the slide bar Zoom function is not available for in camera Switching to in camera out camera MENU Switch camera Displaying Playing taken still picture video Flick left Continuous shooting You can shoot continuously up to 100 images by switc...

Страница 103: ...he terminal automatically adjusts settings and shoots pictures in the following functions Image stabilizer is always turned on Auto focus Regardless of the distance from an object the camera automatically focuses on a pointed object When an object includes people face detection frame appears first to be focused on Touch focus Touch a displayed object to automatically focus on When Touch shutter in...

Страница 104: ...a determines that lighting is insufficient appears on the screen to notify that the flash is ready Tap the icon to temporarily turn off the flash Even if the setting is off appears to inform you that the flash is off when the lighting is insufficient Tap the icon to enable auto flash temporarily If continuous shooting or HDR mode is set the flash does not turn on Or depending on night scene it may...

Страница 105: ...slide bar Zoom function is not available for in camera Switching to in camera out camera MENU Switch camera Displaying Playing taken still picture video Flick left Automatic video recording The terminal automatically adjusts settings and records video in the following functions Recording sound is always turned on Auto focus Start recording when the center of the screen is clearly focused on Touch ...

Страница 106: ... Home screen Camera 2 MENU QR code 3 Display a code on the shooting screen Scan A confirmation sound is played when scanning is complete and the scanned data appears Scanning divided data One data item divided into multiple up to 16 QR codes can be scanned and be displayed as a combined data Continue reading if unscanned data exists Returning to the still image shooting screen BACK Turning the lig...

Страница 107: ...hot by camera Activate camera Send upload print etc image P168 Deleting image Slideshow Edit Rotate left Rotate right Crop Set picture as Move Copy Details Show on map etc Some files may not be moved copied Categorizing and viewing images Tap Albums in the album list to switch display categorizing by Albums Locations Times Tags When sorting by Tags images are sorted by tag information set in Picas...

Страница 108: ...er some files may not be played back Files in MIDI format and received files cannot be displayed in the list Playing is possible when the file is selected in other application etc For details on how to transfer music video files to the microSD card from a PC see Operating data on the terminal from a PC P168 For the first activation select 使い方の説明を読む Read user guide or 説明を読まず利用する Use without reading...

Страница 109: ...mmunication charge may be applied Using the GPS function Note that DOCOMO is not liable for any damages that may occur as a result of irregularities in the GPS system Note that DOCOMO is not liable for pure economic loss if you cannot confirm the positioning communication result with the terminal because of failure malfunction or external factors such as power failure including battery exhaustion ...

Страница 110: ...ing of trees Near a high voltage cable In a car inside a train compartment Bad weather such as heavy rain or snow When there are obstructions people or objects near the terminal Location access setting Allow location access to applications 1 From the Home screen Settings Location access 2 Turn Access to my location to ON Agree Agree If Access to my location is turned on GPS satellites Wi Fi mobile...

Страница 111: ... map display Pinch out Pinch in Zooms in out Double tap Zooms in Tap with 2 fingers Zooms out Street View Street View does not cover some areas 1 On the map screen touch and hold a position Tap a call out For the first activation check new functions of Street View and tap OK When Street View is operating Tap Compass mode to activate Compass mode The compass in Street View shows the same direction ...

Страница 112: ...ate Navigation INFORMATION Alternatively from the Home screen Navigation Displaying layer You can add traffic information to the map or switch to aerial photomap display 1 On the map screen Select an item Traffic information and routes are not available in all locations Google Latitude You and your friends can check where you are on the map To use Google Latitude you need to set up a Google accoun...

Страница 113: ...edule screen Switching display unit Tap year and month at the upper left screen Day Week Month Agenda Setting Calendar Settings General settings Set required items Managing calendar for synchronizing viewing 1 On the calendar screen Calendars to display Registered account names or account calendar names appear P156 2 Mark an account name or account calendar name Calendars to sync Mark a calendar t...

Страница 114: ... which detects your sleep cycle to sound alarm in a lighter part of your sleep Up to 10 alarms can be registered for Alarm Only 1 Comfortable Alarm can be set per a day The alarm clock does not operate if the terminal is not fully charged It is recommended to use the Comfortable Alarm while charging 1 From the Home screen AlarmClock 2 Setting Alarm Set time Set each item Save OK Turning alarm on o...

Страница 115: ...estions appear linking with the keyword Incremental search Voice search Speak a keyword Displaying Help Help You can check how to operate the electronic dictionary etc Setting electronic dictionary Settings Manage Info Misc Settings Set required items Set font size number of search results operations for playback Managing dictionaries Settings Manage Info Dictionary Manager Perform required operat...

Страница 116: ...appear according to the character entry Voice Search From the Home screen Voice Search Speak a keyword 2 Select a search suggestion Search settings Make search settings 1 From the Home screen Google Settings 2 Set required items Voice Set language or voice input Phone search Specify search target applications in the terminal Privacy accounts Set privacy for Google search and accounts To show help ...

Страница 117: ...een ドコモバックアッ プ docomo backup microSDカードへ保存 Save to microSD card 2 Backup Select data to back up Start backup Backup Enter docomo apps password Restore Restore data of phonebook sp mode mail media files etc backed up on a microSD card to the terminal 1 From the Home screen ドコモバックアッ プ docomo backup microSDカードへ保存 Save to microSD card 2 Restore Select for data type to restore Select data to restore Se...

Страница 118: ... savable characters in a phonebook entry vary by terminal When backing up phonebook entries to microSD card entries without name cannot be copied When available memory space of microSD card is not enough backup may not be executed In such case delete unnecessary files from the microSD card to save the memory space When the remaining battery gets low backup or restoration may not be executed In suc...

Страница 119: ...ings Slide in function 38 Select lock Security unlock preference Easy data transfer support Menu Page Wi Fi 122 Easy Wi Fi registration AOSS system 125 WPS system Miracast 173 Bluetooth 163 FM transmitter Radio frequency 126 More Data usage 126 Airplane mode 126 VPN settings 127 Tethering 127 NFC Osaifu Keitai Settings 84 Mobile networks 121 129 176 Bluetooth Low Energy Settings 166 ...

Страница 120: ...ate Vibrate when touch Distinct touch 132 Vibration level Increase vibration level when walking Display Brightness 132 Sleep Lit when held 132 Wallpaper 55 Daydream 133 Theater mode 133 Slide display 133 Privacy view 133 Homescreen selector 53 Customize screen 47 Navigation bar 134 Battery icon 134 Auto rotate screen 134 Best fit zoom 134 Intelligent color adjust 134 Shake to unrotate 134 Blue lig...

Страница 121: ...genre setting Music genre setting Auto effect setting Storage Unmount SD card Mount SD card 137 Erase SD card Unmount USB storage Mount USB storage 172 Download file save to destination 79 Menu Page Battery Battery monitor sensor 138 Battery usage App running time App battery check NX eco 138 Apps 139 Menu Page docomo service Application manager 140 docomo Wi Fi Easy Connection Wi Fi settings for ...

Страница 122: ...42 Make passwords visible 144 Password manager 148 Hide recently used app 149 Privacy Mode Settings 149 Device administrators ー Unknown sources 152 Verify apps 152 Trusted credentials 152 Install from SD card 152 Clear credentials 153 SD card password settings 153 Menu Page More My physical profile 153 Slide in function 154 Language input 36 38 155 Backup reset 188 Menu Page Add account 156 Menu P...

Страница 123: ...1 From the Home screen Settings In WIRELESS NETWORKS More Mobile networks Access Point Names Adding new access point New APN Do not change the MCC MNC to other than 440 10 The setting disappears from the screen 1 From the Home screen Settings In WIRELESS NETWORKS More Mobile networks Access Point Names 2 New APN 3 Name Enter a network profile OK 4 APN Enter the access point name OK Accessibility M...

Страница 124: ... requiring subscription For details on sp mode refer to NTT DOCOMO website Setting mopera U mopera U is an ISP of NTT DOCOMO If you have subscribed to mopera U you can use Internet after making the simple settings mopera U is a service requiring subscription 1 From the Home screen Settings In WIRELESS NETWORKS More Mobile networks Access Point Names 2 mopera U mopera U設定 mopera U settings INFORMAT...

Страница 125: ...y key and tap Connect After selecting Wi Fi network connection selection screen may appear INFORMATION Even when Wi Fi is ON packet communication is available However while you connect Wi Fi network Wi Fi comes first When the Wi Fi network is disconnected it switches to LTE 3G GSM network connection automatically Note that packet communication fee may apply if network connection stays switched If ...

Страница 126: ...ork Forget Connecting other devices with Wi Fi Direct Connect between Wi Fi Direct devices without routing an access point etc Set Wi Fi to ON in advance To transfer data such as videos or still images using Wi Fi Direct obtain an application compatible with data transfer via Wi Fi Direct from Play Store and install it 1 From the Home screen Settings Wi Fi 2 Wi Fi Direct When a Wi Fi Direct device...

Страница 127: ... when Wi Fi Auto ON OFF is activated because Wi Fi information in the area is changed etc In such case connect manually Easy Wi Fi registration You can connect through simple operations when connecting via a Wireless LAN access point supporting AOSS or WPS 1 From the Home screen Settings 2 Easy Wi Fi registration Select a registration method AOSS system AOSS system Tap AOSS button Perform operatio...

Страница 128: ... roaming When you have never entered the service area since the terminal was ON Data usage You can enable Internet access via mobile network set limit of mobile data communications on graph or set alert when usage exceeds the limit 1 From the Home screen Settings In WIRELESS NETWORKS More Data usage 2 Set Mobile data to ON Data usage managing screen appears and mobile data communication volume est...

Страница 129: ...PN settings Save Connecting to VPN 1 From the Home screen Settings In WIRELESS NETWORKS More VPN settings 2 Select a VPN to connect to 3 Enter necessary authentication information Connect When you are connected to the VPN appears on the status bar Disconnecting VPN 1 Open the Notification panel 2 Select a notification of VPN connecting Disconnect Tethering Tethering is a function for using mobile ...

Страница 130: ...tion of the dedicated driver refer to the following website http www fmworld net product phone usb in Japanese only Wi Fi tethering You can allow Wi Fi devices to access the Internet by using the terminal as Wi Fi hotspot You can connect up to 8 Wi Fi devices Only 2 4 GHz is supported for tethering Setting Wi Fi tethering Set Wi Fi tethering to ON for connection setting By default WPA2 PSK AES is ...

Страница 131: ...leting old registration appears To use AOSS connection with new device tap Yes To cancel AOSS setting on the Configure Wi Fi hotspot screen tap AOSS OFF For some Wi Fi devices AOSS connection may not be established If connection is failed use WPS connection or connect manually Only 2 4 GHz is supported for AOSS system Stopping packet connection Some applications automatically perform packet commun...

Страница 132: ... or more Press and hold P until the phone options menu appears Tap Manner mode Manner mode Silent Manner mode Alarm Original manner Even in Manner mode shutter sound auto focus lock sound count down sound for self timer and Find Me Ringtone for Bluetooth Low Energy Settings are emitted Changing Manner mode type 1 From the Home screen Settings Sound Vibration settings Manner mode Select manner mode...

Страница 133: ...ibration 1 From the Home screen Settings Sound Vibration settings 2 Set each item MIC input Set microphone when connecting stereo earphones When connecting stereo earphones without microphone select Phone MIC Phone ringtone Set phone ringtone Vibrate on ring Set whether to vibrate while ringtone is sounding You cannot set during manner mode Notification sound Set notification sound Dialpad touch t...

Страница 134: ...een If Mild is selected it does not vibrate when scrolling but only when tapping To increase vibration level of Distinct touch while walking from the Home screen Settings Sound Vibration settings Mark Increase vibration level when walking Brightness Set brightness of screen backlight 1 From the Home screen Settings Display Brightness 2 Slide the slider to adjust brightness OK To adjust brightness ...

Страница 135: ...een 2 Set required items Theater mode Set to display dedicated menus for the horizontal screen when charging starts on the desktop holder P29 1 From the Home screen Settings Display Theater mode ON at the top right of the screen 2 Application settings Set each item Tap a button assigned for an application to delete or change the registered application Slide display Set to display the slide display...

Страница 136: ...Step Activity counter app in advance P153 1 From the Home screen Settings Display Best fit zoom Set each item Intelligent color adjust Set whether to adjust screen color tone depending on surrounding light such as a fluorescent lamp incandescent lamp and sun light 1 From the Home screen Settings Display Mark Unmark Intelligent color adjust Shake to unrotate You can return screen rotated by Auto ro...

Страница 137: ... may not be reflected or set font may not be displayed correctly on some applications or Web sites Note that if you replace handwritten characters created by 個 別文字編集 Edit individual letter in Original handwriting font with your own handwritten characters some characters may be hard to read Font size Change font size 1 From the Home screen Settings Display Font size Select a size Dominant hand Set ...

Страница 138: ...ting or LED is set to OFF for the message setting the illumination does not light Setting of At alarm notification operates for the widget application Analog clock When the smartphone pierce set sample is attached it lights according to the setting Video correction Picture correction Set whether to correct image quality of videos TV YouTube etc and still images Gallery 1 From the Home screen Setti...

Страница 139: ...TION Auto effect setting is effective only for Play Music by default When Dolby Mobile is set do not use other sound effects such as equalizer Checking the memory space Check memory space of the terminal microSD card USB mass storage connected via USB 1 From the Home screen Settings Storage Erasing data in microSD card Format Note that this operation erases all data in the microSD card 1 From the ...

Страница 140: ...o mode may appear Advanced settings for eco mode 1 From the Home screen Settings NX eco 2 Advanced settings Set each item Eco level Set type of eco level If you select Light Moderate tap Confirm to see setting values If you select Original tap Edit to change to original setting values Battery Activate eco mode when the remaining battery power becomes less than set level Timer Activate eco mode at ...

Страница 141: ...tions are unistalled you can reset the terminal to restore 1 From the Home screen Settings Apps 2 Select an application Uninstall OK Disabling applications Disabling application is available for some applications and services that cannot be uninstalled Disabled applications are not displayed on the screen P48 displayed by tapping from the Home screen or cannot be launched either But they are not u...

Страница 142: ...es Show open source licenses Security codes for the terminal Some functions provided for convenient use of the terminal require the security code to use them Besides the security code for locking the terminal the network security code necessary for the network services etc are available Make use of the terminal using an appropriate security code according to your purpose Notes on the security code...

Страница 143: ...o お客様サポート Customer support see P223 for the Instruction Manual application マナーもいっしょに携 帯しましょう Use mobile phone with your manners in 付録 Appendix PIN code Security code called as PIN code can be set in the docomo mini UIM card The code is set to 0000 at subscription which you can change by yourself P142 PIN code is a 4 to 8 digit number code that must be entered each time you insert the docomo mini U...

Страница 144: ...insert it to a PC or phone without password setting function use of data or formatting cannot be made Some microSD cards may not support this function Setting PIN code Set up SIM RUIM card lock Set PIN code to be entered when the terminal is turned ON 1 From the Home screen Settings Security Set up SIM RUIM card lock 2 Lock SIM card Enter the PIN code OK To cancel the setting Lock SIM card Enter P...

Страница 145: ...ication if you press the fingerprint sensor in Step 1 release your finger from the fingerprint sensor and then slide with the registered fingerprint to unlock When the fingerprint authentication is not available you can authenticate by tapping other unlocking method button INFORMATION When you select Security on and from the Home screen Settings Security Mark Power button instantly locks the scree...

Страница 146: ... Security Security unlock preference 2 Authenticate To set for the first time authentication is not required 3 Select an unlock preference Pattern Set to unlock by a pattern connecting at least 4 points Security code Set to unlock by a security code 4 to 16 digit number Password Set to unlock by a password which consists of 4 to 16 alphanumerics symbols Fingerprint Set to unlock by fingerprint aut...

Страница 147: ...he fingerprint once makes fingerprint authentication available Locking screen automatically When you select Security on in Select lock and set time elapses after sleep mode the screen is locked automatically You need to set the security unlock preference in advance P144 1 From the Home screen Settings Security 2 Automatically lock Select a time When you forget unlocking method When you forget unlo...

Страница 148: ...different from the time of fingerprint registration For registration authentication of your fingerprint align the first joint of one of your fingers to the center of the sensor press your finger parallel to the sensor and slide it downward until it passes the fingerprint sensor area To prevent authentication failure due to difference in finger positions at registration and authentication keep your...

Страница 149: ...fingerprint sensor The phenomenon may be improved Fingerprint registration or authentication fails often To clean the fingerprint sensor wipe its surface with a dry soft and static free cloth Long term use may cause the fingerprint sensor to get dusty but do not try to remove the dust with a pointed object even in such a case Static electricity may cause malfunction Before placing the finger on th...

Страница 150: ...vance P144 1 From the Home screen Settings Security 2 Encrypt phone Encrypt phone Authenticate Encrypt phone INFORMATION After encrypted security code or password entry screen appears each time the terminal is powered on Note that you cannot return to the password entry screen if you touch and hold on the keypad and tap then select Input language Android keyboard settings In that case reboot the t...

Страница 151: ...Notes when using Privacy mode For descriptions notes or compatible applications for Privacy mode from the Home screen Settings Security Privacy Mode Settings Authenticate Function description notes to refer Privacy mode can be set only for phonebook in FUJITSU account If you change docomo account to FUJITSU account data added by i concier name card data SNS account information are not saved When y...

Страница 152: ...p is canceled privacy mode set for phonebook entry registered into the group is also canceled In this time phonebook entry registered into several groups can be viewed even if privacy mode is still set to the other groups In such case newly set groups Privacy mode operation settings Action when call received Set actions for incoming call or mail Specify phonebook in Privacy mode operation settings...

Страница 153: ...ionary used in privacy mode Receive indicator Set whether to notify you of incoming calls receiving mails from the phonebook group specified to hide by changing battery icon type in privacy mode Activate Deactivate options for privacy mode Set activating and deactivating operation of privacy mode 1 From the Home screen Settings Security 2 Privacy Mode Settings Authenticate Activate Deactivate opti...

Страница 154: ...the Home screen Settings Security 2 Mark Unmark Verify apps Managing authentication information You can install authentication information for accessing VPNs etc or other certificates from a microSD card Displaying credential authentication information or certificates 1 From the Home screen Settings Security 2 Trusted credentials Installing authentication information or certificate Installing auth...

Страница 155: ... deleted to register a new one Authenticate password Authenticate microSD card to which a password is set on another terminal Change password Change SD card password Delete password Delete SD card password Forcibly delete password Delete all data including micro SD card password When a password is set to microSD card Password authentication is required when the microSD card is attached to other te...

Страница 156: ...and down steep slope or stairs or getting on a vehicle bicycle car train bus etc When you jogged or did some sports other than walking or walked extremely slowly When shaking or swinging the terminal counting steps activity may not be performed accurately INFORMATION At the beginning of walking the figure is not changed because the Pedometer is judging to prevent miscount whether you started walki...

Страница 157: ...panese display operate as follows From the Home screen Settings In PERSONAL More Language input 言語 Language 日本語 Japanese Registering words 1 From the Home screen Settings In PERSONAL More Language input 2 Personal dictionary 3 Set required items PHRASE Register words Shortcut Display a phrase as a conversion candidate for entered characters Language Set a language to which a registered word is sav...

Страница 158: ...peech plug in in Japanese is not supported by default 1 From the Home screen Settings In PERSONAL More Language input 2 Text to speech output Speech rate Select a rate Adding accounts 1 From the Home screen Settings 2 Add account Select account type Set each item Setting account Select an account type Set an account Set each item INFORMATION Multiple Google accounts can be added on the terminal Ta...

Страница 159: ...c Make the settings of date and time 1 From the Home screen Settings Date time 2 Set required items When you unmark Automatic date time Automatic time zone you can set date time zone and time manually Make the settings for supporting user operations For the first activation a confirmation screen asking if you use the screen reader appears 1 From the Home screen Settings Accessibility 2 Set require...

Страница 160: ...software Upgrade the OS of the terminal P194 Status Check battery status phone number network name and address IMEI individual serial number etc Legal information Auth Check Open source license the Terms of use of Google or information of certificate or compliant marks Model number Android version Baseband version Kernel version Build number Check each version or number About phone ...

Страница 161: ... may damage or destroy data saved on the microSDXC card Do not insert one If you want to reuse a microSDXC card on which data is destroyed format microSDXC card all data will be erased on an SDXC compatible device When copying data to from a non SDXC compatible device use a microSDHC card or microSD card complying with standards of device to share data The terminal supports up to Class 10 speed mi...

Страница 162: ...of the terminal b With the metal contacts side facing down insert a microSD card into the microSD card slot until it clicks c Close the slot cap of the terminal P21 Removing a Open the slot cap of the terminal then push the microSD card lightly and then release it then pull the microSD card straight out b Close the slot cap of the terminal P21 INFORMATION Note that the microSD card may jump out of...

Страница 163: ...Tap Help to show how to use File Manager Tap Make a new folder to create a new folder 3 Select operation Copy Copy a folder file Move Cut the folder file Delete Delete a folder file Copy to Copy a folder file to a folder that you select Move to Move a folder file to a folder that you select Rename Rename a folder file Add to Bookmark Add the folder file to Bookmark Send To Send the folder file Zip...

Страница 164: ...infrared data port and do not move it until data sending receiving completes Infrared communication may not be performed in areas exposed to direct sunlight directly under fluorescent lights or near other infrared devices Depending on the terminal of the other party it may be difficult to exchange data Sending My profile via infrared communication 1 From the Home screen docomo phonebook 2 My profi...

Страница 165: ... Home screen Infrared 2 Receive OK OK OK Receive all phonebook entries Receive all Enter the docomo apps password OK Enter the same authentication password as the one entered on the sender OK OK OK Save If an account selection screen appears select an account You can connect the terminal and a Bluetooth device to perform wireless communication or play voice sound or music Note that using Bluetooth...

Страница 166: ...device and wireless LAN IEEE802 11b g n use the same frequency band 2 4 GHz if the device is used near a device with wireless LAN capability radio wave interference may occur and communication speed may be reduced noise may occur or connection may not be established In this case turn the wireless LAN device power off or move the terminal and the Bluetooth device away at least 10 m from the wireles...

Страница 167: ...ata from a Bluetooth device Set a Bluetooth device to connection stand by mode in advance Example Sending files in Gallery 1 Open Gallery and touch and hold an image 2 See all Bluetooth 3 Tap a Bluetooth device Open the Notification panel to check if transmission is completed Example Receiving files from a Blutooth device 1 Send files from a Bluetooth device 2 After file arrival is notified open t...

Страница 168: ...Me Ringtone in Bluetooth Low Energy setting is emitted regardless of the Manner mode and Public mode settings NFC is an abbreviation for Near Field Communication and a short range wireless communication method of international standard defined by ISO International Organization for Standardization You can use a contactless IC card function Reader Writer function Reader Writer Peer to Peer communica...

Страница 169: ...Android Beam function 2 Show website map etc to transfer on the sender s terminal 3 Hold mark over each other s terminal When the terminal detects a compatible device notification sounds The screen content on the sender s terminal is zoomed out and Touch to beam appears When Software User Agreement screen appears follow the onscreen instructions 4 Tap the screen content to transfer The content sho...

Страница 170: ...g for the second time or later go to Step 3 2 Open the Notification panel Connected as a media device Media device MTP Camera PTP For Windows XP select Media device MTP If you select Camera PTP data on the microSD card in the terminal may not be displayed correctly 3 Select a program Follow the onscreen instructions 4 Perform target operations INFORMATION When Camera PTP is selected data on the in...

Страница 171: ...i setting confirmation screen appears follow the onscreen instructions 2 DiXiM Serverの設定 DiXiM Server setting When DiXiM Server confirmation screen appears tap はい Yes 3 Set required items DiXiM Server Mark to turn the server function on サーバー名 Server name Change the name displayed on the DLNA device アクセス権の設定 Set access right Mark アクセス権の初 期設定 Set up access right to permit DLNA devices to access the ...

Страница 172: ... in the server list 3 コンテンツタップ時の動作 Action when content is tapped 別の機器で再生 Play on another device 4 再生先機器の選択方法 Selection method for another player device その都度選ぶ Select each time あらかじめ決めておく Predetermined When you select その都度選ぶ Select each time go to Step 6 5 既定の再生機器 Default player device Select a DLNA device to play 6 Select a playback type Select a folder Select a content When you select その都度選ぶ Sele...

Страница 173: ...ng location that you set in 保存先設定 Saving location setting P169 4 Select a content in the list of 持ち出し番組 Programs to be moved out Connecting with USB mass storage You can exchange data between the terminal and a USB memory or an external hard disk drive connected with a USB cable for connecting peripheral device commercially available DOCOMO does not guarantee actual operations for all USB devices ...

Страница 174: ... the HDMI cable to a TV HDMI port For HDMI connection switching input volume control etc refer to the operation manual of the TV 3 Connect the HDMI conversion cable to the external connection jack of the terminal If the HDMI cable is unplugged while displaying on the TV the terminal turns to connection stand by mode for a certain period of time INFORMATION When connecting the TV that does not supp...

Страница 175: ...he terminal automatically connects with that device 2 Tap a detected Wi Fi Miracast device Disconnecting Wi Fi Miracast device Tap a connected device OK INFORMATION When connecting a device that does not support HDCP images or sounds are not output properly Depending on content external output may be prohibited from the content provider or may be suppressed due to a performance problem When you re...

Страница 176: ...International Services DOCOMO International Services website INFORMATION For Country codes International call access codes Universal number international prefix available countries regions and network operators refer to Mobile Phone User s Guide International Services or DOCOMO International Services website To use data communication during roaming set Data roaming setting to on P177 INFORMATION S...

Страница 177: ... Network operators in Mobile networks to Choose automatically optimum network is automatically selected When you use a network operator of a country region covered by the flat rate service you can use the service with flat rate packet communication charges overseas up to the specified upper limit per a day To use this service subscription of packet flat rate service in Japan is required For detail...

Страница 178: ...ess point APN before use P121 Setting Network Mode 1 From the Home screen Settings In WIRELESS NETWORKS More Mobile networks 2 Network Mode 3 LTE 3G GSM Auto LTE 3G GSM INFORMATION If the mode is set to LTE 3G GSM Auto and a GSM GPRS network and 3G network of the same network operator are detected at the same time connection to a 3G network is given priority If the mode was set to GSM in the count...

Страница 179: ...3 If Automatic conversion function for International dial assist is marked and when you call someone in Japan enter a phone number from City code Tap Converted number Making a call inside the country you stay You can make a call to the other party s land line phone or mobile phone in the same way you do in Japan 1 From the Home screen Phone 2 Dial Enter a phone number Start with the area code city...

Страница 180: ...firm settings When Activate restricting is selected tap Restricting all incoming call OK to enter network security code When Deactivate restricting is selected tap OK to enter network security code Incoming notification while roaming Incoming notification while roaming Activate notification Deactivate notification Confirm notification settings Incoming calls received when the power is off or while...

Страница 181: ...ID notification request service charged Tap OK to operate following the voice prompt Roaming call notification charged Tap OK to operate following the voice prompt Roaming guidance charged Tap OK to operate following the voice prompt Voice mail charged Select an item and tap OK to operate following the voice prompt Call forwarding charged Select an item and tap OK to operate following the voice pr...

Страница 182: ...or use in your travel destination Also do not charge the battery with a transformer for overseas travel 2 Only supported as a charger to charge the terminal battery 3 Use in combination with AC Adapter 03 Troubleshooting Check for the necessity of software update first and update the software if necessary P190 When checking the following items does not improve symptoms contact Repairs on the last ...

Страница 183: ... short Running multiple applications increases battery consumption and usage time may become short Exit from applications which you are not using as follows Exiting running application P52 Exiting applications with Use NX eco to make settings for reducing battery consumption P138 Is the terminal left for a long time under the state of out of service area Out of service area a lot of power is consu...

Страница 184: ...play has afterimages If the same screen is displayed for a while afterimages of that screen may remain even after the screen is changed for a certain operation The clock is not on time The clock time may be wrong when the terminal stays powered on for a long time Make sure that Automatic date time of Date time is marked and then turn OFF and ON the terminal in a place with good signal conditions P...

Страница 185: ...not displayed normally Normal touch panel operations are not possible Turn the terminal OFF and ON P31 Phone Voice call Cannot dial by tapping Do you set Airplane mode P126 During a voice call the distant party s voice is hard to listen to or too loud Change the listening volume Turn Voice clear Voice adjust and Voice slowing ON to make the other party s voice easy to understand P60 Calls are not ...

Страница 186: ...n an area with poor signal strength Do you set channels P97 Photos and videos taken with the camera are blurred Check if clouds or dirt attach to the lens of camera You can also focus using the touch focus function P101 103 Osaifu Keitai Osaifu Keitai function is unavailable When Omakase Lock is activated or appears on the status bar and Osaifu Keitai functions are unavailable regardless of the NF...

Страница 187: ...formed correctly When trying to display an image No thumbnail appears gray frame appears on the image list When image data is damaged No thumbnail or gray frame may appear Bluetooth The terminal cannot be connected to a Bluetooth device A Bluetooth communication device cannot be found from the terminal Make Bluetooth device commercially available registering stand by state and then register the de...

Страница 188: ...ly available external device USB mouse keyboard etc If you use a commercially available conversion adapter for microUSB connect the conversion adapter for microUSB and an external device and then connect to the terminal Error messages Memory space is full The terminal is low on memory If you keep using some functions and applications may not be operated Open setting screen to select unnecessary ap...

Страница 189: ...receive technical support to make settings In Japanese only This service is not available when your docomo mini UIM card is not inserted during international roaming or in Airplane mode Smartphone Anshin Remote Support is a charged service requiring subscription Some operations and settings are not supported For details of Smartphone Anshin Remote Support refer to NTT DOCOMO s website 1 Call スマートフ...

Страница 190: ...he microSD card attached before resetting P149 When the touch panel is not working properly etc after resetting turn the terminal OFF and ON Warranty The terminal is provided with a written warranty Make sure that you receive it Check the written contents and items such as 販売店名 お買い上げ日 Shop name date of purchase and keep it in a safe place If it does not contain the necessary information immediatel...

Страница 191: ...s When corrosion due to moisture condensation perspiration etc is detected or if any of the internal boards are damaged or deformed repairs may not be possible if external connection jack stereo earphone jack or liquid crystal is damaged or the terminal outer case is lifted Even in case that a repair is possible since those conditions are outside the range of the warranty a repair is charged After...

Страница 192: ...when you change the model or have repairs done to the terminal DOCOMO shall have no liability for any change or loss of any kind Under some circumstances DOCOMO may replace your terminal with its equivalent instead of repairing it In that case we cannot transfer these data to replaced products except for some data This function allows you to connect the network and check if software in the F 07E n...

Страница 193: ...t available or during roaming software update is not available even if Wi Fi is connected or When docomo network is not available or during roaming install cannot be started even if Wi Fi is connected appears The same messages appear even while connecting via Wi Fi SMS sent during software update is stored in the SMS center When updating software your private information concerning F 07E model ser...

Страница 194: ...the software is not updated when the update notification is received software update available appears on the status bar If software update at the preset time could not be performed the software update will be performed at the same time the following day Software cannot be updated automatically when the Auto update setting is set to Manual Update or while updating software by Now update Updating s...

Страница 195: ...refrain from starting other application is displayed INFORMATION While updating the software all key operations become disabled and updating cannot be canceled If software update could not be started at the preset time the software update will be performed at the same time the following day Software is not updated at the reserved time while Android software is being upgraded When an alarm etc is s...

Страница 196: ...card is needed For using packet communication subscription to sp mode is required Exit from all applications before upgrading Android software Activating applications while upgrading may interrupt Upgrade Android software Do not turn off the terminal while upgrading While performing Upgrade Android software all functions of the terminal including making receiving calls are unavailable Upgrade Andr...

Страница 197: ... Download later is selected time for download is automatically set Changing start time is unavailable If you do not want to download at the automatically set time tap Upgrade Android software Cancel and then tap Download now only via Wi Fi to download the update file Installing update file When downloading the update file is complete installing to the terminal is available Install now Immediately ...

Страница 198: ...41 used Approx 250 min AC Adapter 04 alone Approx 160 min when Desktop Holder F41 used Approx 160 min DC Adapter 03 Approx 250 min Display Type TFT Size Approx 4 7 inches Number of colors 16 777 216 colors Resolution 720 H 1280 V dots HD Image pickup device Type Out camera Back illuminated CMOS In camera Back illuminated CMOS Size Out camera 1 3 0 inches In camera 1 8 2 inches Number of effective ...

Страница 199: ...ature requires longer time 7 2 4 GHz 5 GHz are supported for IEEE 802 11n 8 Compatible with IEEE802 11ac draft version The terminal may not be able to communicate with official version compatible devices to be launched in future or draft version compatible devices from other companies For compatible products refer to the following website http www fmworld net product phone wifi In Japanese only 9 ...

Страница 200: ...health condition The technical regulations and international guidelines set out limits for radio waves as the Specific Absorption Rate or SAR which is the value of absorbed energy in any 10 grams of tissue over a 6 minute period The SAR limit for mobile phones is 2 0 W kg The highest SAR value for this mobile phone when tested for use at the ear is 0 596 W kg There may be slight differences betwee...

Страница 201: ...english product sar FUJITSU LIMITED Website http www fmworld net product phone sar in Japanese only 1 Technical regulations are defined by the Ministerial Ordinance Related to Radio Law Article 14 2 of Radio Equipment Regulations 2 Regarding the method of measuring SAR when using mobile phones in positions other than against the ear international standards IEC62209 2 were set in March of 2010 On t...

Страница 202: ...cturer will void the user s authority to operate the equipment The device complies with 15 205 of the FCC Rules FCC RF Exposure Information This model phone meets the U S Government s requirements for exposure to radio waves This model phone contains a radio transmitter and receiver This model phone is designed and manufactured not to exceed the emission limits for exposure to radio frequency RF e...

Страница 203: ...cessory designated for this product or an accessory which contains no metal and which positions the handset a minimum of 1 5 cm from the body In the United States the SAR limit for wireless mobile phones used by the general public is 1 6 Watts kg W kg averaged over one gram of tissue SAR values may vary depending upon national reporting requirements and the network band This equipment has been tes...

Страница 204: ... proximity to personal medical devices such as pacemakers and hearing aids Pacemakers Pacemaker manufacturers recommend that a minimum separation of 15 cm be maintained between a mobile phone and a pace maker to avoid potential interference with the pacemaker To achieve this use the phone on the opposite ear to your pacemaker and does not carry it in a breast pocket Hearing Aids Some digital wirel...

Страница 205: ...hen only for personal use Avoid taking pictures of others with the terminal without their consent or disclosing recorded pictures of others without their consent to general public through Internet websites etc because they may infringe on portrait rights Trademarks Company and product names mentioned in this manual are trademarks or registered trademarks of their respective holders FOMA i mode i α...

Страница 206: ...sions below are used in this manual Windows 8 indicates the Microsoft Windows 8 operating system and Microsoft Windows 8 Pro operating system Windows 7 stands for Microsoft Windows 7 Starter Home Basic Home Premium Professional Enterprise and Ultimate Windows Vista stands for Windows Vista Home Basic Home Premium Business Enterprise and Ultimate Windows XP indicates the Microsoft Windows XP Profes...

Страница 207: ...an Ltd its parent or their affiliates collectively Disney own co own or license copyright and other intellectual property rights Please read the applicable Terms of Use before use Disney Mobile is the registered trademark of Disney Other company and product names mentioned in this manual are trademarks or registered trademarks of their respective holders Others Part of this product includes module...

Страница 208: ...r use Additional information may be obtained from MPEG LA L L C See http www mpegla com libtiff Copyright 1988 1997 Sam Leffler Copyright 1991 1997 Silicon Graphics Inc Permission to use copy modify distribute and sell this software and its documentation for any purpose is hereby granted without fee provided that i the above copyright notices and this permission notice appear in all copies of the ...

Страница 209: ...ollick David P Dutcher 田 辺宗一 金子稔編 Taishukan Shoten 新漢語林MX 鎌田正 米山寅太郎著 みんなで国語辞典b あふれる新語 北原保雄編著 もっと 明鏡 委員会編集 KY式日本語 北原保雄編著 もっと明鏡 委員会編集 問題な日本語 北原保雄編 北原保雄 小林賢次 砂川有里 子 鳥飼浩二 矢澤真人執筆 築地魚河岸ことばの話 生田與克 冨岡一成著 裁判おもしろことば学 大河原眞美著 Jiyu Kokuminsha 現代用語の基礎知識2013年版 自由国民社編 Shogakukan 家庭医学館 総編集 柳下徳雄 服部光男 岡島重孝 小学 館 家庭医学館編集委員会 Kadokawa Gakugei Shuppan 角川類語新辞典 大野晋 浜西正人著 Sanseido デイリー日中英 中日英辞典 池田巧監修 三省堂編修所編 デイリー日韓英 韓日英辞典 福...

Страница 210: ...osed based on the open source licenses refer to the following website For details refer the website below http spf fmworld net fujitsu c develop sp android In Japanese only This terminal supports SIM unlock If you release SIM lock you can use SIM by a carrier other than NTT DOCOMO The SIM unlock service is provided at a docomo Shop A SIM unlock charge is separately required With UIM other than by ...

Страница 211: ...88 Air vent 26 Airplane mode 126 Alarm 112 AlarmClock 112 Alert sensitivity 130 Android Beam 166 Android keyboard 155 APN 121 App battery check 138 Application list docomo Palette UI 56 Application info 56 Group 56 List format 56 Managing 56 Search 56 Setting for Recently 56 Sorting 56 Application list NX Home 48 App list loop setting 52 Display grid list 51 Display pattern 51 Hide app settings 52...

Страница 212: ... 165 Bluetooth antenna section 25 Bluetooth communication 163 Bluetooth devices 16 Bluetooth Low Energy Settings 166 Alert Notification 166 Find Me Ringtone 166 Proximity 166 Time 166 Bookmarks 77 Deleting 77 Editing 77 Registering 77 Brightness 132 Automatic brightness 132 Browser 75 Accessibility 79 Advanced 79 Bandwidth management 79 Displaying web page 75 General 79 History 76 Incognito tab 76...

Страница 213: ... 30 Charging adapter 28 Desktop Holder 29 PC 31 Precautions on charging 28 Charging terminal 26 Checking applications to install 152 Checking the memory space 137 Clearing credentials 153 Common phrase 36 Customize Area docomo Palette UI 54 Area NX Home 40 Home screen docomo Palette UI 54 Home screen NX Home 40 Screen 47 Customize screen 47 D Data enabled 129 Data roaming 177 Data usage 126 Date 1...

Страница 214: ...r 140 AUTO GPS 140 Data usage check 140 docomo apps password 140 docomo location information 140 docomo Wi Fi Easy Connection 140 Open source licenses 140 SD card backup 140 Send device error information 140 Wi Fi settings for docomo apps 140 Dolby Mobile setting 137 Dominant hand 135 Double tap 32 Drag 32 Draining water 23 E Early warning Area Mail 74 Earpiece 25 Easy data transfer support 39 Ini...

Страница 215: ... Error messages 186 Export Administration Regulations 203 External connection jack 25 External device connection 168 Connecting with a PC 168 Connecting with a Wi Fi printer 168 Connecting with DLNA device 169 Connecting with other devices 171 External storage 159 F Face recognition 144 Factory data reset 188 FAQ 180 FeliCa reader writer 19 File operations 161 Fingerprint 144 Fingerprint authentic...

Страница 216: ...1 Changing icons 40 Customize 40 Deleting 41 Display new alerts 42 Display settings 42 Display Slide Navi 42 Display status bar tab 42 Folder 40 Home screen loop setting 42 Home setting 41 Moving 41 Touch helper guide display 42 Wallpaper 41 Widget 40 Homescreen selector 53 I iC transfer service 83 Icon 42 Back icon 42 Home icon 42 Menu icon 42 Navigation bar 42 Notification icon 43 Slide display ...

Страница 217: ... input 155 Local 111 Location information 108 Lock screen 46 Lock screen wallpaper 144 Owner info 144 Screen 143 Widget 46 Long play mode 136 M Mail 68 70 73 Making Receiving a call in the country you stay 177 Making a call 177 Making a call to outside country you stay including Japan 177 Receiving a call 177 Manner mode 130 Manner mode 130 Manner mode Alarm 130 Manner mode Silent 130 Original man...

Страница 218: ... Reload 91 Reset recommendation 91 Select storage 92 Send log 91 Telop display 91 mopera U 122 Multimedia 136 My physical profile 153 User information 153 My profile 67 N Name card creator 67 Navigation bar 42 134 Network Mode 176 Network operators 176 Network security code 141 Network service 62 Network service overseas 179 New APN 121 NFC communication 166 NFC Osaifu Keitai Lock Setting 85 Notif...

Страница 219: ... a call 58 Receiving a call 60 Speaker phone 61 Phone memo 62 Enabling Phone memo 62 Phone memo list 62 Recording 60 Set answer time 62 Set reply message 62 Phone ringtone 131 Phonebook 64 Canceling group 65 Communication 65 Creating group 65 Deleting 65 Deleting group 65 Editing 64 Editing group name 65 Export to SD card 66 Exporting 66 Favorites 66 Import from SD card 66 Import from SIM card 66 ...

Страница 220: ...k History 150 Picture 151 Picture setting 151 Receive indicator 151 Setting 149 Privacy view 133 Proximity sensor 25 Public mode Drive mode 63 Public mode power OFF settings 63 PUK code 142 Q QR code reader 104 History 104 Light 104 Reading 104 Quick reply 60 R Real Time broadcasting in real time style 87 Rear microphone 25 Recent calls 61 Recommended applications 57 Switching 56 Registering words...

Страница 221: ...se 176 Shake to unrotate 134 Shift Time broadcasting in storage style 87 Shooting function for camera still image 101 Adjust flicker 102 Auto focus 101 Automatic exposure 101 Scene mode 101 Touch focus 101 White balance 101 Shooting function for camera video 103 Auto focus 103 Touch focus 103 White balance 103 Shooting settings for camera still image 102 Camera Mode 102 Flash 102 HDR mode 102 Loca...

Страница 222: ...Activity counter app 153 Stereo earphone jack 25 Still image shooting screen 100 Storage 137 159 Strap hole 26 Super clear mode 132 Swipe 32 Switching input method 36 T Talk 75 Tap 32 Task manager 52 Temperature Humidity sensor 25 Tethering 127 Easy registration 129 Text to speech 156 Theater mode 30 133 Time 157 ToruCa 86 Touch and hold 32 Touch panel 25 Notes for using 32 Using 31 Touch sounds 1...

Страница 223: ... 114 156 Block offensive words 156 Download offline speech recognition 156 Language 156 Speech output 156 Voice slowing 61 Volume key 26 Volumes 129 VPN 127 Adding 127 Connection 127 Disconnecting 127 W Warranty 188 Waterproofness Dustproofness 20 Wi Fi 122 Adding 124 Advanced settings 124 auto IP setting 125 Avoid poor connections 125 Disconnecting 124 Easy registration 125 IP address 125 MAC add...

Страница 224: ...r 95 Using 1Seg 92 1Seg settings Data broadcasting setting 97 Display information when playing 97 Display subtitle 97 Initializing broadcasting data 97 Reminder setting 97 Smooth mode 97 Switching main sub sounds 97 Switching sound 97 Switching soundtrack 97 Switching subtitle language 97 Twitter operation button 97 Version information 97 2 touch input 35 ...

Страница 225: ... bother other people Please ask checking changing subscription detail application of various services and request of various information materials online My docomo http www mydocomo com 各種お申込 お手続き Various application Procedures in Japanese only From PCs dmenu お客様サポー ト Customer support 各種お申込 お手続き Various application Procedures Packet communication free in Japanese only From sp mode You need Network...

Страница 226: ...ur terminal has a number of useful functions designed for public use such as a setting that instructs your terminal not to answer incoming calls and the ability to set the terminal for silent operation Public mode Power OFF P62 The caller hears an announcement notifying that the receiver is in a place requiring power off of mobile phone and the call is disconnected Vibrate P131 Vibrates when there...

Страница 227: ...ernational Services website Universal number international prefix 8000120 0151 81 3 6832 6600 toll free From DOCOMO mobile phones For loss theft malfunction and inquiries while overseas 24 hour reception If you lose your terminal or have it stolen immediately take the steps necessary for suspending the use of the terminal If the terminal you purchased is damaged bring your terminal to a repair cou...

Страница 228: ...before you dial For Applications or Repairs and After Sales Service please contact the above mentioned information center or the docomo Shop etc near you on the NTT DOCOMO website Repairs Business hours 24 hours open all year round Unavailable from part of IP phones From land line phones In Japanese only 0120 800 000 toll free Unavailable from land line phones etc No prefix 113 toll free From DOCO...

Отзывы: