268
Installing Blade Components
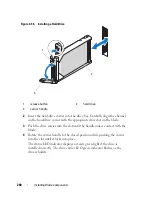
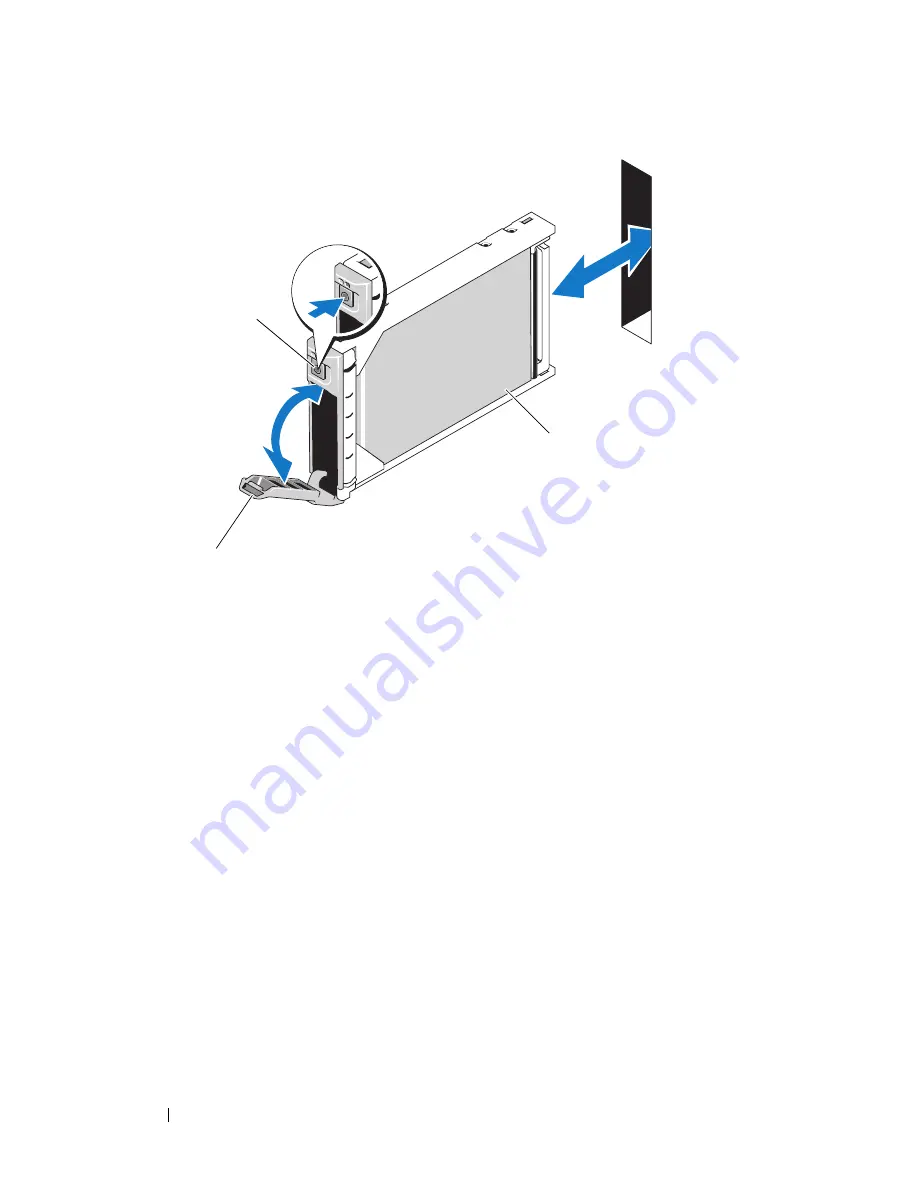
Figure 3-56. Installing a Hard Drive
2
Insert the hard-drive carrier into the drive bay. Carefully align the channel
on the hard-drive carrier with the appropriate drive slot on the blade.
3
Push the drive carrier into the slot until the handle makes contact with the
blade.
4
Rotate the carrier handle to the closed position while pushing the carrier
into the slot until it locks into place.
The status LED indicator displays a steady green light if the drive is
installed correctly. The drive carrier LED green indicator flashes as the
drive rebuilds.
1
release button
2
hard drive
3
carrier handle
1
3
2
Содержание PowerEdge M620
Страница 1: ...Dell PowerEdge Modular Systems Hardware Owner s Manual ...
Страница 39: ...About Your System 39 Figure 1 19 Identifying Midplane Version 1 1 1 midplane identification label 2 1 ...
Страница 40: ...40 About Your System Figure 1 20 Identifying Midplane Version 1 0 1 midplane identification label 2 1 ...
Страница 51: ...About Your System 51 Figure 1 23 CMC Daisy Chaining 1 management network 2 secondary CMC 3 primary CMC 1 2 3 ...
Страница 60: ...60 About Your System Figure 1 24 Example of PowerEdge M610x Port Mapping of Blade 2 ...
Страница 68: ...68 About Your System Figure 1 26 Example of Half Height Blade Port Mapping ...
Страница 136: ...136 About Your System ...
Страница 286: ...286 Installing Blade Components ...
Страница 308: ...308 Installing Enclosure Components ...
Страница 330: ...330 Running System Diagnostics ...
Страница 360: ...360 System Board Information ...
Страница 362: ...362 Getting Help ...
Страница 368: ...Index 368 V video controller installing 273 ...

