8-16
Cisco Network Modules Hardware Installation Guide
OL-2485-20
Chapter 8 Connecting Voice Network Modules
IP Communications High-Density Digital Voice or Fax Network Module
Caution
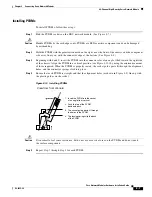
It is normal to feel some resistance, but do not use excessive force on the PVDM2 module, and do not
touch the surface components.
Step 5
Repeat
Step 2
through
Step 4
for each PVDM2 module.
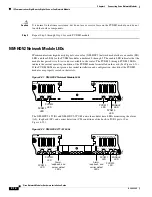
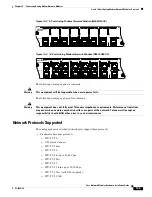
NM-HDV2 Network Module LEDs
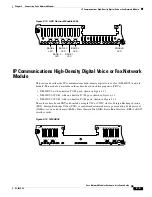
IP communications high-density digital voice or fax (NM-HDV2) network modules have an enable (EN)
LED, and four LEDs for the PVDM2 modules, numbered 0 through 3. The enable LED indicates that the
module has passed its self-tests and is available to the router. The PVDM 0 through PVDM 3 LEDs
indicate the current operating condition of the PVDM2 modules installed on the card. (See
Figure 8-21
.)
If the PVDM LEDs are not green after initial installation and configuration, check that the PVDM2
modules are properly seated in their slots.
Figure 8-21 NM-HDV2 Network Module LEDs
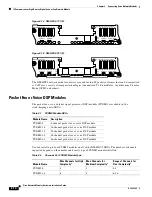
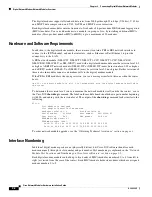
The NM-HDV2-1T1/E1 and NM-HDV2-2T1/E1 network modules have LEDs monitoring the alarm
(AL), loopback (LP), and carrier detection (CD) conditions of the built-in T1/E1 ports. (See
Figure 8-22
.)
Figure 8-22 NM-HDV2-2T1/E1 LEDs
NM-HDV2
PVDM 3
PVDM 2
PVDM 1
See Manual before Installation.
PVDM 0
V0
EN
103881
PVDM 3
LED
PVDM 2
LED
PVDM 1
LED
PVDM 0
LED
ENABLE
LED
95203
NM-HDV2-2T1/E1
PVDM 3
PVDM 2
PVDM 1
CTRLR T1/E1 0
See Manual before Installation.
PVDM 0
V0
AL
LP
CD
AL
LP
CD
EN
CTRLR T1/E1 1
PVDM 3
LED
Alarm,
loopback, and
carrier detect
LEDs
Alarm,
loopback, and
carrier detect
LEDs
PVDM 0
LED
PVDM 2
LED
PVDM 1
LED
ENABLE
LED

