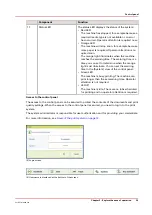
The parts of the control panel
Number
Description
1
The LEDs indicate the current amount of sheets in the corresponding paper
tray. Each lit-up LED indicates the presence of about 100 sheets (based on
media of 80 g/m
2
or 20 lb bond).
2
Press the button to open the corresponding paper tray. You can only open 1
paper tray at a time.
3
When the check mark is green, the media in the paper tray is defined. The
system knows which media is in the paper tray.
4
When the arrows are red, the media in the paper tray is not defined. The
system does not know which media is in the paper tray. The [Trays] view on
the control panel indicates that no media is assigned to the paper tray.
5
The [Not assigned] button. This button applies to the paper tray where you
just put the media.
You can press the [Not assigned] button when you load a new media type
into a paper tray without defining this media type on the control panel first.
Then the printer cannot accidentally use the media in this paper tray before
the media is correctly defined on the control panel. You can define the me-
dia type in the [Trays] view on the control panel later (see
).
NOTE
Make sure that the paper tray is open when you press the [Not as-
signed] button.
The paper modules
20
Chapter 2 - Explore the print system
VarioPrint 6000 line
Содержание VarioPrint 6000 Series
Страница 1: ...VarioPrint 6000 line Operation guide VarioPrint 6180 6220 6270 6330 2020 Canon Production Printing ...
Страница 8: ...Contents 8 VarioPrint 6000 line ...
Страница 9: ...Chapter 1 Introduction ...
Страница 14: ...Information in this operation guide 14 Chapter 1 Introduction VarioPrint 6000 line ...
Страница 15: ...Chapter 2 Explore the print system ...
Страница 31: ...Chapter 3 Explore the ease of operation ...
Страница 46: ...Transaction printing workflow 46 Chapter 3 Explore the ease of operation VarioPrint 6000 line ...
Страница 47: ...Chapter 4 Start the print system ...
Страница 56: ...Log in to the printer 56 Chapter 4 Start the print system VarioPrint 6000 line ...
Страница 63: ...Chapter 5 Prepare the print system ...
Страница 101: ...Chapter 6 Prepare the print jobs ...
Страница 110: ...Print a page number via PRISMAsync 110 Chapter 6 Prepare the print jobs VarioPrint 6000 line ...
Страница 111: ...Chapter 7 Plan the workload remotely ...
Страница 114: ...Use the Remote Control app to monitor printing 114 Chapter 7 Plan the workload remotely VarioPrint 6000 line ...
Страница 115: ...Chapter 8 Plan the jobs ...
Страница 127: ...6 Touch OK Move jobs to another destination Chapter 8 Plan the jobs 127 VarioPrint 6000 line ...
Страница 139: ...5 Touch OK Create a note for the operator Chapter 8 Plan the jobs 139 VarioPrint 6000 line ...
Страница 165: ...Chapter 9 Carry out print jobs ...
Страница 232: ...Make an intermediate check print 232 Chapter 9 Carry out print jobs VarioPrint 6000 line ...
Страница 233: ...Chapter 10 Keep the system printing ...
Страница 246: ...Status indicators 246 Chapter 10 Keep the system printing VarioPrint 6000 line ...
Страница 247: ...Chapter 11 Media handling ...
Страница 289: ...Chapter 12 Maintain the print system ...
Страница 316: ...Close the doors and covers 316 Chapter 12 Maintain the print system VarioPrint 6000 line ...
Страница 317: ...Chapter 13 PRISMAlytics Dashboard ...
Страница 319: ...Chapter 14 Troubleshooting ...
Страница 334: ...Create and download a log file 334 Chapter 14 Troubleshooting VarioPrint 6000 line ...
Страница 335: ...Chapter 15 Specifications ...
Страница 353: ......


