


Zaxcom Fusion User’s Manual______________________________________________________Chapter 2
37
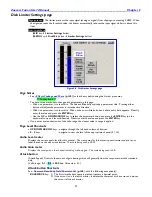
Disk Mix page
Page purpose:
This page routes the 8 analog inputs, 8 digital inputs, Slate Mic and the Reference Tone to the 12
recording tracks.
How to get here:
(
MIX
key
)
(
MENU
key
Disk Mix
button
)
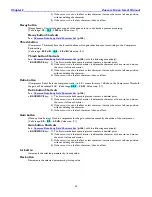
Figure 2-4 Disk Mix page – Top and Bottom pages
Page Notes
In this page, the top line shows the 8 available input channels (In1 – In8) plus the slate mic and the tone
generator. The vertical line of numbers on the right shows the 12 available recording tracks. The bottom row
of buttons controls the parameters of the matrix selections.
Figure 2-4 shows a Fusion 12 set up to record 8 analog pre-fader inputs to tracks 1 through 8, 2 digital pre-fader
inputs recorded to tracks 9 and 10 and a post-fader mix to tracks 11 and 12. Analog input #1 and digital input
#2 are inverted. The slate-mic and the tone generator are enabled for all tracks except 9 and 10.
Page Level Shortcuts
None
Disk Matrix buttons
Connects the Input Channel to the Recording Channel. Pressing the button cycles through the available choices,
based on the setting of the
Analog/Digital In Toggle
,
Phase Invert
and
Pre-/Post-Fader
buttons
.
Indicator
Description
Black A
Analog input post-fader
Black A with Line
Analog input post-fader with signal phase inverted
White A
Analog input pre-fader
White A with Line Analog input pre-fader with signal phase inverted
Black D
Digital input post-fader
Black D with Line
Digital input post-fader with signal phase inverted
White D
Digital input pre-fader
White D with Line Digital input pre-fader with signal phase inverted
Table 2-2 Disk Mix Indicator Descriptions
Preset button
This button allows you to save and recall up to five saved settings. Think of each preset as a page on which to
write the configuration.
To save a configuration, perform the following:
1)
Move to the Preset # you want to build. Normally, the first to be built would be Preset 1.
2)
If you have not previously saved anything into the preset, it will be a blank slate (pun intended). Establish all of
the required items for this preset.
3)
If you need to establish any additional presets, repeat steps 1 & 2 for each additional configuration.