12-1
IM AQ1200-01EN
Multi-Core Loss T
esting (Option)
3
2
1
4
5
6
7
8
9
10
11
12
13
14
15
16
17
18
19
App
Index
20
12.1 Creating New Projects
Procedure
New Project Screen
1.
Using the
rotary knob
and
ENTER
, select
Multi-Core Loss Test
.
2.
Press the
Master/Slave
soft key to select
Master
.
3.
Press the
New Project
soft key to display the following screen.
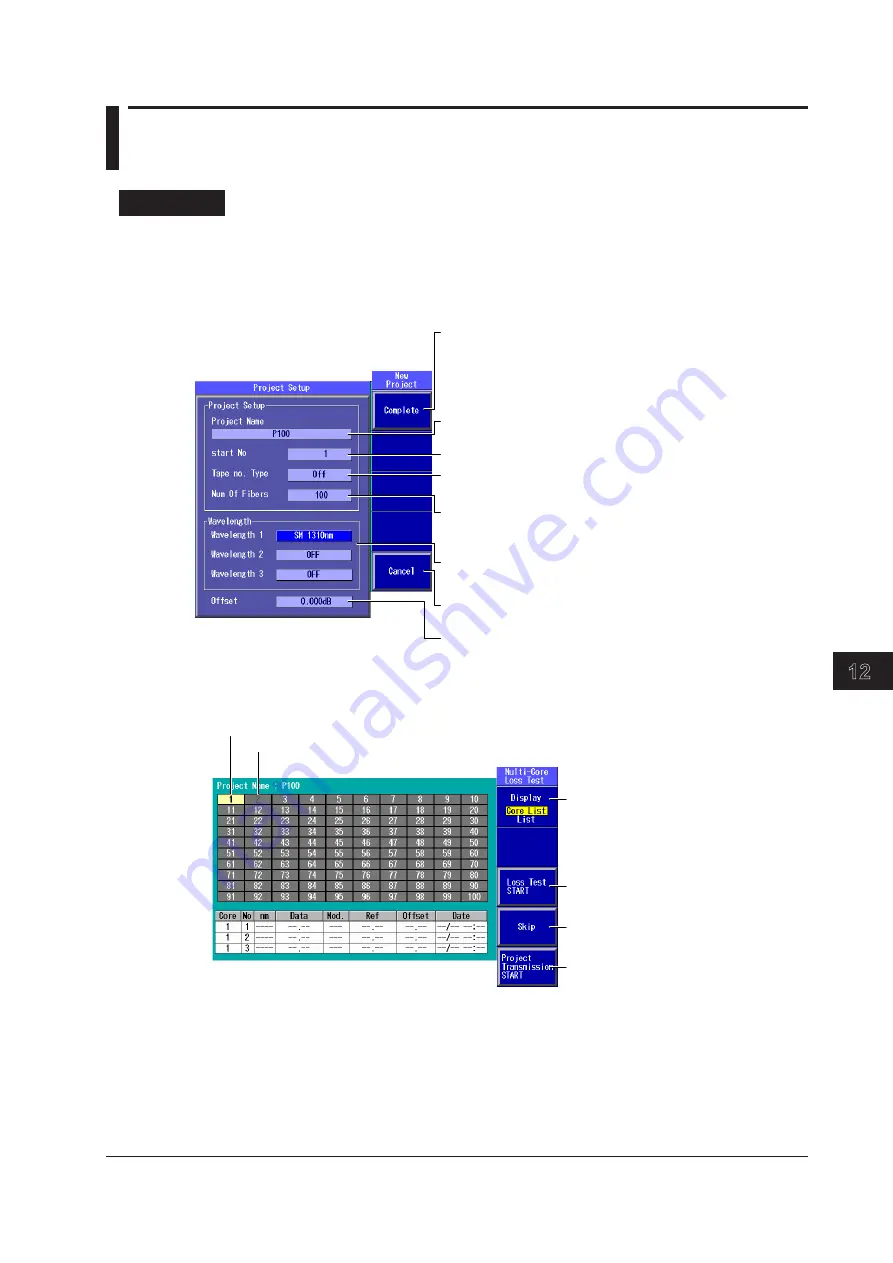
Project Name
To set the project name, follow the procedure in section 2.4.
Complete
Press this soft key after you have configured the project, wavelength,
and offset settings. The loss test screen shown in the next section
appears.
If you enter a project name and specify at least one wavelength, this
key becomes available.
Set the starting core number (1 to 9900).
Set the tape number type (Off, a-b(2), a-c(3), a-d(4), a-e(5), a-f(6),
a-g(7), a-h(8)).
Set the number of fibers or tapes (up to 100 fibers when Tape
no. Type is set to Off, up to 50 tapes when Tape no. Type is set
to a-b(2), ..., up to 12 tapes when Tape no. Type is set to a-h(8)).
Set the wavelength.
The available settings vary depending on the models.
Cancels the project settings.
The instrument returns to the previous screen.
Set the offset (–9.900 to 9.900 dB).
Loss Test Screen
Press the
Complete
soft key to display the following screen.
Set the list to show (Core List, List).
For list examples, see section 9.4.
Skipped core numbers are dimmed.
The selected core number is highlighted.
Use the rotary knob and the arrow keys
to select a core number.
Starts loss testing (see section 12.3)
Specify skipping.
Starts the transmission of project
information (see section 12.2)
Saving Project Information
Press
SETUP
and the
File
soft key. Or, press
SETUP
twice. The file save screen appears. Follow the
procedure in section 18.2 to save the project information that you configured.
Chapter 12 Multi-Core Loss Testing (Option)


