background image

Transmitting Documents

WorkCentre Pro 555/575


5-33

ITU-T Relay Communications

Relay Communication allows you to send documents from your fax 
machine (initiating station) to one fax machine (relay station), which 
further sends them to additional fax machines (end stations). If you 
have several end stations in one or more regional areas you can save 
time and phone expense by setting up a relay system.

ITU-T Relay Transmission

To perform a ITU-T relay operation, the following information must be 
programmed in your machine.

Initiating Station Setup:

Assign the relay station telephone number to a One Touch Key or 
Speed Dial number. The WorkCentre Pro 555/575 will only 
function as an initiating station.

Relay Station Setup:

The relay station must program the end station telephone 
numbers to Speed Dial numbers One Touch numbers or Group 
numbers.

The relay station must provide these numbers and any required 
passwords to the Initiating Station.

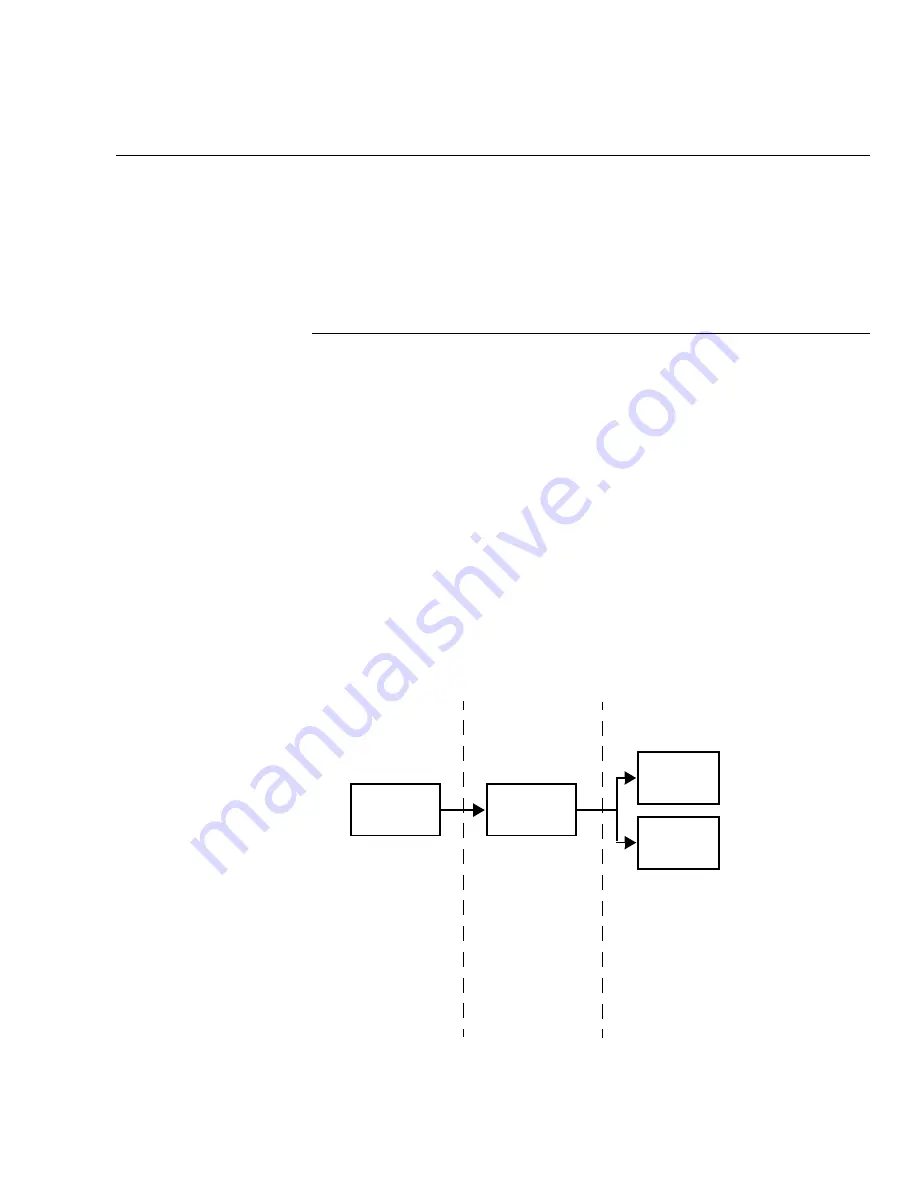
Example:

Relay 
Station 

End 
Station

End 
Station

1 Relay 
Station

End Stations

1 Originator

Relay station 
box number/
password/relay 
station number 
programmed to 
a Speed Dial 
number or One 
Touch key on 
the Initiating 
Station.

Relay box 
numbers/passw
ords/end station 
numbers 
programmed to 
Speed Dial 
numbers, One 
Touch keys, or 
Groups.

Initiating 
Station

Summary of Contents for WorkCentre Pro 575

Page 1: ...XEROX WorkCentre Pro 555 575 Advanced Features Guide 708P84302...

Page 2: ...ks of other companies are also acknowledged Copyright protection claimed includes all forms and matters of copyrightable material and information now allowed by statutory or judicial law or hereinafte...

Page 3: ...ming the Machine 2 1 Using the Menu Mode 2 1 Keys used in Menu Mode Operation 2 2 Menu Flow Map 2 4 Character Entries 2 7 Keys used to Enter Characters 2 7 Character Code Table 2 8 Entering Characters...

Page 4: ...2 36 Long Original Setting 2 37 Redial Count Interval Setting 2 38 Receive Interval 2 39 Resolution Contrast Setting 2 40 Power Saver Setting 2 42 Refuse Junk Mail Setting 2 44 Ringer Volume Setting...

Page 5: ...nced Receive 3 7 Collate Fax 3 7 Reduce Receive Fax Setting 3 8 Receive to Memory 3 9 Secure Receive 3 10 Automatic Secure Receive Setup 3 10 Secure Receive Mode Temporary Stop 3 14 Discard Extra Sett...

Page 6: ...1 Cover Sheet Setup 5 12 Sending a Document with a Cover Sheet 5 13 Batching 5 15 Confirming a Transmission 5 16 One Time Fax Options 5 17 Number of Pages 5 18 Listen to Dial 5 19 Send then Poll 5 20...

Page 7: ...x 7 3 Storing a Document to be Polled in a Multi poll Box 7 5 Cancelling Documents Stored in a Polling Box 7 6 Modifying Documents Stored in a Polling Box 7 6 Polling a Remote Document Poll once or Mu...

Page 8: ...ess 8 18 Chapter 9 Reports 9 1 Setting Up Reports and Lists 9 1 Activity Report Setup 9 2 Confirmation Report Setup 9 5 Confirmation Report 9 6 Confirmation Report Memory Send 9 7 Group Send Report 9...

Page 9: ...6 Sending Faxes Using Security 11 7 Setting the Redial Options 11 7 Faxing Long Originals 11 8 Setting the Fax Receive Options 11 9 Setting the Receive Footer Option 11 9 Receiving Faxes when the Prin...

Page 10: ...eating a Mailbox 11 20 Editing a Mailbox 11 21 Deleting a Mailbox 11 22 Using Department Codes 11 22 Setting up Department Codes 11 22 Changing a Department Code 11 23 Deleting a Department Code 11 23...

Page 11: ...es A 1 Installing the Optional Paper Tray A 7 Appendix B Ordering Supplies B 1 Ordering Supplies B 1 Ordering Supplies Automatically B 3 Setting up Automatic Supplies Ordering B 3 Setting up the desti...

Page 12: ...Party Certification E 4 Radio Frequency Emissions USA E 4 European Certification E 6 Approvals and Certification E 6 UK Electricity at Work Regulation E 7 Environmental Compliance E 10 ENERGY STAR E...

Page 13: ...ents Use the Table of Contents to find topics easily Introduction Chapter 1 Describes the information in the User s Guide and Advanced Features Guide Programming the Machine Chapter 2 Describes Menu M...

Page 14: ...Centre software to set up the WorkCentre Troubleshooting Chapter 12 Guides the user through problem solving and provides a list of error codes messages and recommended corrective actions Installing Op...

Page 15: ...of the machine and provides an overview of how the machine operates Each key on the Control Panel is described Getting Started Chapter 3 Includes the procedures for setting up the basic machine infor...

Page 16: ...ou may have to press a series of keys before arriving at the desired menu The resulting screen message for each step appears next to the series of keys pressed For example The procedure to enable the...

Page 17: ...ents the text Notes are emphasized with italics The following is an example of a note The following are examples of a caution and a warning CAUTION Do not touch the green drum surface Touching the dru...

Page 18: ...Introduction 1 6 WorkCentre Pro 555 575...

Page 19: ...setting machine defaults Using the Menu Mode Various functions of the WorkCentre are available by selecting menu items with the menu screen displayed on the Control Panel The display shows one menu a...

Page 20: ...displayed press the Down arrow key to scroll down through the menu selections When the menu screen is displayed press the Left arrow key to display the preceding menu When entering characters use thi...

Page 21: ...he Menu Numbers Most Menu features are assigned a sequence number You can select the feature you wish to program quickly by pressing Menu and the sequence numbers Refer to the Menu Flow Map on the pag...

Page 22: ...Programming the Machine 2 4 WorkCentre Pro 555 575 Menu Flow Map...

Page 23: ...Programming the Machine WorkCentre Pro 555 575 2 5...

Page 24: ...Programming the Machine 2 6 WorkCentre Pro 555 575...

Page 25: ...er characters For more information on entering characters refer to the character entry procedures later in this chapter Keys used to Enter Characters Key Function Moves the cursor to the left to delet...

Page 26: ...the numeric keys in the left column and the characters that correspond to each key in the right column Multiple characters are assigned to most keys and accessed by pressing the corresponding key a sp...

Page 27: ...ng Characters Input correct characters over the existing characters 1 Using the and arrow keys position the cursor at the character to be corrected 2 Enter the desired character Note You may need to m...

Page 28: ...rsor at the character to be deleted or at the point of insertion 2 Press The message I is displayed 3 To insert enter the correct character s To delete press Note If you are not in the insert mode pre...

Page 29: ...Keys located in the left of the Control Panel are programmed to perform some of the most frequently used features automatically Several of these keys use multi layered menus similar to the Menu Mode T...

Page 30: ...x options to use during the communication Please read this section carefully and refer to the suggested chapters for detail feature descriptions Use the following list as an aid in planning the Phoneb...

Page 31: ...hine and requests that machine to forward the document to a network user or to a ITU T mailbox This feature can also be used to poll store a document in a ITU T mailbox of remote compatible machines R...

Page 32: ...h methods To assign Speed Dial numbers 1 Press 2 Enter the desired Speed Dial number 1 999 3 Press Enter Hint To print a list of all assigned Speed Dial numbers press See the User s Guide Note If you...

Page 33: ...Numeric Keypad enter the name max 20 characters then press Enter 7 To skip the Fax Options press and go to step 23 to complete the procedure To program the Fax Options press Hint You can enter a pause...

Page 34: ...ater 9 Enter the desired time you want to start the job within 24 hours For the 12 hour format select AM PM then press Enter 10 To add an additional option go to step 8 To exit press and go to step 23...

Page 35: ...Sub address 17 To skip this option press Go to step 8 To send a document to a sub address location press to select SUB 18 Enter the numeric remote sub address then press Enter 19 To add a password to...

Page 36: ...One Touch key press the desired One Touch Key or to skip this step press Enter 24 To assign additional Speed Dial numbers repeat steps 2 23 25 When you have completed the Speed Dial assignment press E...

Page 37: ...delete the Speed Dial number press To modify the number information press To retain the number information press Refer to the previous procedure Pre setting Speed Dial Numbers to update the speed dial...

Page 38: ...dial attempts The alternate number dialing function is not performed in Relay Polling or Mailbox communications To assign One Touch numbers 1 Press 2 Press the desired One Touch key Hint To print a li...

Page 39: ...enter the name max 20 characters then press Enter 6 To program the Fax Options press and go to step 7 To skip the Fax Options press and go to step 22 Hint You can enter a pause or charge code in the...

Page 40: ...er the desired time you want to start the job within 24 hours For 12 hour format select AM PM then press Enter 9 To add an additional option go to step 7 To exit press and go to step 22 to complete th...

Page 41: ...mplete the procedure Sub address 16 To skip this option press Go to step 7 To send a document to a sub address location press to select SUB 17 Enter the numeric remote sub address then press Enter 18...

Page 42: ...sub address option press 21 To add an additional option go to step 7 To exit press and go to step 22 22 To assign additional One Touch numbers repeat steps 2 21 23 When you have completed the One Touc...

Page 43: ...splays To modify or delete a One Touch number 1 Press 2 Press the One Touch key you want to modify or delete 3 To delete the One Touch number press To modify the number information press To retain the...

Page 44: ...ill be requested and comments on each of the fields To preset numbers to a group 1 Press Hint To print the Group Phonebook press Fields Comments Group Number Any 25 555 50 575 numbers between 1 and 19...

Page 45: ...er 6 Repeat step 5 to enter additional numbers 7 When you entered each number you want to include in this group press Enter 8 To assign this group to a One Touch key press the One Touch key To skip th...

Page 46: ...To preset a group see Pre setting Group Numbers in this Chapter To send a document to a programmed group 1 Load the document face down in the Document Support 2 Select the desired Resolution and Contr...

Page 47: ...odify then press Enter 3 Select the Change option To delete this group press To modify this group press Refer to Pre setting Group Numbers if necessary To exit without changing this group press 4 The...

Page 48: ...tre Pro 555 575 Filling out the One Touch Label As you assign phone numbers to the One Touch keys use a pencil to fill in the location name on the One Touch Label One Touch Label 25 One Touch Label Wo...

Page 49: ...his code is required to perform any modifications it is used as a Supervisory master key The Master Code department number is preset to 01 by the WorkCentre The individual Department Codes are used to...

Page 50: ...Note To reset the Department Code the following is displayed To recover the Department Code already being set press 1 To set a new Department Code press 2 Note If the Master Number is assigned go to s...

Page 51: ...enter the name to assign to this Department max 20 characters then press Enter Refer to the Character Entries Section 8 Using the Numeric Keypad enter the 5 digit Department Code to assign to this De...

Page 52: ...es To add or change the Department Code settings 1 From the Enter Dept code screen enter the Master Department Code then press Enter 2 Press 3 To add or change Dept codes press CAUTION To disable the...

Page 53: ...5 575 2 35 5 To delete this Dept code press To modify this Dept code press To exit without changing this Dept code press 6 Modify the information as desired If needed refer to Setting the Department C...

Page 54: ...or distortion This feature cannot be accessed if a document is stored in memory Both the sender and the receiver must have the ECM feature to perform ECM communications Communication time is longer w...

Page 55: ...ng Original option To select 1m press To select Any length press 3 The menu selection screen redisplays Press Exit or Stop to return to the Standby Mode 1 M 39 inches Allows document sizes up to 1 Met...

Page 56: ...ials can be set between 0 and 14 attempts If the Resend Stored Fax feature is active and the machine exceeds the number of redials your document is retained in memory see Chapter 5 Transmitting Docume...

Page 57: ...nsecutively from the same phone line The interval set by this procedure is inserted after every fourth transmission 1 Press 2 Using the Numeric Keypad enter the number of minutes you want the machine...

Page 58: ...ending normal text and graphics Selected when Resolution LED is off Fine Use for documents with small characters newspaper print etc Superfine Use for documents containing very detailed print Photo Us...

Page 59: ...tandard press To select Fine press To select Superfine press 3 Select the Contrast To select Normal press To select Darker press To select Lighter press 4 The menu selection screen redisplays Press Ex...

Page 60: ...y Mode for the pre set time period Manual Mode Enters the Power Saver Mode when the Power Save key on the control panel is pressed If the machine is in the Standby Mode when the Power Save key is pres...

Page 61: ...elect the Manual mode or Off select the default for the Printer Power Save mode Printer Power Save Turns the printer heater off to save power consumption Press Select the Manual mode press Then go to...

Page 62: ...your machine phonebook Refuse Junk Mail is effective only on incoming calls in the Auto Receive Mode See Setting the Auto Answer Mode in chapter 3 To enable the Refuse Junk Mail feature 1 Press 2 Sel...

Page 63: ...Centre Ringer Volume The volume range is from 0 off to 7 high To adjust the Ringer volume 1 Press 2 Using the Numeric Keypad enter the Ringer Volume setting from 0 7 then press Enter 3 The menu select...

Page 64: ...kCentre Alarm Volume The volume range is from 0 off to 7 high To adjust the Alarm volume 1 Press 2 Using the Numeric Keypad enter the Alarm Volume setting from 0 7 then press Enter 3 The menu selectio...

Page 65: ...e Key Touch Volume The volume range is from 0 off to 7 high To adjust the Key Touch volume 1 Press 2 Using the Numeric Keypad enter the Key Touch Volume setting from 0 7 then press Enter 3 The menu se...

Page 66: ...ntre Monitor Volume The volume range is from 0 off to 7 high To adjust the Monitor volume 1 Press 2 Using the Numeric Keypad enter the Monitor Volume setting from 0 7 then press Enter 3 The menu selec...

Page 67: ...lect to delete or send the scanned pages when the memory becomes full during scanning To set the Send After Scan default mode 1 Press 2 To enable Send After Scan press then go to step 3 To disable Sen...

Page 68: ...ows a remote Xerox test facility or service center to perform diagnostic tests on your machine 1 Press To enable the Remote Access feature press To disable the Remote Access feature press 2 The menu s...

Page 69: ...emory There are two Download selections No Job in Memory and Any Time 1 Press To download the firmware when there is no job in memory press To download the firmware at anytime press 2 The menu selecti...

Page 70: ...ine to retrieve information You should advise the Xerox authorized service persons of the password in order to do this There are two RDC Password selections Set RDC Password and Password 1 Press To se...

Page 71: ...e contains the sending machines telephone number the time the fax was received and the number of pages To set the Separator Page feature 1 Press 2 Select the Separator Page option To enable the Separa...

Page 72: ...perations To enable this feature for a single operation refer to Listen to Dial in chapter 5 To set the Line Monitor feature 1 Press 2 Select the Line Monitor option To enable the Line Monitor feature...

Page 73: ...tions can be programmed whilst other operations are being carried out for maximum equipment utilization and efficiency For example you can store a document to memory while the machine is receiving a d...

Page 74: ...File Man Print Received File auto Local Single Copy Multi Copy Scan Multi Copy Print Print Report Manual Print Report Auto X Print Transmission Report X Mailbox Input X X X X X Mailbox Output X Print...

Page 75: ...rinter Receive to Memory Local Single Copy X X Multi Copy Scan X X Multi Copy Print X X X X Print Report Manual X X X X Print Report Auto X X X X Print Transmission Report X X X X Mailbox Input X X X...

Page 76: ...ning Local Single Copy X X Multi Copy Scan X X Multi Copy Print X X Print Report Manual X X X Print Report Auto X X X Print Transmission Report X X X Mailbox Input X X X Mailbox Output X X X Print Rec...

Page 77: ...X TAD Auto Switching Use when the machine is used together with a telephone answering device TAD When enabled the machine receives voice messages and fax receptions without a user present Switching be...

Page 78: ...an incoming call may be manually answered on a TEL connected or on a parallel connected same line telephone If the call is voice call you may talk with the caller If the call is a fax call you may swi...

Page 79: ...hine will not receive a document until you press the Start key This mode enables you to use the machine as a telephone yet receive documents when desired The default Answer Mode is Auto answer Fax Set...

Page 80: ...messages and receive documents unattended When this feature is enabled switching between voice message recording and fax receiving is performed automatically To set the Fax Tad answer mode 1 Press No...

Page 81: ...e of call If the remote machine is sending a fax document the machine automatically receives it If the remote machine is making a phone call the machine generates Pseudo rings To set the Tel Fax answe...

Page 82: ...ode Use the Manual Answer mode if you have a single line for fax and voice communications The Manual Answer mode allows you to answer incoming calls manually If an incoming call is a fax you can recei...

Page 83: ...ge on top of the stack in the copy output tray To enable the Collate fax function 1 Press Modes and Features Description Collate Fax When enabled received documents are collated with the last page on...

Page 84: ...his feature is set to On and letter A4 size copy paper is installed the WorkCentre reduces longer size documents to fit on the paper If Off is selected the longer size document prints on 2 pages To se...

Page 85: ...d If the memory becomes full while the machine is receiving a document the machine terminates the operation but retains the pages it received successfully To enable the Receive to Memory feature 1 Pre...

Page 86: ...d In addition to the Automatic Secure Receive feature you can manually enable the machine to Secure Receive at any time See Manual Secure Receive in this section To stop a Secure Receive time period a...

Page 87: ...ode or your existing security code then press Enter 4 The menu selection screen redisplays Press Exit or Stop to return to the Standby Mode Note If you enter an existing code the New security code scr...

Page 88: ...then press Enter 4 Select the Secure receive option To disable the Secure Receive Mode press then press Exit or Stop to return to the Standby Mode To enable the Secure Receive Mode and designate the...

Page 89: ...f the week If you select 2 Fixed time for any day of the week you will go to step 9 after selecting the options for seven days of the week 7 Enter the time period during which you want the WorkCentre...

Page 90: ...ed documents To temporary stop the Secure Receive Mode 1 Press 2 To print all documents press 3 Enter your 4 digit security code and press Enter after 2 second The machine prints all documents receive...

Page 91: ...anners that are slight slipping to fit the image on one page This feature not allowed in all markets In some cases the lower part of the document data may be lost To set the Discard Extra selection 1...

Page 92: ...Receiving Documents 3 16 WorkCentre Pro 555 575...

Page 93: ...ach dialing method can be used for fax transmissions polling receptions or telephone calling operations A basic transmission includes loading the document dialing a number and transmitting the documen...

Page 94: ...set the Resolution and Contrast 3 Lift the handset or press 4 Enter the fax phone number then press Enter if necessary To enter a pause press the Pause key To enter a Charge Code press the Charge Cod...

Page 95: ...e station using Alpha Dialing 1 Load the document face down in the Document Support 2 If desired set the Resolution and Contrast 3 Press the Phonebook key and select for Alpha dial Enter the first let...

Page 96: ...the and arrow keys to scroll the complete phonebook 6 When the desired name is highlighted press Start after 2 seconds 7 The machine automatically dials the phone number of the name you selected confi...

Page 97: ...ed Dial number must be programmed in the Speed Dial Phonebook see Chapter 2 Pre setting Speed Dial Numbers To dial a remote station using a Speed Dial number 1 Load the document face down in the Docum...

Page 98: ...ber by pressing the corresponding One Touch key To use this function the One Touch number must be programmed in the Phonebook see Pre setting One Touch Numbers To link a One Touch Key to a Speed Dial...

Page 99: ...g 1 Load the document face down in the Document Support 2 Select the desired Resolution and Contrast 3 Using the numeric keypad enter the phone number and press Start To enter a pause press the Pause...

Page 100: ...ual Redial Last Number Off hook This redial function enables you to transmit a document to the party of the number last dialed by the operator using the machine To redial the last number a fax number...

Page 101: ...Chain key To Chain Dial 1 Load the document face down in the Document Support 2 Select the desired Resolution and Contrast 3 Press 4 To enter a One Touch press the One Touch key To use the Numeric Key...

Page 102: ...group for this procedure Enter numbers using the Numeric Keypad One Touch keys or Speed Dial numbers To send a document to several numbers 1 Load the document face down in the Document Support 2 Selec...

Page 103: ...rs press Start The machine dials each number in the group and sends the document Note If you select the same entry twice you are prompted to delete or retain that second entry Note To modify or delete...

Page 104: ...Dialing Methods 4 12 WorkCentre Pro 555 575...

Page 105: ...ransmissions during periods when telephone rates are lower Priority Transmission A priority send transmission is performed prior to any other job reserved in memory Resend Normally document data store...

Page 106: ...machine begins dialing When the line connects the transmission begins You can set the machine to redial up to 14 times if a busy signal is detected If you use the Direct Send transmission mode the ma...

Page 107: ...red The number of pages that can be stored in memory is dependent on the size of your Memory Job Numbers Job numbers are assigned to communications that have been scanned into memory A Job Number is u...

Page 108: ...transmission The Direct Send mode can be selected as the default setting or selected from the Control Panel for one operation This mode can be selected when residual memory is low or a very large doc...

Page 109: ...ment data is stored in memory and is sent when the lines becomes available To send a Document using the Memory Send mode 1 Load the document face down in the Document Support 2 Select the desired Reso...

Page 110: ...rocedure that follows To send a document using the Direct Send mode as the default transmission mode 1 Load the document face down in the Document Support 2 Select the desired Resolution and Contrast...

Page 111: ...the Document Support 2 Select the desired Resolution and Contrast 3 Press 4 Press to send the document To return to the Standby Mode without sending the document press 5 Using one of the dialing meth...

Page 112: ...ect the desired Resolution and Contrast 3 Press 4 Use the Numeric Keypad and the arrow keys to enter the time and date you want the job to start then press Enter 5 Using one of the dialing methods ent...

Page 113: ...Document Support 2 Select the desired Resolution and Contrast 3 Press 4 Using one of the dialing methods enter the remote fax number then press Enter if needed The document is transmitted immediately...

Page 114: ...Setting up the Phonebook To enter a Charge Code when sending a document 1 Load the document face down in the Document Support 2 Select the desired Resolution and Contrast 3 Using the Numeric Keypad m...

Page 115: ...nually sending a cover sheet each time you send a document The effective scanning image range is 5 9 inches 150 mm Any image outside the specified range is discarded This feature will store one image...

Page 116: ...ge document face down in the Document Support 2 Press 3 Press to enable the Cover Sheet option 4 Select the Cover Sheet image option To create a cover sheet without an image press To add an image to y...

Page 117: ...with a Cover Sheet 1 Load a document face down in the Document Support 2 Select the desired Resolution and Contrast 3 Press 4 Select the Cover Sheet option To print a Cover Sheet press To attach a Cov...

Page 118: ...ress Enter 7 Using one of the dialing methods enter the fax number and press Enter if necessary The document is sent with a Cover Sheet if selected and the machine returns to the Standby Mode Note You...

Page 119: ...ns are the same To intentionally send multiple documents in a batch transmission perform the sending procedure for each document setting the send criteria the same for each job Batching automatically...

Page 120: ...de If a communication error occurs while attempting to connect to the remote party a long tone is generated and an error indication is displayed Press the Stop key to clear the error message Activity...

Page 121: ...op of the recording paper for Direct Send Transmissions only Listen to Dial Turns the speaker ON to monitor the line tones Send then Poll Sends a document then polls a document from the remote machine...

Page 122: ...he receiving machine To set the Total Number of Pages 1 Load the document face down in the Document Support 2 Press Direct Send 3 Press 4 Using the Numeric Keypad enter the total number of pages in th...

Page 123: ...in Chapter 2 To set the Listen to Dial feature 1 Load the document face down in the Document Support 2 Select the desired Resolution and Contrast 3 Press 4 Select the Listen to Dial option To enable...

Page 124: ...Poll feature 1 Load the document face down in the Document Support 2 Select the desired Resolution and Contrast 3 Press 4 Select the Send then Poll option To enable the Send then Poll feature press To...

Page 125: ...additional fax options or using one of the dialing methods enter the fax number then press Enter if necessary The document is sent If this feature is enabled the document set to poll is received then...

Page 126: ...M option To send the document using ECM press To disable the ECM Mode for this transmission press 5 Press Menu to select additional fax options or using one of the dialing methods enter the fax number...

Page 127: ...own in the Document Support 2 Select the desired Resolution and Contrast 3 Press 4 Select the Secure Send option To enable the Secure Send Mode press To disable the Secure Send Mode press 5 Press Menu...

Page 128: ...default status is regained To set the Send After Scan feature 1 Load the document face down in the Document Support 2 Select the desired Resolution and Contrast 3 Press 4 Select the Send After Scan op...

Page 129: ...pages being scanned press To send the pages being scanned press 6 Press Menu to select additional fax options or using one of the dialing methods enter the fax number then press Enter if necessary Th...

Page 130: ...de Default Setting on the next page To check Account Code usage print the Activity Report See Chapter 9 Reports 1 Load the document face down in the Document Support 2 Select the desired Resolution an...

Page 131: ...code is printed along with the transmission information on the Activity Report allowing you to check the activity to that party 1 To set the Account Code default setting Press 2 Select the Account Cod...

Page 132: ...displayed To set or change Department Codes refer to Chapter 2 Changing Department Codes To use the machine Enter the 5 digit Department Code then press Enter The standby mode screen displays If no a...

Page 133: ...ds the number of redials set is not cleared but saved in memory for the specified length of time See the Resend Stored Fax procedure that follows to resend the stored document To set the Resend Stored...

Page 134: ...or a specified length of time Perform this procedure to resend a fax that is stored for resending If the facsimile number you dialed was not correct you can change the number before resending the docu...

Page 135: ...be changed 4 Select the Change option To resend the job without changing the facsimile number press The machine starts dialing the number To resend the job with a different facsimile number press 5 Us...

Page 136: ...one number and if the numbers match the document is sent Refer to the One Time Fax Options earlier in this chapter to send a secured individual transmission To enable Secure Send 1 Press 2 Select the...

Page 137: ...Assign the relay station telephone number to a One Touch Key or Speed Dial number The WorkCentre Pro 555 575 will only function as an initiating station Relay Station Setup The relay station must pro...

Page 138: ...ant to assign a password press and go to step 7 6 Using the Numeric Keypad enter the password you want to assign to this box then press Enter 7 Enter the Speed Dial or One Touch key that you preset fo...

Page 139: ...m the list of pending jobs The Cancel Job key allows you to cancel pending jobs by job type Pressing Stop alone does not cancel a Memory or Pending job You must use the Cancel Job or Job Status keys t...

Page 140: ...er a job number you want to cancel Incoming call Cancels a job currently being received Send Cancels an active job or a reserved Memory Send job Following jobs may be displayed Send to one number Grou...

Page 141: ...o cancel an Incoming Reception press To cancel a Polling operation press To cancel a Document Waiting to be Polled press To cancel a Job Number press or If no job is reserved for the job type such job...

Page 142: ...3 Press the and arrow keys to view each pending job of this type 4 When the job you want to cancel is displayed press Enter The machine returns to the Standby Mode Note If no key is pressed within 5 s...

Page 143: ...cess of being transmitted in the Direct Send mode If the Direct Send job is in the Redial Mode the job is a pending job Refer to the Cancel Job key 1 If the document is being transmitted press Stop 2...

Page 144: ...Cancelling Jobs 6 6 WorkCentre Pro 555 575...

Page 145: ...t up a document to be polled by a remote machine Be Polled or poll multiple remote machines during the same operation Group or Continuous Poll The Polling feature allows you to retrieve a document fro...

Page 146: ...y the polling machine when retrieving your documents A 4 digit security code 0000 9999 Only WorkCentre Pro 745 635 645 657 655 755 machines can poll your machine The remote machine fax number Both the...

Page 147: ...without security or a multi poll box but not both You can store a document to both a Poll once box with security and a Multi poll box 1 Load the document face down in the Document Support 2 Select th...

Page 148: ...your machine To select both a security code and a Fax Number press and go to step 6 Press or 6 Using the numeric keypad enter the 4 digit Security Code or the fax number of the remote polling machine...

Page 149: ...l box see Polling a Remote Document Poll once or Multi poll Box in this Chapter 1 Load the document face down in the Document Support 2 Select the desired Resolution and Contrast 3 Press 4 To store th...

Page 150: ...a document is present in the polling box you have selected the Already Assigned screen displays To replace or add to a document stored in a Poll box 1 Load the document face down in the Document Supp...

Page 151: ...umber or both that were used when the previous document was stored in this Poll once box Press the Enter key after each entry 7 Select the change option To delete and replace the stored document press...

Page 152: ...other WorkCentre Pro 745 635 645 657 655 755 machines To poll a document from a remote machine 1 Press 2 Using one of the dialing methods dial the remote telephone number then press Start if necessary...

Page 153: ...poll documents from Multiple Remote Machines 1 Press 2 Press 3 Using the numeric keypad Phonebook or One Touch keys enter the number and press Enter if necessary Groups can also be entered if preset t...

Page 154: ...of numbers that do not require a Security Code press To enter a Security Code press 7 Using the numeric keypad enter the required Security Code then press Enter The machine dials each number in the gr...

Page 155: ...ted machines at the same time on each day you have selected Only one Continuous Polling operation can be reserved at a time To delete the reserved Continuous Poll operation refer to Deleting Continuou...

Page 156: ...dialing methods enter the remote machine facsimile numbers and press Enter if necessary 6 Select the security option If a security code is required press Then enter the Security Code obtained from th...

Page 157: ...the continuous poll operation you must delete and reenter the information To delete a Continuous Poll Job 1 Press 2 To delete the Continuous Poll Job press The Continuous Poll Job is deleted and the...

Page 158: ...Polling 7 14 WorkCentre Pro 555 575...

Page 159: ...can control the number of times a document can be polled and by whom The following types of mailboxes are available Confidential Box Once a document is polled or printed from the box it is cleared If...

Page 160: ...tup for that box Creating an ITU T Mailbox Before documents can be stored the mailbox number must be setup in your mailbox station Confidential To allow polling a Confidential Mailbox a password must...

Page 161: ...o create a Confidential mailbox press To create a Bulletin Board type mailbox press 4 Using the Numeric Keypad enter a mailbox number then press Enter Note A password is required to transmit or receiv...

Page 162: ...ou want to assign to this box then press Enter 7 The display will return to the mailbox setup screen You may add additional mailboxes by selecting or you can return to the standby mode by pressing Exi...

Page 163: ...this box enter the password and press Enter 4 The menu selection screen redisplays Press Exit or Stop to return to the Standby Mode Storing a Document in a Local ITU T Mailbox To store a document in y...

Page 164: ...press Enter 7 Enter a password if required then press Enter The document is stored in the mailbox you selected Note If you selected Bulletin Board and entered a password when creating this ITU T Mail...

Page 165: ...nt a document from your local ITU T mailbox 1 Press 2 Select the type of mailbox you want to print the document from To print from a Confidential mailbox press To print from a Bulletin Board mailbox p...

Page 166: ...ilbox number then press Enter 5 Enter the password if required then press Enter The WorkCentre prints the document from the ITU T mailbox you selected then returns to the Standby Mode Note If you ente...

Page 167: ...TU T Mailbox 1 Press 2 Select the type of mailbox you want to delete the document from To delete from a Confidential mailbox press To delete from a Bulletin Board mailbox press Hint To print a list of...

Page 168: ...enter the mailbox number then press Enter 5 If you entered a password when creating this mailbox number enter that same password then press Enter The document stored in the mailbox you selected is de...

Page 169: ...uments to a Remote Mailbox 1 Load the document face down in the Document Support 2 Select the desired Resolution Contrast 3 Press Feature Description Confidential Sending a document to a Remote Confid...

Page 170: ...dential mailbox press To send to a Bulletin Board mailbox press or 5 To send to a remote mailbox press 5 Delete contents 4 Store to mailbox 3 Poll from mailbox 2 Send to mailbox Confidential 1 Print m...

Page 171: ...the password preset in the remote machine s Bulletin Board mailbox then press Enter 8 Using one of the dialing methods enter the phone number of the remote mailbox station then press Enter if necessa...

Page 172: ...mailbox number and password from the remote user to use in the following procedure To poll a document from a remote mailbox 1 Press 2 Select the type of mailbox from which you want to retrieve the doc...

Page 173: ...l enter the remote password then press Enter 6 Using one of the dialing methods enter the phone number of the remote mailbox station then press Enter if necessary The machine dials the remote station...

Page 174: ...ess PWD Add a password to Sub or Sep for secure communications The sub address can be up to 20 digits To communicate with a compatible ITU T remote fax you must obtain the sub address and password if...

Page 175: ...s to select SUB 5 Use the numeric keypad to enter the remote sub address and press Enter 6 To enter a password press to select PWD Using the numeric keypad enter the password if required by the remote...

Page 176: ...ate with a remote WorkCentre obtain and enter the remote ITU T mailbox number To poll a WorkCentre ITU T Confidential Mailbox the remote and local machines must have the same password 1 Remove any doc...

Page 177: ...ct Done 7 Using one of the dialing methods enter the remote phone telephone number and press Enter 8 Press Start 9 If a security code is required press Then enter the security code obtained from the r...

Page 178: ...Mailbox Communications 8 20 WorkCentre Pro 555 575...

Page 179: ...ollowing a transmission reception polling relay or mailbox operation The following reports can be printed automatically Activity Reports Contain the details of send and receive communications and can...

Page 180: ...When Set key default is selected you can choose which reports are printed when the Activity Report key is pressed for a reception Transmission or both The following information is printed on the Activ...

Page 181: ...Transmission Speed Code Line Density Code Encoding 0 2400 bps 0 8 pels mm x 3 85 lines mm 0 MH 1 4800 bps 1 8 pels mm x 7 7lines mm 1 MR 2 7200 bps 2 8 pels mm x 15 4 lines mm 2 MMR 3 9600 bps 3 3 JBI...

Page 182: ...se if a report prints automatically after 40 communications press then go to step 4 3 Select the Set key default mode To print reports of all Sent and Received communications press To print a report o...

Page 183: ...mmunication On Error Prints a report only when an error occurs Off A report is not automatically printed In addition you can set the WorkCentre to print the first page of the fax on the report for Mem...

Page 184: ...on To set the Confirmation Report automatic print status 1 Press 2 Select the Confirmation report print function To automatically print a report after a Direct Send press To automatically print a repo...

Page 185: ...y print a report when an error occurs press To disable the automatic report print function press then go to step 4 3 For Always or On Error reports you can have the WorkCentre print the first page of...

Page 186: ...error occurs press Item Description Job number Job Number of transmission Date Date and time that the job was accepted To Remote name or facsimile number Document Pages Number of pages of memory input...

Page 187: ...or On Error reports you can have the WorkCentre print the first page of the fax on the Group Send Report To print the first fax page press To print the report without the first fax page press 4 Press...

Page 188: ...ress Not available in all markets Item Description Job number Job Number of transmission Date Date and time that the job was accepted Number of pages Number of pages of memory input Start time Time wh...

Page 189: ...r of transmission Date Date and time that the job was accepted Start time Time when the transmission started End time Resend until Time when the transmission ended the time when a Resend Stored Fax tr...

Page 190: ...tomatically print a report when an error occurs press To disable the report feature press Then go to Step 4 3 For Always or On Error reports you can have the WorkCentre print the first page of the fax...

Page 191: ...job was accepted Document pages Number of pages Start time Time when the transmission started End time Resend until Time when the transmission ended the time when a Resend Stored Fax transmission is...

Page 192: ...you want to setup To automatically print a Local Mailbox Reception Report press Select On or Off A reception list automatically prints when the machine receives stores a document in a local Mailbox se...

Page 193: ...nted on the Mailbox Reception Report Item Description Job number Job number Mailbox nbr Mailbox number Mailbox Type Mailbox Type Poll once Multi poll Private Mailbox nbr of Pages Number of document pa...

Page 194: ...ave stored in it The following reports can be printed Activity Report ITU T Mailbox Reports Pending Jobs Report Department Code Report Power Failure List Menu Map Settings Report Activity Report Press...

Page 195: ...The following information is printed on the ITU T Mailbox Report To print an ITU T Mailbox Report Press The ITU T Mailbox Report prints then the machine returns to the Standby Mode Item Description Ma...

Page 196: ...listed by communication type i e Send Receive To be polled and Resend Stored Fax To print the Pending Jobs Report 1 Press The Pending Jobs Report prints then the machine returns to the Standby Mode It...

Page 197: ...the report prints information for only that user s department The following information is printed on the Department Code Report To print the Department Code Report 1 Press The Department Code Report...

Page 198: ...tions is automatically printed The following information is printed on the Power Failure List for all Transmit and Receive Polling Mailbox Receive to Memory and Resend Stored Fax communications Item D...

Page 199: ...Map The Menu Map is a list of all machine features in a flow chart format Refer to Chapter 2 for a detailed Menu Flow Map To print the Menu Map 1 Press or Press 2 The Menu Map prints then the machine...

Page 200: ...per size 1st cassette Fax send Memory send Secure send Cover sheet Resend stored fax Send header Send after scan Auto rcv 2 Tone 1Minutes 5 Off 3 3 3 3 Manual On Off Off 3Minutes On Off Standard Norma...

Page 201: ...hine returns to the Standby Mode Note Total Pages represents the grand total for Scanned and Printed pages it is not the same as Drum count that is found on the Activity Report Note The firmware ident...

Page 202: ...Reports 9 24 WorkCentre Pro 555 575...

Page 203: ...Collate Making Copies To copy a document 1 Load the document face down in the Document Support 2 Press 3 If desired set the Contrast Resolution and Reduction 4 Press the key select the collate option...

Page 204: ...ion press 6 Select the Paper source To select the Paper Tray press then go to step 9 To select the Bypass Tray press then go to step 7 To select the Optional Paper Tray press then go to step 9 Note Wh...

Page 205: ...lect the Legal size press 8 Select the Thick Paper mode To enable the Thick paper mode press To disable the Thick paper mode press 9 Using the Numeric Keypad select the desired number of copies and pr...

Page 206: ...Copying Documents 10 4 WorkCentre Pro 555 575...

Page 207: ...book of One Touch Speed Dial and Group Dial numbers you can also get help quickly on a particular task or feature from the ControlCentre To open the ControlCentre and connect to the WorkCentre 1 Click...

Page 208: ...ents with small characters Superfine up to 406 x 391 dpi Use for documents containing very detailed print 4 To set the default contrast for outgoing faxes and copies select one of the following option...

Page 209: ...k Request account code The Activity Report prints the account code used to send a fax to a remote fax number which helps you to track the activity to remote fax numbers 10 To arrange multiple copies o...

Page 210: ...d and receive To use the phone line to send and receive faxes Receive only To use the phone line to receive faxes only Receive during certain times To specify a time period for receiving faxes Set the...

Page 211: ...Changing Your ControlCentre Password You can change the password that you use to open the ControlCentre on your PC 1 From the File menu click Change Password The Change ControlCentre Password dialog...

Page 212: ...options Inside margin To print the header close to the document text If the document text is near the top edge of the paper the header and text might overlap Outside Margin To print the header at the...

Page 213: ...kCentre compares the number dialed to the remote fax machine s telephone number and if the numbers match sends the fax 1 Click the Fax icon and then click the Fax Send tab 2 Click Send with security e...

Page 214: ...WorkCentre Faxing Long Originals You can set up the WorkCentre to scan documents longer than typical page sizes 1 Click the Fax icon and then click the Fax Send tab 2 In the Long original length box s...

Page 215: ...tion at the WorkCentre Receiving Faxes when the Printer is Unavailable You can choose to receive faxes in memory when the WorkCentre s printer is not available The WorkCentre will store the received f...

Page 216: ...n you want secure receive turned on each day 6 In the Ending box select the time when you want secure receive turned off each day 7 Click one or more days of the week on which you want to receive secu...

Page 217: ...on option make sure letter size paper is loaded in the WorkCentre 1 Click the Fax icon and then click the Fax Receive tab 2 To reduce legal size faxes to fit on letter size paper click Reduce faxes to...

Page 218: ...l retries in the After exceeding retry attempts box 6 Click Apply to set the options at the WorkCentre Setting up a Phonebook To save time dialing fax numbers you can create a Phonebook of frequently...

Page 219: ...sten to dial To turn on the WorkCentre speaker to monitor the line tones Print confirmation report To print a confirmation report after each fax you send to the fax number Dial later To send faxes at...

Page 220: ...ed list of preset numbers to the One Touch key Group Dial To assign a group number from the displayed list of preset numbers to the One Touch key 6 From the list of speed dial or group entries click t...

Page 221: ...ebook icon 2 Click the Speed Dial tab 3 Click the Add button The Speed Dial Entry dialog box opens 4 In the Speed dial 001 999 box select the number you want to preset 5 In the Name box type the perso...

Page 222: ...location to retrieve documents from polling via a compatible remote fax machine Password optional To specify the password required for Mailbox ITU T communications 11 Do one of the following Click OK...

Page 223: ...roup Dial number your Phonebook must contain preset Speed Dial numbers or One Touch key entries 1 Click the Phonebook icon 2 Click the Group Dial tab 3 Click the Add button The Group Dial Entry dialog...

Page 224: ...up Dial Number 1 Click the Phonebook icon 2 Click the Group Dial tab 3 Click the Group Dial number you want to edit then click the Edit button 4 In the Group Dial Entry dialog box make the changes you...

Page 225: ...e Phonebook dialog box opens 3 In the Save in box select a location for the Phonebook 4 In the File name box type a name for the Phonebook 5 Click Save Opening a Phonebook File If you made changes to...

Page 226: ...the same mailbox both documents remain in the mailbox Bulletin Board To not clear a document from the mailbox after it s retrieved or printed If another document is stored in the same mailbox it repla...

Page 227: ...s for the end station select Group Dial in the Entry from box Click the Change button select the Group Dial number you want to use and click OK Note You must use a Group Dial number to transmit docume...

Page 228: ...department of their code they must enter their code to use the WorkCentre You can print the Department Code Report for a record of each department s usage of the WorkCentre Setting up Department Code...

Page 229: ...ick the Edit button The Department Code Entry dialog box opens 4 Change any of the following options Department ID Select a new department number Department code Type a new five digit code Department...

Page 230: ...ey See Setting the machine defaults Confirmation Reports Setup You can set the WorkCentre to automatically print a report after each transmission Always or after a failed transmission On error or to n...

Page 231: ...issions received by the end station If you select either Always or On error you can click Show first fax page to have the WorkCentre print the first page of the fax on the report 7 Click Apply to set...

Page 232: ...le name box type a name for the settings file 4 Click Save Opening a Saved WorkCentre Settings File 1 Do one of the following From the File menu click Open Settings From the toolbar click the Open but...

Page 233: ...Self test option required To run the test automatically and test a number of functions of the machine press To select individual test press then select the test that you want to run The tests are ADF...

Page 234: ...t the various speaker volumes available and confirm that the test was successful Switch test Press then During this test you will be prompted to open and close the scanner cover open and close the mac...

Page 235: ...ted for about 4 seconds and a message to indicate the nature of the error is displayed If this happens take corrective action per the following table Error Message Probable Cause Corrective Action BRO...

Page 236: ...t is not fully inserted into the Document Support Reload the document LOWER PAPER EMPTY The lower paper tray is empty Add paper to the Lower Paper Tray Ensure the Lower Paper Tray is closed MEMORY FUL...

Page 237: ...unication with the correct password or Telephone Number PRINTER PROBLEM A power failure occurred which resulted in loss of data stored in memory A Power Failure list is printed when power is restored...

Page 238: ...rvice 30 The Stop key was pressed during the communication Retry the operation 32 The designated number of pages does not match the actual document Verify the designated number is correct If the docum...

Page 239: ...remote station is compatible then retry the communication B2 B3 B4 B5 Network communication problem Check the remote machine and retry the operation C0 C1 C2 C3 C4 Picture signal problem Retry the op...

Page 240: ...nsmission Speed Code Line Density Code Encoding 0 2400 bps 0 8 pels mm x 3 85 lines mm 0 MH 1 4800 bps 1 8 pels mm x 7 7lines mm 1 MR 2 7200 bps 2 8 pels mm x 15 4 lines mm 2 MMR 3 9600 bps 3 3 JBIG 4...

Page 241: ...Off hook press Start before returning the handset to the cradle Is the modular cord of the fax machine disconnected Is the Dialing Mode of the machine set correctly See the User s Guide Setting the D...

Page 242: ...he Fax Speed to transmit the document at a slower speed See Chapter 2 Setting up the Phonebook Problem Check Items When you are to receive a document via the Manual Reception mode the fax is not recei...

Page 243: ...heck with the remote station Is there a problem with the remote machine Does the same problem happen when you copy a document If so clean the Recording Unit See Chapter D Maintaining the Product The p...

Page 244: ...Troubleshooting 12 12 WorkCentre Pro 555 575...

Page 245: ...Options This appendix contains the steps for installing the optional handset and paper tray Installing the Optional Handset not available in all countries 1 Check the contents of the option installat...

Page 246: ...A 2 WorkCentre Pro 555 575 3 Press the Top Cover Open button and open the top cover 4 Click the handset support bracket into place and close the two covers...

Page 247: ...WorkCentre Pro 555 575 A 3 5 Slide the retaining clip for the base unit into the slots on the rear of the unit 6 Position the base unit on the support bracket...

Page 248: ...A 4 WorkCentre Pro 555 575 7 Plug one end of the handset cord into the base unit 8 Plug the other end of the handset cord into the handset...

Page 249: ...WorkCentre Pro 555 575 A 5 9 Plug the telephone cord into the base unit 10 Plug the other end of the telephone cord into the handset socket on the rear of the machine...

Page 250: ...A 6 WorkCentre Pro 555 575 11 Press the plastic covers into position in order to retain the handset cord...

Page 251: ...l Paper Tray The Optional Paper Tray installation kit contains a base unit and a paper tray 1 Check the contents of the installation kit 2 Locate the mounting pegs on the base unit 3 Remove the Docume...

Page 252: ...A 8 WorkCentre Pro 555 575 4 Position the machine over the mounting pegs on the base unit 5 Lower the machine onto the base unit...

Page 253: ...WorkCentre Pro 555 575 A 9 6 Press down and latch the base of the optional paper tray 7 Load a full packet of paper into the optional paper tray...

Page 254: ...A 10 WorkCentre Pro 555 575 8 Place the cover on the optional paper tray 9 Insert the optional paper tray into the base unit...

Page 255: ...WorkCentre Pro 555 575 A 11 10 Replace the Paper Tray Document Output Tray and Bypass Tray...

Page 256: ...A 12 WorkCentre Pro 555 575...

Page 257: ...English 1 800 668 0199 Europe Call your local sales and service provider Supplies Item Part Number Paper letter size 20 lb Paper legal size 20 lb Paper A4 80 g m 3R721 Xerox 4024 3R727 Xerox 4024 3R91...

Page 258: ...B 2 WorkCentre Pro 555 575 Options Item Part Number Optional Paper Tray Americas letter Europe A4 98S04391 98S04389...

Page 259: ...ined when the order center fax number is input You may also want the flexibility to make bulk orders in order to gain quantity discounts when dealing directly with the Xerox supplies center Setting up...

Page 260: ...Select or enter the Speed Dial number or select the Alpha name and press Enter 4 The menu selection screen redisplays Press Exit or Stop to return to the Standby Mode Entering the part details To set...

Page 261: ...ad to enter the part number of the toner or drum 5 Press then and use the keypad to enter the quantity required 6 The menu selection screen redisplays Press Exit or Stop to return to the Standby Mode...

Page 262: ...ess 3 Press and use the keypad to enter your customer number Menu 4 Image print 3 Other information 2 Supplies Supplies order setup 1 Destination setup 5 Ship to address 4 Ship to name 3 Contact tel n...

Page 263: ...se the keypad to enter the name to whom the items will be despatched Press and use the keypad to enter the shipping address for items 4 The menu selection screen redisplays Press Exit or Stop to retur...

Page 264: ...rm To print the order form 1 Press 2 Press The order form will print 3 The menu selection screen redisplays Press Exit or Stop to return to the Standby Mode Menu 4 Image print 3 Other information 2 Su...

Page 265: ...lacing the Paper When the machine runs out of paper PAPER TRAY IS EMPTY displays and printing stops Replace the paper using the following procedure Bypass Tray 1 Pull up the Document Output Tray and o...

Page 266: ...Bypass Tray CAUTION Do not insert more than one sheet of paper on the Bypass Tray It will cause a paper jam 3 Adjust the Paper Guides so that both sides of the paper are secure 4 Return the Document...

Page 267: ...WorkCentre Pro 555 575 C 3 Paper Tray 1 Pull up the Document Output Tray and remove the Bypass Tray 2 Open the Paper Guides Document 04 Bypass Tray Output Tray Paper Guide 05 Paper Guide...

Page 268: ...o 555 575 3 Do not fan the paper Make sure that the corners of paper are neatly aligned 4 Insert up to 250 sheets into the Paper Tray Secure the stack by adjusting the Paper Guides 06 07 Paper Guide P...

Page 269: ...555 575 C 5 CAUTION To avoid paper jams do not exceed the upper limit line on the Paper Guides 5 Replace the Bypass Tray and Document Output Tray Upper Limit Line 08 Paper Guide Bypass Tray 09 Docume...

Page 270: ...size press 3 The menu selection screen redisplays Press Exit or Stop to return to Standby Mode To select Letter size press To select A4 press Then go to step 3 Note When the Optional Paper Tray is in...

Page 271: ...teristics are subject to change based on the supplier and on the particular batch of envelopes from the same supplier ordered at different times To assure maximum performance select envelopes with the...

Page 272: ...tone sounds the OUT OF TONER message displays and printing stops CAUTION Only replace the Toner Cartridge after TONER IS LOW or OUT OF TONER displays If the Toner Cartridge is replaced prematurely pr...

Page 273: ...old the Toner Cartridge by the green handles 3 Remove the new Toner Cartridge from the box it comes packed in Holding it firmly with both hands rock it left and right forward and back in the direction...

Page 274: ...that the four pins two on each side fit into the grooves inside the machine Color coordinated 2 labels have been affixed to the Toner Cartridge and to the inside of the machine Install the Toner Cart...

Page 275: ...WorkCentre Pro 555 575 C 11 5 Press down on the Top Cover until a Click is heard to ensure the latches engage 6 Verify the display has returned to the Standby Mode 17 Top Cover...

Page 276: ...NING is displayed CAUTION Do not expose the green drum to light for more than 3 minutes Never expose the drum to direct sunlight or touch the drum Damage or poor print quality may result To replace th...

Page 277: ...dge by the green handles Do not expose the green drum to light for more than 3 minutes Never expose it to direct sunlight or touch the green drum Damage or poor print quality may result Note Immediate...

Page 278: ...e machine aligning the guides of the cartridge with the grooves inside the machine Color coordinated 1 labels have been affixed to the Drum Cartridge and to the inside of the machine Install the Drum...

Page 279: ...that the four pins two on each side fit into the grooves inside the machine Color coordinated 2 labels have been affixed to the Toner Cartridge and to the inside of the machine Install the Toner Cart...

Page 280: ...atches engage Verify the display has returned to the Standby Mode To reset the counter of the Drum Cartridge Perform the following procedure to reset the Drum Cartridge counter after you replace the D...

Page 281: ...Retard Pad is included with the Drum Cartridge kit and should be installed at the same time as the Drum Cartridge Continue on to the ADF replacement procedure Note Make sure to reset the counter when...

Page 282: ...o 555 575 Replacing the ADF Retard Pad Note The ADF retard pad is included in the Drum Cartridge Kit Follow the instructions below to replace the ADF retard pad 1 Open the Control Panel Cover and loca...

Page 283: ...WorkCentre Pro 555 575 C 19 2 Remove the retard pad by releasing the latch at the base of the retard pad and rotating the pad upwards 3 When it is in the horizontal position pull out the retard pad...

Page 284: ...C 20 WorkCentre Pro 555 575 4 Replace the retard pad 5 Rotate the retard pad downwards and press until it clicks into place 6 Close the control panel cover...

Page 285: ...the Machine Cleaning the Cabinet Wipe the machine with a damp cloth to remove dust and fingerprints Use water to dampen the cloth Do not use chemicals for cleaning as this can cause discoloration or d...

Page 286: ...ing procedure to clean the Scanner components 1 Open the Control Panel Cover 2 Wipe the glass surface and the guide with a soft dry cloth lens cleaner cloth If the surfaces require moisture to remove...

Page 287: ...ard Pad and the rollers with a dry cloth If the surfaces require moisture to remove the dirt use a cloth slightly dampened with water to remove the dirt followed by a dry cloth 4 Close the Control Pan...

Page 288: ...om of the machine chamber Paper Pickup Roller The Paper Pickup Roller is located at the bottom of the machine chamber Use the following procedure to clean the Paper Guide and Paper Pickup Roller 1 Pus...

Page 289: ...dge by the green handles Do not expose the green drum to light for more than 3 minutes Never expose it to direct sunlight or touch the green drum Damage or poor print quality may result Note Immediate...

Page 290: ...located at the bottom of the machine chamber 4 Wipe the Paper Pickup Roller and Paper Guide with a dry cloth If the surfaces require moisture to remove the dirt use a cloth slightly dampened with wate...

Page 291: ...of the cartridge with the grooves inside the machine Color coordinated 1 labels have been affixed to the Drum Cartridge and to the inside of the machine Install the Drum Cartridge by aligning these la...

Page 292: ...that the four pins two on each side fit into the grooves inside the machine Color coordinated 2 labels have been affixed to the Toner Cartridge and to the inside of the machine Install the Toner Cart...

Page 293: ...WorkCentre Pro 555 575 C 29 7 Press down on the Top Cover until a Click is heard to ensure the latches engage 8 Verify the display has returned to the Standby Mode 20 Top Cover...

Page 294: ...C 30 WorkCentre Pro 555 575...

Page 295: ...0mm Legal Width 8 5 in 216 mm x 14 0 in 356 mm A4 Width 8 3 in 210 mm x 11 7 in 297 mm Paper Tray Capacity 80 gsm 20 lb Main Tray 250 sheets Bypass Tray 1 sheet Optional Tray 500 sheets Copy Output Tr...

Page 296: ...ctable Lines 1 line Printer Emulation 600 x 600 dpi printing 406 x 392 dpi Fax Copy PC Operating Environment Windows 95 98 or NT 4 0 Printer Driver Xerox Driver Software PC Interface Bi directional Pa...

Page 297: ...oner Cartridge yield is 6000 prints assuming 4 print coverage Memory Jobs 100 Department Codes 50 Group Numbers Pro 555 25 groups Pro 575 50 groups Input Mailbox 100 boxes One Touch Numbers Pro 555 20...

Page 298: ...D 4 WorkCentre Pro 555 575...

Page 299: ...ied with the product Symbology General warning alerts user to the risk of personal damage Example of specific warning Warning Heated Surface Unplug this equipment from the wall outlet before cleaning...

Page 300: ...d in the back and sides of the product are provided for ventilation To ensure reliable operation of the product and to protect it from overheating these openings must not be blocked or covered The pro...

Page 301: ...is certified as a Class 1 laser product under the U S Department of Health and Human Services DHHS Radiation Performance Standard according to the Radiation Control for Health and Safety Act of 1968...

Page 302: ...pment has been tested and found to comply with the limits for a Class B digital device pursuant to Part 15 of the FCC Rules These limits are designed to provide reasonable protection against harmful i...

Page 303: ...modifications to this equipment not specifically approved by the Xerox Corporation may void the users authority to operate this equipment WARNING Shielded cables must be used with this equipment to ma...

Page 304: ...l Directive 99 5 EEC approximation of the laws of the member states related to R TTE A full declaration defining the relevant directives and referenced standards can be obtained from your Xerox Limite...

Page 305: ...andards They have all undergone a variety of stringent safety tests including earth bond insulation resistance and electrical strength tests Xerox Limited manufacturing plants have been awarded ISO 90...

Page 306: ...eir authorized distributors conform to all relevant safety legislation and standards However like all electrical equipment they have to be regularly serviced and maintained by competent persons Xerox...

Page 307: ...f all tests ANSWER After safety testing your Xerox Limited Customer Service Engineer will provide you with a certificate which details the results of all tests completed In the event of any defect bei...

Page 308: ...gy efficiency Low Power and Sleep Mode The Workcentre Pro 555 575 switch to a standby mode of operation when each task has been completed In this mode of operation the power consumption is less than t...

Page 309: ...e registration authorities Recycled Paper The WorkCentre Pro 555 575 has established performance with the use of recycled paper with its consequent benefits to the environment Xerox recommends part nu...

Page 310: ...equipment which complies with this standard the European Telecommunication Standards Institute ETSI has issued an advisory document EG 201 121 which contains notes and additional requirements to ensur...

Page 311: ...the FCC rules you must carefully read and follow the instructions listed below This equipment complies with Part 68 of the FCC rules On the rear of this equipment is a label that contains among other...

Page 312: ...es you that your machine is causing damage disconnect the machine from the telephone line and call for service Do not reconnect the machine until necessary repairs are made The telephone company will...

Page 313: ...thod of connection In some cases the company s inside wiring associated with a single line individual service may be extended by means of a certified connector assembly telephone extension cord The cu...

Page 314: ...ly to the requirement that the sum of the Ringer Equivalence Numbers of all the devices does not exceed 5 This digital apparatus does not exceed the Class A limits for radio noise emissions from digit...

Page 315: ...Centre 11 14 authorizing setting the department control 2 31 automatic document feeder maximum capacity D 1 automatic receive mode default setting 3 3 B background jobs 5 2 batching 5 15 battery 9 20...

Page 316: ...ield D 3 continuous polling 7 11 contrast default setting 2 40 control account codes 5 26 5 27 setting department codes 2 31 control panel error code 12 6 one touch label 2 30 ControlCentre activity r...

Page 317: ...r correct mode 2 36 5 22 junk mail 2 44 line monitor 2 54 long original 2 37 memory send or direct send 5 4 reports 9 2 9 14 resend stored fax 5 29 ringer volume 2 45 2 46 2 47 2 48 secure receive 3 1...

Page 318: ...ing 7 1 7 13 polling a remote ITU T mailbox 8 14 printing documents in a ITU T local mail box 8 7 receiving 3 1 3 15 resending stored documents 5 30 sending to a remote ITU T mailbox 8 11 size D 1 sto...

Page 319: ...ying using ControlCentre 11 18 presetting using ControlCentre 11 17 group dialing continuous polling 7 11 deleting group numbers 2 29 described 5 1 group polling 7 9 manual group dialing 4 10 modifyin...

Page 320: ...D 2 weight D 3 machine features menu map 2 4 mailbox communications 8 1 8 19 creating using ControlCentre 11 20 deleting using ControlCentre 11 22 described 5 1 editing using ControlCentre 11 21 ITU...

Page 321: ...ion modes D 1 modifying department codes 2 34 group numbers 2 29 speed dial numbers 2 19 multi access communications 2 55 multiple polling receptions 7 9 N normal contrast 2 40 number of pages describ...

Page 322: ...Jobs Key used 9 18 9 19 9 21 Pending Jobs Report 9 18 personal documents confidential ITU T mailboxes 8 1 secure receive 3 2 3 10 secure send 5 23 phonebook setting one touch numbers 2 20 setting spe...

Page 323: ...1 troubleshooting 12 11 R receive footer setting using ControlCentre 11 9 receive interval setting using ControlCentre 11 10 receive to memory described 3 2 3 9 receiving documents 3 1 3 15 collate fa...

Page 324: ...tre 11 24 11 26 Reception Reports 9 14 reception reports 11 25 relay originator 9 5 9 12 Settings Report 9 22 settings reports 11 25 resend stored fax 5 29 5 30 default setting 5 29 resending 5 30 res...

Page 325: ...e codes 5 10 confirming a transmission 5 16 cover sheet 5 13 delayed start 5 8 direct send mode 5 6 group send 2 28 ITU T mailboxes 8 11 manual group 4 10 manual send 5 8 memory send 5 5 priority tran...

Page 326: ...amming the phonebook 2 12 2 30 text programming 2 7 toner error message 12 5 replacing C 8 supplies B 1 toner pack yield D 3 tones alarms 12 3 toner empty C 8 top cover error code 12 6 error message 1...

Page 327: ...mission problems 12 9 type machine type D 2 U unavailable features error message 12 4 V voltage D 2 volume ringer adjusting 2 45 2 46 2 47 2 48 W warming up message 12 5 warnings drum life warning 12...

Reviews: