195
A
PPLICATION
L
IQU
ID
R
ATE
C
ONTROL
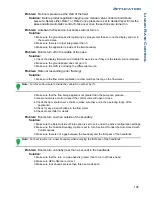
Problem:
No boom pressure at the start of the field.
Solution:
Before product application begins, use manual valve control to build boom
pressure. Select either Rate 1 or Rate 2 once pressure is set to desired level. Enter the
pass and allow automatic control to take over once the sections are turned on.
Problem:
AutoSwath checked on, but booms will not turn on.
Solution:
1. Make sure the ground speed is registering a value greater than zero on the display and not in
the covered area.
2. Make sure there is a target rate greater than 0.
3. Make sure the applicator is inside of the field boundary.
Problem:
Booms turn off in the middle of the pass.
Solution:
1. Check the display firmware and module firmware to see if they are the latest version released.
2. Make sure the ground speed does not go to 0.
3. Make sure the GPS is not losing the differential source.
Problem:
Rate not responding (error flashing)
Solution:
1. Make sure the flow meter calibration number matches the tag on the flow meter.
Note: For Raven flow meters, divide the calibration number by 10.
2. Make sure that the flow being applied is not greater than the pump can produce.
3. Use manual valve control to see if the control valve will open or close.
4. Check the tip manufacturer’s charts to make sure they are in the operating range of the
application.
5. Check for any product buildup in the flow meter.
6. Check product filter for debris.
Problem:
Booms turn on when outside of the boundary.
Solution:
1. Make sure the Rate Outside of Field option is set to zero under the active configuration settings.
2. Make sure the Outside Boundary Option is set to Turn Section Off under the Automatic Swath
Control options.
3. Make sure there is not a gap between the boundary and the first pass of the headlands.
Note: For best results, run a new boundary when spraying the first pass of the headlands.
Problem:
Booms turn on briefly (less than a second) in the headlands
Solution:
1. Make sure that the turn on look-ahead is greater than the turn off look-ahead.
2. Make sure GPS offsets are correct.
3. Make sure look aheads are less than three seconds each.
Summary of Contents for ag leader
Page 1: ...Operators Manual Firmware Version 5 4 Ag Leader PN 4002722 Rev G ...
Page 2: ...Firmware Version 5 4 ...
Page 20: ...6 Firmware Version 5 4 ...
Page 38: ...24 Firmware Version 5 4 For more information see Legend Settings on page 52 ...
Page 55: ...41 SETUP M ANAGEMENT S ETUP Remove button Press to remove a business ...
Page 56: ...42 Firmware Version 5 4 ...
Page 78: ...64 Firmware Version 5 4 ...
Page 82: ...68 Firmware Version 5 4 Press to Export All Log files Export All Log Files ...
Page 84: ...70 Firmware Version 5 4 ...
Page 94: ...80 Firmware Version 5 4 ...
Page 108: ...94 Firmware Version 5 4 ...
Page 140: ...126 Firmware Version 5 4 ...
Page 154: ...140 Firmware Version 5 4 ...
Page 158: ...144 Firmware Version 5 4 ...
Page 162: ...148 Firmware Version 5 4 ...
Page 222: ...208 Firmware Version 5 4 ...
Page 244: ...230 Firmware Version 5 4 ...
Page 260: ...246 Firmware Version 5 4 ...
Page 290: ...276 Firmware Version 5 4 ...
Page 304: ...290 Firmware Version 5 4 ...

