53
Heater Fuel Pickup Tube Installation (continued)
Alternative Installation – Drilling hole in Fuel Tank
Installing the Fuel Pickup Tube
DANGER: Use caution when working in or around the area of the diesel fuel tank. Diesel fuel vapors are potentially
explosive. Do not smoke while working near the diesel fuel tank.
DANGER: Before drilling into a fuel tank, drain all fuel from the tank. Use nitrogen or an inert gas to purge the
diesel fuel vapors from the tank. Keep the diesel tank filled with inert gas while drilling.
DANGER: Use extreme caution when drilling into a diesel fuel tank. Sparks from an electric drill or drill bit could
cause an explosion.
Special Tools Required
Tape Measure
Drill Motor
¼” Drill Bit
1” Hole Saw
Tubing Cutter
Important Installation Tips
•
Check for internal baffles inside the fuel tank BEFORE drilling any holes.
•
Remove protective caps from ends of pickup tube prior to installation.
•
Do not apply any type of sealant material to the fuel pickup tube assembly. Doing so will result in plugged fuel
lines.
•
The ferrule nut and 1/4" NPT fitting must be tightened securely into the bushing before installing the pickup
tube into the tank. Failure to tighten the fittings will allow the bushing and washer assembly to slide down the
pickup tube and drop into the fuel tank.
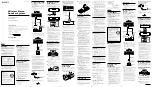
Installation
1.
Measure and mark the mounting holes on the fuel tank as shown.
2.
Drill (2) 0.25" outer holes first followed by the 1.00" center hole.
a.
Thoroughly clean and flush the tank to remove any chips.
3.
Measure the fuel tank diameter and cut the pickup tube 3” shorter.
a.
With the pickup tube positioned at the correct height, place a wrench on the flats of the bushing and
tighten the 1/4" NPT fitting and the ferrule nut securely.
4.
Remove the large nut, metal cupped washer and rubber washer from the bushing assembly.
a.
Insert the fuel pickup tube (with the reinforcing washer) into the tank using the slot created by the two
0.25" holes.
b.
Lift the pickup tube and bushing into position through the 1.00" hole.
c.
Hold the pickup tube in place and reinstall the rubber washer, metal cupped washer, fuel pump
bracket and large nut onto the bushing. Hand tighten the large nut.
d.
Position the pickup tube as needed to facilitate fuel line connections.
e.
Place a wrench on the flats of the bushing and tighten the large nut securely.
5.
Install the supplied warning nameplate onto the fuel tank in a visible area near the fuel cap.
Summary of Contents for TriPac Envidia
Page 2: ......
Page 11: ...9 Battery Box Dimensions Figure 1 Battery Box Dimensions...
Page 12: ...10 Battery Box Dimensions continued Figure 2 Battery Box Dimensions continued...
Page 13: ...11 Evaporator Control Box Dimensions Figure 3 Evaporator Control Box Dimensions...
Page 14: ...12 Condenser with Receiver Drier Dimensions Figure 4 Condenser with Receiver Drier Dimensions...
Page 15: ...13 HMI Dimensions Figure 5 HMI Dimensions...
Page 16: ...14 1000 Watt Power Inverter Dimensions Option Figure 6 1000 Watt Power Inverter Dimensions...
Page 18: ...16 D2 D4 Heater Dimensions Option Figure 8 Heater Dimension...
Page 19: ...17 BLANK PAGE...
Page 21: ...19 Typical Component Locations Figure 9 Typical Component Locations...
Page 45: ...43 A C Duct Installation continued FLUSH MOUNTED EVAPORATOR Figure 21 A C Duct locations...
Page 76: ......
Page 77: ......
Page 78: ......
Page 79: ......