


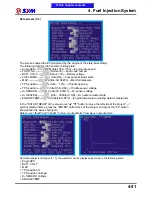
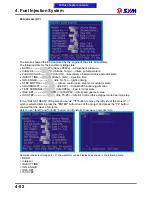


4. Fuel Injection System
4-39
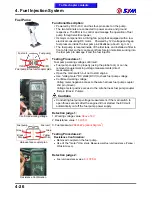
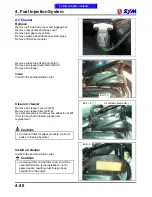
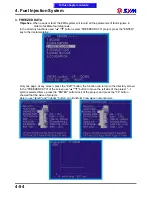
Remove fuel pump/fuel unit
Remove side cover.
Remove rear carrier
Remove rear bodycover.
Remove floor panel.
Remove under cover.
(refer to chapter 14)
Remove fuel pump lines coupler.
Release the fuel tube folder, removed the fuel tube.
Remove the fuel tank fixed bolts (Bolt Ž 3), remove the
fuel tank.
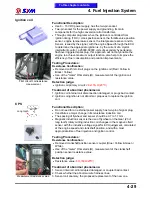
Remove / Install fuel pump and fuel unit
Remove fuel pump
fixed bolts (Bolt Ž 6),
remove fuel
pump.
Install In the anti-demolition order.
Cautions
Then remove fuel pump, fuel in fuel tank
internal to confirm not excessive.
Then install fuel pump and fuel unit, attention
direction.
Confirm whether the fuel filter dirt,
obstructive.
Fuel pump installation, to confirm whether it
is normal to the fuel out (the pressure about 3
kg/cm2).
Bolt Ž 3
Pressure Regulating Valve
Fuel filter
Fuel pump coupler
To this chapter contents
Summary of Contents for Citycom.300i
Page 5: ...Serial Number Home page Contents...
Page 38: ...2 Maintenance Information 2 17 Note To this chapter contents...
Page 46: ...3 LUBRICATION SYSTEM 3 8 Notes To this chapter contents...
Page 106: ...4 Fuel Injection System 4 60 Note To this chapter contents...
Page 173: ...10 AC Generator Starting Clutch 10 10 Notes To this chapter contents...
Page 195: ...12 Cooling System 12 14 Notes To this chapter contents...
Page 223: ...14 Brake System 14 12 Note To this chapter contents...
Page 244: ...17 Electrical System 17 5 FUSE Fuse circuit diagram To this chapter contents...
Page 262: ...17 Electrical System 17 23 Note To this chapter contents...
Page 270: ...19 Electrical Diagram 19 1 Home page Contents LH30W EFi Electrical Diagram 19...


