


9-16 ELECTRICAL SYSTEM
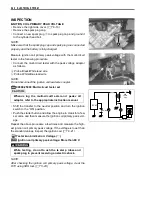
STARTER RELAY INSPECTION
• Remove the seat. (
$
8-6)
• Disconnect the battery
-
lead wire from the battery.
• Remove the starter relay cover
1
.
• Disconnect the starter motor lead wire, battery lead wire and
starter relay coupler
2
.
• Remove the starter relay
3
.
• Apply 12 V to
A
and
B
terminals and check for continuity
between the positive and negative terminals with the multi-cir-
cuit tester. If the starter relay clicks and continuity is found,
the relay is ok.
%
09900-25008: Multi-circuit tester set
6
Tester knob indication: Continuity test (
5
)
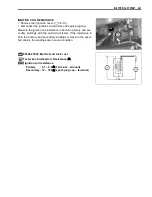
#
Measure the relay coil resistance between the terminals with the
multi-circuit tester. If the resistance is not within the specified
value, replace the starter relay with a new one.
%
09900-25008: Multi-circuit tester set
2
Tester knob indication: Resistance (
Ω
)
&
Starter relay resistance: 3 – 5
Ω
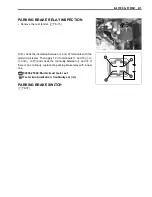
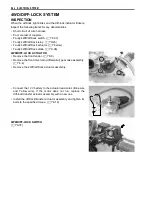
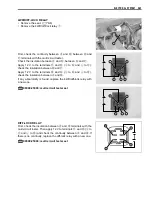
NEUTRAL RELAY INSPECTION
• Remove the seat. (
$
8-6)
• Disconnect the neutral relay.
Apply 12 V to terminals
A
and
B
(
+
to
A
and
-
to
B
) and
check the continuity between
C
and
D
with the multi-circuit
tester. If there is no continuity found, replace the neutral relay
with a new one.
%
09900-25008: Multi-circuit tester set
6
Tester knob indication: Continuity set (
5
)
Do not apply battery voltage to the starter relay for five
seconds and more, since the relay coil may overheat
and get damaged.
Summary of Contents for LT-A450X
Page 2: ...SUPPLEMENTS LT A450XK9 09 MODEL LT A450XK8 12 13 WIRING DIAGRAM 14 ...
Page 47: ...PERIODIC MAINTENANCE 2 29 ...
Page 48: ...2 30 PERIODIC MAINTENANCE ...
Page 63: ...ENGINE 3 7 Remove the engine mounting nuts Remove the engine from the right side ...
Page 215: ......
Page 315: ...7 24 COOLING AND LUBRICATION SYSTEM ENGINE LUBRICATION SYSTEM To cylinder head OIL PUMP ...
Page 316: ...COOLING AND LUBRICATION SYSTEM 7 25 EXHAUST SIDE INTAKE SIDE ...
Page 317: ......
Page 332: ...8 14 CHASSIS REAR CARRIER Remove the rear carrier REAR BOX Remove the rear box 1 ...
Page 417: ......
Page 452: ...9 34 ELECTRICAL SYSTEM HEADLIGHT INSTALLATION Head light coupler Head light R Adjusting point ...
Page 484: ...10 26 SERVICING INFORMATION Rear box Rear fender Right mud guard Left mud guard ...
Page 510: ......
Page 514: ......


