


ENGINE 3-107
#
A
INCORRECT
B
CORRECT
• Install the 2nd ring
3
and the 1st ring
4
to the piston.
NOTE:
1st ring and 2nd ring differ in shape.
• Be sure to bring the concave side of 1st ring to the top when
fitting it to the piston.
• 2nd ring has letter “R” marked on the side. Be sure to bring
the marked side ring to the top when fitting it to the piston.
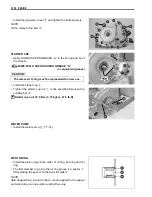
• Position the gaps of the three ring as shown. Before inserting
each piston into the cylinder, check that the gaps are so
located.
A
Exhaust side
B
Intake side
5
2nd ring and lower side rail
6
Upper side rail
7
1st ring and spacer
PISTON AND CYLINDER
• Apply molybdenum oil solution onto the piston pin and small
end of the conrod.
NOTE:
Install the piston with the punch mark
A
on the piston head fac-
ing toward the exhaust side.
+
MOLYBDENUM OIL SOLUTION
When installing the spacer, be careful not to allow its
two ends to overlap in the groove.
120˚
120˚
120˚
Summary of Contents for LT-A450X
Page 2: ...SUPPLEMENTS LT A450XK9 09 MODEL LT A450XK8 12 13 WIRING DIAGRAM 14 ...
Page 47: ...PERIODIC MAINTENANCE 2 29 ...
Page 48: ...2 30 PERIODIC MAINTENANCE ...
Page 63: ...ENGINE 3 7 Remove the engine mounting nuts Remove the engine from the right side ...
Page 215: ......
Page 315: ...7 24 COOLING AND LUBRICATION SYSTEM ENGINE LUBRICATION SYSTEM To cylinder head OIL PUMP ...
Page 316: ...COOLING AND LUBRICATION SYSTEM 7 25 EXHAUST SIDE INTAKE SIDE ...
Page 317: ......
Page 332: ...8 14 CHASSIS REAR CARRIER Remove the rear carrier REAR BOX Remove the rear box 1 ...
Page 417: ......
Page 452: ...9 34 ELECTRICAL SYSTEM HEADLIGHT INSTALLATION Head light coupler Head light R Adjusting point ...
Page 484: ...10 26 SERVICING INFORMATION Rear box Rear fender Right mud guard Left mud guard ...
Page 510: ......
Page 514: ......


