background image

20) 

Pan/User 3 Button

Press to enter Pan Mode. Press shift 
then PAN Button to enter User 3 as 
defi ned in the Setup Menu option 

CL-9: USER 1-4 ASSIGN

See Pan Mode.

21) 

EQ Gain/User 2 Button

Press to enter EQ Gain Mode. Press shift 
then EQ GAIN Button to enter User 2 
as defi ned in the  Setup Menu option 

CL-9: USER 1-4 ASSIGN

.. 

See EQ Gain 

Mode. 

Press EQ GAIN and EQ FREQ But-

tons together to enter Q-Factor Mode. 

See 

Q-Factor Mode.

22) 

EQ Frequency/User 1 Button

Press to enter EQ Frequency Mode. Press 
shift then EQ FREQ Button to enter User 
1 as defi ned in the  Setup Menu op-
tion 

CL-9: USER 1-4 ASSIGN

.. 

See EQ 

Frequency Mode. 

Press EQ GAIN and EQ 

FREQ Buttons together to enter Q-Factor 
Mode. 

See Q-Factor Mode.

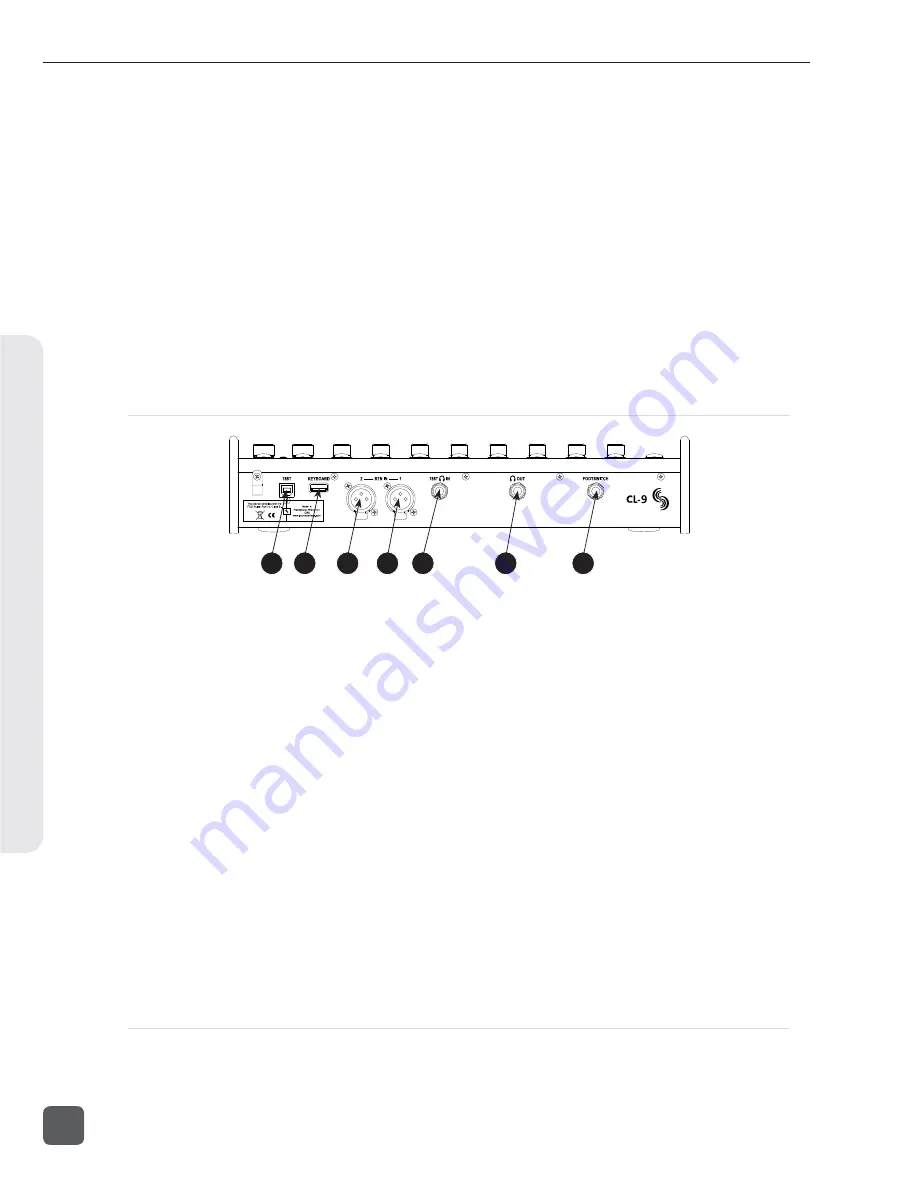
CL-9 Rear Panel Descriptors

1

2

3

4

5

6

7

1) 

788T USB-B Input

For CL-9 operation and power, connect 
to the 788T’s rear panel KEYBD USB-A 
connector.  

2) 

USB Keyboard Input

USB-A female connector for USB key-
boards. This acts as a thru port to the 
788T USB Keyboard Input, which is 
used to connect the CL-9 to the 788T. 
This connector allows for simultaneous 
keyboard and CL-9 use.

3) 

XLR RTN 1

Active-balanced analog line-level input 
for return monitoring. Pin-1 ground, 
pin-2 (+), pin-3 (

).

4) 

XLR RTN 2

Active-balanced analog line-level input 
for return monitoring. Pin-1 ground, 
pin-2 (+), pin-3 (

).

5) 

788T Headphone Input 

1/4-inch TRS stereo unbalanced jack. 
For connecting the 788T Headphone 
Output to the CL-9. Tip = left, ring = 
right, sleeve = ground.

6) 

Line-Level Headphone Output 

1/4-inch TRS stereo unbalanced jack, 
line-level output. Program is identical 
to the CL-9’s front panel Headphone 
Outputs. Tip = left, ring = right, sleeve = 
ground.

7) 

Footswitch Input 

1/4-inch TRS jack with two GPI 
lines. Used to trigger select 788T 
functions. Functionality is as-
signed in the Setup Menu option 

KEYBOARD/LOGIC IN: ASSIGN

CL-9 Fader Control 

The eight 100 mm faders control the fader level of the eight inputs. Faders only have effect on an 
input when it is being sent to a track post-fade. 

788T/788T-SSD User Guide and Technical Information

130

v. 3.01 

Features and specifications are subject to change. Visit www.sounddevices.com for the latest documentation.

Hardw

are Controllers

10

Summary of Contents for 788T

Page 1: ...r Guide and Technical Information for 788T and 788T SSD Recorders Version 3 01 Sound Devices LLC E7556 State Rd 23 and 33 Reedsburg WI USA 1 608 524 0625 fax 1 608 524 0655 Toll Free 800 505 0625 www sounddevices com support sounddevices com UDMA USB 2 0 SATA 2 5 ...

Page 2: ......

Page 3: ...alog and Digital 32 Output Routing 32 Output Types 33 Output Delay 33 Chapter 4 Routing and Mixing Input to Track Routing 34 Pre Fade vs Post Fade 34 Routing Using the Input Settings Window 35 Routing Using the Setup Menu 36 Routing Using The Track Setup Window 37 Routing Using the CL 8 38 Routing Using the CL 9 38 Mix Assist 38 Noise Adaptive Threshold 38 Number of Open Microphone Attenuation 38 ...

Page 4: ...Metering Headphone Output 72 Selecting Headphone Sources 72 Setting Headphone Source Options 72 Headphone Source as Outputs 74 Input Solo PFL 74 MS Stereo Monitoring 75 SoundField B Format Surround Monitoring 75 Rotary Switch Behavior 76 Headphone Favorite Selection 76 Headphone Playback Mode 76 Headphone Warning Tones 76 Headphone Power Up Gain 76 CL 9 Headphone Monitoring 76 Metering and Display...

Page 5: ... Settings 108 CL WiFi Application for Apple iOS 110 Transport View 110 Take List 112 Routing 113 Chapter 10 Hardware Controllers CL 1 Keyboard and Remote Control Interface 114 CL 2 Remote Fader optional 116 CL 2 Connection 116 CL 2 Panel Descriptions 117 Fader Assignment 118 CL 2 Switches 118 CL 8 Controller optional 120 CL 8 Connection 120 CL 8 Front Panel Descriptors 121 CL 8 Side Panel Descript...

Page 6: ...ts with sam pling rates between 32 kHz and 192 kHz The time code implementation makes the 788T ready for any recording job from over the shoulder to cart based production The 788T implements a no compromise audio path that includes Sound Devices high performance microphone preamplifiers Designed specifically for high bandwidth high bit rate digital recording these preamps set a new standard for fr...

Page 7: ... OR ABUSE OF THIS PRODUCT OR UNAUTHORIZED MODIFICATIONS REPAIRS OR ALTERATIONS TO THIS PRODUCT OR FAILURE TO STRICTLY COMPLY WITH SOUND DEVICES LLC S OPERATING AND INSTALLATION INSTRUCTIONS TO THE FULLEST EXTENT PERMITTED BY LAW SOUND DEVICES SHALL HAVE NO LIABILITY TO THE END USER OR ANY OTHER PERSON FOR COSTS EXPENSES DIRECT DAMAGES INCIDENTAL DAMAGES PUNITIVE DAMAGES SPECIAL DAMAGES CONSEQUENTI...

Page 8: ......

Page 9: ...r supply to the DC connector on the Right Panel 2 Attach the supplied Li ion rechargeable battery to the recorder Line up battery contacts with the battery compartment mounting pins Rotate battery lock to secure the battery in place 788T Rear Panel Included L Mount Battery The included battery must be charged for six hours before initial use The 788T will charge the L Mount battery when DC is conn...

Page 10: ...or one second to power on 788T C D E F BFS d 0 ARM BFS d 0 UT PWR REC 6 INPUTS MUST BE ACTIVE TO BE RECORDED Push to release the recessed Input Gain Controls Rotate the knob clockwise past the detent to turn on the input In the full counter clockwise position the input is not active and is not available for use 788T 788T SSD User Guide and Technical Information 2 v 3 01 Features and specifications...

Page 11: ...mic line digital Phantom on mic on line off High Pass Filter on off Limiter on off Input to Track Routing Mute none mute Polarity normal reverse Press adjacent key to change the parameter 8 The Input Settings Window is where changes are made to input parameters Press the TONE key to toggle Phantom Power Choose 48V for microphones Turn the Rotary Switch to adjust the High Pass Filter Frequency MENU...

Page 12: ...ary Switch to route to Tracks A X2 10 Return to the Main Display Momentarily move the Input Selector Switch again 11 Press the MENU key to enter the Setup Menu Various options are configured from the Setup Menu including Sampling Rate Bit Depth Time Code etc Navigate through the Setup Menu by turn ing the Rotary Switch A B MENU HDD R L MENU HDD Setup Menu Basics Highlighted selection Selects highl...

Page 13: ...s at least one active Switched on Input routed to it When the asterisk and blue LED s are flashing the track is enabled but not armed Tracks that enabled but not armed will not be recorded 788T A B C D E F BFS d 0 IN CF EX ARM ARM BFS d 0 INPUT PWR REC R L MENU HDD Track Setup Menu Basics Selector Box Track Status Indicator Input Routing Window Master Levels Window Track to Media Window Meter Togg...

Page 14: ...ast recorded take 15 Press the HDD key to enter the Take List The take list displays a listing of all recordings A B MENU HDD R L MENU HDD Take List Basics Next Take Selected Take Last recorded Take Rename Take Metadata Edit Menu Add Take Notes Exits the Take List Turn the Rotary Switch to navigate through the Take List push to toggle the type of information displayed 788T 788T SSD User Guide and ...

Page 15: ...NE OUTS FW800 FW400 USB BAL AES OUT 1 2 3 4 TIMECODE SYNC WORD VID IN DC IN 10 18V PIN 4 PIN 1 WORD OUT MENU SELECT 1 2 3 4 5 6 UNBAL ANALOG BAL LINE OUTS FW800 FW400 USB BAL AES OUT 1 2 3 4 TIMECODE SYNC WORD VID IN DC IN 10 18V PIN 4 PIN 1 WORD OUT FW400 USB FW800 USB FireWire 400 FireWire 800 To avoid any possible directory corruption on the 788T do not interrupt the connection process Always p...

Page 16: ... move upward through the options and parameters 5 LCD Display Primary display Press and hold the LCD Backlight key and press the Rotary Switch to turn the LCD backlight on or off Press and hold the LCD Backlight key and turn the Rotary Switch to adjust LCD backlight brightness By default the LCD backlight color will indicate the recorder s current mode configurable with Setup Menu op tion LCD BACK...

Page 17: ...roperties and select files for playback From the main screen press and hold the HDD key to toggle the playback source between available media In the Setup Menu use the HDD key to move down through the options and parameters 14 Rewind Key Performs reverse REW scrubbing through the played file when pressed and held in playback and play pause mode Reverse playback rate increases the longer the key is...

Page 18: ... current directory the filename and time display flash to indicate that a new file has been selected One more press of the key exits playback mode Pressing the STOP key whilst in stop mode displays the name of the next file to be recorded in the LCD In the Setup Menu the STOP key is also used to exit from any menu returning to the main display 20 Record Key Press to begin recording The 788T is a r...

Page 19: ...initiate recording after entering this mode and enter cue markers To stop record ing in this mode you must disengage the panel lock and press the stop key Left Panel Connectors and Controls 3 1 2 1 XLR Analog Inputs Channels 1 4 Active balanced analog microphone or line level input for inputs 1 4 on XLR con nector Input type is set within the Input Settings Window Pin 1 ground pin 2 pin 3 2 TA3 An...

Page 20: ... computer Mac OS Win dows to access the internal hard drive and CompactFlash volumes as mass stor age devices or for extended display and control of the 788T using Wave Agent See Wave Agent for details 6 Sync Input This BNC is used to connect an external video sync or word clock reference signal for word clock purposes Accepts NTSC PAL and Tri level video syncs as well as word clock rates between ...

Page 21: ... Compatible with Type I Type II and MicroDrives High speed UDMA cards are recommended for higher track count recording 4 Battery Mount Accepts Sony InfoLithium L Series bat teries Also accepts batteries conforming to this mount Numerous capacities from 1500 to 7000 mAh are available 5 Multi Function DE 15 Connector Mates with Sound Devices XL 88 Multi Pin Breakout Cable The DE 15 connector acts as...

Page 22: ...ing display between the set date and time of the 788T This information is written as the creation and modification date for generated audio files 7 External Digital Clock Indicator This display will show when the 788T is locked to a valid external sync source sync reference is user selectable in the Setup Menu The display will indicate the current valid sync source D digital input W word clock V v...

Page 23: ... If a file has time code information embed ded the playback frame rate is indicated If external time code is connected and the external rate differs from the rate set internally the display will flash 13 Bit Depth Indicator Shows the set record bit depth In play back shows the file bit depth 14 Meter Toggle Press the soft VU LCD Backlight key to toggle between VU1 VU2 and A H views VU1 displays Tr...

Page 24: ...eadphone Gain Level When the headphone gain is adjusted this will appear and indicate the gain level in dB 17 Slate Mic Gain Level CL 8 only Slate Mic gain level is adjusted from 46 to 6 dB in 1 dB increments To attenuate the gain press and hold the CL 8 SLATE button and turn the Rotary Switch 18 Media Track Count Display toggles between remaining time and track count when media is set to receive ...

Page 25: ...ndication Press and hold the Input Selector Switch for five or more seconds to latch Input PFL To exit the PFL monitor ing select another input with the Input Selector Switch or rotate the Rotary Switch This mode only applies when the INPUT PFL FUNCTION is set to enabled 5 High Pass Filter Indicates the state of the High Pass Filter and the cut off frequency selected Control the High Pass Filter b...

Page 26: ...ttings Window cannot be ac cessed if the Input s Gain Pot is switched to Off Track Setup Window The Track Setup Window allows a user to record enable or disable tracks route inputs to tracks adjust master gain levels and route tracks to media Press the front panel INPUT key to access the Track Setup Window There are four views of the Track Setup Window Track Level Meters View Track Routing View Ma...

Page 27: ...off when the track is disabled 2 Track Level Meters Displays all twelve available track Level Meters Meter ballistics settings are iden tical to the front panel Track Level Meters and are adjustable within the Setup Menu 3 Track Routing View Press the Rewind key to access the Track Routing View 4 Master Gain Levels View Press the Play key to access the Master Levels View 5 Track to Media View Pres...

Page 28: ...t appears if the MEDIA Fast Forward Key is selected 9 10 9 Track to Media Routing Displays which media the given track will be recorded to Rotate the Rotary Switch to move the selector box Press in on the Rotary Switch to toggle the routing of the track to CompactFlash Internal Drive or External media respectively Tracks will only be written to a given media if it is selected in the Setup Menu opt...

Page 29: ... as shown Gain is adjusted from 60 to 15 dB in 1 dB increments using the Rotary Switch or the soft up and down arrows Press in on the Rotary Switch to return to unity gain 0 dB 17 Meters Press the soft METERS Play key to re turn to the Track Level Meters View 18 AUX Master Gain Level Displays gain level applied to the Aux Tracks Only one bar is displayed when tracks are linked as a stereo pair Two...

Page 30: ...g information can be toggled through by pressing in on the Rotary Switch Beginning Time Code Stamp Time of File Creation Date of File Cre ation Scene Names Drives Containing the File and Folder that Contains the File 6 DRV Drive Directory Press the soft Drive HDD key to access the Drive Directory File Viewer 7 RENAME Press the soft RENAME Rewind key to access the file metadata rename window 8 EDIT...

Page 31: ... if Take 11 is selected 13 15 14 13 Take Appears when the Take is selected Pressing the Take Rewind key will decrement the take number If the take number is decremented to match the name of the last file recorded the False Take prompt will appear 14 Done Pressing the soft DONE PLAY key saves the increment decrement settings for the next take to be recorded 15 Take Appears when the Take is selected...

Page 32: ...the Rotary Switch The highlighted file will display file properties and additional file information Press play to immediately playback the select file 4 Additional File Information Displays additional information of the currently selected file The information displayed is determined by the state of the File Information Toggle 6 5 Time and Date Display toggles between date of file creation and time...

Page 33: ...d media The time available is dependent on user setup 14 Media Size Displays the media size for the highlight ed media 15 Drive Directory Options Menu Press the soft Options Fast Forward key to access the Drive Options Menu The following drive functions are performed in the Drive Options Menu Rename Set Clear Copy Flags Empty Trash and False Takes Erase format Panel and LCD Descriptions 2 788T 788...

Page 34: ... 9 is attached Select ing Fader Control changes the eight front panel Input Gain Controls to adjust the fader level on an input Trim levels are now set using the Rotary Switch from within the respective input s Input Settings Window Pressing in on the Rotary Switch will toggle between Trim control and High Pass Filter control When Input Enables Only is selected the Front Panel Controls turn the in...

Page 35: ...ing settings Input Type Phantom Power High Pass Filter Input Gain Trim and Fader Input Limiter Input Polarity Input Mute Input Routing Mix Assist To enter the Input Settings Window press the desired input s Front Panel Input Selector Switch The Input Settings Window will latch on this allows for one handed operation of the 788T If momentary action is desired press and hold the Input Selector Switc...

Page 36: ...is set to Fader Controls pressing the Rotary Switch will toggle between Trim and High Pass Filter control Filter slopes of 6 dB and 12 dB per octave are selectable in the Setup Menu and will apply to all inputs where the high pass filter have been engaged Input Gain The gain display will toggle between trim and fader levels if applicable If the Setup Menu op tion INPUT FRONT PANEL CONTROLS is set ...

Page 37: ...ogram material slightly before the threshold about 6 dB for a more gradual tape like sound Inputs can have their limiters linked or grouped according to the Input Linking settings This is ideal for working with stereo or surround sources See Input Linking Input Limiters are disabled when set to record at high sampling rates 48048 Input Polarity Input Polarity inversion sometimes referred as phase ...

Page 38: ...trol the post fade signal level of the linked pair and the even fader will be disabled MS Linking Mid side MS matrixing is a method for processing audio signal from a cardioid microphone and a bidirectional microphone into a stereo signal The cardioid microphone is the mid signal and con nects to input 1 and the bidirectional microphone is the side signal and connects to input 2 The cardioid micro...

Page 39: ... The gain adjustment is controlled in the 788T digital domain Never apply digital phantom to unbalanced digital inputs as this can result in damage to the hardware The 788T can lock its sample clock to a single AES42 digital microphone signal This is set from the Setup Menu option REC SYNC REFERENCE to the corresponding digital inputs When the 788T is set to use its internal clock any connected in...

Page 40: ...th the six outputs Output Routing The audio sources for each output bus are set in the Setup Menu option OUTPUT ROUTING Rotat ing the Rotary Switch will move the highlight box amongst the available sources Pushing the Rotary Switch will toggle the routing status of the highlighted item The Menu and HDD buttons will scroll the view up and down to access other outputs The chart below shows the audio...

Page 41: ...onnector with nominal level of 10 dBV This level can be adjusted in the Setup Menu from 40 to 0 dB in 1 dB increments Balanced Digital AES Outputs 1 6 Balanced AES outputs 1 4 are on TA3 connectors on the right side panel Balanced AES outputs 5 6 are on the DE 15 connector on the rear panel See Connector Pin Assignments These outputs are com patible with most AES3 and S PDIF inputs The format for ...

Page 42: ... is Armed for Recording At Factory Default inputs are sent to Tracks L and R Post Fade and Tracks A X2 Pre Fade L R A B C D E F G H X1 X2 Inputs 1 2 3 4 5 6 7 8 Pre Fade vs Post Fade Inputs can be assigned to tracks either pre or post fade Pre fade tracks are fed the respective input s audio signal immediately following the Trim level stage of the signal path Fader adjustments have no effect on pr...

Page 43: ...ut 1 is currently assigned to Track L 2 To make edits to the input to track assignments press the Play key 3 Route or un route the input to Track L and Track R by pressing the Rewind and Fast Forward keys respectively Route or un route the input to Tracks A X2 using the Rotary Switch Scroll through the assignable tracks by turning the rotary switch To route or un route the input to tracks press in...

Page 44: ...NPUT key to cycle through the preset input to track routing combinations These presets are factory set and cannot be changed The last three preset selections are CUSTOM ROUTE options Press the EDIT soft key to enter the custom rout ing menu Custom routing allows any input to be assigned to any track In the menu highlighted input and track combination are displayed in white text The eight inputs ar...

Page 45: ...ss the Play key to toggle between pre and post fade routing per input Pre and post fade assignments are applied to all inputs routed to that track 6 Once a track is assigned move to the next input to track combination desired 7 To remove an input to track combination assignment navigate to that combination and press the UNASSIGN LCD Backlight soft key or the Rotary Switch 8 Exit and complete the a...

Page 46: ...ithin 1 mS to ensure that no syllables are lost and then will gate off smoothly over 500mS This gating action is smooth and imperceptible when switching between microphones Mix Assist will allow sev eral microphones to be open simultaneously if there are several talkers Mix Assist does not limit the number of open microphones Mix Assist is more sophisticated than a simple gate and uses four differ...

Page 47: ...cted Mix Assist attenuation is applied to the tracks L and R only This allows the user to simultaneously create both a mix assisted mix on tracks L and R and a manual mix on any other track set to post fade When ON ALL TRACKS FOLLOW LR is selected Mix Assist enabled inputs routed to post fade tracks will be attenuated by Mix Assist The input activity LED ring will light bright green to indicate an...

Page 48: ...t recording are lined out in the menu list During recording subsequent presses of the REC key can perform one of three Setup Menu selected actions no action new cue cue markers are set within the file being written new file a new file is started with each press of the REC key the take counter increases by one Pre Record Buffer To prevent missing record cues or up cutting takes the 788T has a pre r...

Page 49: ...MER START then set the record stop time in the Setup Menu option REC TIMER STOP The 788T will boot up and start recording when the timer start time elapses Track Arming The 788T only records tracks that are armed Armed tracks are tracks that are both record enabled and have active inputs routed to them Track Enabling is controlled in the Track Setup Menu To en able a track for recording perform th...

Page 50: ... on Track is not routed to a media in the Track to Media menu Solid Track is Armed enabled and will be recorded Track has been enabled in the Track Setup Window or by pressing the CL 9 Track Button and there is one or more ac tive inputs routed to it Track to Media Routing From the Track to Media View tracks are individually assigned to CompactFlash Internal Drive or External media This is extreme...

Page 51: ...uting status of a media Master Gain Levels The master gain levels are controlled independently for the Left Right X1 and X2 Tracks The Left and Right tracks and the X1 and X2 Aux Tracks can be linked allowing one level control for both tracks of the pair Levels are adjustable from 60 to 15 dB in 1 dB increments The master gain level is applied to the Tracks prior to recording This allows the Sound...

Page 52: ... reduction equally to both tracks of the pair LINKED is recommended when recording stereo program so that level changes are identi cal on both tracks ON is recommended when using the tracks of the pair as two separate buses Track Limiter activity is displayed in the Master Gain Levels Window Track Limiter Indicators will appear when the Track Limiters are engaged When Limiters are LINKED the indic...

Page 53: ...quency 2 Higher sampling frequencies allow for wider audio bandwidth The 788T generates the following sampling rates 32 kHz 44 1 kHz 47 952 kHz 47 952 kHz F Mode 48 kHz 48 048 kHz 48 048 kHz F Mode 88 2 kHz 96 kHz 96 096 kHz 96 096 kHz F Mode 176 4 kHz 192 kHz See Time Code for more information about F Mode sample rates Considerations When Recording With High Sample Rates Increasing the sample rat...

Page 54: ...ed Tracks are indicated by an asterisk and disabled Tracks have no aster isk 4 Press the ROUTING Rewind key to access the Track Routing View 5 Using the Rotary Switch navigate the track routings removing all routing on Tracks C through X2 Tracks C D E F G H X1 and X2 must have no inputs routed to them 6 Press the Stop key to return to the Main Screen 7 Access the Setup Menu option REC SAMPLE RATE ...

Page 55: ...n WAV The 788T writes AES 31 Broadcast Wave formatted files The audio files created by the 788T include additional information Metadata in the file s header BEXT Broadcast Audio Extension and iXML data chunks See Appendix 2 Metadata Implementation Software that does not recognize these ad ditional broadcast wave data chunks will simply ignore them File Type The 788T has two file type options for r...

Page 56: ...nic file names are S01T01_1 wav S01T01_2 wav S01T01_3 wav S01T01_4 wav and the take name is S01T01_X wav scene number take number extension mono file designator S01T01_1 WAV Scene Name Numbering Scene names are selected for use from a scene name list This list is managed in the Setup Menu op tion REC SCENE NAME NUMBER Any number of scene name lists can be generated and these can be made up of any ...

Page 57: ...ter After the ninth character is entered the scene name is automatically saved If all characters are removed no scene name will be written to files Scene Name Incrementing Decrementing Scene Names can be quickly incremented from the main screen by pressing and holding the Stop key and then the Fast Forward key See Front Panel Button Shortcuts Scenes will be incremented by either alpha characters A...

Page 58: ...soft Scene Fast Forward key to increment the scene name from WILDCAT1T02 WAV to WILDCAT2T01 WAV 5 Press the soft Done Play key 6 The name of the next take will be displayed on the top line indicated by the n 788T 788T SSD User Guide and Technical Information 50 v 3 01 Features and specifications are subject to change Visit www sounddevices com for the latest documentation Recording and Playback 5 ...

Page 59: ...s character is used to designate mono tracks when recording mono WAV files can cause confusion 3 The Rotary Switch or the soft keys are used to choose characters numbers Press the soft Check Mark TONE key or press in on the Rotary Switch to save the character and move to the next position From the Setup Menu the action for take resetting is controlled by the following options Never take numbers do...

Page 60: ... to the FALSETAKES folder When record ing to internal drive CompactFlash and external FireWire storage devices files determined as False Takes will be moved to the FALSETAKES folder on each storage media that the file has been writ ten to This folder sits in the drive root False Takes will remain on the drive until the FALSETAKES folder is emptied Emptying the False Take Folders Files that have be...

Page 61: ...red The chart below details the supported metadata parameters iXML Metadata stored in the Broadcast Wave iXML chunk bEXT Metadata stored in the Broadcast Wave bEXT chunk FMT Metadata stored in the Broadcast Wave Format chunk supported blank not supported Metadata Type Notes U Entered by User M Automatically Entered by the Machine Read Write General Information Project iXML U via Folder Options men...

Page 62: ...s a list of every Polyphonic or Monophonic take that has been recorded on the 788T The name of the take is displayed on the left side of the Take List The right side of the Take List displays additional file information Press the Rotary Switch to toggle the type of information displayed Each press will toggle between the following information Beginning time code stamp Time of file creation Date of...

Page 63: ...y Take Edit Menu From this menu the user can perform the following edit operations while the recorder is in Standby or Record modes Notes Rename Circle Project Scene Take Tape Roll Set Copy Flag Clr Copy Flag Delete sends file to the Trash Post record only Load Settings Rename Tracks When Notes Circle Scene or Take are edited on a C Link master unit with Setup Menu option CONNECTION MODE set to C ...

Page 64: ...y Renaming Takes Takes can be renamed in the Take Edit Menu during and after recording Renaming a take renames its associated files and updates their embedded metadata Edits made to the Take name are applied across all media and associated mono files The new name can be up to 26 characters in length in cluding the WAV extension Duplicate Takes In the event of a duplicate take name the 788T will de...

Page 65: ...EXT and IXML data chunks Scene Scene name edits can be made during and after recording Any changes to the Scene name are ap plied to both the file name and the Scene tag in the iXML and bEXT chuncks Take Take number edits can be made during and after recording Any changes to the Take are applied to both the file name and the Take tag in the iXML and bEXT chunks Tape Roll Edits can be made to the T...

Page 66: ...ghlight and select the Delete option 5 The Confirm Take Delete window appears Select which drives the file should be deleted from using the soft CF HDD and EXT Rewind Play and Fast Forward keys The take will be deleted from any drive that is highlighted 6 For example if the file WILDCAT2T01 WAV is to only be sent to the EXT drive Trash Folder press the soft CF and HDD Rewind and Play keys to desel...

Page 67: ...e previous current and upcoming takes See Wave Agent Control for details CL WiFi Metering and Display With a CL WIFI accessory connected to the C Link in jack an ad hoc wireless connection can be es tablished between the 788T and any Apple iOS device The CL WiFi application running on the iOS devices can be used to enter or edit various metadata fields for the previous current and upcoming takes S...

Page 68: ...e CURRENT SELECTION Sample Rate Sample rate of recorded audio Options are Current Selection At time of report generation or None CURRENT SELECTION Frame Rate Timecode frame rate Options are Current Selection At time of report generation or None CURRENT SELECTION Bit Depth Bit depth of recorded audio Options are Current Selection At time of report generation or None CURRENT SELECTION Tone Level The...

Page 69: ... Track to Media routing It is also possible to generate a single sound report in a single folder 1 Press the HDD key to access the Take List 2 Press the soft DRV HDD key to access the Drive Directory 3 Use the Rotary Switch to highlight the desired folder 4 Press the soft Options Fast Forward key to access the Drive Directory Options Menu 5 Select the Create CSV option from the list A message will...

Page 70: ...directories Navigate to the appropriate directory Select the file that is desired for play back with the Rotary Switch and press the PLAY key The current playback media is indicated by the highlighted white type on black background media descriptor on the left hand side of the main LCD display Regardless of the directory selected for playback when the REC key is pressed the 788T will revert to the...

Page 71: ...T s internal sample rate The 788T word clock output is always active Connect the 788T s WORD OUT to the slave device s WORD INPUT AES Digital Outputs AES digital outputs provide both PCM audio data and word clock within the same stream A com patible slave device can derive its reference clock from this stream at the same time as receiving the digital audio This is ideal for recording the digital o...

Page 72: ... not appear Video Sync The 788T can lock to valid video sync sources including composite NTSC PAL and Tri level con nected to the Sync Input connector If valid video sync is detected V is displayed in the LCD If no valid video sync is detected the input activity LED rings will flash yellow and the Lock indicator V does not appear Digital Inputs 1 2 3 4 5 6 7 8 The 788T can be set to derive word cl...

Page 73: ...ystal to maintain the date time of the unit This time code battery is charged from internal or exter nal power whenever the 788T is powered up If the time of day clock is reset during the production day or if the time code mode is changed from 24 hour run to another mode and back the time code value will change You must re jam all time code devices to ensure proper synchronization File based recor...

Page 74: ...of any file This is useful when the wrong Frame Rate was selected at the time of re cording See Wave Agent Beta for more details F Sampling Rate Modes 48 048k and 48 048kF The 48 048kF mode F stands for fake faux Fostex take your pick is a specific compatibility mode for use with the Fostex DV40 software 1 74 and previous Avid Final Cut Pro and other post pro duction environments that do not recog...

Page 75: ...Both 96 096 and 96 096kF settings use a record sampling rate of 96 096 kHz 0 1 higher than 96 kHz The 96 096F mode is a rarely used workflow and should only be selected if specifically requested by production It is essentially the high sampling rate version of 48048F mode The takes are recorded at 96 096 kHz but are stamped at 96 kHz Additionally in 96 096F mode the time code rate is restricted to...

Page 76: ...ing is stopped This is appropriate when dual system sound is used with video cameras set for Rec Run time code The video camera will function as master time code and the recorder transport will follow the video camera transport Ext TC cont Auto Record The internal time code generator follows the external time code signal appearing at the time code input When external code advances the 788T enters ...

Page 77: ... the Stop key 5 Begin rolling time code from the master time code source 6 The 788T recorder will display the Record Pending message immediately after detecting a time code signal 7 When the selected Hold Off value has elapsed the 788T will begin recording Things to consider when using Time Code Hold Off This feature only applies to Ext TC Auto Record and Ext TC Cont Auto Record modes If Pre Roll i...

Page 78: ...ernal generator user bits and frame rate are shown at the bottom of the screen To jam the 788T from an external value press the JAM soft key TONE key or the Rotary Switch The screen will display JAMMING Once the 788T is jammed to the external time code the external and internal numbers will match and run in sync no valid time code is received If the 788T does not receive valid time code from the s...

Page 79: ...elected user bit mode NOUSEREDITS will appear in the screen NTSC Standard Def Video Production NTSC video uses a frame rate of 29 97 frames per second Thit leaves 108 frames per hour unac counted To keep 29 97 time code in sync with clock time the concept of drop frame was de vised Two frames are dropped at the beginning of each minute that is not divisible by 10 54 x 2 108 To sync the 788T time c...

Page 80: ...one routings will be available when turning the Rotary Switch Headphone monitoring sources can be set from various preset combinations of inputs and tracks including stereo MS decoding and SoundField B Format surround decoding The order of monitor sources is also user selectable To set the available headphone source options 1 Enter the HP MONITOR MODES Setup Menu option Once you enter the Monitor ...

Page 81: ...e M mid and S side track pairs Highlighted media is source of monitor program During playback will function as MS track monitor Inputs 1 4 Inputs 1 6 Inputs 1 8 Combinations of summed inputs appear in each ear Tracks LA RB Tracks LAC RBD Tracks LACE RBDF Tracks LACEG RBDFH Tracks LACEGX1 RBDFHX2 Tracks LRAB Tracks LRABCD Tracks LRABCDEF Tracks LRABCDEFGH Tracks LRABCDEFGHX1X2 Tracks LR Tracks LRA ...

Page 82: ... of the headphone monitor can be selected as an output source This al lows the user to send the selected headphone monitor source to third party devices Output muting and the Headphone Volume control have no effect on the signal at the outputs Headphone program is sent to the outputs before the CL 9 is introduced in the signal path Input Solo PFL Inputs are quickly soloed pre fade listen in headph...

Page 83: ...udio the 788T headphone monitor can decode the B format signal into L R stereo The 788T constructs a stereo signal using the W X and Y signals of the B format The Z axis signal is not used Similar to the 788T s MS stereo monitoring the stereo width is fixed for headphone monitoring To record and monitor B format signals connect signals as follows SoundField 788T Resulting File Name for monophonic ...

Page 84: ...e reported on the LCD The output level of the warning bell can be adjusted from Off or 60 to 12 dBFS in the Setup Menu option HP WARNING BELL LEVEL Recording Start and Stop Bells If enabled in the Setup Menu option HP RECORD STOP BELL the start of recording can be indicated audibly by a single 440 Hz tone sent solely to headphones When recording is stopped two 220 Hz tones will be sent to the head...

Page 85: ...ent Meter View is displayed in the lower right corner of the LCD Display VU1 A B C D E F 0 ARM ARM 0 R L Track L Track R Track F Track D Track E Track B Track A Track C VU2 A B C D E F S 0 ARM ARM 0 R L Track L Track R Track X2 Track H Track X1 Track B Track A Track G A H A B C D E F 0 ARM ARM 0 R L Track A Track E Track B Track F Track D Track H Track C Track G Meter Scale There are two factory m...

Page 86: ...rd key 5 Each LED is represented by a square box Use the Rotary Switch to adjust the value for each LED The 788T prevents entering a greater value than the LED to the left and a lower value than the LED to the right To move to the adjacent square press the Rewind and Fast Forward keys respectively 6 Press the soft check mark Tone key to save the settings and exit the meter scale setup 7 Highlight ...

Page 87: ...avorite scale should have an asterisk following its name in the list Digital Meter View All 12 track meters can be viewed at the same time from the Track Setup Window To enter the Track Setup Menu press the INPUT key The metering ballistics and peak hold time settings are defined in the Setup Menu and apply to both the Front Panel Output Meter and the Digital Meter View Meter Ballistics The output...

Page 88: ... peak LED will hold its position for the selected duration from 0 to 5 seconds in 1 second increments This allows for easy viewing of peak values that could otherwise go unnoticed Input Activity Ring LEDs The LEDs surrounding the Input gain pots indicate the input activity for each input respectively The LEDs illuminate in various colors and intensities to represent the state of each input Green s...

Page 89: ... from being inadvertently record ed Tone can be activated while recording by following these steps 1 Enter the Setup Menu option FILE MARKER MODE and set it to disabled 2 Press the REC key to begin the recording 3 To record tone Press and hold down the REC key then press the TONE key To latch tone press and hold the Tone key for 2 seconds press again to release Once tone is generated the REC key c...

Page 90: ...is selected in the Setup Menu option REC RECORD INDICATOR CL 2 Metering and Display The CL 2 is an optional one channel remote fader for the 788T The CL 2 displays Post Fade Signal activity Post Fade Limiting activity Media Activity status Input Solo Input Mute status and Record status See CL 2 Remote Fader for more details CL 8 Metering and Display The CL 8 is an optional mixing control surface f...

Page 91: ...ings See Wave Agent Control for details CL WiFi Metering and Display With a CL WIFI accessory connected to the C Link in jack an ad hoc wireless connection can be established between the 788T and any Apple iOS device The CL WiFi application running on the iOS devices can be used to display 788T track metering time code and various other settings See CL WIFI for details Monitoring and Metering 7 78...

Page 92: ...ate and time code are unrelated 1 Enter the Setup Menu option TIME DATE SET 2 Set the current time and date using the navigation below soft keys increment and decrement time and date controller can be turned as well advances to the next selection returns to the previous selection Once set the time and date clock will be maintained indefinitely Folder Actions All files generated by the 788T can be ...

Page 93: ...KES SOUNDDEV TRASH PROJECT 07Y01M15 SCENE NAMET01 WAV NAMET02 WAV The FALSETAKES SOUNDDEV and TRASH folders are automatically generated SOUNDDEV is not viewable from the 788T File Viewer A TOP LEVEL folder sits in the root directory This folder can be negated by choosing None in the menu File Folder Options These two files are title NAME in the menu Rec Scene Name Number This is a TOP LEVEL folder...

Page 94: ...en simply press the HDD key twice 3 Use the Rotary Switch to scroll through files and folders Select at the top of the list to move up one menu level For quick access to the Root Directory press the soft MENU key 4 Select either HDD CF or EXT and scroll down through the directory to the required file Should CF or EXT not be connected the media will be crossed out in the media select screen Larger ...

Page 95: ...nu 4 Select Rename 5 Rename the folder and press the soft Check Mark TONE key to save the new file name Set and Clear Copy Flags Copy Flags are useful for selecting various takes to be copied from one media to another By default Takes recorded by the 788T have their Copy Flag set to On If the Setup Menu option FILE COPY FLAG RESET is enabled the Copy Flags will automatically clear after the file h...

Page 96: ...s across all available media Delete must be performed within the Take List See Take Edit Menu for more details File Options Menu The File Options Menu is accessed by pressing the soft OPTIONS FAST FORWARD key for any file in the Drive Directory User Settings can be recalled from any WAV file recorded by the 788T post firmware revision 2 18 See Saving and Recalling User Settings Drive Directory Opt...

Page 97: ...the Take List To set or clear Copy Flags from the Drive Options Menu 1 Select a media or folder in the Drive Directory 2 Press the soft OPTIONS FAST FORWARD key then choose Set Copy Flag or Clr Copy Flag respectively If the media or folder contains sub folders the 788T will display the following prompt Emptying the Trash Files and folders that have been moved to the Trash or False Takes folders ca...

Page 98: ...all data on the drive has been copied or is no longer needed 2 Press the HDD key to access the Take List 3 Press the soft DRV HDD key to access the Drive Directory 4 Press the soft MENU key to access the Root Directory 5 Use the Rotary Switch to highlight the desired media to be formatted 6 Press the soft Options Fast Forward key to access the Drive Directory Options Menu 7 Select the ERASE option...

Page 99: ...pecification can be substituted for the factory hard drive When choosing a substitute hard drive note that higher RPM hard drives draw more current reducing battery run time Higher speed drives may be used with the 788T however they will not significantly improve performance They will slightly increase transfer throughput with the penalty of increased current draw and reduced battery run time The ...

Page 100: ... internal drive When to Use CF The key benefits of CompactFlash include wider temperature range capability than hard drives greatly increased shock immunity versus hard drives convenient portable removable media ubiquitous card readers and transfer tools more power efficient than hard drives and solid state drives Formatting Upon insertion of an unformatted or non FAT32 formatted CF card the 788T ...

Page 101: ... Transfer to a Computer In host mode an attached FireWire storage volume such as a hard drive or DVD RAM can be used to record and play back audio files Because the 788T can write to all available mediums simultaneously the ability to write to an external drive reduces the need for post record copying of sound files External hard drive is attached When to Use External FireWire Drives The key benef...

Page 102: ... 702 702T 722 and 744T recorders The power conditioning circuitry is integrated into the 788T s design Qualified Drives External FireWire storage volumes that can be formatted and addressed as FAT32 can be used with the 788T These include External hard drives bus powered or mains powered Drives as large as 2 TB can be ad dressed FireWire CompactFlash card readers DVD RAM drives DVD RAM Drives DVD ...

Page 103: ...rive Before selecting individual takes to be copied make sure that all other Copy Flags have been cleared on that drive Select takes to be copied by setting their Copy Flags Then copy flagged files from one media to another in the Setup Menu option File Copy Files The following tech note is a step by step descrip tion of how to copy individual files from the internal drive to the CompactFlash usin...

Page 104: ...other file utility files can be copied read and deleted directly to and from the 788T internal drive The 788T FireWire ports automatically detect whether the 788T is connected to a computer for FireWire file transfer or to an external drive The USB connection serves two purposes It can be set in the Setup Menu option CONNECTION MODE to connect to a computer as a mass storage device or to connect t...

Page 105: ...e drive icons to the trash On Windows platforms use the Eject Safely Remove or Disconnect External Media icon in the system tray To disconnect the 788T from the computer 1 Make certain that any software applications that reference the 788T drive are closed and that all file copy functions to and from the 788T have completed 2 In Mac OS X highlight the drive icon on the desktop and select e to ejec...

Page 106: ...788T 788T SSD User Guide and Technical Information 98 v 3 01 Features and specifications are subject to change Visit www sounddevices com for the latest documentation File Management and Storage 8 ...

Page 107: ... REWIND Arrow in all menus Custom Route User Interface Un assign Route Time Menu Moves to previous field Right Arrow Mirrors the LCD FAST FORWARD Arrow in all menus Custom Route User Interface Assign Route InRoute User Interface Edit if on Custom Route File User Interface Selects Options for Folders Files when displayed Shortcut Edit User Interface Edit shortcut if on shortcut number Scene Track L...

Page 108: ... Saves and exits Only when Carriage Return is permitted Insert Inserts a space character when permitted Escape Cancel Exits without saving in both menus Up Arrow Increment Character in both menus Down Arrow Decrement Character in both menus Left Arrow Previous Character in both menus Right Arrow Next Character in both menus Home Goes to the beginning of the string being edited End Goes to the end ...

Page 109: ... for multiple shortcuts the shortcut with the lowest number will take precedence Shortcut List Functionality The shortcut list is a user definable list of keyboard keys Logic In that perform specified actions The actions that a keyboard key can perform are listed in the below table Action Function Momentary Key Simulates selected button Can simulate in any menu Toggle Key Toggles the state of sele...

Page 110: ...ing an external Record LED or relay directly via a suitable resistor The Logic output is able to source or sink up to 500 mA The logic output pin can be set to go high or low when record is initiated on the 788T This setting is maintained in the Setup Menu option LOGIC OUT ASSIGN Logic Out Assign Setting Logic Output Voltage in Record Mode DC potential at Pin 8 of DB 15 connector referenced to Cha...

Page 111: ... both when the master and slave max file size is met Pressing record on the master when Setup Menu Option FILE MARKER MODE is set to NEW FILE closes the file and begins a new recording on both the slave and the master To ensure accurate start and stop times across all units in the chain set all recorders in the chain to the same file type format Also set Setup Menu option REC FILE TYPE on the mast...

Page 112: ... 7 Press Record on the master recorder All units in the chain will enter record Press stop on the master to stop the recording of all linked recorders The slave units will display the following message 8 Wait for the above message to disappear before pressing record again on the master If record is pressed while the Media Notification is displayed the slave units may not receive the record command...

Page 113: ... on the slave unit This behavior can be disabled with Setup Menu option REC REMOTE TRACK NAMING When the slave unit is intended to be a mirror backup of the mas ter unit i e The audio program on each track of the master is identical to the audio program on each respective track of the slave unit remote track naming should be enabled on the slave unit When the slave unit is intended to serve as add...

Page 114: ... following steps to connect the 788T to Wave Agent Beta 1 Make certain that you are running the latest revision of 788T firmware and Wave Agent Beta software 2 Enter the 788T Setup Menu option CONNECTION MODE 3 Select the CONNECT TO WAVE AGENT USB ONLY option 4 Connect a USB cable to the 788T USB B port and to a USB A port on the computer 5 Launch Wave Agent Beta 6 Click on the Wave Agent Mode pul...

Page 115: ...in its range The default SSID of the CL WIFI is CL WIFI If no other wireless access points with the SSID of CL WIFI will be in use within range of the CL WIFI that is being configured it is not necessary to change the SSID of the CL WIFI Creat ing a unique SSID will help avoid potential conflicts with other wireless access points within range Entering the Setup Menu option CL WIFI CONFIGURE will a...

Page 116: ...re the device s wire less settings 3 If Wi Fi is set to Off touch the button to turn it on and wait for a list of available Wi Fi ac cess points 4 Touch the access point in the list that has the SSID of the CL WIFI interface If no WEP se curity has been enabled on the CL WIFI skip to step 5 If WEP security has been enabled on the CL WIFI you will be prompted for the 10 character passphrase that was...

Page 117: ...iOS device is not connecting properly to the CL WIFI refer to the following points Make certain that the CL WiFi application is not running on the iOS device before entering the 788T Setup Menu option CL WIFI CONFIGURE Make certain that the CL WiFi application is not launched while the 788T is in the Setup Menu option CL WIFI CONFIGURE or any of its related screens Set the SSID of the CL WIFI to s...

Page 118: ...ta On the iPad the Transport view also allows for editing the Scene Take Notes and Circled metadata of the current and next take After pressing Record wait for the spinning icon to go away before pressing Stop or Record again Editing track names and tracks enabled status is done in the Transport view on the iPad and through the Track view on the iPod and iPhone To access the Track view on the iPod...

Page 119: ...en abled but not armed are indicated in blue To change the enabled status of a track on the iPad first ensure that the Name Enable mode is set to Enable by touching the Track Enable button In Enable mode touch the track to change its enabled status This action is performed in the Track view on the iPod and iPhone Tracks that are enabled will only be armed and recorded if at least one powered on in...

Page 120: ...rmation is displayed on the right side of the screen next to the take list Editing metadata To edit a field touch the text to be edited and use the display to change the test When finished push the Done button on the top of the screen to commit the edit Next Take Current Take Editing track name take number or scene name of the current or next take will affect all subsequent takes Editing these fie...

Page 121: ...at routing An orange background on a track label indicates that all inputs routed to that track are routed post fader while a green backround indicates that all inputs routed to that track are routed pre fader Touch the track label to toggle the pre post fader routing status of the track Post fader orange track Inputs Tracks Routed Not routed Pre fader green track Remote Control 9 788T 788T SSD Us...

Page 122: ...ct the included C Link cable to the 788T s C Link Input connector 2 Connect the opposite end of the C Link cable to the CL 1 s C Link connector 3 Connect a PS 2 keyboard to the PS 2 connector on the CL 1 4 Connect switches between assigned pins 1 6 pin 7 ground and pin 8 5V on the CL 1 See CL 1 Logic Inputs and Outputs The C Link port on the 788T provides power for CL 1 operation CL 1 Keyboard Int...

Page 123: ...ed to a key can also be assigned to a switch To configure a pin as an input navigate to KEYBOARD LOGIC IN ASSIGN in the Setup Menu Select a new SHORTCUT number then locate the Login inputs amongst the assignable keys Choosing CL1 LOGIC IN 1 would correspond to pin 1 on the CL 1 CL1 LOGIC IN 2 would correspond to pin 2 on the CL 1 and so on After a Logic input is selected assign the desired action ...

Page 124: ...nd powers the CL 2 via the C Link Input connector no other powering source is required Immediately after connecting the CL 2 it will search and update accordingly to the 788T s latest version of firm ware A warning screen will appear should the CL 2 be disconnected during operation The 788T will re tain all CL 2 settings until further action is taken If the CL 2 is reconnected the 788T will immedi...

Page 125: ... the LED indicates media activity Flashing Green media is mounting Solid Green all selected media is ready Yellow at least one media is reading writing Red at least one media is full or has encoun tered an error 5 Multipurpose LED Displays post fade signal level in vari ous colors and intensities to represent the state of the selected channel Green signal activity Yellow post fade limiter activity...

Page 126: ...g Notes Momentary Toggle Toggle Only Record Button Sw 1 4 Momentary Hold to record release to stop Sw 1 4 Toggle Press and release switch to record press and release again to stop Sw 2 3 Toggle On enters record Off stops the recording Play Button Sw 1 4 Momentary Hold to play release to pause Sw 1 4 Toggle Press and release switch to play press and release again to pause Sw 2 3 Toggle On enters pl...

Page 127: ... as defined by shortcut setting Jam Rx Time Code Action varies as defined by shortcut setting Jam Zeros Action varies as defined by shortcut setting Jam Value Action varies as defined by shortcut setting Edit Value Action varies as defined by shortcut setting Edit U Bits Action varies as defined by shortcut setting Increment Scene Increments Scene Name Number False Take Enters False Take prompt Co...

Page 128: ...e CL 8 has a dedicated button for Slate Mic activity Additionally the USB Keyboard pass through port permits keyboards to be attached for metadata entry and remote control CL 8 Connection The CL 8 connects to the 788T via the USB Keyboard Input on the 788T s back panel The 788T con nects and powers the CL 8 via USB no other powering source is required Immediately after con necting the CL 8 it will...

Page 129: ...Illuminates Blue when the respective Input has been routed to Track L To route the respective Input to Track L press the A button while in the CL 8 Main View 6 Track R Indicator Illuminates Blue when the respective Input has been routed to Track R To route the respective Input to Track R press the B button while in the CL 8 Main View 7 Aux 1 Indicator Illuminates green when the respective input is...

Page 130: ...is set in the Setup Menu option COMMS INPUT SOURCE 3 USB Keyboard Input USB A Female Connector for USB keyboards This acts as a thru port to the 788T USB Keyboard Input which is used to connect the CL 8 to the 788T This connector allows for simultaneous keyboard and CL 8 control CL 8 Back Panel Descriptors KEYBOARD ALT SLATE 8 Made In Reedsburg Wisconsin USA www sounddevices com This device compli...

Page 131: ...tive infinity off to 0 dB A narrow range allows the user to adjust the fader level from 15 to 15 dB CL 8 Views The CL 8 allows for quick control of input to track routing and input settings on each Input Use the Alt button to toggle between the Main Aux Routing and Input Settings View Main View The Main View is always the first of the CL 8 views to be displayed after startup or initial connection ...

Page 132: ...ngs View the L R Aux 1 and Aux 2 LED indicators are disabled Limiter and High Pass Filter LEDs illuminate solid yellow when the respective input setting is enabled Input Polarity LEDs illuminate solid blue when the input s polarity has been inverted The LEDs will flash respectively on each input if the Limiter and High Pass Filter are disabled and Input Polarity is nor mal Press the ALT button to ...

Page 133: ...Com Mic to the TA3 Input 8 on the 788T 4 Slide the Input 8 Selector Switch to the right to enter the Input 8 Settings Window 5 Setup the input accordingly That is choose input type phantom power etc The Input to Track routing for Input 8 is unavailable when set as the Com Mic 6 Set the trim level of the External Com Mic using the 788T Input 8 Front Panel Gain Control 7 See Slate Mic Routing and Sl...

Page 134: ...the Slate Mic 1 From the 788T s Main LCD Screen press and hold the SLATE button on the CL 8 s Left Panel 2 Turn the Rotary Switch to adjust the gain The gain level is momentarily displayed in the Sample Rate field of the LCD display 3 Release the SLATE button to deactivate the Slate Mic 788T 788T SSD User Guide and Technical Information 126 v 3 01 Features and specifications are subject to change ...

Page 135: ...rack routing and track enabled status Allows user to quickly solo any input track or output in the headphone monitor Ability to quickly mute outputs No extended power sources required Control and powering via a single USB cable CL 9 Connection The CL 9 is connected to the 788T and powered from it via USB no other powering source is re quired Connect the 788T s rear panel KEYBD USB A port to the CL...

Page 136: ...tput in the headphones press and hold to toggle the setting status and turn to adjust the set ting value See CL 9 Modes 3 Ring LEDs Displays pre fade signal level in various colors and intensities to represent the state of each channel Green pre fade signal activity Yellow pre and post fade limiter activity Red signal over load clipping The LEDs illuminate solid red to indicate a muted input or so...

Page 137: ...TN Mono mode The RTN audio is sent to both sides of the headphone monitor 13 COM2 RTN 2 Switch and LED Two position switch Slide and hold left to engage talk back to COM2 Slide right to listen to RTN 2 in the headphone monitor For RTN2 momentary action slide and hold switch in position for one second or longer Press and release Shift then slide and hold COM2 right to activate the Slate Press and r...

Page 138: ...ich is used to connect the CL 9 to the 788T This connector allows for simultaneous keyboard and CL 9 use 3 XLR RTN 1 Active balanced analog line level input for return monitoring Pin 1 ground pin 2 pin 3 4 XLR RTN 2 Active balanced analog line level input for return monitoring Pin 1 ground pin 2 pin 3 5 788T Headphone Input 1 4 inch TRS stereo unbalanced jack For connecting the 788T Headphone Outp...

Page 139: ...The 12 o clock position is unity gain 0 dB When adjusting a track s level control the level of each track in the stereo pair is temporarily displayed on the 788T Main LCD display When connected the CL 9 takes over control of the Master and Aux Track levels The 788T Master Gain Levels Window is still accessible but track level adjustment from the 788T is locked out This prevents any discrepancy bet...

Page 140: ...f the 788T Headphone Outputs Turn the CL 9 Headphone Level Control COM1 Send Controls the COM1 send level sent to routed destinations Hold COM1 switch to the Left then turn the CL 9 Headphone Level Control COM2 Send Controls the COM2 send level sent to routed destinations Hold COM2 switch to the left then turn the CL 9 Headphone Level Control Slate Send Controls the Slate send level sent to routed...

Page 141: ...e is active EQ Frequency is adjusted from 30 Hz to 10 kHz in 10 Hz steps and from 10 1 kHz to 20 kHz in 100 Hz steps EQ Gain is adjusted from 12 to 12 dB in 1 dB increments The EQ Q factor is adjustable from 0 1 to 10 in 0 1 steps An input s EQ setting can also be bypassed from any of the EQ Modes The EQ is off when bypassed the EQ settings are stored but are completely removed from the signal pat...

Page 142: ...flashes blue The specific setting for the active mode is displayed on the 788T Main LCD display In all modes except Output Mode the CL 9 Ring LEDs indicate pre fade signal level PFL in vari ous colors and intensities to represent the state of each channel See Output Mode for details Green signal activity Yellow pre and post fade limiter activity Red signal overload clipping The LEDs illuminate sol...

Page 143: ...f the input and neighboring input is displayed in dB on the 788T Main LCD Display while being adjusted When in Trim Mode none of the Mode LEDs are illuminated Encoder Accel eration applies to Trim Mode see Encoder Acceleration EQ Frequency In EQ Frequency Mode turn an input s Rotary Encoder to adjust the EQ frequency of the respective input EQ Frequency is adjusted from 30 Hz to 10 kHz in 10 Hz st...

Page 144: ...f the other modes In Output Mode the CL 9 Ring LEDs illuminate in various colors and intensities to indicate output source activity pre output gain Green output source signal activity and Red output source signal overload clipping The LEDs illuminate solid red when an output is muted and solid yellow when an output is soloed in the headphone monitor Press the Rotary Encoder to solo the respective ...

Page 145: ...r Mode is desired 4 Once the fourth User Mode is selected the 788T exits the CL 9 USER 1 4 ASSIGN menu and returns to the Setup Menu Exit the Setup Menu To access a User Mode press and release the Shift Button the Shift LED flashes blue then press the assigned Mode Button Press the Mode Button again to return to Trim Mode To immediately access another mode press any one of the Mode Buttons To acce...

Page 146: ...n the 788T Main LCD Display while in Low Cut Mode Input Limiter Mode User In Input Limiter Mode press and hold the input s Rotary Encoder for one second or longer to toggle an input s Limiter on or off Input Limiters are not available when set to sampling rates of 88 2 kHz and above Limiter status is displayed on the 788T Main LCD Display while in Input Limiter Mode Phantom Power Mode User In Phan...

Page 147: ...ing Input Routed Pre Fade green Input Routed Post Fade red N A N A Toggles Routing of Input to Track Toggles all inputs routed to that track as Pre or Post Fade Input Routing and Track Enabling are performed directly from the CL 9 interface without having to enter any of the 788T menus The A H and L R Track Buttons are located on the top row of the CL 9 The Aux 1 and 2 Track X1 X2 Buttons are loca...

Page 148: ...k The CL 9 Ring LEDs indicate input to track routing status An input s Ring LED il luminates if the input is routed to the selected track The color of the LED indicates pre or post fade routing status Green LEDs indicated pre fade routing and red LEDs indicate post fade routing To toggle pre and post fade routing status press and hold an input s Rotary Encoder for 5 seconds or longer Pre and post ...

Page 149: ...late can be routed to any Track Output or Headphone monitor in the Setup Menu option COMMS ROUTING When the Slate is activated the Com Send Source overrides the program feed of the selected destinations At Factory default the Slate is routed to all tracks outputs and headphone monitors To route the Slate to select destinations follow these steps 1 With a CL 9 connected enter the Setup Menu option ...

Page 150: ... Tone Setup Returns The CL 9 has two active balanced line level XLR Return Inputs on the Rear Panel These are used to monitor external line level audio sources This is useful for monitoring the returns from a camera or a return communication line from a Boom Op To listen to a RTN slide the COM1 RTN1 or COM2 RTN2 switch to the right Slide again to deac tivate For momentary action slide and hold for...

Page 151: ...route the COM1 or COM2 circuit to select destinations follow these steps 1 With a CL 9 connected enter the Setup Menu option COMMS ROUTING 2 Using the CL 9 Select Encoder or 788T Rotary Switch scroll through the available desti nations The lower case letters represent headphone montiors and the numbers represent outputs Lower case letters represent Headphone Monitors Numbers represent Outputs 3 Pr...

Page 152: ...ones via Output 1 and to the Sound Mixer s Left Headphone monitor via any of the CL 9 Headphone connections when COM1 is active 5 Connect the Boom Op s headset mic signal into the line level RTN1 Input on the CL 9 6 Set the RTN1 level Slide and hold the COM1 RTN1 switch in the right RTN1 position then turn the CL 9 Headphone Level Control This adjusts the return level Boom Op s Headset Mic sent to...

Page 153: ...ssigned to trigger select 788T functions Shorting Tip to Sleeve al lows one function shorting Ring to Sleeve provides another Functionality is assigned in the Setup Menu option KEYBOARD LOGIC IN ASSIGN CL 9 LED Brightness The CL 9 LED Brightness Level can be set independently of the 788T LED brightness level To adjust the LED brightness level of the CL 9 hold the 788T Backlight key and turn the CL...

Page 154: ...1 kg CL WIFI The CL WIFI Interface is an optional hardware accessory to interface wirelessly with supported mobile devices running the CL WiFi application When connected and configured the CL WIFI functions as a wireless access point that the mobile device can connect to to form a device to device ad hoc network For complete documentations of the CL WIFI Interface operation see Hardware Controller...

Page 155: ...Hardware Controllers 1 0 788T 788T SSD User Guide and Technical Information 147 ...

Page 156: ... computers Connect to Wave Agent option allows the 788T to be connected via USB to Wave Agent 1 10 for Control Mode features Visit www waveagent com for details CL WIFI option allows communication via the CL WiFi accessory C Link Metadata Sharing allows units to share certain metadata over C Link 788T C Link ports are disabled when Connect to Wave Agent is selected Connect as Mass Storage Wave Age...

Page 157: ...rkG Track H TrkH Track X1 Aux1 Track X2 Aux2 11 Rec Remote Track Naming Enable or disable track names from a C Link master unit to change track names on this unit Disabled Enabled 12 Rec Take Name Number Numeric auto incrementing number used for take identification selectable alpha character integers up to 32000 with or without preceding 0 s T01 13 Rec Take Reset Mode Defines when take numbers are...

Page 158: ...MS 1 2 4 8 1 2MS 4 8 1 4 5 6 1 4 5 6MS 1 3 1 2 3 4MS 1 2 3 4MS 5 6 1 2 3 4MS 5 6 7 8 1 6 7 8 1 6 7 8MS 5 8 Unlinked 20 Input MS to Pre Fade ISO Select where MS decoding is applied when activated On sends MS decoded signal to any track the input is routed to Off causes pre fade signal routed to ISO tracks A H to be pre MS decoding On Off On 21 Input Front Panel Controls Sets the Input Gain Potentio...

Page 159: ... on or off When On LR Tracks Only option is selected L and R tracks are the only tracks Mix Assisted When On All Tracks follow LR is selected all post fade tracks will be affected by Mix Assist Off On LR Tracks Only On All Tracks follow LR Off 28 Input 1 Delay Sets a digital delay for each input Can be used to compensate for delay in various digital wireless microphone units or digital processors ...

Page 160: ...e permissible with the 788T s FAT32 file system is 4 GB 4 GB 2 GB 1 GB CF 640 MB 4 GB CF 3 6 GB 2 GB CF 1 8 GB 1 GB CF 950 MB 512MB CF 450 MB 2 GB CF 1 8 GB 40 File Folder Options Allows the user to organize files in root and sub folders For no folders select None on every level TOP LEVEL Project MID LEVEL Roll BOTTOM LEVEL Scene None Add new entry None Add new entry Daily None Add new entry Scene...

Page 161: ... mm dd yy tt dd mm yy tt uu uu tt tt user bits are set to 4 user defin able digits with 4 take digits uu uu uu uu tt tt tt tt user bits are set to the take coun ter for all 8 digits mm dd yy uu dd mm yy uu mm dd yy tt 47 TimeCode Jam Menu Allows the user to jam or edit the internal time code generator and user bits Also accessible by pressing HDD and MENU keys simultane ously Jam RX TC Jam Zeros J...

Page 162: ...to the set time Setting the internal clock during a production day will require time code devices to be re jammed time date Clock is not set until done is selected 64 LCD Contrast Adjusts the contrast level of the LCD display 0 100 65 LCD Backlight Mode Enables or disables the LCD backlight color from indicating that the 788T is in Record Playback or Standby White Green Red Red on Record Only Gree...

Page 163: ... in HP Favorite Mode Playback Drive Select pressing in on the switch toggles between the available storage media for Playback Selects Favorite Mode 75 HP Monitor Modes Selects the modes and the sequence in which they appear in the Head phone Source Display Inputs 1 2 Inputs 3 4 Inputs 5 6 Inputs 7 8 Tracks L R Tracks A B Tracks C D Tracks E F Tracks G H Tracks X1 X2 Input 1 Input 2 Input 3 Input 4...

Page 164: ... only with L Ident To outputs only with L Ident To record tracks and outputs with L Ident To record tracks and outputs 85 Tone Record Lock Sets the Tone key to be either avail able or locked while in Record Mode Enabled While Recording Locked While Recording Locked While Recording 86 Comms Send Source Communication systems are only available when the CL 8 or CL 9 is attached COM1 and COM2 are only...

Page 165: ...nguage Select the language of the keyboard attached to the CL 1 English German French English 97 CL 2 Fader Assign Assigns the input that the CL 2 fader will control None Input 1 Input 2 Input 3 Input 4 Input 5 Input 6 Input 7 Input 8 Input 1 98 CL 9 User 1 4 Assign Assigns the four User Modes avail able on the CL 9 Input Limiter Mode Input Phantom Mode Input Delay Mode Input Phase Mode Input Low ...

Page 166: ...d Settings by pressing the soft X BRIGHTNESS key The Take List only recalls the last 100 takes If the file you wish to recall settings from is older than that use the Drive Directory To recall settings from a file in the Drive Directory follow the settings below 1 Enter the Drive Directory by pressing the HDD button twice 2 Highlight the desired file 3 Press the soft OPTIONS FAST FORWARD key to en...

Page 167: ... REWIND keys are available in Playback mode Use the LCD BACKLIGHT and TONE keys again to unlock the panel L Ident Tone toggle TONE LCD BACKLIGHT Press the TONE then the LCD BACKLIGHT key to toggle L Ident tone mode Track Setup INPUT Press the INPUT key to access the Track Setup Window Meter all 12 available tracks and arm disarm tracks for recording Input Routing STOP INPUT Press and hold the STOP...

Page 168: ...in on the Rotary Switch to turn on the LCD Backlight Flashlight Mode REWIND PLAY STOP With the unit powered down hold down these keys while powering the unit to enter Flashlight mode This illuminates all LEDs Press the PWR key again to exit 788T 788T SSD User Guide and Technical Information 160 v 3 01 Features and specifications are subject to change Visit www sounddevices com for the latest docum...

Page 169: ... input Gain input dBu to 20 dBFS Mic Off 0 to 76 dB Line Off 26 to 50 dB Input Impedance Mic XLR and TA3 3 3k ohm Line XLR and TA3 3 3k ohm Input Clipping Level Mic 8 dBu minimum gain 10 dB Line 26 dB minimum gain 0 dB Input Topology Mic and Line fully electronically balanced RF ESD short and overload protected pin 2 hot pin 3 cold Gain Matching Mic Line inputs 0 1 dB channel to channel while link...

Page 170: ...000 XP Vista Mac OS 10 4 only USB 2 0 Slave mode only For connection to Windows 2000 XP Vista Mac OS 10 4 for data transfer or Wave Agent control USB Keyboard Input For connection to USB keyboards for entering notes and controlling features and functions of the 788T via user selectable keyboard shortcuts C Link 6 wire modular input and output RS 232 machine control word clock time code transfer Ti...

Page 171: ...rs 110 ohm transformer balanced 3 5 mm Headphone tip signal L ring signal R sleeve signal ground Mates with 3 5 mm TRS jack 1 4 inch Female Headphone tip signal L ring signal R sleeve signal ground Mates with 1 4 inch TRS jack 5 pin LEMO Time code 1 ground 2 SMPTE TC In 3 ASCII in out 4 tuning out 5 SMPTE TC out LEMO B series connector pin assignments as viewed on panel mounted connector Sync Inpu...

Page 172: ...n the Setup Menu DE 15 Multi Function Connector AES I O GPIO PWR 1 AES 3 4 Input 2 AES 1 2 Input 3 AES 5 6 Output 4 AES 7 8 Input 5 AES 5 6 Input 6 EXT DC Ground 7 EXT DC Ground 8 LOGIC Output 9 LOGIC Input 10 10V to 18V DC 11 AES 3 4 Input 12 AES 1 2 Input 13 AES 5 6 Output 14 AES 7 8 Input 15 AES 5 6 Input The D Sub connector provides 8 channels of balanced AES input 2 channels of AES outputs GP...

Page 173: ...ecorder Features large rotary faders and push buttons to control input routing setup control and access to the 788T Slate Mic Connects to the 788T over USB CL 1 Remote Control and Keyboard Interface used to control the 788T s record start and stop functions using a toggle switch Allows user to connect a PS 2 keyboard for control and metadata entry CL 2 Remote 30 mm linear fader for the 788T Digita...

Page 174: ...l sources to the 788T for synchronizing the 788T also used to sync external devices from the word clock of the 788T XL DVDRAM External slot loading DVD RAM drive in FireWire and USB enclosure 5X writing For use with 7 Series recorders for recording copying and playback Powered by FireWire bus or included external supply XL H Bare Hirose 4 pin locking DC connector HR10 7P 4P XL LB2 5 pin LEMO to tw...

Page 175: ... below You may not copy the printed materials accompanying the SOFTWARE PRODUCT Restrictions on use Licensee may not distribute copies of the SOFTWARE or accompanying materials to others Licensee may not modify adapt translate reverse engineer decompile disassemble or create derivative works based on the SOFTWARE or its accompa nying printed or written materials Transfer restrictions Licensee shal...

Page 176: ...0 4 2 2001 ESD 4kV Contact 8kV Air Discharge IEC 61000 4 3 2006 EN 61000 4 3 2005 Radiated RF Immunity 3V m 80 AM 1kHz 1 step of the previous frequency 80 1000 MHz IEC 61000 4 4 2004 EN 61000 4 4 2005 EFT Burst 0 5 kV 2kV IEC 61000 4 4 2004 EN 61000 4 4 2005 EFT Burst 0 5kV to 1kV IEC 61000 4 5 2005 EN 61000 4 5 2001 Surge 1kV Differential Mode line to line 2kV Common Mode line to ground IEC 61000...

Page 177: ...ncluding warranty repair please contact Sound Devices for an RMA return mer chandise authorization before sending your unit in for repair Product returned without an RMA number may experience delays in repair When sending a unit for repair please do not include ac cessories including SSD drives CF cards batteries power supplies carry cases cables or adapters unless instructed by Sound Devices Soun...

Page 178: ......

Page 179: ......

Page 180: ...788T 788T SSD rev 3 01 Printed in U S A ...

Reviews: