Ongoing Reader Maintenance
30
1. Disconnect power from the FingerKey.
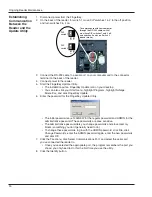
2. On the back of the reader, for switch 1, move DIP switches 1 & 2 to the off position,
and turn switches 3 & 4 on.
1
2
3
4
ON
OFF
DIP
switch 1
1
2
3
4
ON
OFF
DIP
switch 2
To communicate with your computer
through the RS-232 cable, switch 1
must have DIP switches 1 and 2 off,
and switches 3 and 4 on. Switch 2
doesn’t matter.
3. Connect the RS-232 cable to a serial port on your computer and to the connector
terminal on the back of the reader.
4. Connect power to the reader.
5. Start the FingerKey Update Utility.
• The installation puts a FingerKey Update icon on your desktop.
• You can also click your Start menu, highlight Programs, highlight Schlage
Biometrics, and click FingerKey Update.
6. Enter the password for the FingerKey Update Utility.
• The initial passwords are 1234NEW for the regular password and ADMIN for the
administrative password. These passwords are case sensitive.
• The administrative password lets you change passwords and erase memory
blocks (something you don’t generally need to do).
• To change these passwords, log in with the ADMIN password, click File, click
Change Passwords, enter the ADMIN password again, enter the new passwords,
and click OK.
7. Click the File menu, click Select Communications Port, and select the serial port
you’ve connected the reader to.
• Once you’ve selected the appropriate port, the program remembers the port you
chose; you only need to do this the first time you use the utility.
8. Click the Identify button.
Establishing
Communication
Between the
Reader and the
Update Utility


