3. Disassembly and Reassembly
3.2.2.2. Developer Unit
1.
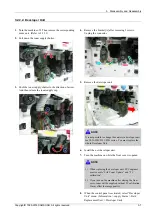
Turn the machine off. Then remove the corresponding
drum unit. (Refer to 3.2.2.1)
2.
Pull down the toner supply shutter.
3.
Push the toner supply shutter to the direction of arrow.
And then release the toner supply cap.
4.
Remove the bracket[A] after removing 2 screws.
Unplug the connector.
5.
Remove the developer unit.
NOTE
It is not possible to change the carriers in developer unit
for CLX-9201/9251/9301 series. You must replace the
whole Developer Unit.
6.
Install the new developer unit.
7.
Turn the machine on while the front cover is opened.
NOTE
1) When replacing the developer unit, SVC engineer
must execute “Life Count Update” and “TC
calibration”.
2) If you turn on the machine after closing the front
cover, toner will be supplied without TC calibration.
It may affect the image quality.
8.
When the control panel is activated, select “Developer
Unit” menu. (Information > supply Status > Field
Replacement Unit > Developer Unit)
Copyright© 1995-2016 SAMSUNG. All rights reserved.
3-7


