2. MOUNTING
IMR01N12-E7
12
2.3 Procedures of Mounting and Removing
Mounting procedures
1.
Prepare the panel cutout as specified in
2.2 Dimensions
.
(Panel thickness: 1 to 10 mm)
2.
Insert the instrument through the panel cutout.
3.
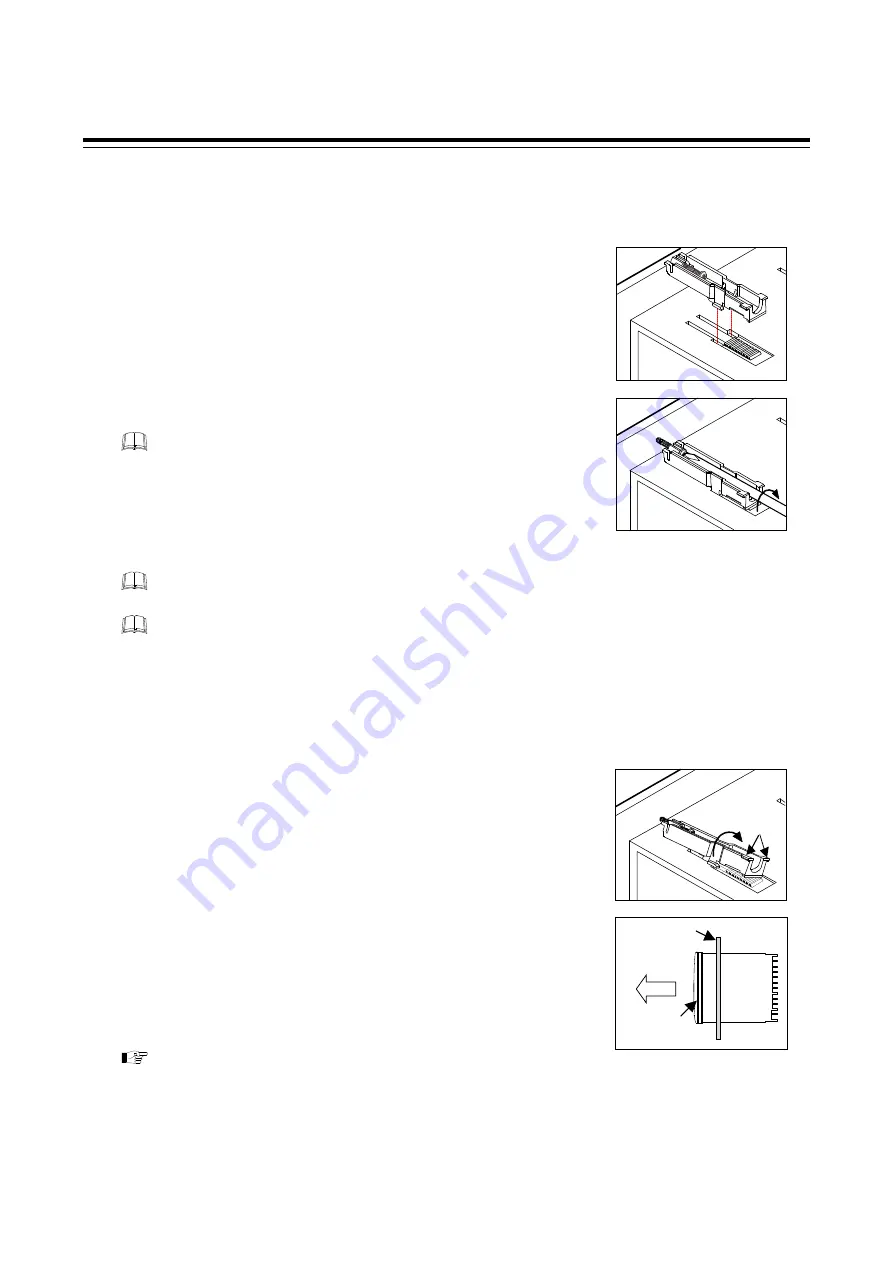
Insert the mounting bracket into the mounting groove of the instrument.
Do not push the mounting bracket forward. (Fig. 1)
4.
Secure the bracket to the instrument by tightening the screw.
Take care to refrain from moving the bracket forward.
5.
Only turn about one full revolution after the screw touches the panel. (Fig. 2)
If the screw has been rotated too tight, the screw may turn idle.
In such a case, loosen the screw once and tighten it again until
the instrument is firmly fixed.
6.
The other mounting bracket should be installed in the same way as
described in
3.
to
5.
When the instrument is mounted, always secure with two mounting brackets so that upper and lower
mounting brackets are positioned diagonally.
The waterproof/dustproof (supplied as standard) on the front of the instrument conforms to IP65 when
mounted on the panel. Checked and confirmed its compliance through the internal test at RKC. For
effective waterproof/dustproof, the gasket must be securely placed between the instrument and the panel
without any gap. If the gasket is damaged, please contact RKC sales office or the agent.
Removal procedures
1.
Turn the power OFF.
2.
Remove the wiring.
3.
Loosen the screw of the mounting bracket.
4.
Hold the mounting bracket by the edge (
) and tilt it (
) to remove from
the case. (Fig. 3)
5.
The other mounting bracket should be removed in the same way as
described in
3.
and
4.
6.
Pull out the instrument from the mounting cutout while holding the front
panel frame of this instrument. (Fig. 4)
When pulling out only the internal assembly from the instrument case
after being wired, refer to
12. REMOVING THE INTERNAL ASSEMBLY (P. 126).
Fig. 1
Fig. 2
Fig. 3
Front
panel frame
Pull out
Panel
Fig. 4


