background image

112

Laser Scanners

RF627, RF627Smart [Revision 2.1.2] 20.09.2021

Button

Assignment

Selecting template elements. In this mode, the  template  element  is  selected  by
clicking on it. 

Drawing template elements. In  this  mode,  adding  a  point  for  drawing  template
elements occurs when you click in the coordinate plane.

Reset drawn lines in drawing mode.

Create a line in drawing mode.

Delete the selected template element. 

Automatic generation of template elements from approximated profile segments.

Turn on/off the display of approximated profile elements. 

Clear the template. 

Save the template in *.json format.

Upload the template to the scanner. 

Close the template editor.

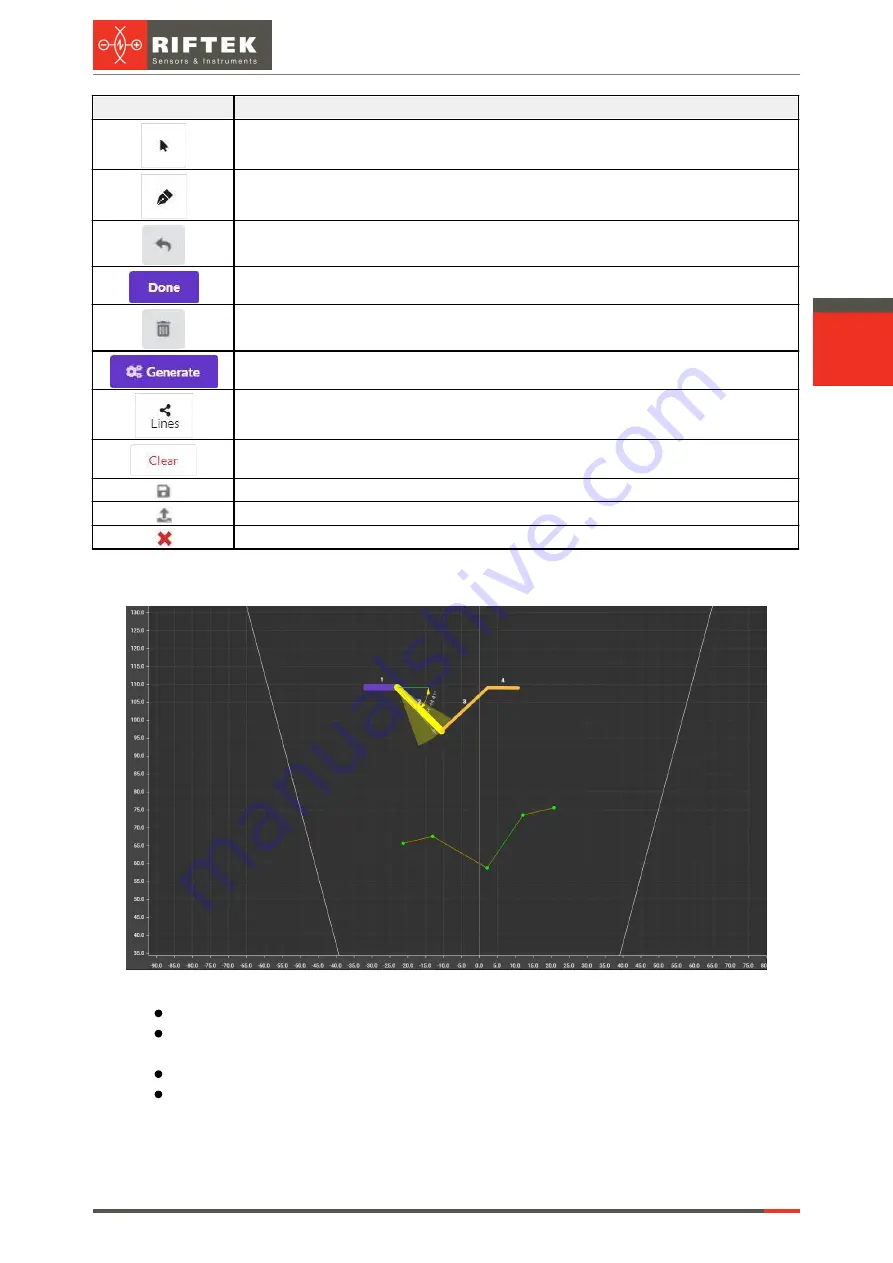
32.3.1.3.     Area for displaying the template and its constraints

The area is intended for:
  displaying template elements (gives an idea of the shape of the template);
  visualizing the selected constraint (selection is made in the area of template

parameters);

  displaying profile points;
  displaying the results of profile approximation (by clicking the 

Lines

 button).

If a template is detected in the current profile, the position of the template will be

shown with green lines.

Summary of Contents for RF627 Series

Page 1: ...Certified according to ISO 9001 2015 LASER SCANNERS User s manual RF627 Series RF627Smart Series...

Page 2: ...ting parameters 20 17 Network tab Network parameters 21 18 General tab General parameters 22 18 1 CMOS sensor parameters 23 18 2 Laser parameters 23 18 3 Image quality settings 23 18 3 1 Exposure time...

Page 3: ...mation by arcs 61 24 2 1 3 Clarification of approximating line segments and arcs 61 24 2 2 Stage 2 Building a graph 62 24 2 2 1 Results display area 63 24 2 2 2 Example of building a graph 64 24 2 3 H...

Page 4: ...cture and search principle 110 32 3 Template editor 110 32 3 1 Description of interface elements 111 32 3 1 1 Area for displaying and configuring template parameters 111 32 3 1 2 Area of controls 112...

Page 5: ...en while operating the scanners Do not target laser beam to humans Do not disassemble the scanner Avoid staring into the laser beam 4 General information Laser scanners are designed for non contact me...

Page 6: ...o increase the working frequency of the scanner in the limited working range up to 5096 Hz in Basic mode and up to 6800 Hz in DS mode The Smart version of the scanner RF627Smart makes it possible to m...

Page 7: ...inputs RS422 3 channels Laser on off hardware input 1 Outputs RS422 1 channel Power supply 9 30 V or 12 39 V for scanners with Blue laser Power consumption not more 6 W without a built in heater Envi...

Page 8: ...1690 535 1000 L 765 mm 2 8 620 1165 430 1010 1165 620 1785 430 1010 L 554 mm 2 5 Detailed CAD documentation 2D and 3D is available here https riftek com upload iblock 757 2D_CAD rar https riftek com...

Page 9: ...RF627 RF627Smart Revision 2 1 2 20 09 2021 Laser Scanners 9 Figure 2 Figure 3...

Page 10: ...re given in Annex 3 Detailed documentation 2D and 3D is available for download on RIFTEK s official website 9 Overall demands for mounting The scanner should be positioned so that the object under con...

Page 11: ...ssignment Note 1 OUT1 RS422 2 IN3 RS422 3 IN3 RS422 4 IN2 RS422 5 IN2 RS422 6 NEXT_LAS_OFF Hardware laser on off input Hardware on off means enabling disabling laser radiation regardless of scanner se...

Page 12: ...ble to the eye Network connection is functioning normally the speed is 1000 Mbps Flashes quickly individual flashes are visible to the eye Network connection is functioning normally the speed is 100 M...

Page 13: ...e shipped with the following network configuration unless otherwise specified in the order Autonegotiation of connection speed 100 1000 Mbps IP address of the scanner 192 168 1 30 Subnet mask 255 255...

Page 14: ...it is recommended to check the connection using the console command ping 192 168 1 30 or the current IP address of the scanner If all the settings are correct the scanner will respond to the command A...

Page 15: ...s the operating conditions of the scanner Do not allow the temperature to rise to 90 C or more The indication turns on when the temperature rises above 90 C or if the temperature is below 15 C Profile...

Page 16: ...etwork settings of the scanner System Scanner system settings including general information about the scanner support for compatibility modes firmware update and the device s operation log log file Ar...

Page 17: ...a video stream from the CMOS sensor of the scanner with the overlay of the uncalibrated profile extracted from the image 15 1 Controls The controls are located at the top of the results display area 1...

Page 18: ...yed in white the region of interest ROI is displayed in yellow if ROI mode is enabled When you hover the mouse over the selected area of the grid a cursor appears indicating the position in the scanne...

Page 19: ...els a button for saving a screenshot i e saving the full image from the scanner image sensor regardless of the display scale a slider for adjusting the gamma correction of the image and a button for r...

Page 20: ...ed Current IP settings Parameter Factory value Description IP address 192 168 1 30 IP address of the scanner Gateway 192 168 1 1 Gateway address Subnet mask 255 255 255 0 Network mask Host IP address...

Page 21: ...RF627 RF627Smart Revision 2 1 2 20 09 2021 Laser Scanners 21 18 General tab General parameters To configure the general parameters of the scanner go to the General tab...

Page 22: ...value of this parameter will be automatically changed to FALSE 2 exposures Combining a profile from 2 frames with different exposure 3 exposures Combining a profile from 3 frames with different expos...

Page 23: ...e laser Laser output power 10 Laser output power level Range of values 0 100 Note The laser output power is adjustable only in manual mode 18 3 Image quality settings The intensity of the reflected li...

Page 24: ...imes NOTE In this mode the frequency of profile output decreases in proportion to the number of exposures When using EDR depending on the selected mode different exposure times are set for even and od...

Page 25: ...ding exposure times for the columns As a result you get a high quality image and a profile of a complex object 18 3 3 Removing background light from extraneous light sources This mode is recommended w...

Page 26: ...e rate PPS will be of the frame rate 18 4 ROI settings The ROI region of interest parameters control the size and position of the CMOS sensor active area By default the active area covers the entire a...

Page 27: ...file in the center When a profile is lost the scanner switches to the mode of scanning the working range by the region of interest the frame rate does not decrease When a profile is detected the scann...

Page 28: ...48 or 1296 Data format Calibrated profile Data transfer formats Calibrated profile transfer of calibrated data profile in Cartesian coordinates of the measuring area RAW profile transfer of uncalibrat...

Page 29: ...fine characteristics of the profile extraction algorithm Parameters Parameter Factory value Description Intensity clipping 1 Signal clipping threshold The frame is analyzed with a vertical window of 5...

Page 30: ...akes it possible to reduce the effect of image noise caused by for example ambient light Range of values 0 100 If the value is 100 the image is not processed Peak width pixels 0 15 Peak brightness wid...

Page 31: ...al may be greater than the brightness of the original signal The scanner incorrectly selects the profile placing it both on the initial laser line and on the re reflexion The First value determines th...

Page 32: ...ing window of the median filter Valid values OFF 3 5 7 9 11 13 15 Bilateral filter width OFF The size number of points of the sliding window of the bilateral smoothing filter Valid values OFF 3 5 7 9...

Page 33: ...rt Revision 2 1 2 20 09 2021 Laser Scanners 33 20 Triggering tab Triggering modes The Triggering tab is intended to configure the measurement synchronization triggering modes as well as the scanner ou...

Page 34: ...art its transfer To facilitate understanding of the synchronization of measurements the concept of synchronization event is used The synchronization event indicates the occurrence of a condition inter...

Page 35: ...ets counter can be reset by an external or internal signal for example by input 3 by timer by program request etc Notes 1 The maximum processed frequency at inputs 1 2 and 3 is 10 MHz If the event arr...

Page 36: ...here is no request the measuring cycle is not started 20 4 Synchronization by external trigger The Trigger section is used to configure an external synchronization signal This section is available onl...

Page 37: ...nputs Parameters of Inputs 1 and 2 Parameter Factory value Description Enable OFF Enable disable the input Mode Rise or Fall Input signal processing mode Rise or fall Synchronization by rise or fall R...

Page 38: ...ith receiving the trigger signal at input 1 taking into account the set parameters Triggering the measurement on the rise of the input pulse Triggering the measurement on the fall of the pulse Trigger...

Page 39: ...S starts with receiving a signal at input 1 The series of measurements stops when the signal level changes Triggering the series of measurements at a high level of the pulse Triggering the series of m...

Page 40: ...d of the integration time 21 1 Synchronous measurements There are two options to connect the scanners for synchronous measurements NOTE The mode number is the line number in the table of trigger setti...

Page 41: ...cted to Input 1 of all Slave scanners As a result the lasers of the scanners of the Master Slave type 2 group and the Slave type 1 group will alternately turn on NOTE The total accumulation time of th...

Page 42: ...cloud Linear Linear movement system The scanner object moves along a straight path Radial Angular movement system The scanner doesn t move The scanned object rotates around its own axis The axis of ro...

Page 43: ...etermined by its height Intensity Grayscale The brightness of a point is determined by the intensity of the radiation reflected from the surface to use this mode it is necessary to enable the transmis...

Page 44: ...r selected by the selector After configuring the display parameters it is necessary to click the refresh button After that the data will be downloaded from the scanner and a point cloud will appear Af...

Page 45: ...oad link https riftek com upload medialibrary 558 RFProfileView zip 3D Export of a point cloud in obj format This format is a commonly available format for describing 3D geometry and can be opened by...

Page 46: ...latest firmware versions are available here https cloud riftek com index php apps files dir RF627_Firmware Procedure 1 Click Choose file and select the firmware file in the 2fw format 2 Click Upload...

Page 47: ...l state of the scanner Clicking the button will generate a file containing the complete state of the scanner Firmware recovery is performed in the same way as updating Recovering the saved firmware 23...

Page 48: ...function or has limited functionality The following license types can have this status TRIAL trial period expired Type License type FREE The block does not require a license All block functions are av...

Page 49: ...canner an internal check will be performed and the results will be displayed In the screenshot above the file was verified successfully and contains data on the trial period extension license type TRI...

Page 50: ...50 Laser Scanners RF627 RF627Smart Revision 2 1 2 20 09 2021...

Page 51: ...sed to detect possible errors This tab contains information about the operations performed and their order To get the log file click the Download button Data can be exported in txt and csv formats You...

Page 52: ...network protocols Forming control actions at the physical outputs of the scanner To ensure the simplicity and ease of use of smart functions the concept of a computation graph hereinafter referred to...

Page 53: ...blocks setting parameters of blocks added to the graph and setting parameters for approximating a profile by a set of segments The area contains three tabs Smart blocks a set of smart blocks grouped b...

Page 54: ...erforms while the output data the result of the block operation is shown in bold Examples the smart block outputs a point the smart block outputs a segment the smart block outputs a line 24 1 2 Block...

Page 55: ...0 09 2021 Laser Scanners 55 24 1 3 Profile Approximation tab The tab provides access to the parameters of the profile approximation algorithm To display a description of parameters click on the questi...

Page 56: ...segment not a broken line and a circle arc is approximated by a circular arc In difficult cases when the profile features do not allow approximating a circle with an arc with sufficient accuracy appr...

Page 57: ...points left to right required to combine these points into a single fragment The splitting is done automatically by manipulating the specified parameters The control of merging the points into fragmen...

Page 58: ...Approximation parameters Maximum deviation mm the maximum permissible distance in mm between the profile point and the approximating segment If the next point does not meet this criterion a new segmen...

Page 59: ...ximum amount 5 Maximum amount 10 New lines were not added since all approximating lines meet the criterion Maximum deviation 1 mm 24 2 1 2 2 Approximation by arcs Approximation parameters Enable enabl...

Page 60: ...or of approximating a profile element by an arc If this parameter is exceeded the element is approximated by a segment Merge threshold mm the threshold for combining consecutive adjacent arcs into one...

Page 61: ...esponds to the true vertex of the angle 24 2 2 Stage 2 Building a graph Upon completion of the profile approximation procedure it is necessary to build a computational graph The computation graph is a...

Page 62: ...a is intended to specify the area in which the selected block operates You can move and resize the search area with the mouse 24 2 2 1 Results display area The area is intended for visual control and...

Page 63: ...gments to obtain a stable splitting in accordance with the profile shape See par 24 2 1 Place two segment detector blocks in the graph building area to select the left and right segments Segments are...

Page 64: ...of the eip block will display the placement of data from the block input in the input assembly this data is sent to the network The location of the data within the assembly can be changed by dragging...

Page 65: ...the flag result is not valid the internal representation of the distance of SDT_SCALAR type is used see par 24 3 1 Then the internal representation of the distance is converted to the general type flo...

Page 66: ...epresents a single measurement signal value In the current revision it corresponds to the float data type In future revisions this may change SDT_POINT point_t Point In the current revision it has the...

Page 67: ...gles conversion of units of measurement etc 5 Converters Smart blocks for performing conversions conversion of types conversion of units of measurement merging of primitives decomposition of primitive...

Page 68: ...the desired angle Examples top bottom left right Angle value 24 Angle tolerance 2 Angle value 99 Angle tolerance 2 Angle value 105 Angle tolerance 2 Angle value 25 Angle tolerance 2 Outputs pos SDT_P...

Page 69: ...left to right from negative X values to positive X values Parameters Mode first The leftmost segment last The rightmost segment by index The segment with the index specified by the Index parameter ris...

Page 70: ...d in modes Mode first constr and Mode last constr Angle tolerance deg 0 89 The tolerance in both directions of the angle of inclination of the segment relative to the horizontal axis It is used in mod...

Page 71: ...m Threshold 0 1 mm Inputs in1 SDT_LINE The baseline against which the deviations are analyzed Outputs area SDT_SCALAR The total area of deviations mm2 calculate roughness calculating the roughness of...

Page 72: ...ts pos SDT_POINT The point with given coordinates fixed line the fixed line the position does not depend on the profile Parameters Slope deg 90 90 The slope of the line relative to the horizontal axis...

Page 73: ...ion templates set a set of templates for robotic welding The template can be set by the user through the block parameters or by an external system using a special block input Parameters General Group...

Page 74: ...1000 0 1 1000 Minimum and maximum length of segment 5 Angle 1 deg Angle 1 tolerance deg 90 10 0 45 Value and permissible deviation of angle 1 Angle 2 deg Angle 2 tolerance deg 90 10 0 45 Value and per...

Page 75: ...segment and the beginning of the right one Minimum allowable distance is 0 Angle deg Angle tolerance deg 50 150 0 89 Value and permissible deviation of angle 1 Lap left Group of parameters for the lap...

Page 76: ...of the templates set block Outputs det SDT_BOOL Flag of successful template detection the joint is recognized the correct data is output left segment SDT_SEGMENT The left segment of the corner right s...

Page 77: ...templates set block Outputs det SDT_BOOL Flag of successful template detection the joint is recognized the correct data is output segment 1 SDT_SEGMENT Segment 1 segment 2 SDT_SEGMENT Segment 2 segme...

Page 78: ...arameters Mode convex Convex trapezoid concave Concave trapezoid hollow convex concave Basis tolerance deg 0 60 The permissible angle between segments to the left and right of the trapezoid Basis tole...

Page 79: ...oint two segments form the corner joint Parameters Mode convex The convex corner joint concave The concave corner joint convex concave Basis tolerance deg 0 60 The permissible angle between the segmen...

Page 80: ...ate segments 24 3 2 4 Math functions section point to point distance calculating the distance between two points arriving at the block inputs Measuring the distance between the center of the trapezoid...

Page 81: ...g of one segment leftmost point and the end of another segment rightmost point end begin The distance between the end of one segment rightmost point and the beginning of another segment leftmost point...

Page 82: ...T Segment 2 Outputs point SDT_POINT The intersection point of two segments angle SDT_SCALAR The angle between segments in degrees middle of two points calculating the midpoint between two points Calcu...

Page 83: ...e system of the external device z SDT_SCALAR The Z coordinate in the 3D coordinate system of the external device segment 2D to 3D converting the line segment from the local 2D coordinate system of the...

Page 84: ...9 values Smoothing by 9 values 11 values Smoothing by 11 values 13 values Smoothing by 13 values 15 values Smoothing by 15 values Inputs in1 SDT_SCALAR Input value for filtering Outputs out SDT_SCALA...

Page 85: ...ting a single precision floating point value to a scalar value Inputs in SDT_FLOAT Floating point value Outputs out SDT_SCALAR Scalar value double to scalar converting a double precision floating poin...

Page 86: ...to the left end of the segment the smaller X coordinate right SDT_POINT The point corresponding to the right end of the segment the greater X coordinate Outputs out SDT_SEGMENT Line segment two point...

Page 87: ...nce of this block is allowed on the graph Parameters Input point 1 256 Input assembly number according to EIP specification Output point 1 256 Output assembly number according to EIP specification Ass...

Page 88: ...port number of the host to which the datagram is sent Input datagram bytes 8 16384 The size of the received datagram This datagram must contain data for the block outputs Receive IP XXX XXX XXX XXX T...

Page 89: ...CP The addresses of the objects Coils Discrete inputs Input registers Holding registers are independent and can overlap Inputs and outputs of the block are generated dynamically using the context menu...

Page 90: ...istribution of block inputs over the input assembly The values of the inputs will be located in accordance with this parameter Input registers Address 0 65535 The starting address of the object Count...

Page 91: ...to 0 coordinates along the X axis It is performed after applying the Swap X Y parameter Flip Y axis on off Flip relative to 0 coordinates along the Y axis It is performed after applying the Swap X Y p...

Page 92: ...cable are not connected Check the cables Incorrect settings of the network card of the PC Check the network card configuration see par 12 1 Scanner freezes Reboot the scanner Scanner electronics failu...

Page 93: ...in In Recovery mode when you enter the IP address of the scanner in the address bar of the browser a simplified web page will be loaded In this page you can perform the following actions view general...

Page 94: ...gnal of adjacent pixels The button for enabling the mode of editing defective pixels of the CMOS sensor EDIT PIXELS button is located in the web interface of the scanner in the area of additional disp...

Page 95: ...art Revision 2 1 2 20 09 2021 Laser Scanners 95 To clear the table row cancel the defective pixel interpolation click in the required row After clicking all the defective pixels added to the table wil...

Page 96: ...F627Smart Revision 2 1 2 20 09 2021 29 Annex 3 Overall and mounting dimensions of scanners with options 29 1 Example of a scanner with replaceable protective windows EW option The scanners with replac...

Page 97: ...RF627 RF627Smart Revision 2 1 2 20 09 2021 Laser Scanners 97...

Page 98: ...98 Laser Scanners RF627 RF627Smart Revision 2 1 2 20 09 2021 29 2 Example of a scanner with air cooling AK EW AC option The scanner with replaceable windows air protection of windows and air cooling...

Page 99: ...F627 RF627Smart Revision 2 1 2 20 09 2021 Laser Scanners 99 29 3 Example of a scanner with water cooling AK EW AC option The scanner with replaceable windows air protection of windows and water coolin...

Page 100: ...30 api v1 config params api v1 config params values reading and writing device parameters For reading you can request specific parameters by name or index To write a parameter it is necessary to form...

Page 101: ...the PUT request o GET 192 168 1 30 api v1 authorization o PUT 192 168 1 30 api v1 authorization key 230d84e16c0dae529098f1f1bb4debb3a6db3c870c4699245e651c06b 714deb35a4d0a43a99f5ea0cc771a0e189c190a 3...

Page 102: ...this document is indicated in the section title Command name MSG_GET_SENSOR_VERSION Scanner command Type Length 1 0 0 0 Parameters none Scanner response Type Length major minor 1 0 0 0 1 0 0 0 Paramet...

Page 103: ...eration mode of the scanner Command name MSG_SET_SENSOR_EXPOSURE Scanner command Type Length exp0 exp1 exp2 6 0 6 0 0 0 0 0 0 0 Parameters exp0 exposure time for the first frame exp1 exposure time for...

Page 104: ...OS sensor Reducing the size of the area increases the operating frequency of the scanner The pair X1 Y1 sets the top left position of the ROI and the pair X2 Y2 sets the bottom right position of the R...

Page 105: ...pad6 127 0 0 0 0 0 0 0 0 0 0 0 Parameters mode scanner operation mode in the current version it is always 0 measurement output mode pad1 separator reserve temp1 CPU temperature the value is calculated...

Page 106: ...eparator reserve 31 2 8 Setting the welding template This command sets the index of the template used for finding a welding joint and outputting its attributes Command name MSG_SET_BASIC_SEAM_TYPE Sca...

Page 107: ...s This command allows sending measurement results welding joint parameters The index of the welding joint is specified by the MSG_SET_BASIC_SEAM_TYPE command The list of parameters depends on the type...

Page 108: ...1 depends on the template not used in the current version prm 0 st status of parameter 1 not used in the current version prm 15 val value of parameter 16 depends on the template not used in the curre...

Page 109: ...ting the profile Each element includes a description of a part of the profile used only for graphical display of an element in the editor as well as a set of self constraints and relative constraints...

Page 110: ...of the template meets the constraints the template is considered found The det output of the block will be set to TRUE and the block outputs will receive data about segments or arcs in the future 32 3...

Page 111: ...Important the first variant must always exist and include all elements of the template 2 A list of elements of the current template and the specified self and relative constraints Clicking on the con...

Page 112: ...ximated profile segments Turn on off the display of approximated profile elements Clear the template Save the template in json format Upload the template to the scanner Close the template editor 32 3...

Page 113: ...grid points forming a polyline appear IMPORTANT The shape of the polyline without specified relative constraints angles between segments and distances between segments does not matter when searching f...

Page 114: ...take into account the shape of the template i e permissible change of elements and permissible ratio between pairs of elements There are two types of constraints self constraints and relative constrai...

Page 115: ...ollowing relative constraints are provided Distance The shortest distance from the end point of the main element to the start point of the relative element Parameters min minimum allowable distance ma...

Page 116: ...nce in perpendicular direction 32 3 2 3 Adding constraints to a template To add a constraint select the main and relative lines When you click on a line the main line is selected first highlighted in...

Page 117: ...element for which this constraint is specified The checkbox next to the constraint enables or disables checking of this constraint when searching for a template The numeric fields define the paramete...

Page 118: ...The template variant determines which elements of the template may be missing When displaying variants the number of the variant is shown along the vertical axis and the number of the element along t...

Page 119: ...nts of the same template Variant 1 All lines are active Variant 2 Line 3 is not active Variant 3 Line 2 is not active 32 3 3 Example of creating a template Below is a sequence of steps to create a tem...

Page 120: ...for element 1 1 Select segment 1 in this case it will become the main element 2 In the Self constraints section of element 1 add a constraint of the Length type 3 Select the added constraint in the S...

Page 121: ...nt The numerical value of the current angle between the elements is also shown When specifying a tolerance the displayed sector must include a relative element 7 Reset the previous selection by clicki...

Page 122: ...f constraints section of element 2 add a constraint of the Length type 3 Select the added constraint in the Self constraints list and specify the minimum and maximum length of the segment 4 Reset the...

Page 123: ...s case it will become the main element 2 In the Self constraints section of element 3 add a constraint of the Length type 3 Select the added constraint in the Self constraints list and specify the min...

Page 124: ...elative constraints list and specify the target angle and tolerance Adding constraints for element 4 1 Reset the previous selection Select segment 4 in this case it will become the main element 2 In t...

Page 125: ...ants section and make element 3 inactive uncheck the box 2 Add a new variant by clicking the ADD button in the Variants section and make element 2 inactive uncheck the box As a result the template wil...

Page 126: ...ef else endif should be used with caution declaration of functions is only supported by the ANSI standard function pointers are not supported the following declarations are ignored static extern volat...

Page 127: ...t8_t uint16_t int16_t uint32_t int32_t Special types are used to work with the input and output ports of the block They are consistent with the data types used inside the computation graph Type Size b...

Page 128: ...t float tan float float tanh float 33 3 2 Special methods Special methods do not require the connection of additional modules void inputs_sync Synchronization of data at all inputs of the smart block...

Page 129: ..._t val Writing data to the output port named portName If there is no port with this name or a type mismatch the value will be invalid 33 4 Examples of scripts ROI position control define ROI_SIZE 30 p...

Page 130: ...Changed the measurement triggering system 4 Added the ability to view oscillograms of signals at the scanner inputs 5 Added the ability to edit defective pixels 6 Added notifications in the web inter...

Reviews: