background image

221

7

Se

ttin

gs

1

Use the four-way controller (

23

) to select [Alarm] 

on the [

W

 Setting] menu.

Check that [Alarm] is set to 

O

 (On).

2

Press the four-way 

controller (

5

). 

The Alarm screen appears.

Check the alarm frequency and time.

3

Press the 

3

 button twice.

The camera returns to 

A

 mode or 

Q

 mode.

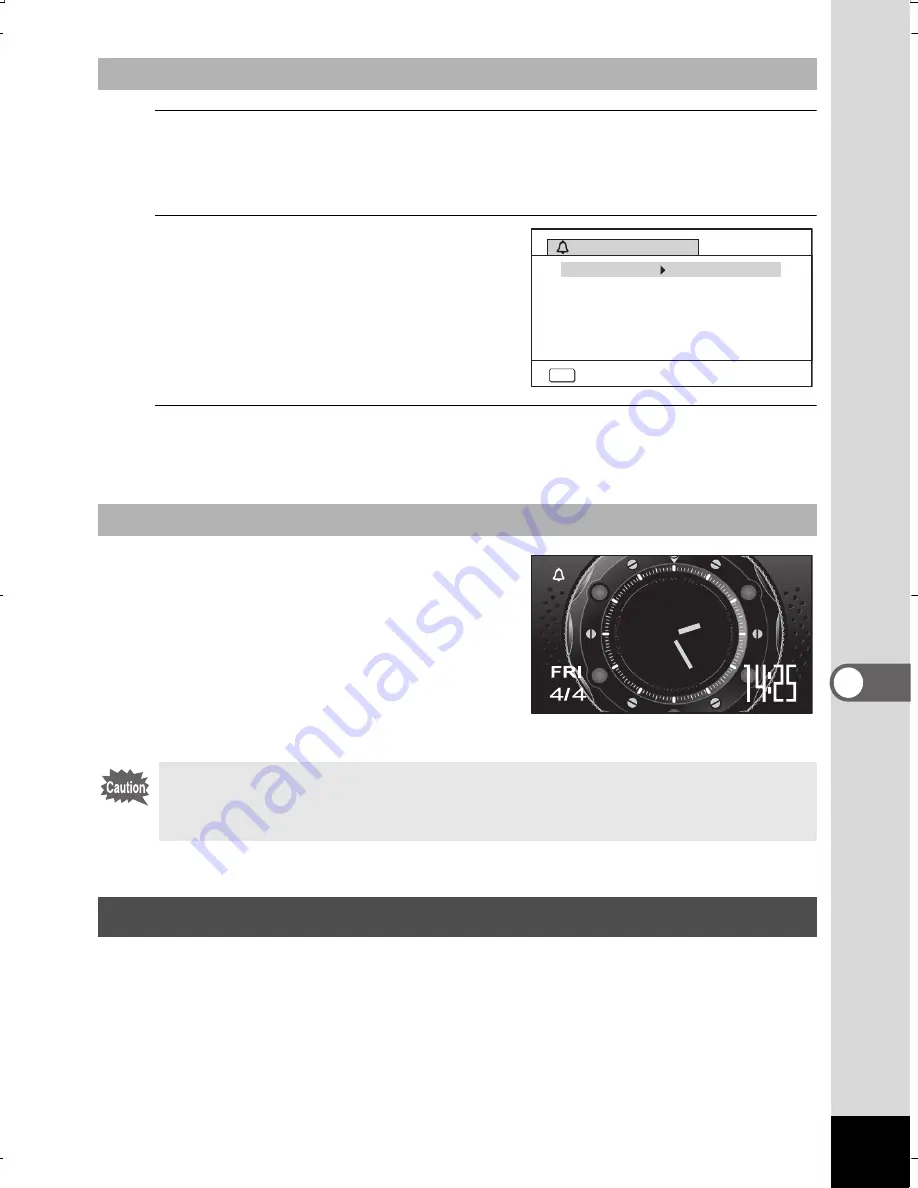
The Clock mode screen appears and 

the alarm rings for one minute when 

the set time is reached while the camera 

is turned off.

You can stop the alarm by pressing any 

button on the camera while the alarm 

is ringing.

The date and time selected in “Setting the Date and Time” (p.49) and 

“Changing the Date and Time” (p.217) serve as the 

W

 ( Hometown) date 

and time. By using the world time function, you can display the time 

in a city other than the Hometown (

X

 Destination). This is useful 

when taking pictures in a different time zone.

Checking the Alarm

Turning the Alarm Off

The alarm will not ring if the camera is on when the set time is reached.

Even if an alarm is set, the alarm will not ring while interval shooting 

is being performed.

Setting the World Time

MENU

14:25

Once

14:14

Time

Settings complete

Alarm

Alarm

Cancel

WG20_OPM_ENG.book  Page 221  Wednesday, February 5, 2014  2:20 PM

Summary of Contents for WG-20

Page 1: ...To ensure the best performance from your camera please read the Operating Manual before using the camera Digital camera Operating Manual...

Page 2: ...d or other countries HDMI the HDMI logo and High Definition Multimedia Interface are trademarks or registered trademarks of HDMI Licensing LLC in the United States and or other countries Eye Fi the Ey...

Page 3: ...play if the camera is aimed at a bright subject This is known as a smear but it is not a malfunction There is a possibility that the illustrations and the display screen in this manual are different f...

Page 4: ...ery or the AC adapter and contact your nearest service center Continuing to use the product can cause a fire or electric shock Caution Do not place your finger on the flash when it is discharging as t...

Page 5: ...a thunder storm should occur while using the battery charger or AC adapter unplug the AC plug cord and discontinue use Continuing to use the product can cause damage to the equipment fire or electric...

Page 6: ...ied battery with this camera Use of other batteries may cause an explosion or fire Do not disassemble the battery Disassembling the battery may cause an explosion or leakage Remove the battery from th...

Page 7: ...ontents of the recording cannot be guaranteed if recording playback or transferring your data to a computer etc is not possible due to a malfunction of your camera or recording media SD Memory Card et...

Page 8: ...properties of the liquid crystal and is not a malfunction If the camera is subjected to rapid temperature changes condensation may form on the inside and outside of the camera Therefore put the camera...

Page 9: ...emoving the SD Memory Card immediately after using the camera as the card may be hot Keep the battery card cover closed and do not remove the SD Memory Card or turn the camera off while the data is be...

Page 10: ...ry Cards that are unused or have been used on another camera Refer to Formatting the Memory p 214 Please note that deleting data or formatting the SD Memory Cards or the built in memory does not compl...

Page 11: ...ll remain free of trouble or damages Waterproof performance is not guaranteed if the camera is exposed to impact such as being dropped or hit Make sure that there are no cracks or scratches on the rub...

Page 12: ...ly Do not open the battery card and terminal covers underwater Do not use in hot water or in a hot spring Do not apply excessive force to the camera for example diving into water with it Doing so may...

Page 13: ...acking or cracks or dents in the packing or packing contact surface If there is any such damage contact your nearest service center If the camera is very dirty or after it has been used in the sea mak...

Page 14: ...itor Indications 23 Getting Started 32 Attaching the Strap 32 Attaching the Strap 32 Powering the Camera 33 Charging the Battery 33 Installing the Battery 34 Using the AC Adapter 38 Installing the SD...

Page 15: ...r Pictures Frame Composite Mode 92 Using the Self timer 94 Taking a Series of Pictures Continuous Shooting Burst Shooting 95 Taking Pictures Using the Remote Control Unit Optional 97 Taking Pictures a...

Page 16: ...n Function 144 Recording a Movie from Pictures Taken at a Set Interval Interval Movie 145 Saving the Settings Memory 149 Playing Back and Deleting Images 151 Playing Back Images 151 Playing Back Still...

Page 17: ...g and Playing Back Sound 208 Recording Sound Voice Recording Mode 208 Setting Voice Recording 208 Recording Sounds 209 Playing Back Sound 210 Adding a Voice Memo to Images 212 Recording a Voice Memo 2...

Page 18: ...on Mode 247 Connecting to a Windows PC 249 Connecting the Camera and Your Windows PC 249 Using MediaImpression on Windows 250 Disconnecting the Camera from Your Windows PC 251 Connecting to a Macintos...

Page 19: ...page number for an explanation of the related operation Indicates information that is useful to know Indicates precautions to be taken when operating the camera A Mode This is the mode for taking stil...

Page 20: ...18 Memo...

Page 21: ...This chapter explains how to view still pictures and movies on the camera or on a TV and how to delete images sound files and movies from the camera 5 Editing and Printing Images This chapter explain...

Page 22: ...ng manual to register your product to apply for newsletters or to find the latest firmware information Checking the Contents of the Package Camera RICOH WG 20 Strap O ST104 Software CD ROM S SW147 USB...

Page 23: ...er switch Power lamp green Flash Speaker Microphone Self timer lamp Focus assist Remote control receiver Macro light Display Tripod socket Battery card cover PC AV terminal Battery lock lever Terminal...

Page 24: ...shake during shooting in Digital Microscope mode p 90 Insert two clips above and below the macro lights part When attaching and detaching the macro stand do not hold the clip part When using the macro...

Page 25: ...ra shake is likely to occur To prevent the camera from shaking use a tripod a remote controller optional and or the self timer function p 94 p 97 You cannot turn off the LCD in N Frame Composite e Pet...

Page 26: ...ppears on the display p 110 1 Shooting mode p 69 12 Drive mode p 94 p 101 2 Battery level indicator p 37 13 Focus mode p 110 3 Face Detection icon p 72 14 Eye Fi communication status p 231 4 Date Impr...

Page 27: ...d Eye Fi is set to P off Eye Fi version error The version of the Eye Fi card is out of date 17 disappears two seconds after the camera is turned on 19 depends on the D Range Setting setting in the A R...

Page 28: ...g mode p 69 A14 Histogram p 30 A2 Battery level indicator p 37 A15 Sensitivity p 122 A3 Face Detection icon p 72 A16 World time setting A4 Date Imprint setting p 136 A17 D Range Setting p 125 A5 EV Co...

Page 29: ...n is set to O O When Highlight Correction and Shadow Correction are both set to O If Highlight Correction and Shadow Correction are both set to P Off nothing appears in A17 B1 and B2 are only displaye...

Page 30: ...h time you press the 4 W button Display in Q Mode The display cannot be changed by pressing the 4 W button while playing back a voice memo movie or pausing playback OK OK OK Edit 10 100 003 0038 100 0...

Page 31: ...nds When no operation is performed for two seconds in Normal Display or Histogram Info only Edit disappears A1 Face Detection icon p 71 A10 Eye Fi communication status p 231 A2 Playback mode Q Still P...

Page 32: ...histogram shows the brightness distribution of an image The horizontal axis represents brightness dark at the left and bright at the right and the vertical axis represents the number of pixels The sh...

Page 33: ...and when the image is overexposed the part to the right is cut off bright portions This camera has a function where overexposed areas are indicated as blinking red and underexposed areas as blinking...

Page 34: ...ching the Strap Attach the strap O ST104 supplied with the camera 1 Pass the narrow end of the strap through the strap lug 2 Pass the other end of the strap through the loop and pull tight Attaching t...

Page 35: ...rated 125 V 7A minimum 6 ft 1 8 m 1 Connect the AC plug cord to the battery charger 2 Plug the AC plug cord into the power outlet 3 Place the battery in the battery charger so that the PENTAX logo is...

Page 36: ...may cause damage or overheating The battery has reached the end of its service life when it starts to run down soon after being charged Replace it with a new battery If the battery is inserted correc...

Page 37: ...y pressing the battery card cover in the opposite direction indicated by 2 slide the cover The cover clicks to confirm that it is securely closed 1 Open the battery card cover 2 Press the battery lock...

Page 38: ...the battery for 30 minutes using the battery charger and store the battery separately Be sure to recharge the battery every 6 to 12 months Storing the battery below room temperature is ideal Avoid st...

Page 39: ...can check the battery level by the indicator on the display Image Storage Capacity 1 flash used for 50 of shots Movie Recording Time 2 Sound Recording Time 2 Playback Time 2 Approx 260 pictures Approx...

Page 40: ...Insert the DC coupler Using the side of the DC coupler to press the battery lock lever insert the DC coupler Confirm that the DC coupler is locked in place The battery card cover will not close while...

Page 41: ...o avoid fire or electric shock Be sure to read About the Battery Charger and the AC Adapter p 3 before using the AC adapter Be sure to read the operation manual accompanying the AC adapter kit K AC117...

Page 42: ...ory Card Allow the camera to dry completely before changing the SD Memory Card Avoid changing the card where the camera is likely to get wet or dirty and make sure that your hands are dry Do not use e...

Page 43: ...ot be recorded correctly if the card is not inserted all the way 3 Close the battery card cover While lightly pressing the battery card cover in the opposite direction indicated by 2 slide the cover T...

Page 44: ...pictures on the A Rec Mode menu Choose the appropriate number of recorded pixels and frame rate in Movie on the A Rec Mode menu For an approximate guide to the number of images or the length of record...

Page 45: ...mera turns off and both the power lamp and display turn off The SD Memory Card is checked when the camera turns on and the memory status is displayed Taking Still Pictures 1p 65 Checking the SD Memory...

Page 46: ...pictures 1 Press the power switch while holding down the Q button The display turns on and the camera starts up in playback mode Starting up in the Playback Mode To switch from Playback Mode to A mode...

Page 47: ...o set the current date and time 1 Use the four way controller 2345 to choose the display language The language date and time can be changed later Refer to the pages below for instructions To change th...

Page 48: ...desired settings do not appear 3 Press the four way controller 3 twice to select Settings complete 4 Press the 4 button The Date Adjustment screen appears Set the date and time by following the proced...

Page 49: ...xits the settings screen and returns the camera to capture mode 2 Press the 3 button The A Rec Mode menu appears 3 Press the four way controller 5 4 Use the four way controller 32 to select Language 5...

Page 50: ...way controller 45 to select O or P 8 Press the 4 button The Initial Setting screen reappears 9 Press the four way controller 3 to select Settings complete 10 Press the 4 button The Date Adjustment sc...

Page 51: ...eturns to Date Format The video output format NTSC PAL is set to the format of the city selected in Hometown on the Initial Setting screen See the following pages for information on the available vide...

Page 52: ...in step 10 the camera clock is reset to 00 seconds To set the exact time press the 4 button when the time signal on the TV radio etc reaches 00 seconds When the Initial Setting or Date Adjustment scr...

Page 53: ...pages below for instructions To change the language follow the steps in Changing the Display Language 1p 225 To change the date and time follow the steps in Changing the Date and Time 1p 217 To chang...

Page 54: ...de is set to 3 s and p 66 Takes a still picture when pressed down fully p 66 Pressing down fully starts and stops movie recording in C Movie and Underwater Movie modes p 139 p 142 Pressing down fully...

Page 55: ...Detection Off Face Detection On Selects or registers a pet in e Pet mode 7 Four way controller 2 Changes the drive mode p 94 p 101 3 Displays the Capture Mode Palette p 70 4 Changes the flash mode p...

Page 56: ...ing y enlarges the image Press f to return to the previous display p 162 In 12 image display press f to change to folder or calendar display p 154 In folder calendar display press y to change to 12 im...

Page 57: ...lay p 151 Fast forwards fast reverses frame forwards frame reverses reverses a movie and makes a movie play forwards during playback p 152 Fast forwards reverses and moves to the next index in sound f...

Page 58: ...an perform simple editing operations on the images that are played back Follow the procedure below to switch between A mode and Q mode 1 Press the Q button The camera switches to Q mode 1 Press the Q...

Page 59: ...ting menu Functions for playing back and editing images and sound files are displayed from the Playback Mode Palette Press the 3 button in A mode to display the A Rec Mode menu Press the 3 button in Q...

Page 60: ...Setting Bright Exit Rec Mode Recorded Pixels Image Tone Quality Level White Balance AE Metering AF Setting Bright Exit Setting Exit Sound Date Adjustment 04 04 2014 World Time Alarm English Standard...

Page 61: ...rent camera settings 5 Use the four way controller 23 to change the setting The quality level changes each time the four way controller 23 is pressed 6 Press the 4 button or the four way controller 4...

Page 62: ...d the screen returns to step 3 To Save the Setting and Start Taking Pictures When the W Setting menu is displayed from Q mode you can switch to A mode by pressing the Q button To Save the Setting and...

Page 63: ...Macro For choosing whether or not to use the auto macro function p 113 Focus Assist For setting whether or not to use the focus assist light p 114 AE Metering For choosing the area of the screen that...

Page 64: ...r to imprint the date and or time when taking still pictures p 136 IQ Enhancer For setting whether to perform the IQ enhancer p 137 Macro Light For setting whether or not to turn on the macro light fo...

Page 65: ...ing the HDMI output format when connecting to an AV device with an HDMI terminal p 229 Eye Fi For setting whether or not to use Eye Fi communication p 231 Brightness Level For changing the brightness...

Page 66: ...Setting Menu 1 W Setting Menu 2 W Setting Menu 3 Setting 2 4 MENU Exit Video Out Folder Name Date Auto Brightness Level HDMI Out Eye Fi NTSC USB Connection MSC Setting 3 4 MENU Exit Quick Zoom Guide...

Page 67: ...eady to take still pictures In this manual this is called Still Picture Capture mode 2 Confirm the subject and shooting information on the display The focus frame in the middle of the display indicate...

Page 68: ...ce detection frame on the display turns green when the camera focuses on the subject at the correct distance 4 Press the shutter release button fully The picture is taken The flash discharges automati...

Page 69: ...a shake Practice pressing the shutter release button halfway fully to learn where the first position and second position are Poor focusing conditions The camera may not be able to focus under the foll...

Page 70: ...is activated the message Closed eyes have been detected appears for 3 seconds Blink Detection Instant Review and Blink Detection When the Face Detection function does not work Blink Detection also doe...

Page 71: ...r way controller 3 in A mode The Capture Mode Palette appears 2 Use the four way controller 2345 to choose a shooting mode A guide of the selected shooting mode is displayed in the lower part of the d...

Page 72: ...bright skin tone p 83 X Digital Wide Stitches two pictures together to create a wider image p 102 c Digital SR Higher sensitivity reduces blur p 81 Q Surf Snow For bright images such as sand or snow A...

Page 73: ...total of 31 frames including both the main and white frames N Frame Composite For capturing images with a frame Recorded pixels is fixed to h or h p 92 Report For capturing image with fixed 1280 960 p...

Page 74: ...ppears right after the Face Detection function is switched to off Face Detection AF and AE may not work if the subject is wearing sunglasses has part of their face covered or is not looking toward the...

Page 75: ...er mode from one of these modes the Face Detection setting returns to the previous setting If you use the Face Detection function when the flash mode is set to Auto the flash mode automatically change...

Page 76: ...In b Auto Picture mode LED turns off after pressing the shutter release button halfway when the camera is in a mode with no face detection function When the Self Portrait Assist function is on LED doe...

Page 77: ...activated and the face detection frame appears p 71 When the camera detects a pet s full face the shutter is automatically released 4 Press the shutter release button halfway The automatically select...

Page 78: ...apply in b mode EV Compensation is unavailable You cannot turn the Face Detection function off The Focusing Area setting is fixed at J Multiple Flower cannot be selected when using Digital Zoom or Int...

Page 79: ...e you can enjoy easy picture taking using standard settings regardless of the settings in the A Rec Mode menu 9 mode settings are as shown below Taking Still Pictures 1p 65 Taking Pictures in the Basi...

Page 80: ...s green when the camera focuses on the subject at the correct distance 3 Press the shutter release button fully The picture is taken Assign 9 mode to the Green Button on the A Rec Mode menu for using...

Page 81: ...zoom If the Digital Zoom is set to off on the menu the Optical Zoom and the Intelligent Zoom ranges are available for use The zoom ratio of the intelligent zoom changes depending on the number of reco...

Page 82: ...en in the digital zoom range appear grainier than pictures taken in the optical zoom range Intelligent Zoom is not available under the following conditions When the number of recorded pixels is set to...

Page 83: ...se settings appropriate for taking pictures of dark scenes such as nightscapes To Set the Digital Zoom Saving the Digital Zoom Function setting 1p 149 Taking Pictures of Dark Scenes Night Scene Night...

Page 84: ...istance 5 Press the shutter release button fully The picture is taken The shutter speed tends to be slower when taking pictures of dark scenes To prevent the camera from shaking set the Pixel Track SR...

Page 85: ...ontroller 2345 to select c Portrait 3 Press the 4 button The shooting mode is selected and the camera returns to capture mode When the camera detects a person s face the Face Detection function is act...

Page 86: ...four way controller 2345 to select R Kids 3 Press the 4 button Kids mode is selected and the camera returns to capture mode When the camera detects a person s face the Face Detection function is activ...

Page 87: ...t mode is selected and the camera returns to capture status When the camera detects the pet s full face the shutter is automatically released 1 Press the I button on the capture status screen in e Pet...

Page 88: ...the registration will be canceled and the camera returns to the still picture capture mode Only dogs and cats can be registered using the Pet Detection function Other animals or human faces cannot be...

Page 89: ...pture status screen in e Pet mode The pet selection screen appears 2 Use the four way controller 45 to select the pet you want to delete 3 Press the Green button 4 Use the four way controller 2 to sel...

Page 90: ...ars p 71 4 Press the shutter release button halfway The focus frame on the display turns green when the camera focuses on the subject at the correct distance When the Sport mode is selected the focus...

Page 91: ...ode Palette appears 2 Use the four way controller 2345 to select Text 3 Press the 4 button The text mode selection screen appears 4 Use the four way controller 23 to select or Taking Pictures of Text...

Page 92: ...of leaves or specimens of tiny insects etc 1 Press four way controller 3 in A mode 2 Use the four way controller 2345 to select Digital Microscope Taking Pictures in Digital Microscope Mode The number...

Page 93: ...ns the area that is captured by the camera x Tele right Enlarges the subject 5 Press the shutter release button halfway The focus frame on the display turns green at the position where the camera focu...

Page 94: ...Use the four way controller 2345 to choose the frame you want to use 5 Press the y button The selected frame appears in single image display You can choose another frame using either of the following...

Page 95: ...ecorded pixels is fixed at h 2048 1536 h 1920 1080 You cannot turn off the LCD by pressing the 4 W button in N Frame composite mode At shipment the camera includes 3 default frames for each aspect rat...

Page 96: ...etects a person s face the Face Detection function is activated and the face detection frame appears p 71 4 Press the shutter release button halfway The focus frame on the display turns green when the...

Page 97: ...pictures In C Movie and Underwater Movie modes recording will start after ten seconds or two seconds Press the shutter release button halfway while the self timer is engaged to stop the countdown and...

Page 98: ...lly Pictures are taken continuously as long as you keep the shutter release button pressed The flash does not discharge in j and c modes j and c cannot be selected in 9 Green b Auto Picture Digital Mi...

Page 99: ...ed with the first shot When the Face Detection function is activated p 71 it works only when taking the first shot The Blink Detection function works only for the last shot The number of recorded pixe...

Page 100: ...k quickly and the camera takes a picture after about three seconds When h 0 sec Remote Control is selected The camera takes a picture immediately The operating range is approx 4 m 13 ft from the front...

Page 101: ...terval 5 Press the four way controller 3 The frame moves to Number of Shots Taking Pictures at a Set Interval Interval Shoot Interval 10 sec 99 min Set the camera to take pictures at intervals The int...

Page 102: ...hutter release button halfway The focus frame on the display turns green if the subject is in focus 11 Press the shutter release button fully Interval shooting starts The LCD turns off between shots d...

Page 103: ...the subject is in focus 4 Press the shutter release button fully Press the shutter release button once to automatically adjust the exposure and take the three pictures at different exposures Taking Pi...

Page 104: ...nto a single frame up to approx 21 mm coverage 35 mm film equivalent 1 Press the four way controller 3 in A mode The Capture Mode Palette appears 2 Use the four way controller 2345 to select X Digital...

Page 105: ...reen when the camera focuses on the subject at the correct distance 5 Press the shutter release button fully The first captured image is temporarily saved and the shooting screen for the second image...

Page 106: ...view guide When the Face Detection function is activated p 71 it works only when taking the first shot The number of recorded pixels for images captured with X mode is fixed at f 2592 1944 1cm Macro i...

Page 107: ...n The camera enters the F mode and the message Set shift direction is displayed 4 Use the four way controller 45 to choose the direction in which the images will be joined The screen for taking the fi...

Page 108: ...frame Move the camera so that the semi transparent image and the actual view overlap and press the shutter release button 8 Take the third frame Repeat steps 5 to 7 to take the third frame The panoram...

Page 109: ...red image s and you can retake the first frame When this option is selected after shooting the second frame the first and the second frames are stitched together and saved as a panoramic photograph Di...

Page 110: ...ed by the light from the flash being reflected in the subject s eyes The flash discharges regardless of the light conditions The flash mode is fixed at a in the following situations When C Movie Under...

Page 111: ...cture This phenomenon occurs when the light from the flash is reflected in the subject s eyes It can be reduced by illuminating the area around the subject or moving closer to the subject and zooming...

Page 112: ...amera is focused on the subject in the autofocus area when the shutter release button is pressed halfway 1cm Macro This mode is used when the distance to the subject is from 1 cm to 30 cm The camera i...

Page 113: ...e camera returns to capture mode After the focus is fixed you can press the four way controller 5 again to display the indicator and readjust the focus In 9 Green mode you can only select q or 3 1cm M...

Page 114: ...pull down menu appears 6 Use the four way controller 23 to change the Focusing Area 7 Press the 4 button The setting is saved The shooting mode and drive mode cannot be changed while the indicator is...

Page 115: ...the respective macro range and is not done in the standard range 1 Press the 3 button in A mode The A Rec Mode menu appears 2 Use the four way controller 23 to select AF Setting 3 Press the four way c...

Page 116: ...e the four way controller 45 to select O On P Off The setting is saved 6 Press the 3 button twice The camera returns to capture mode Setting the Assist Light Focus Assist Looking at the light directly...

Page 117: ...y controller 23 to select a finishing tone 5 Press the 4 button The setting is saved 6 Press the 3 button The camera returns to capture mode Setting the Image Tone When Monochrome is selected Tone Adj...

Page 118: ...ng table for the appropriate settings according to expected usage The default setting is g V 1280 960 can only be set for recorded pixels when Report mode is set V does not appear in the Recorded Pixe...

Page 119: ...e is fixed at h h The number of recorded pixels for images captured in X Digital Wide mode is fixed at f The number of recorded pixels will be h if you exit Digital Wide mode without taking the second...

Page 120: ...ge the quality level The maximum number of pictures you can take is displayed at the top of the screen when you select a quality level 5 Press the 4 button The setting is saved 6 Press the 3 button Th...

Page 121: ...ce F Auto The camera adjusts the white balance automatically G Daylight Use this mode when taking pictures outside in sunlight l Shade Use this mode when taking pictures outside in the shade I Tungste...

Page 122: ...it fills the frame displayed in the center of the screen 3 Press the shutter release button fully The white balance is automatically adjusted 4 Press the 4 button The setting is saved and the screen...

Page 123: ...the picture with the center of the image having more influence on the exposure N Spot AE metering The camera determines the exposure by metering the brightness only at the center of the image When the...

Page 124: ...utton The camera returns to capture mode Setting the Sensitivity AUTO The sensitivity is automatically adjusted by the camera Default value sensitivity 80 800 80 The lower the sensitivity the less noi...

Page 125: ...3200 or 6400 the number of recorded pixels is fixed at f 2592 1944 2592 1464 When set to c Digital SR 9 Green C Movie or Underwater Movie mode only AUTO is available When set to S Fireworks mode the...

Page 126: ...lue To darken select a negative value You can choose the EV setting in the range of 2 0 EV to 2 0 EV in 1 3 EV steps 4 Press the 3 button The camera returns to capture mode Setting the Exposure EV Com...

Page 127: ...5 Use the four way controller 45 to select O or P 6 Press the 3 button twice The camera returns to capture status The D Range Setting icon appears on the display Correcting the Brightness D Range Sett...

Page 128: ...a returns to capture mode D Range settings are not applicable in b Auto Picture 9 Green modes Setting Pixel Track SR Shake reduction settings in C Movie and Underwater Movie mode are configured under...

Page 129: ...erval Shooting Interval 10 sec 99 min Set the camera to take pictures at intervals The intervals can be set in increments of one second from ten seconds to 4 minutes or in 1 minute increments from 4 t...

Page 130: ...saved and the frame returns to Start Delay 9 Press the 3 button twice The camera returns to the shooting screen The operations up to this point have only configured the Interval Shoot settings To act...

Page 131: ...to switch between O On or P Off O On Blink Detection function works P Off Blink Detection function does not work The setting is saved 4 Press the 3 button The camera returns to capture mode Setting B...

Page 132: ...e setting is saved 4 Press the 3 button The camera returns to capture mode You can assign one of the following functions to the Green button Green Mode p 77 Voice Recording p 208 Movie p 141 or Fn Set...

Page 133: ...n 5 Press the 4 button The setting is saved 6 Press the 3 button The camera returns to capture mode Assigning a Function Green Mode is registered as the default setting If you select Movie for both Fn...

Page 134: ...n Setting screen appears 6 Use the four way controller 23 to select a key you want to assign a function to 7 Press the four way controller 5 A pull down menu appears 8 Use the four way controller 23 t...

Page 135: ...ou assign the Fn Setting to the Green button You can assign only one function to each key Still picture mode Movie mode Default setting 2 EV Compensation 2 Movie SR 3 Recorded Pixels 3 EV Compensation...

Page 136: ...r soft outlines 1 Press the 3 button in A mode The A Rec Mode menu appears 2 Use the four way controller 23 to select Sharpness 3 Use the four way controller 45 to change the sharpness level F Soft G...

Page 137: ...roller 23 to select Saturation Tone Adjustment 3 Use the four way controller 45 to select the level of saturation or tone F Low Blue for tone G Normal B W for tone H High Sepia for tone 4 Press the 3...

Page 138: ...en taking still pictures 1 Press the 3 button in A mode The A Rec Mode menu appears 2 Use the four way controller 23 to select Date Imprint 3 Press the four way controller 5 A pull down menu appears 4...

Page 139: ...saved 4 Press the 3 button The camera returns to capture mode The date and or time imprinted with the Date Imprint function cannot be deleted Note that if the printer or the image editing software is...

Page 140: ...or 6400 In the c Digital SR mode When the drive mode is set to c Burst Shooting Setting the Macro Light In Digital Microscope mode the macro lights turn on regardless of whether the setting is turned...

Page 141: ...re mode 4 Press the shutter release button halfway The focus frame on the display turns green when the camera focuses on the subject at the correct distance 5 Press the shutter release button fully If...

Page 142: ...p 9 The flash will not discharge in mode When the Focus Mode is set to you can adjust the focus before recording starts and during recording Optical and digital zoom can be used in Underwater Movie mo...

Page 143: ...Press the 4 button C Movie mode is selected and the camera returns to capture mode The following information appears on the display 1 Movie mode icon 2 Movie shake reduction icon 3 Remaining recordab...

Page 144: ...tical and digital zoom can be used before recording starts Digital zoom is available during recording when digital zoom p 81 is set to O On When the shooting mode is set to C Movie or Underwater Movie...

Page 145: ...r 5 A pull down menu appears Selecting the Number of Recorded Pixels and Frame Rate for Movies Setting Recorded Pixels Frame Rate Use M 1280 720 30 fps Records images in HDTV format 16 9 Movement is r...

Page 146: ...SR Movie Shake Reduction function 1 Press the 3 button in A mode The A Rec Mode menu appears 2 Use the four way controller 23 to select Movie 3 Press the four way controller 5 The Movie screen appears...

Page 147: ...a Set Interval Interval Movie Interval You can set this to 1 minute 5 minutes 10 minutes 30 minutes or 1 hour Total Time Set the total time from 10 minutes to 359 hours The total time and the settable...

Page 148: ...3 to set the hours then press the four way controller 5 3 Use the four way controller 23 to set the minutes then press the four way controller 5 The frame returns to Total Time 7 Press the four way co...

Page 149: ...e 3 button are pressed during standby Pressing the 4 button cancels interval movie You can set the Interval Movie from A Rec Mode menu 1 Press the 3 button in A mode The A Rec Mode menu appears 2 Use...

Page 150: ...rt delay a start time corresponding to the current time and the start delay you set is displayed in real time The total time you can set differs according to the shooting interval you set as indicated...

Page 151: ...etting for each item is on or off Item Description Default setting Page Face Detection A Face Detection mode set by using the I button P p 71 Flash Mode The flash mode set with the four way controller...

Page 152: ...emory 3 Press the four way controller 5 The Memory screen appears 4 Use the four way controller 23 to choose an item 5 Use the four way controller 45 to select O On or P Off 6 Press the 3 button twice...

Page 153: ...us or next image appears Press the i button while the image is displayed to display the Delete screen Press the four way controller 2 to select Delete and press the 4 button Playing Back Still Picture...

Page 154: ...ay controller 2 Pauses playback Zoom button y Increases the volume Zoom button f Reduces the volume Press and hold the four way controller 5 Fast forwards playback Press and hold the four way controll...

Page 155: ...page Use the four way controller 2345 to move the frame If there are too many images to fit on one page pressing the four way controller 24 while image 1 is selected will display the previous page Sim...

Page 156: ...wice in Q mode The screen changes to 12 image display 2 Press the f button The screen changes to folder display or calendar display Folder display The list of folders with recorded images and sound fi...

Page 157: ...e press the four way controller 3 The Playback Mode Palette appears 2 Use the four way controller 2345 to choose an icon The guide for the selected function appears below 3 Press the 4 button The play...

Page 158: ...Palette p 236 OK OK MENU Cancel 1 2 OK OK MENU Cancel 1 2 OK OK MENU Cancel Edit 100 100 0038 0038 100 0038 38 Image Rotation Rotates captured images Useful when viewing vertical images on a TV Slide...

Page 159: ...frame Select Overwrite or Save as to save p 192 Movie Editing Save as Still image For saving one frame from a movie as a still picture p 200 Divide Movies For dividing a movie into two Adding title pi...

Page 160: ...the four way controller 23 to select Start 6 Press the 4 button The slideshow starts Pressing the 4 button during the slideshow pauses the slideshow To resume the slideshow press the 4 button again 7...

Page 161: ...four way controller 23 to select an item and press the 4 button 5 Use the four way controller 23 to select Sound Effect 6 Use the four way controller 45 to select O On or P Off Except when the Screen...

Page 162: ...the four way controller 5 while playing back a movie or a picture with sound skips to the next image Sound files made in O Voice Recording are not played back in the slideshow Panorama images are dis...

Page 163: ...lect s Image Rotation and press the 4 button The rotation selection screen 0 Right 90 Left 90 or 180 appears 4 Use the four way controller 2345 to choose the rotation direction and press the 4 button...

Page 164: ...magnifies the image to 10 You can use the mark of the guide at the bottom left of the screen to check which portion of the image is magnified The following operations can be performed while an image i...

Page 165: ...ge you want to magnify 2 Confirm that the I icon is displayed in the image and press the I button The image is magnified around the face first recognized when the image was taken If multiple faces wer...

Page 166: ...larger magnification ratio Zoom button left f Zooms up on the subject being displayed for Face close up playback at an equal or slightly smaller magnification ratio Face close up playback is not avai...

Page 167: ...way controller 45 to choose the image sound file you want to delete 2 Press the i button A confirmation screen appears 3 Use the four way controller 2 to select Delete 4 Press the 4 button The image...

Page 168: ...the image with sound U appears on the images with sound 2 Press the i button A confirmation screen appears 3 Use the four way controller 2 to select Delete Sound 4 Press the 4 button The sound file i...

Page 169: ...es that you want to delete and press the 4 button O appears on the selected images and sound files Pressing and holding the y button displays the selected image in a single screen and you can check wh...

Page 170: ...images and sound files at once 1 Press the 3 button in Q mode The W Setting menu appears When you press the 3 button in A mode press the four way controller 5 once Deleting All Images and Sound Files...

Page 171: ...deleted 1 Enter Q mode and use the four way controller 45 to choose the image you want to protect 2 Press the four way controller 3 The Playback Mode Palette appears 3 Use the four way controller 2345...

Page 172: ...ay controller 2 to select Protect 8 Press the 4 button The selected image or sound file is protected To protect other images or sound files repeat Steps 5 to 8 Select Cancel to exit the Protect settin...

Page 173: ...e 4 button The Playback Mode Palette reappears To Protect All Images and Sound Files Protected images and sound files are deleted when the SD Memory Card or the built in memory is formatted p 214 To c...

Page 174: ...kit K AC117 optional is recommended p 38 For AV equipment with multiple video IN jacks check the operating manual of the AV device and select the video IN jack to which the camera is connected You ca...

Page 175: ...both devices on When viewing images on AV equipment with multiple video input terminals such as a TV refer to the operation manual of the device and select the video input terminal to which to connec...

Page 176: ...HDMI cable to the HDMI terminal 4 Connect the other end of the HDMI cable to the HDMI IN jack on the AV device 5 Turn the AV device and camera on The camera information is displayed on the screen of...

Page 177: ...es Close the terminal cover securely when not using the terminal How to close the terminal cover Close the cover in the opposite direction indicated by 3 While lightly pressing on the terminal cover s...

Page 178: ...select n Resize 4 Press the 4 button The screen for choosing the image size appears 5 Select Recorded Pixels and Quality Level Use the four way controller 45 to choose the size and quality Use the fo...

Page 179: ...e and save the cropped image as a separate image 1 Enter the Q mode and use the four way controller 45 to choose the image you want to crop 2 Press the four way controller 3 The Playback Mode Palette...

Page 180: ...tion The image is saved at the same quality level as the original Images are processed to reduce the size of people s faces detected with the Face Detection function p 71 when taking pictures so that...

Page 181: ...ge the reduction ratio F Approx 5 G Approx 7 H Approx 10 8 Press the 4 button A confirmation dialog for overwriting the image appears If the selected image is protected the processed image is saved as...

Page 182: ...choose from six filters red pink purple blue green and yellow Extract Color Processes the image using the selected color extraction filter You can choose from three filters red green and blue Color Em...

Page 183: ...he digital filter selection screen appears 1 B W Sepia 2 Toy Camera 3 Retro 4 Color 5 Extract Color 6 Color Emphasis 7 High Contrast 8 Starburst 9 Soft 10 Fish eye 11 Brightness 12 Miniature Subsequen...

Page 184: ...riting the image appears If the selected image is protected the processed image is saved as a new image and the following confirmation does not appear 7 Use the four way controller 23 to select Overwr...

Page 185: ...roller 23 to select Overwrite or Save as 9 Press the 4 button The images processed with the filter are saved To Select a B W Sepia Retro Color Extract Color Color Emphasis or Starburst Filter Four way...

Page 186: ...the four way controller 23 to select Overwrite or Save as 9 Press the 4 button The images processed with the filter are saved To Select Toy Camera High Contrast Fish eye Brightness or Miniature Filte...

Page 187: ...ard H Strong 6 Press the 4 button A confirmation dialog for overwriting the image appears If the selected image is protected the processed image is saved as a new image and the following confirmation...

Page 188: ...ixels of f When there is little contrast between the object and the background the shape of the object may not be sharp depending on the conditions of the original image Creating a Collage Image The c...

Page 189: ...from h or h 7 Press the 4 button Returns to the item selection screen 8 Use the four way controller 23 to choose the Layout 9 Press the four way controller 5 A pull down menu appears Selecting the Nu...

Page 190: ...12 Use the four way controller 23 to choose Backgnd 13 Press the four way controller 5 A pull down menu appears 14 Use the four way controller 23 to choose the background You can choose the white bac...

Page 191: ...or 19 Repeat step 18 to lay out the rest images 20 Press the 9 button Returns to the item selection screen Laying Out the Image The collage function cannot be used on the following images Movies or im...

Page 192: ...A confirmation dialog for saving the image appears 23 Use the four way controller 2 to select Save 24 Press the 4 button The edited image is saved Saving the Edited Image The quality level of the ima...

Page 193: ...s a new image and the following confirmation does not appear 5 Use the four way controller 23 to select Overwrite or Save as 6 Press the 4 button The edited image is saved Red eye Compensation The red...

Page 194: ...the four way controller 2345 to select N Frame Composite 4 Press the 4 button The 12 frame display of the frame selection screen appears 5 Use the four way controller 2345 to choose a frame Adding a F...

Page 195: ...confirmation does not appear 9 Use the four way controller 23 to select Overwrite or Save as 10 Press the 4 button The edited image is saved with the recorded pixels of h 2048 1536 h 1920 1080 Four wa...

Page 196: ...ting the camera to a computer 3 When the device detection window opens click Cancel 4 Insert the CD ROM into the CD ROM drive 5 When the installer window opens click EXIT 6 If there is not already a F...

Page 197: ...mera For more information on downloading refer to our website Overlaying Your Original Frame on an Image Type of original frame Blur Edge Composite Frame Type F All sides G Upper and lower sides H Rig...

Page 198: ...Frame Type and press the four way controller 5 7 Use the four way controller 23 to select a frame type and press the four way controller 4 8 Set Color in the same way as in Steps 6 and 7 9 Adjust the...

Page 199: ...to select Overwrite or Save as 14 Press the 4 button The edited image is saved with the recorded pixels of f 2592 1944 2592 1464 1 Press the Green button The frame position adjustment screen appears...

Page 200: ...way controller 2345 Press to adjust the position of the image Zoom button right y Press to make the image larger Zoom button left f Press to make the image smaller To Set Up Text Stamp I button Press...

Page 201: ...he four way controller 23 to select the color and press the four way controller 4 1 Press the Green button The preview screen appears 2 Press the 3 button The screen returns to the original screen 3 P...

Page 202: ...ie Editing 4 Press the 4 button The Movie Editing selection screen appears 5 Select Save as Still Image on the Movie Editing selection screen 6 Press the 4 button The screen appears for selecting a fr...

Page 203: ...es the movie 3 Stops the movie and returns to the first frame 4 Reverses the movie frame by frame 5 Advances the movie frame by frame 8 Press the 4 button A confirmation dialog appears 9 Use the four...

Page 204: ...icture are displayed 8 Press the 4 button The screen appears for confirming the position of the title picture 9 Use the four way controller 23 to select the position A Adds the title picture to the be...

Page 205: ...is played back for three seconds and then the movie is played back The still picture registered as title picture is used as the thumbnail of the movie When a title picture is added to the end of a mov...

Page 206: ...5 to select the image sound file you want to copy 4 Press the 4 button The selected image sound file is copied to the built in memory To copy other images or sound files repeat Steps 4 to 7 Select Can...

Page 207: ...1 In Q mode press the four way controller 3 The Playback Mode Palette appears 2 Use the four way controller 2345 to select r DPOF 3 Press the 4 button The screen for selecting Single Image or All Ima...

Page 208: ...another image and repeat steps 6 and 7 8 Press the 4 button The setting is saved and the screen shown in Step 4 reappears Depending on the printer or printing equipment at the photo processing lab the...

Page 209: ...ting a Single Image p 206 for details of how to make the settings 4 Press the 4 button The settings for all the images are saved and the camera returns to the DPOF setting screen Printing All Images T...

Page 210: ...the four way controller 23 to select Green Button 3 Press the four way controller 5 A pull down menu appears 4 Use the four way controller 23 to select Voice Recording and press the 4 button 5 Press...

Page 211: ...ess the shutter release button fully Recording stops Recording Sounds If you press and hold down the shutter release button for more than one second in step 2 recording continues until you take your f...

Page 212: ...the volume If there are no recorded indexes Four way controller 4 Reverses playback Four way controller 5 Fast forwards playback If there are recorded indexes Four way controller 4 Plays back startin...

Page 213: ...211 6 Recording and Playing Back Sound 4 Press the four way controller 3 Playback stops...

Page 214: ...s 3 Use the four way controller 2345 to select Voice Memo 4 Press the 4 button Recording starts 5 Press the 4 button Recording stops Recording a Voice Memo A voice memo cannot be added to the image th...

Page 215: ...voice memos in single image display 2 Press the four way controller 2 Playback starts The following operations can be performed during playback Zoom button y Increases the volume Zoom button f Reduces...

Page 216: ...e four way controller 2 to select Format 5 Press the 4 button Formatting starts When formatting is completed the camera returns to A mode or Q mode Formatting the Memory Do not remove an SD Memory Car...

Page 217: ...troller 45 to adjust the volume Set the volume to f to mute the start up sound shutter sound operation sound and self timer sound 6 Change Playback Volume in the same way as in steps 4 and 5 4 Use the...

Page 218: ...r the recorded sound files appears 3 Use the four way controller 45 to select a sound file Play back the selected file to confirm Four way controller 2 Plays back the first two seconds of the sound fi...

Page 219: ...justment screen appears 4 Press the four way controller 5 The frame moves to mm dd yy Depending on the initial setting or previous setting dd mm yy or yy mm dd may be displayed 5 Use the four way cont...

Page 220: ...screens use mm dd yy as an example The operations are the same even if another date style has been selected 11 Use the four way controller 23 to change the month 12 Press the four way controller 5 Th...

Page 221: ...hoose whether the alarm will ring at the same time every day or only once at the set time 1 Press the 3 button in Q mode The W Setting menu appears When you press the 3 button in A mode press the four...

Page 222: ...3 to change the hour then press 5 The frame moves to the minute field Change the minutes in the same manner 10 Press the 4 button 11 Press the four way controller 3 The frame moves to Settings complet...

Page 223: ...button on the camera while the alarm is ringing The date and time selected in Setting the Date and Time p 49 and Changing the Date and Time p 217 serve as the W Hometown date and time By using the wor...

Page 224: ...ity that is currently selected blinks on the map 6 Use the four way controller 45 to change the Destination city The current time location and time difference of the selected city appear 7 Use the fou...

Page 225: ...Press the four way controller 5 A pull down menu appears 6 Use the four way controller 23 to select X Destination or W Hometown X Displays the time of the Destination city W Displays the time of the H...

Page 226: ...e magnified display 1 Press the 3 button in Q mode The W Setting menu appears When you press the 3 button in A mode press the four way controller 5 once 2 Use the four way controller 23 to select Text...

Page 227: ...ean and Chinese traditional and simplified 1 Press the 3 button in Q mode The W Setting menu appears When you press the 3 button in A mode press the four way controller 5 once 2 Use the four way contr...

Page 228: ...d Up to 9999 images are saved in the same folder DCIM 100_0401 101_0408 102RICOH DCIM 100_0401 101_0408 DCIM 100_0401 100 100 101 100 101 102 DCIM 100_0401 101_0408 102RICOH 100 101 102 Image taken on...

Page 229: ...ch to save images You can enter up to five numbers and letters The 5 digit name is displayed after the 3 digit folder number 1 Select _USER in step 4 in Selecting the Rule for Naming Folders 2 Press t...

Page 230: ...he camera to AV equipment choose the appropriate video output format NTSC or PAL for taking and playing back images 1 Press the 3 button in Q mode The W Setting menu appears When you press the 3 butto...

Page 231: ...nce 2 Use the four way controller 23 to select HDMI Out 3 Press the four way controller 5 A pull down menu appears Depending on the country or region images and sound files may fail to be played back...

Page 232: ...down menu vary depending on the selected Video output format To change the display set the Video output format before setting the HDMI output format The table below shows the combinations of the Video...

Page 233: ...Use the four way controller 23 to select Eye Fi 3 Use the four way controller 45 to select O or P O Turns on communication using an Eye Fi card P Turns off communication using an Eye Fi card 4 Press...

Page 234: ...nce 2 Use the four way controller 23 to select Brightness Level 3 Use the four way controller 45 to adjust the brightness F Dark G Normal H Bright 4 Press the 3 button The camera returns to A mode or...

Page 235: ...select the time until the camera enters power saving mode Choose from 2min 1min 30sec 15sec 5sec or Off 5 Press the 4 button The setting is saved Using the Power Saving Function Power Saving does not...

Page 236: ...ect the time until the camera turns off automatically Choose from 5min 3min or Off 5 Press the 4 button The setting is saved Setting Auto Power Off Auto Power Off does not function in the following si...

Page 237: ...utton in A mode press the four way controller 5 once 2 Use the four way controller 23 to select Quick Zoom 3 Use the four way controller 45 to switch between O On or P Off O On The Quick Zoom is avail...

Page 238: ...ur way controller 5 once 2 Use the four way controller 23 to select Guide Display 3 Use the four way controller 45 to switch between O On or P Off O On The mode guides are displayed P Off The mode gui...

Page 239: ...d and corrected Perform Pixel Mapping Pixel Mapping is only available in A mode Pixel mapping cannot be selected even if the W Setting menu is displayed by pressing the 3 button in Q mode When executi...

Page 240: ...the four way controller 2345 to select Start up Screen 3 Press the 4 button The image selection screen appears 4 Use the four way controller 45 to choose the image for the start up screen Only images...

Page 241: ...een has been set it is not being deleted even if the original image is deleted or the SD Memory Card or built in memory is formatted However the image is deleted if you change the start up screen afte...

Page 242: ...e 4 button to display the clock on the display 1 Press and hold down the 4 button The camera turns on and the clock appears on the screen The camera turns off automatically after approximately 10 seco...

Page 243: ...CD ROM Windows Image viewing managing editing software MediaImpression 3 6 1 LE Applicable languages English French German Spanish Portuguese Italian Dutch Swedish Russian Chinese traditional and simp...

Page 244: ...n CPU Intel Pentium IV 1 6 GHz AMD AthlonTM XP 1800 or equivalent Intel CoreTM 2 Duo E6300 AMD AthlonTM 64 X2 5000 or higher recommended Memory 512 MB minimum 2 GB or higher recommended Hard Disk Spac...

Page 245: ...version CPU PowerPC G4 800 MHz processor or equivalent Intel CoreTM 2 Duo or higher recommended Memory 512 MB minimum 1 GB or higher recommended Hard Disk Space 300 MB minimum 1 GB or higher recommen...

Page 246: ...language and click OK The setup screen appears Follow the on screen guidance to install the software Installing the Software Windows Make sure your Windows PC meets the system requirements before ins...

Page 247: ...he image viewing managing editing software MediaImpression 2 2 LE 1 Turn your Macintosh on 2 Insert the CD ROM into the CD ROM drive 3 Double click the CD ROM icon 4 Double click the Software Installe...

Page 248: ...et please click Product Registration on the setup screen after the language selection screen is displayed The world map screen shown on the right for Internet Product Registration is displayed Click t...

Page 249: ...er 23 to select MSC 6 Press the 4 button The setting is saved 7 Press the 3 button The camera returns to A mode or Q mode Setting the USB Connection Mode Make sure to set the USB connection mode befor...

Page 250: ...that supports USB Mass Storage Class you can copy read and write files from a computer without installing a dedicated driver PTP Picture Transfer Protocol A protocol that allows transfer of digital i...

Page 251: ...Turn your camera on The AutoPlay screen appears If the AutoPlay screen does not appear follow the steps in When the AutoPlay screen does not appear p 250 Connecting the Camera and Your Windows PC We r...

Page 252: ...isk MediaImpression starts and the Import screen appears 3 Specify Device 4 Click the folder icon next to Destination Folder and specify the destination location To transfer all images proceed to step...

Page 253: ...rom your Windows PC and the camera You can find more information on how to use MediaImpression by using the help pages Select Help in Menu at the top right of the screen You cannot upload images to so...

Page 254: ...le Connect the terminal of the USB cable with arrow mark facing the front side of the camera 4 Turn your camera on The camera is recognized as NO_NAME on the desktop Connecting the Camera and Your Mac...

Page 255: ...images choose the images while pressing the Command key To specify the destination location click the folder icon If any of the Import Options are checked marks will appear on the images that were tra...

Page 256: ...NO NAME or the volume label name in Get Media from You can find more information on how to use MediaImpression by using the help pages Select ArcSoft MediaImpression Help in Help on the menu bar You c...

Page 257: ...en set up 4 Turn the camera on 5 Set Eye Fi in the W Setting menu to O On The images are transferred automatically For details on how to set up the camera refer to Setting the Eye Fi Communication p 2...

Page 258: ...his often requires long transferring times While images are being transferred the Auto Power Off does not function If you transfer large sized files such as a movie the temperature inside the camera i...

Page 259: ...257 8 Connecting to a Computer Memo...

Page 260: ...d gZ Self timer jc Continuous Shooting Burst Shooting hi Remote Control k Interval Shoot l Auto Bracketing Focus Mode Standard q Macro 1cm Macro 3 Pan Focus s Infinity z Manual Focus A Rec Mode menu I...

Page 261: ...hi Remote Control k Interval Shoot l Auto Bracketing Standard Focus Mode q Macro 1cm Macro 3 Pan Focus s Infinity z Manual Focus 9 9 9 10 Image Tone A Rec Mode menu 14 15 11 11 16 17 18 19 Recorded Pi...

Page 262: ...l zoom are possible intelligent zoom cannot be used 8 Fixed to P Off 9 Fixed at Natural 10 Fixed at Bright 11 Fixed to f when the Sensitivity selection is ISO 3200 6400 12 Set in Movie on the A Rec mo...

Page 263: ...mpatible with this camera Format the SD Memory Card in the camera p 214 Card is locked The SD Memory Card is write protected p 7 Compression error This message occurs when the camera fails to compress...

Page 264: ...or files that cannot be processed No card in the camera Displayed if no SD Memory Card is inserted when Image Sound Copy is selected from the Playback Mode Palette and the OK button is pressed The bui...

Page 265: ...too dark Adjust the brightness level in Brightness Level in the W Setting menu p 232 Power Saving function is on When the Power Saving function is on the display automatically darkens after a certain...

Page 266: ...the center of the display If it is difficult to do so first lock the focus on the desired subject focus lock and then move the camera to recompose The flash does not discharge The flash mode is set to...

Page 267: ...d even after reset N A A Rec Mode Menu Items Item Default Setting Shooting mode A Last Memory Setting Reset Setting Page Image Tone Bright Yes Yes p 115 Recorded Pixels g 4288 3216 Yes Yes p 116 Quali...

Page 268: ...Drive Mode P Off Yes Yes Focus Mode P Off Yes Yes Zoom Position P Off Yes Yes MF Position P Off Yes Yes White Balance P Off Yes Yes Sensitivity P Off Yes Yes EV Compensation P Off Yes Yes AE Metering...

Page 269: ...0 00 Yes Yes World Time Select Time Same as W Hometown Yes Yes p 221 Destination City According to initial setting Yes No Destination DST P Off Yes No Hometown City According to initial setting Yes No...

Page 270: ...Pixels h h Yes Yes p 186 Layout Yes Yes Background White Yes Yes Select image s Digital Filter B W Sepia No p 180 Original Frame Blur All sides White No p 195 Edge Composite All sides White No Frame...

Page 271: ...ration Mode Q Mode w x button Zoom Position Full wide angle No p 79 Four way controller 2 Drive Mode 9 Standard Yes p 94 p 101 3 Shooting Mode b Auto Picture Yes Yes p 69 4 Flash Mode Auto Yes p 108 5...

Page 272: ...SC Male PAL New York NTSC Delhi PAL Halifax NTSC Colombo PAL Central and South America Mexico City NTSC Kathmandu PAL Lima NTSC Dacca PAL Santiago NTSC East Asia Yangon NTSC Caracas NTSC Bangkok PAL B...

Page 273: ...icroscope mode Fixed at f when the sensitivity is set to 3200 or 6400 Fixed at f in Burst Shooting mode Fixed at V 1280 960 in Report mode Movie M 1280 720 30 fps F 1280 720 15 fps G 640 480 30 fps H...

Page 274: ...19 pictures f 2592 1944 39 pictures 75 pictures 109 pictures 778 pictures 1499 pictures 2119 pictures 2592 1464 49 pictures 98 pictures 151 pictures 975 pictures 1921 pictures 2927 pictures h 2048 153...

Page 275: ...prox 11 2 l approx 20 9 m approx 33 5 when combined with optical zoom Digital zoom Max approx 6 7 combines with 5 optical zoom to give zoom magnification equivalent to 33 5 Motion blur reduction Still...

Page 276: ...rwater Movie Landscape Flower Portrait Digital Wide Surf Snow Digital SR Kids Pet Sport Fireworks Candlelight Night Scene Portrait Text Food Digital Panorama Frame Composite Report Digital Microscope...

Page 277: ...o the results of in house testing Interfaces USB 2 0 high speed compatible PC AV terminal HDMI terminal Type D Micro Video output format NTSC PAL monaural Waterproof and dustproof rating JIS waterproo...

Page 278: ...h proves defective during the 12 month warranty period should be returned to the dealer from whom you purchased the camera or to the manufacturer If there are no representatives of the manufacturer in...

Page 279: ...vicing This warranty policy does not affect the customer s statutory rights The local warranty policies available from our distributors in some countries can supersede this warranty policy Therefore w...

Page 280: ...l interference to radio communications However there is no guarantee that interference will not occur in a particular installation If this equipment does cause harmful interference to radio or televis...

Page 281: ...with the standards Records maintained continue to reflect the equipment being produced can be expected to be within the variation accepted due to quantity production and testing on the statistical ba...

Page 282: ...o inappropriate waste handling If a chemical symbol is added beneath the symbol shown above in accordance with the Battery Directive this indicates that a heavy metal Hg Mercury Cd Cadmium Pb Lead is...

Page 283: ...ks 81 B Text 89 X Digital Wide 102 F Digital Panorama 105 a Landscape 70 b Flower 70 Underwater 139 Underwater Movie 139 K Food 70 Report 71 Digital Microscope 90 N Frame Composite 92 U Candlelight 81...

Page 284: ...165 Deleting sounds 166 Digital Filter 180 Digital Microscope Mode 90 Digital SR Mode 81 Digital Wide Mode 102 Digital Zoom 81 Display brightness 232 Display Language 225 Dividing movies 201 DPOF sett...

Page 285: ...y y 162 Manual Focus 110 Manual K White Balance 120 Mass Storage Class 248 MediaImpression 241 Memory 149 3 button 52 54 Miniature filter 180 Movie Editing 200 Movie SR Movie Shake Reduction Function...

Page 286: ...es by date 226 Saving settings 149 SD Memory Card 40 Select Time 223 Self portrait Assist 74 Self timer g 94 Sensitivity 122 Setting Menu 63 267 Shadow Correction 125 Sharpness 134 Shooting informatio...

Page 287: ...285 9 Appendix V Video output format 228 270 Voice Memo 212 Voice Recording 208 W Waterproof and Dustproof 139 White Balance 119 Windows 242 World Time 221 Z Zoomx w 79 OPWG20201 EN...

Page 288: ...r RICOH IMAGING DEUTSCHLAND GmbH Am Kaiserkai 1 20457 Hamburg GERMANY http www ricoh imaging de RICOH IMAGING UK LTD PENTAX House Heron Drive Langley Slough Berks SL3 8PN U K http www ricoh imaging co...

Reviews: