


- EN -
12
Pos: 249 /Alle Pr odukte/U eberschriften/H ead 1/H 1 R einigung und W artung @ 7\mod_1196625212761_121.docx @ 41469 @ @ 1
Maintenance and cleaning
Pos: 250 /Alle Pr odukte/U eberschriften/H ead 2/H 2 Ger ät r einigen @ 102\m od_1516113982020_121.docx @ 482142 @ @ 1
Cleaning the device
Pos: 251 /Alle Pr odukte/D ummy_module/===== Abstand 3 pt ===== @ 11\m od_1251901846864_0.docx @ 72826 @ @ 1
Pos: 252.1 /Alle Pr odukte/W arnhinw eise/>>>>>Warnhinw eis Lini e oben<<<<< @ 71\mod_1462791699897_121.docx @ 367011 @ @ 1
Pos: 252.2 /Alle Pr odukte/W arnhinw eise/N eu/TIP/Ar t und F olgen/af_Em pfehl ung: @ 102\mod_1516285094029_121.docx @ 483402 @ @ 1
Recommendation regarding cleaning:
Pos: 252.3 /Alle Pr odukte/W arnhinw eise/N eu/Schutzm aßnahmen/ul_Ger ät mi nd. 2-mal j ährlich rei nigen @ 102\m od_1516285609391_121.docx @ 483456 @ @ 1
•
Clean the unit as required but at least twice a year.
Pos: 252.4 /Alle Pr odukte/W arnhinw eise/N eu/Schutzm aßnahmen/ul_Besonders Laufei nheit und Pum pengehäuse r einigen @ 77\m od_1470321302408_121.docx @ 395142 @ @ 1
•
When cleaning the pump, pay particular attention to the cleaning of the impeller unit and pump housing.
Pos: 252.5 /Alle Pr odukte/W arnhinw eise/>>>>>Warnhinw eis Lini e unten<<<<< @ 71\m od_1462792106537_121.docx @ 367038 @ @ 1
Pos: 253 /Alle Pr odukte/D ummy_module/===== Abstand 3 pt ===== @ 11\m od_1251901846864_0.docx @ 72826 @ @ 1
Pos: 254 /Alle Pr odukte/R ei nigung/W artung/R+W Mittel/ul_Bei nachlassender Leistung Ger ät mit Wasser und Bürste rei nigen @ 32\m od_1345554978557_121.docx @ 181337 @ @ 1
•
In the event of the filter housing capacity reducing, clean the unit under running water using a brush.
Pos: 255 /Alle Pr odukte/R ei nigung/W artung/R+W Mittel/ul_Keine R einigungsmittel oder chemische Lösungen verwenden @ 64\mod_1449238101090_121.docx @ 337331 @ @ 1
•
Do not not use cleaning agents or chemical solutions.
Pos: 256 /Alle Pr odukte/R ei nigung/W artung/R+W Mittel/ul_Em pf. Rei nigungsmittel bei hartnäckiger Verkalkung: @ 44\mod_1407159944343_121.docx @ 243379 @ @ 1
•
Recommended cleaning agent for removing stubborn limescale deposits:
Pos: 257 /Alle Pr odukte/R ei nigung/W artung/R+W Mittel/vl_Essig- und chlorfrei en H aushaltsrei niger @ 44\m od_1408108796310_121.docx @ 244030 @ @ 1
– Vinegar- and chlorine-free household cleaning agent.
Pos: 258 /Alle Pr odukte/R ei nigung/W artung/R+W Mittel/ul_Nach dem Rei nigen alle T eile mit kl arem W asser gründlich abspülen @ 45\mod_1409733590605_121.docx @ 246183 @ @ 1
•
After cleaning, thoroughly rinse all parts in clean water.
Pos: 259 /Alle Pr odukte/D ummy_module/===== Abstand 6 pt ===== @ 7\mod_1196627997106_0.docx @ 41651 @ @ 1
Pos: 260 /Alle Pr odukte/U eberschriften/H ead 2/H 2 PondoM ax Eco 1500/2500 @ 114\mod_1535122595187_0.docx @ 516592 @ @ 1
PondoMax Eco 1500/2500
Pos: 261 /Alle Pr odukte/R ei nigung/W artung/Pum pen (i nkl. Pumpeng ehäuse)/a
d_Laufei nheit r einigen/ersetzen @ 114\mod_1535122968011_121.docx @ 516673 @ @ 1
Cleaning/replacing the impeller unit
Pos: 262 /Alle Pr odukte/D ummy_module/===== Abstand 3 pt ===== @ 11\m od_1251901846864_0.docx @ 72826 @ @ 1
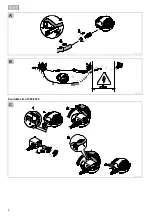
Pos: 263 /Alle Pr odukte/U eberschriften/<So g ehen Si e vor:>>>>>>>>>>>>>> @ 44\mod_1399394612025_121.docx @ 240393 @ @ 1
How to proceed:
Pos: 264 /Alle Pr odukte/Bildvervw eise (spr achneutral!)/C @ 24
\m od_1314277815262_0.docx @ 138214 @ @ 1
C
Pos: 265 /Alle Pr odukte/M ontage und D em ontage/Schr auben/ol _Schrauben entfernen @ 32\m od_1345550761227_121.docx @ 181153 @ @ 1
1. Remove screws.
Pos: 266 /Alle Pr odukte/M ontage und D em ontage/Schr auben/- Schrauben dienen als Transportsicherung @ 32\mod_1345550985267_121.docx @ 181179 @ @ 1
– The screws are used as transport protection and not required for operation.
Pos: 267 /Pumpen/Schl ammsauger/Alle Pumpen/Schl ammsauger /ol _Rasthaken betaetigen und Filteroberschal e aufklappen @ 32\m od_1345551055217_121.docx @ 181205 @ @ 1
2. Actuate the engagement hook and fold up the strainer top casing.
Pos: 268 /Pumpen/Schl ammsauger/Alle Pumpen/Schl ammsauger /ol _Pumpe herausnehmen @ 32\mod_1345551169165_121.docx @ 181231 @ @ 1
3. Remove pump.
Pos: 269 /Alle Pr odukte/R ei nigung/W artung/Pum pen
(i nkl. Pumpeng ehäuse)/ol _Pumpengehaeuse: b) abdr ehen, Laufei nheit herauszi ehen @ 32
\m od_1345556405059_121.docx @ 181417 @ @ 1
4. Unscrew the pump housing and pull out the impeller unit.
Pos: 270 /Alle Pr odukte/R ei nigung/W artung/R+W Mittel/vl Teil e mit Wasser und Buerste r einigen, beschädigte T eile ersetzen @ 32\m od_1345557239441_121.docx @ 181443 @ @ 1
– Clean all components under running water using a soft brush, replace damage parts.
Pos: 271 /Alle Pr odukte/R ei nigung/W artung/ol_Ger aet in umg ekehrter R eihenfolge zusamm enbauen @ 32\m od_1345557416891_121.docx @ 181469 @ @ 1
5. Reassemble the unit in the reverse order.
Pos: 272 /Alle Pr odukte/R ei nigung/W artung/Pum pen (i nkl. Pumpeng ehäuse)/
- Leitung Pum pe in Oeffnung Filterunterschal e l egen @ 32\m od_1345557788129_121.docx @ 181521 @ @ 1
– Place the pump cable into the cable opening of the bottom strainer casing such that the cable will not be crushed
when closing the filter housing.
Pos: 273 /Alle Pr odukte/D ummy_module/===== Abstand 6 pt ===== @ 7\mod_1196627997106_0.docx @ 41651 @ @ 1
Pos: 274 /Alle Pr odukte/U eberschriften/H ead 2/H 2 PondoM ax Eco 3500 @ 114\mod_1535122680484_0.docx @ 516619 @ @ 1
PondoMax Eco 3500
Pos: 275 /Alle Pr odukte/R ei nigung/W artung/Pum pen (i nkl. Pumpeng ehäuse)/ad_Laufei nheit r einigen/ersetz
en @ 114\mod_1535122968011_121.docx @ 516673 @ @ 1
Cleaning/replacing the impeller unit
Pos: 276 /Alle Pr odukte/D ummy_module/===== Abstand 3 pt ===== @ 11\m od_1251901846864_0.docx @ 72826 @ @ 1
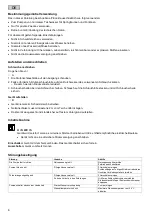
Pos: 277 /Alle Pr odukte/U eberschriften/<So g ehen Si e vor:>>>>>>>>>>>>>> @ 44\mod_1399394612025_121.docx @ 240393 @ @ 1
How to proceed:
Pos: 278 /Alle Pr odukte/Bildvervw eise (spr achneutral!)/D @ 25
\m od_1317992446522_0.docx @ 144142 @ @ 1
D
Pos: 279 /Alle Pr odukte/M ontage und D em ontage/Schr auben/ol _Schrauben entfernen @ 32\m od_1345550761227_121.docx @ 181153 @ @ 1
1. Remove screws.
Pos: 280 /Alle Pr odukte/M ontage und D em ontage/Schr auben/- Schrauben dienen als Transportsicherung @ 32\mod_1345550985267_121.docx @ 181179 @ @ 1
– The screws are used as transport protection and not required for operation.
Pos: 281 /Pumpen/Schl ammsauger/Alle Pumpen/Schl ammsauger /ol _Rasthaken betaetigen und Filteroberschal e aufklappen @ 32\m od_1345551055217_121.docx @ 181205 @ @ 1
2. Actuate the engagement hook and fold up the strainer top casing.
Pos: 282 /Pumpen/Schl ammsauger/Alle Pumpen/Schl ammsauger /ol _Pumpe herausnehmen @ 32\mod_1345551169165_121.docx @ 181231 @ @ 1
3. Remove pump.
Pos: 283 /Alle Pr odukte/R ei nigung/W artung/Pum pen (i nkl. Pumpeng ehäuse)/ol _Pumpengehäuse ccw dr ehen und entfernen (Bajonettverschl uss) @ 114
\m od_1535112934344_121.docx @ 516556 @ @ 1
4. Unscrew the pump housing by turning counter-
clockwise and remove (bayonet closing mechanism).
Pos: 284 /Alle Pr odukte/R ei nigung/W artung/R+W Mittel/vl Teil e mit Wasser und Buerste r einigen, beschädigte T eile ersetzen @ 32\m od_1345557239441_121.docx @ 181443 @ @ 1
– Clean all components under running water using a soft brush, replace damage parts.
Pos: 285 /Alle Pr odukte/R ei nigung/W artung/ol_Ger aet in umg ekehrter R eihenfolge zusamm enbauen @ 32\m od_1345557416891_121.docx @ 181469 @ @ 1
5. Reassemble the unit in the reverse order.
Pos: 286 /Alle Pr odukte/R ei nigung/W artung/Pum pen (i nkl. Pumpeng ehäuse)/
- Leitung Pum pe in Oeffnung Filterunterschal e l egen @ 32\m od_1345557788129_121.docx @ 181521 @ @ 1
– Place the pump cable into the cable opening of the bottom strainer casing such that the cable will not be crushed
when closing the filter housing.
Pos: 287 /Alle Pr odukte/D ummy_module/===== Abstand 6 pt ===== @ 7\mod_1196627997106_0.docx @ 41651 @ @ 1
Pos: 288 /Alle Pr odukte/U eberschriften/H ead 2/H 2 PondoM ax Eco 5000/8000/11000/14000/17000 @ 114\m od_1535122762289_0.docx @ 516646 @ @ 1
PondoMax Eco 5000/8000/11000/14000/17000
Pos: 289 /Alle Pr odukte/R ei nigung/W artun
g/Pum pen (i nkl. Pumpeng ehäuse)/ad_Laufei nheit r einigen/ersetzen @ 114
\mod_1535122968011_121.docx @ 516673 @ @ 1
Cleaning/replacing the impeller unit
Pos: 290 /Alle Pr odukte/D ummy_module/===== Abstand 3 pt ===== @ 11\m od_1251901846864_0.docx @ 72826 @ @ 1
Pos: 291 /Alle Pr odukte/U eberschriften/<So g ehen Si e vor:>>>>>>>>>>>>>> @ 44\mod_1399394612025_121.docx @ 240393 @ @ 1
How to proceed:
Pos: 292 /Alle Pr odukte/Bildvervw eise (spr achneutral!)/E @ 26
\mod_1320397120645_0.docx @ 146421 @ @ 1
E
Pos: 293 /Alle Pr odukte/M ontage und D em ontage/Schr auben/ol _Schrauben entfernen @ 32\m od_1345550761227_121.docx @ 181153 @ @ 1
1. Remove screws.
Pos: 294 /Alle Pr odukte/M ontage und D em ontage/Schr auben/- Schrauben dienen als Transportsicherung @ 32\mod_1345550985267_121.docx @ 181179 @ @ 1
– The screws are used as transport protection and not required for operation.
Pos: 295 /Pumpen/Schl ammsauger/Alle Pumpen/Schl ammsauger /ol _Rasthaken betaetigen und Filteroberschal e aufklappen @ 32\m od_1345551055217_121.docx @ 181205 @ @ 1
2. Actuate the engagement hook and fold up the strainer top casing.
Pos: 296 /Pumpen/Schl ammsauger/Alle Pumpen/Schl ammsauger /ol _Pumpe herausnehmen @ 32\mod_1345551169165_121.docx @ 181231 @ @ 1
3. Remove pump.
Pos: 297 /Alle Pr odukte/M ontage und D em ontage/Schr auben/ol _Schrauben entfernen @ 32\m od_1345550761227_121.docx @ 181153 @ @ 1
4. Remove screws.
Pos: 298 /Alle Pr odukte/R ei nigung/W artung/Pum pen (i nkl. Pumpeng ehäuse)/ol _Pumpengehaeuse: a) mit H alteri ng, Dichtung und Lauf
ei nheit abnehmen @ 32\mod_1345557559505_121.docx @ 181495 @ @ 1
5. Remove the pump housing including its holding ring, sealing and impeller unit.
Pos: 299 /Alle Pr odukte/R ei nigung/W artung/R+W Mittel/vl Teil e mit Wasser und Buerste r einigen, beschädigte T eile ersetzen @ 32\m od_1345557239441_121.docx @ 181443 @ @ 1
– Clean all components under running water using a soft brush, replace damage parts.
Pos: 300 /Alle Pr odukte/R ei nigung/W artung/ol_Ger aet in umg ekehrter R eihenfolge zusamm enbauen @ 32\m od_1345557416891_121.docx @ 181469 @ @ 1
6. Reassemble the unit in the reverse order.
Pos: 301 /Alle Pr odukte/R ei nigung/W artung/Pum pen (i nkl. Pumpeng ehäuse)/
- Leitung Pum pe in Oeffnung Filterunterschal e l egen @ 32\m od_1345557788129_121.docx @ 181521 @ @ 1
– Place the pump cable into the cable opening of the bottom strainer casing such that the cable will not be crushed
when closing the filter housing.
Pos: 302 /Alle Pr odukte/D ummy_module/>==== Seitenwechsel ====< @ 0\m od_1125648978015_0.docx @ 1631 @ @ 1
Summary of Contents for PondoMax Eco 11000
Page 115: ...115 PMX0005 Ende der Liste für Textmarke Inhalt2 ...
Page 116: ...71302 11 19 ...


