


Color Balancing Multiple Displays
62
m52L Installation Guide
4
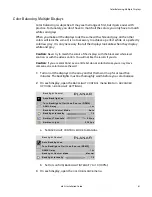
If the array has never been color balanced, make sure you start with the
NATIVE
color temperature setting on each display. If you are not interested in achieving a
specific color temperature, use
NATIVE
, which is the brightest. If the display has
been color balanced before, it will display
CUSTOM
in the
COLOR
TEMPERATURE
line, because the balance values don’t match any of the pre-set color
temperatures.
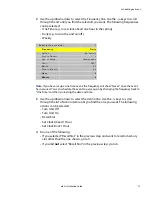
5
On each display, highlight
TEST
PATTERN
and use the left or right arrows until the
menu displays
WHITE
.
Note:
Always use the internal Test Patterns for color balancing, not an external pattern.
6
When all displays are white, find the
least bright
display in the array. This will be
the “baseline” display, and you will
not
adjust it. All other displays will be adjusted
to this baseline display.
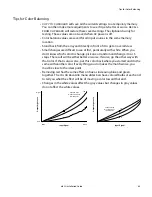
Why pick the “least bright” display? Why not pick the brightest and adjust to it?
When the white value is 100, the display is as bright as it can get. You are
adjusting for slight variations in backlight brightness.
7
Choose a display next to the baseline display and adjust its white values (red,
green and blue) to make it match the baseline display. Concentrate on the center
of the displays, not the adjacent edges. (If you can’t bring these settings down to
match the baseline, maybe you didn’t choose the darkest display.) Do
not
adjust
the gray values at this time.
8
Continue with other adjacent displays until all the displays have the same
appearance when white. Be careful not to change the values of displays once you
are satisfied with them. Select
HIDE
MENU
to keep from setting other displays and
allow you to see more of the white field. To unhide the menu, press
ENTER
.
Note:
The menus will automatically turn off after a time determined in the
MENU
OPTIONS
menu (
MENU
>
ADVANCED
OPTIONS
>
MENU
OPTIONS
>
MENU
TIMEOUT
). If
MENU
TIMEOUT
is set to
NEVER
TIME
OUT
, the menus stay up indefinitely.
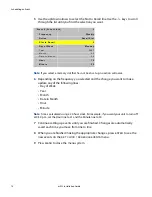
9
When all displays look the same when displaying the White test pattern, choose
the Gray test pattern in all displays.
10
Choose any display as the new baseline display. It does not need to be the
baseline display you used for white.
11
Adjust the gray values for all the displays until they match the baseline display.
Do one display at a time. Again, match the center part of the picture, not the
edges.
12
When all displays match in gray, close all the menus. The test pattern
automatically turns off.
Summary of Contents for m52L
Page 1: ...m52L Installation Guide ...
Page 2: ......
Page 4: ...iv m52L Installation Guide ...
Page 10: ...Table of Contents vi m52L Installation Guide ...
Page 20: ...Tools and Other Things You May Need 10 m52L Installation Guide ...
Page 28: ...Lining Up Screen Brackets 18 m52L Installation Guide ...
Page 32: ...About UPS Supplies 22 m52L Installation Guide ...
Page 58: ...Sharpness Settings 48 m52L Installation Guide ...
Page 60: ...Picture Position 50 m52L Installation Guide ...
Page 64: ...Using Planar s Big PictureTM 54 m52L Installation Guide ...
Page 68: ...Viewport Adjustment 58 m52L Installation Guide ...
Page 74: ...Tips for Color Balancing 64 m52L Installation Guide ...
Page 88: ...Turn Backlight Off With No Source and DPMS Delay 78 m52L Installation Guide ...
Page 92: ...Controlling With RS232 Commands 82 m52L Installation Guide ...
Page 102: ...Deleting a Configuration 92 m52L Installation Guide ...
Page 106: ...Where to Go From Here 96 m52L Installation Guide ...
Page 116: ...106 m52L Installation Guide ...
Page 118: ...Rear View 108 m52L Installation Guide Rear View 0 3 0 7 5 7 2 7 21 0 00 3 ...
Page 120: ...110 m52L Installation Guide ...