


Justify Settings
m52L Installation Guide
45
Justify Settings
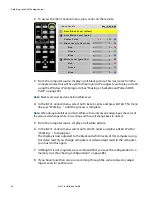
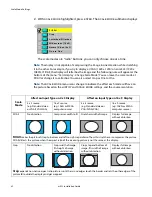
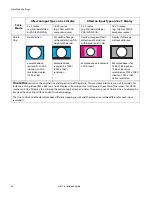
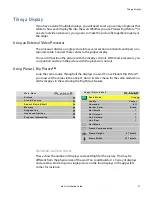
Justify determines how the picture will be placed in a wall of displays. For a single
display, Justify determines placement on the screen. For a wall of displays, if the
image is not large enough to fill all the displays in the wall, some will be left blank.
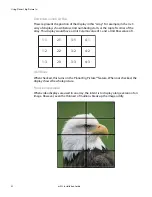
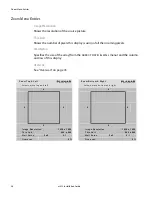
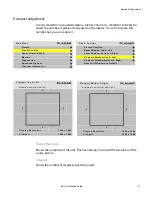
Top/Left
Positions the image starting with the top, leftmost display, then across and down.
Center
Positions the image starting with the center of the image in the center of the wall
spreading out equally to all displays.
Bottom/Right
Positions the image starting with the bottom, rightmost display, then across and up.
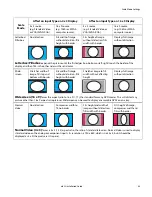
Overscan
This is used to hide blank areas and stray lines in the edges of an image. The lower
the overscan setting, the more of the optical image that is seen. Planar displays have
a default overscan of 3% for S-Video and composite video images. Standard CRT
televisions have an overscan of about 5%, which may actually hide content or images
that you want to see.
Border Color
This determines the color of the “extra” space around the picture if it doesn’t fill the
screen. The choices are: black, red, white, red, green, blue, dark red, dark green and
dark blue.
Note:
When the
SCALE
MODE
is
FILL
ALL
, the
BORDER
COLOR
line will be grayed out,
because there will be no border.
Wall Width and Wall Height
See "Wall Width and Wall Height" on page 51.
Unit Column and Unit Row
See "Unit Column and Unit Row" on page 52.
Wall Mode
See "Wall Mode" on page 52.
Summary of Contents for m52L
Page 1: ...m52L Installation Guide ...
Page 2: ......
Page 4: ...iv m52L Installation Guide ...
Page 10: ...Table of Contents vi m52L Installation Guide ...
Page 20: ...Tools and Other Things You May Need 10 m52L Installation Guide ...
Page 28: ...Lining Up Screen Brackets 18 m52L Installation Guide ...
Page 32: ...About UPS Supplies 22 m52L Installation Guide ...
Page 58: ...Sharpness Settings 48 m52L Installation Guide ...
Page 60: ...Picture Position 50 m52L Installation Guide ...
Page 64: ...Using Planar s Big PictureTM 54 m52L Installation Guide ...
Page 68: ...Viewport Adjustment 58 m52L Installation Guide ...
Page 74: ...Tips for Color Balancing 64 m52L Installation Guide ...
Page 88: ...Turn Backlight Off With No Source and DPMS Delay 78 m52L Installation Guide ...
Page 92: ...Controlling With RS232 Commands 82 m52L Installation Guide ...
Page 102: ...Deleting a Configuration 92 m52L Installation Guide ...
Page 106: ...Where to Go From Here 96 m52L Installation Guide ...
Page 116: ...106 m52L Installation Guide ...
Page 118: ...Rear View 108 m52L Installation Guide Rear View 0 3 0 7 5 7 2 7 21 0 00 3 ...
Page 120: ...110 m52L Installation Guide ...