


Tiling a Display
m52L Installation Guide
51
Tiling a Display
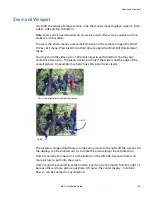
If you have a wall of multiple displays, you will need to set up a variety of options that
relate to how each display fits into the wall. Whether you use Planar’s Big Picture™ or
an external video processor, your goal is to make the picture fit together properly at
the edges.
Using an External Video Processor
The processor divides a single picture into several sections and sends each part on a
separate cable. Connect these cables to the proper display.
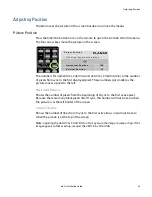
You can still position the picture with the display controls. With most processors, you
can position and zoom the picture with the processor controls.
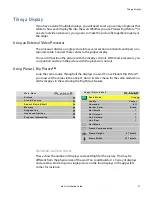
Using Planar’s Big Picture
TM
Loop the same source through all the displays in a wall. To use Planar’s Big Picture™,
you must set the values in the
ASPECT
RATIO
&
WALL
menu for the same wall size on
all the displays in the wall using the Big Picture feature.
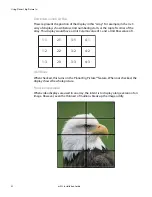
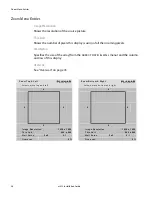
Wall Width and Wall Height
These show the number of displays wide and high for the
picture
. This may be
different from the physical size of the wall. You could build a 4 x 3 array of displays
and use
WALL
MODE
to put a single picture on the four displays in the upper left
corner, for instance.
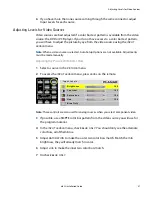
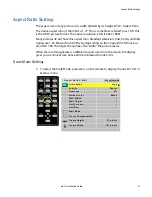
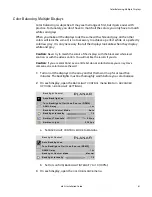
M a i n M e n u
P i c t u r e
S i z e & P o s i t i o n
A s p e c t R a t i o & Wa l l
M e m o r y
D i a g n o s t i c s
A d v a n c e d O p t i o n s
P r o g r a m I n f o r m a t i o n
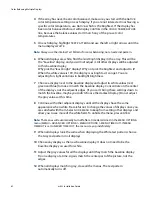
A s p e c t R a t i o & Wa l l
S c a l e M o d e
C r o p
J u s t i f y
C e n t e r
O v e r s c a n
0 %
B o r d e r C o l o r
B l a c k
Wa l l W i dt h
1
Wa l l H e i g h t
1
U n i t C o l u m n
1
U n i t R o w
1
Wa l l M o d e
F r a m e C o m p e n s a t i o n
F r a m e H e i g h t
9 7 p i x e l s
F r a m e W i dt h
1 5 7 p i x e l s
Summary of Contents for m52L
Page 1: ...m52L Installation Guide ...
Page 2: ......
Page 4: ...iv m52L Installation Guide ...
Page 10: ...Table of Contents vi m52L Installation Guide ...
Page 20: ...Tools and Other Things You May Need 10 m52L Installation Guide ...
Page 28: ...Lining Up Screen Brackets 18 m52L Installation Guide ...
Page 32: ...About UPS Supplies 22 m52L Installation Guide ...
Page 58: ...Sharpness Settings 48 m52L Installation Guide ...
Page 60: ...Picture Position 50 m52L Installation Guide ...
Page 64: ...Using Planar s Big PictureTM 54 m52L Installation Guide ...
Page 68: ...Viewport Adjustment 58 m52L Installation Guide ...
Page 74: ...Tips for Color Balancing 64 m52L Installation Guide ...
Page 88: ...Turn Backlight Off With No Source and DPMS Delay 78 m52L Installation Guide ...
Page 92: ...Controlling With RS232 Commands 82 m52L Installation Guide ...
Page 102: ...Deleting a Configuration 92 m52L Installation Guide ...
Page 106: ...Where to Go From Here 96 m52L Installation Guide ...
Page 116: ...106 m52L Installation Guide ...
Page 118: ...Rear View 108 m52L Installation Guide Rear View 0 3 0 7 5 7 2 7 21 0 00 3 ...
Page 120: ...110 m52L Installation Guide ...