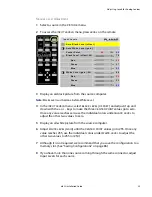

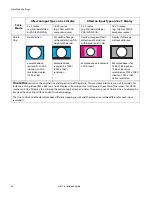


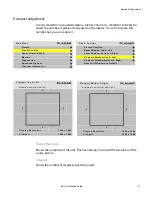

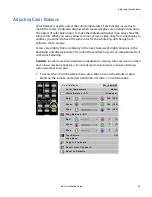


Adjusting Position
m52L Installation Guide
49
Adjusting Position
Position moves the picture on the screen but does not move the menus.
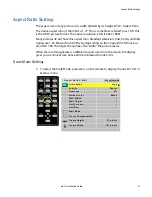
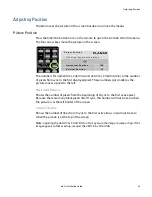
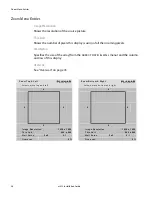
Picture Position
Press the
SIZE
/
POS
button once on the remote to open the
PICTURE
POSITION
menu.
The four arrow keys move the picture on the screen.
The numbers for
HORIZONTAL
POSITION
and
VERTICAL
POSITION
refer to the number
of pixels from sync to the first displayed pixel. These numbers get smaller as the
picture moves up and to the left.
Horizontal Position
Shows the number of pixels from the beginning of H sync to the first active pixel.
Because there are many black pixels after H sync, this number will not be zero when
the picture is at the left border of the screen.
Vertical Position
Shows the number of lines from V sync to the first active line, so it will not be zero
when the picture is at the top of the screen.
Note:
Adjusting the
VERTICAL
POSITION
too far may cause the image to jump or hop. If the
image appears to flicker or hop, readjust the
VERTICAL
POSITION
.
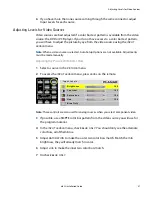
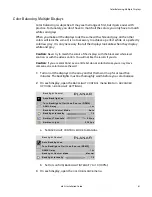
P i c t u r e P o s i t i o n
U s e a r r o w k e y s t o m o v e i m a g e
H o r i z o n ta l P o s i t i o n
1 6 8
Ve r t i c a l P o s i t i o n
1 9
Summary of Contents for m52L
Page 1: ...m52L Installation Guide ...
Page 2: ......
Page 4: ...iv m52L Installation Guide ...
Page 10: ...Table of Contents vi m52L Installation Guide ...
Page 20: ...Tools and Other Things You May Need 10 m52L Installation Guide ...
Page 28: ...Lining Up Screen Brackets 18 m52L Installation Guide ...
Page 32: ...About UPS Supplies 22 m52L Installation Guide ...
Page 58: ...Sharpness Settings 48 m52L Installation Guide ...
Page 60: ...Picture Position 50 m52L Installation Guide ...
Page 64: ...Using Planar s Big PictureTM 54 m52L Installation Guide ...
Page 68: ...Viewport Adjustment 58 m52L Installation Guide ...
Page 74: ...Tips for Color Balancing 64 m52L Installation Guide ...
Page 88: ...Turn Backlight Off With No Source and DPMS Delay 78 m52L Installation Guide ...
Page 92: ...Controlling With RS232 Commands 82 m52L Installation Guide ...
Page 102: ...Deleting a Configuration 92 m52L Installation Guide ...
Page 106: ...Where to Go From Here 96 m52L Installation Guide ...
Page 116: ...106 m52L Installation Guide ...
Page 118: ...Rear View 108 m52L Installation Guide Rear View 0 3 0 7 5 7 2 7 21 0 00 3 ...
Page 120: ...110 m52L Installation Guide ...