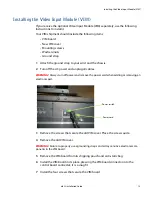
Connecting Power
m52L Installation Guide
21
Connecting Power
The display typically draws 4.5A at 115V or 2.25A at 230V. For countries outside of
North America, it is the responsibility of the installer to provide the power supply
cord certified for use in the destination country.
Connect a power cable to the power supply and to an AC source. The power supply is
auto-ranging, so it works with any source from 100 to 240 VAC, 50 to 60 Hz.
The AC Master switch is next to the power receptacle, both of which are located in
the rear of the display.
About UPS Supplies
Some installations use a UPS - Uninterruptible Power Supply. Most UPS devices will
work with the m52L. Review the power specifications of your UPS device to make
sure it is compatible with the m52L.
Power receptacle and power switch location
Summary of Contents for m52L
Page 1: ...m52L Installation Guide ...
Page 2: ......
Page 4: ...iv m52L Installation Guide ...
Page 10: ...Table of Contents vi m52L Installation Guide ...
Page 20: ...Tools and Other Things You May Need 10 m52L Installation Guide ...
Page 28: ...Lining Up Screen Brackets 18 m52L Installation Guide ...
Page 32: ...About UPS Supplies 22 m52L Installation Guide ...
Page 58: ...Sharpness Settings 48 m52L Installation Guide ...
Page 60: ...Picture Position 50 m52L Installation Guide ...
Page 64: ...Using Planar s Big PictureTM 54 m52L Installation Guide ...
Page 68: ...Viewport Adjustment 58 m52L Installation Guide ...
Page 74: ...Tips for Color Balancing 64 m52L Installation Guide ...
Page 88: ...Turn Backlight Off With No Source and DPMS Delay 78 m52L Installation Guide ...
Page 92: ...Controlling With RS232 Commands 82 m52L Installation Guide ...
Page 102: ...Deleting a Configuration 92 m52L Installation Guide ...
Page 106: ...Where to Go From Here 96 m52L Installation Guide ...
Page 116: ...106 m52L Installation Guide ...
Page 118: ...Rear View 108 m52L Installation Guide Rear View 0 3 0 7 5 7 2 7 21 0 00 3 ...
Page 120: ...110 m52L Installation Guide ...


