


Selecting the Correct Input
20
m52L Installation Guide
The m52L converts the analog inputs to DVI and makes this available at the Digital
Out connector. This means you can bring in a picture source - UXGA, SXGA, VGA,
1080p - to the first display and connect the rest of the displays in the loop with DVI.
The
advantages
of DVI are:
• DVI is less subject to picture degradation than analog methods of loop-
through. (However, even with DVI, loop-through is not infinite.)
• DVI inputs require much less setup and adjustment. You adjust the picture in
the first unit only, the unit with the analog input. Setup time is reduced.
Note:
When the analog source is selected, the signal coming from the DVI out connector will
be accepted and displayed by other m52L displays. However, it does not strictly conform to
the DVI standard. Non-Planar units will not be able to display this signal.
Note:
Due to copyright protection protocols, the Digital Out connector will be disabled
when viewing the HDCP DVI input.
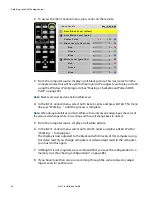
Depending on which input is selected, the Digital Out connector will show the
picture from the analog input or the digital input.
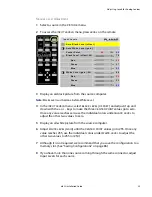
Selecting the Correct Input
The following table gives you common examples of which devices have which
inputs. In terms of input quality, the table is in order of the most desirable input to
the least desirable input.
Input
Found on the Following Devices
DVI
Computers with digital out capability
SDI
Studio quality video equipment
Analog
Computers, laptops
RGB and RGBS from video processors or other professional
equipment (may need BNC to DB15 adapter cable). These
may have separate sync, composite or sync on green.
Component
DVD players
Set top boxes (e.g. for cable TV or satellite TV)
Any YPbPr signal
S-Video
DVD players
Set top boxes
VCRs
Composite
TV tuners
VCRs
Set top boxes
Summary of Contents for m52L
Page 1: ...m52L Installation Guide ...
Page 2: ......
Page 4: ...iv m52L Installation Guide ...
Page 10: ...Table of Contents vi m52L Installation Guide ...
Page 20: ...Tools and Other Things You May Need 10 m52L Installation Guide ...
Page 28: ...Lining Up Screen Brackets 18 m52L Installation Guide ...
Page 32: ...About UPS Supplies 22 m52L Installation Guide ...
Page 58: ...Sharpness Settings 48 m52L Installation Guide ...
Page 60: ...Picture Position 50 m52L Installation Guide ...
Page 64: ...Using Planar s Big PictureTM 54 m52L Installation Guide ...
Page 68: ...Viewport Adjustment 58 m52L Installation Guide ...
Page 74: ...Tips for Color Balancing 64 m52L Installation Guide ...
Page 88: ...Turn Backlight Off With No Source and DPMS Delay 78 m52L Installation Guide ...
Page 92: ...Controlling With RS232 Commands 82 m52L Installation Guide ...
Page 102: ...Deleting a Configuration 92 m52L Installation Guide ...
Page 106: ...Where to Go From Here 96 m52L Installation Guide ...
Page 116: ...106 m52L Installation Guide ...
Page 118: ...Rear View 108 m52L Installation Guide Rear View 0 3 0 7 5 7 2 7 21 0 00 3 ...
Page 120: ...110 m52L Installation Guide ...