


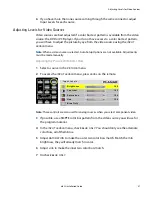


Adjusting Levels for Video Sources
m52L Installation Guide
37
6
If you have more than one source coming through the same connector, adjust
Input Levels for each source.
Adjusting Levels for Video Sources
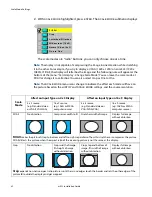
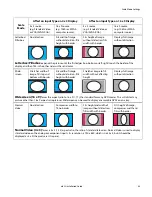
Video sources are best adjusted if a color bar test pattern is available from the video
source: the DVD or VCR player. If you do not have access to a color bar test pattern,
you will have to adjust the picture by eye from the video source using the
INPUT
LEVELS
menu.
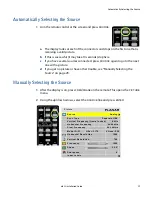
Note:
When a video source is selected, Auto Setup Options are not available. Adjustments
must be made manually.
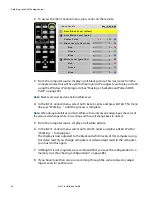
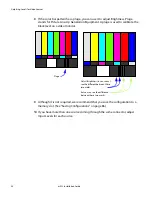
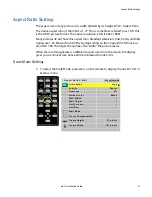
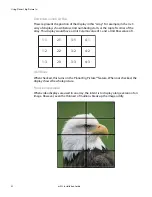
Adjusting the Picture With Color Bars
1
Select a source in the
PICTURE
menu.
2
To access the
INPUT
LEVELS
menu, press
LEVEL
on the remote.
Note:
These controls are also used for analog sources when you select component video.
3
If possible, use a SMPTE color bar pattern from the video source you will use for
the program material.
4
In the
INPUT
LEVELS
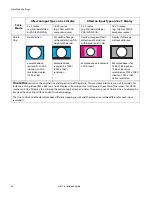
menu, check
BLUE
ONLY
. You should only see the alternate
color bars, all of them blue.
5
Adjust
SATURATION
to make the outer two color bars match. Match them in
brightness; they will already match in color.
6
Adjust
HUE
to make the inner two color bars match.
7
Uncheck
BLUE
ONLY
.
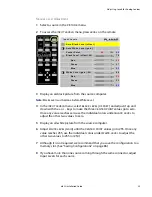
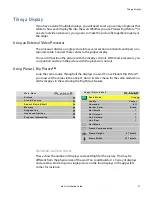
I n p u t L e v e l s
B r i g h t n e s s
1 4 0
C o n t r a s t
1 6 5
S a t u r a t i o n
1 5 0
H u e
1 2 8
B l u e O n l y
Summary of Contents for m52L
Page 1: ...m52L Installation Guide ...
Page 2: ......
Page 4: ...iv m52L Installation Guide ...
Page 10: ...Table of Contents vi m52L Installation Guide ...
Page 20: ...Tools and Other Things You May Need 10 m52L Installation Guide ...
Page 28: ...Lining Up Screen Brackets 18 m52L Installation Guide ...
Page 32: ...About UPS Supplies 22 m52L Installation Guide ...
Page 58: ...Sharpness Settings 48 m52L Installation Guide ...
Page 60: ...Picture Position 50 m52L Installation Guide ...
Page 64: ...Using Planar s Big PictureTM 54 m52L Installation Guide ...
Page 68: ...Viewport Adjustment 58 m52L Installation Guide ...
Page 74: ...Tips for Color Balancing 64 m52L Installation Guide ...
Page 88: ...Turn Backlight Off With No Source and DPMS Delay 78 m52L Installation Guide ...
Page 92: ...Controlling With RS232 Commands 82 m52L Installation Guide ...
Page 102: ...Deleting a Configuration 92 m52L Installation Guide ...
Page 106: ...Where to Go From Here 96 m52L Installation Guide ...
Page 116: ...106 m52L Installation Guide ...
Page 118: ...Rear View 108 m52L Installation Guide Rear View 0 3 0 7 5 7 2 7 21 0 00 3 ...
Page 120: ...110 m52L Installation Guide ...