


m52L Installation Guide
9
Installing an m52L
This section explains how to install an m52L. We suggest that you read the entire
section before you attempt to install the unit.
Before You Begin
Make sure you have all the items in these checklists before you begin unpacking and
installing your m52L(s).
Plan Your Installation
You should have a detailed plan of how the units are to be configured. The plan
should include calculations for the following:
• Power (maximum of three units per 20A circuit for 115V operation)
• Cable runs
• Ventilation and cooling requirements
• If hanging display on a wall, location of studs in the wall
Prepare Your Installation Location
You should have prepared the area where you will install the unit. If custom
enclosures are part of the installation, they must be fully designed to accommodate
the installed unit and ventilation and cooling requirements.
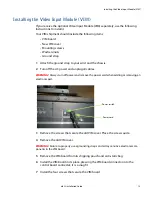
Tools and Other Things You May Need
• Tools:
• Needle nose pliers to remove staples from the bottom of the shipping box
• Utility knife to cut shrink wrap or box banding
• Level to ensure the display is hung straight
• Stud finder (if hanging display on a wall)
• Computer network LAN cables (straight through - no crossover) to interconnect
multiple displays for RS232 control
• LCD screen cleaner or LCD wipes - available at most electronics stores
• At least two very strong people to help lift units into place
Summary of Contents for m52L
Page 1: ...m52L Installation Guide ...
Page 2: ......
Page 4: ...iv m52L Installation Guide ...
Page 10: ...Table of Contents vi m52L Installation Guide ...
Page 20: ...Tools and Other Things You May Need 10 m52L Installation Guide ...
Page 28: ...Lining Up Screen Brackets 18 m52L Installation Guide ...
Page 32: ...About UPS Supplies 22 m52L Installation Guide ...
Page 58: ...Sharpness Settings 48 m52L Installation Guide ...
Page 60: ...Picture Position 50 m52L Installation Guide ...
Page 64: ...Using Planar s Big PictureTM 54 m52L Installation Guide ...
Page 68: ...Viewport Adjustment 58 m52L Installation Guide ...
Page 74: ...Tips for Color Balancing 64 m52L Installation Guide ...
Page 88: ...Turn Backlight Off With No Source and DPMS Delay 78 m52L Installation Guide ...
Page 92: ...Controlling With RS232 Commands 82 m52L Installation Guide ...
Page 102: ...Deleting a Configuration 92 m52L Installation Guide ...
Page 106: ...Where to Go From Here 96 m52L Installation Guide ...
Page 116: ...106 m52L Installation Guide ...
Page 118: ...Rear View 108 m52L Installation Guide Rear View 0 3 0 7 5 7 2 7 21 0 00 3 ...
Page 120: ...110 m52L Installation Guide ...