Chapter 4
Settings — [Canvases]
56 - ENGLISH
6) Drag the input source to be used and drop it to a desired position.
f
The
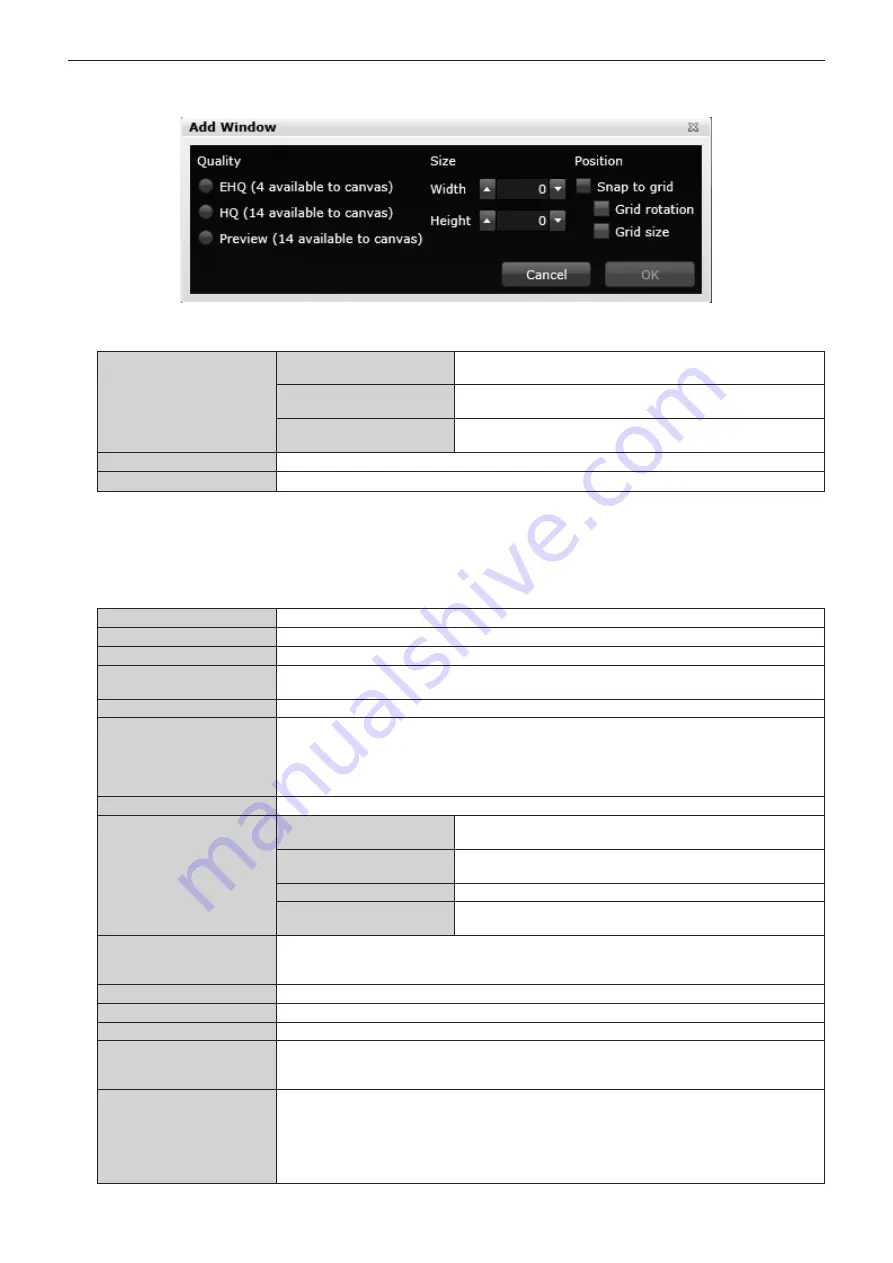
[Add Window]
screen will be displayed.
7) Set the window to be created on the canvas.
[Quality]
[EHQ]
Loads input signals at current resolution status (dot-by-dot high
resolution).
[HQ]
Samples and loads input signals at 1/2 the resolution (mid-
resolution).
[Preview]
Loads input signals at low resolution.
This is used for preview.
[Size]
Set the size of the window to be created by inputting a value.
[Position]
Set whether to snap to grid when positioning a new window using [Snap to grid] (
x
page 56).
f
Refer to “Number of windows that can be combined” (
x
page 57) for the number of windows that can be combined.
8) Click the [OK] button.
f
The window is displayed in the canvas window of which the center is at the 0,0 point.
9) Adjust the positioned window.
[Zoom All]
Adjust the display size of the canvas window so that all windows positioned are visible.
[Center Canvas Origin]
Position a new window in the canvas window, taking the 0,0 point as the center.
[Window Management]
Select a window placed in the canvas window.
[Name]
Sets the name of the the selected window. Use single-byte alphabets, numeric digits, and underbars
(_) for a name. Up to 19 characters can be entered. Use the alphabets for the first character.
[Input]
Change the input source of the selected window.
[Input Crop Settings]
When the picture quality of edge portions are poor in the input source image, pixels and lines can be
cut out.
Click [Input Crop Settings], and display the setting items and input values. The image of which edges
are cut out is automatically enlarged to fit the window. The aspect ratio of the image before the edges
are cut out is not maintained.
[Size]
Set the size of the window by inputting a value.
[Position]
[Horizontal]
Set the distance between the horizontal center of the window and
the 0 point on the X axis in the canvas window by inputting a value.
[Vertical]
Set the distance between the vertical center of the window and the
0 point on the Y axis in the canvas window by inputting a value.
[Depth]
Set the order of overlap of the windows positioned.
[Rotation]
Rotates the placed window.
Slide the bar or input the angle of rotation to adjust.
[Border]
Set a border line in the window displayed on an output device.
Set the pixel width with [Width] to set the window border. Click the button under [Width] to select a
color from the color table. After selecting a color, click the [Done] button to save the color.
[Flip Horizontally]
Flips the window in the horizontal direction.
[Flip Vertically]
Flips the window in the vertical direction.
[Lock Aspect Ratio]
Fixes the aspect ratio of the window.
[Snap to Output]
Select whether to snap to the output screen when positioning a new window overlapping on the
output screen. This operation changes the aspect ratio by resizing the window, and positions it on the
canvas by matching the pixels at the output position in the associated layout.
[Snap to grid]
Snaps the center of the new window to the intersection of the current grids. Grids do not appear until
this option is selected and the window is activated. Drag the window close to the desired position,
then the window snaps to the position.
[Snap to grid] has two suboptions. It is possible to set whether to snap to the rotation of the grids, or
to enable free adjustment by rotating operation. It is also possible to set to resize the window to the
size of the current grid window.


