background image

Chapter 4

Settings — [Layouts]

ENGLISH - 49

[Layouts]

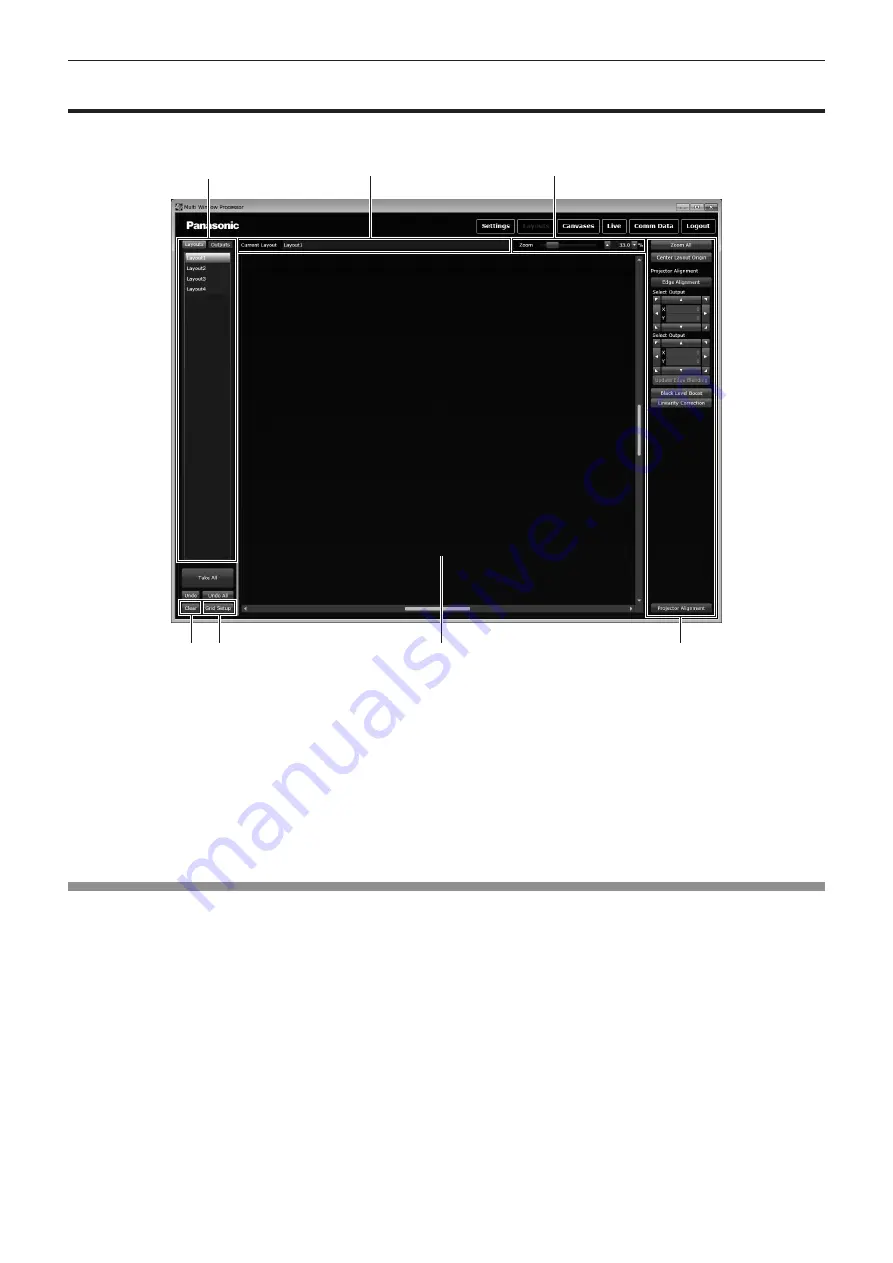
Display the [Layouts] page by clicking the [Layouts] button.
On the [Layouts] page, set the layout of output devices. Up to four layouts can be set.

4

5

7

6

1

2

3

1  Source area

Allows selection of either the [Layouts] tab or the [Outputs] tab.

2  [Current Layout]

Displays the name of the currently selected layout. The layout 

name can be changed. Use single-byte alphabets, numeric 

digits, and underbars (_) for a name. Up to 19 characters can 

be entered. Use the alphabets for the first character.

3  [Zoom]

Zooms in or out the display in a layout window. Slide the zoom 

bar or input a value to adjust.

Quick zoom in and out is possible using a mouse with a scroll 

wheel.

4  [Clear]

Undoes changes made on the [Layouts] page.

5  [Grid Setup]

Displays grid lines in the layout window. (

x

 page 51)

6  Layout window

Lays out output devices.

7  Setting area

Adjusts a layout. (

x

 page 51)

Creating layouts

Position output devices similar to the actual positioning.

1)  Click the [Layouts] tab in the source area.


f

A list of layouts is displayed.

2)  Select the layout to set.
3)  Click the [Outputs] tab.


f

A list of available output devices is displayed.

Summary of Contents for ET-MWP100G

Page 1: ...o ask a qualified technician or your dealer when installing it Before operating this product please read the instructions carefully and save this manual for future use Before using this product be sure to read Read this first x pages 2 to 7 Before setting up this product be sure to read Setting up x page 22 TQBH0318 1 Multi Window Processor Commercial Use Operating Instructions Functional Manual E...

Page 2: ...rating instructions which include using the provided power cord and shielded interface cables when connecting to computer or peripheral device If DVI D interface cable is to be used the user must use only shielded DVI D interface cable with ferrite cores to avoid potential harmful interference Any unauthorized changes or modifications to this equipment will void the user s authority to operate CAU...

Page 3: ...odifications Caution This equipment has been tested and found to comply with the limits for a Class A digital device pursuant to part 15 of the FCC Rules These limits are designed to provide reasonable protection against harmful interference when the equipment is operated in a commercial environment This equipment generates uses and can radiate radio frequency energy and if not installed and used ...

Page 4: ...new plug is to be fitted please observe the wiring code as shown below If in any doubt please consult a qualified electrician WARNING THIS APPLIANCE MUST BE EARTHED IMPORTANT The wires in this mains lead are coloured in accordance with the following code Green and Yellow Earth Blue Neutral Brown Live As the colours of the wire in the mains lead of this appliance may not correspond with the coloure...

Page 5: ...let the power connector into the device terminal If the plug is not inserted correctly electric shocks or overheating will result f f Do not use plugs which are damaged or wall outlets which are coming loose from the wall Do not use anything other than the provided power cord Failure to observe this will result in fire or electric shocks caused by a short circuit or overheating Please note that if...

Page 6: ... to overheat which can cause fire or damage to the device f f Set the device in a location where the air intake exhaust ports will not be blocked Never attempt to remodel or disassemble the device High voltages can cause fire or electric shocks f f For any inspection adjustment and repair work please contact an Authorized Service Center Do not allow metal objects flammable objects or liquids to en...

Page 7: ...ill cause the device to become unbalanced and fall which could result in damage or injury The device will be damaged or deformed Do not put your weight on this device You could fall or the device could break and injury will result f f Be especially careful not to let young children stand or sit on the device Do not place the device in extremely hot locations Doing so will cause the outer casing or...

Page 8: ...ademarks of SD 3C LLC f f VGA and XGA are trademarks of International Business Machines Corporation in the United States f f SVGA is a trademark or registered trademark of Video Electronics Standards Association f f All other names company names and product names mentioned in this manual are trademarks or registered trademarks of their respective owners Please note that the and TM symbols are not ...

Page 9: ...r projected images from multiple projectors to produce one image in a multiple screen display independent from the other projectors functions Quick Steps For details refer to the corresponding pages 1 Attach optional accessories to the device x page 71 f f Make sure to ask a qualified technician or your dealer when installing the product 2 Set up the device x page 22 3 Connect with external device...

Page 10: ...r cord 36 Switching on the device 36 Switching off the device 37 Preparing the control computer 38 Starting the control software 38 Description of the login screen 39 Login to the control software 41 Closing the control software 42 Chapter 4 Settings Overview of operation 44 Operation flow with the control software 44 Sending commands to the device 44 Saving current settings to the device 44 Setti...

Page 11: ...ENGLISH 11 Chapter 1 Preparation This chapter describes things you need to know or check before using the device ...

Page 12: ...en installing it in a location which is prone to static electricity f f When this device is used at a location where static electricity occurs often such as on a carpet communications of the DIGITAL LINK and the wired LAN are disconnected more often In such cases use an anti static mat and keep possible sources of noise and static electricity away from the device and cables f f In rare cases the L...

Page 13: ...air cable to transmit video audio Ethernet and serial control signals This device supports connection to DIGITAL LINK compatible displays projector flat panel display or to twisted pair cable transmitters receiver For DIGITAL LINK compatible projectors and twisted pair cable transmitters of other manufacturers of which the operation has been verified refer to the Panasonic website http panasonic n...

Page 14: ...e supplied power cord only with this device f f For missing accessories consult your dealer f f Store small parts such as screws with toothed lock washers which are removed from the device in an appropriate manner and keep them away from small children Note f f The model numbers of accessories are subject to change without prior notice Contents of the supplied CD ROM The contents of the supplied C...

Page 15: ...This is the interface board with 4 inputs for HD SD SDI signals Interface Board for Digital Link 2output ET MCQDL350 This is the interface board with 2 outputs for DIGITAL LINK signals POWER SUPPLY ET RPS100G This unit is the same as POWER SUPPLY installed in the device By additionally installing to the device you can form a redundant power supply system configuration Note f f The model numbers of...

Page 16: ...responsible for any damage to the Licensee caused by Licensee s reverse engineering decompiling or disassembly of the Software r r Article 6 After sales Service If a problem should occur with the Software while Licensee is using the Software and Licensee notify Panasonic of the problem by telephone or letter Panasonic will make a best effort to notify such Licensee of necessary information to solv...

Page 17: ...ce for installing the optional POWER SUPPLY 9 Air exhaust port 10 POWER SUPPLY section 11 Air intake port r r CPU board section 1 2 3 4 USB RS232 LAN 1 4 6 3 5 5 2 1 LAN terminal This is the LAN terminal to connect to a network or computer You can control this device using a computer 2 LAN LINK ACT indicator Turns on when connected and flashes when sending and receiving signals 3 LAN10 100 indicat...

Page 18: ...re exclusively used by output interface boards The 12 slots from Slot3 to Slot14 can be used by either input or output interface boards For details on possible installation locations refer to Installing optional accessories x page 71 r r Input output terminals The input terminals are numbered in1 in2 and so on in order from the left Similarly the output terminals are numbered out1 out2 and so on H...

Page 19: ...TPUT 1 1 2 1 DVI U SCALED OUTPUT terminal This terminal is used for digital analog RGB and YCBCR YPBPR signal output 2 Status indicator of the interface board x page 20 r r Interface Board for 3G SDI 2input Model No ET MCYSD200 3G SDI INPUT ST 3G SDI INPUT 1 2 1 1 2 1 3G SDI INPUT terminal This terminal is used for 3G SDI including HD SD SDI signal input 2 Status indicator of the interface board x...

Page 20: ...device Green Connected to an external device via a cable Orange An HDCP signal is being input Orange flashing A non HDCP signal is being input 6 Status indicator of the interface board x page 20 r r POWER SUPPLY Model No ET RPS100G POWER OFF ON AC IN 100 240Vac 50 60Hz 12V 1 3 4 2 1 POWER switch Turns the power on off 2 AC IN terminal This terminal is used for connecting the supplied power cord 3 ...

Page 21: ...hings you need to do before using this device such as the setup and connections Attach optional accessories before installing the device at a location Be sure to ask a qualified technician or your dealer when attaching optional accessories to the device x page 71 ...

Page 22: ...04 F g g When using the device between 1 400 m 4 593 and 2 700 m 8 858 above sea level 0 C 32 F to 35 C 95 F f f Do not install the device near other devices that produce a considerable amount of heat such as power amps If such conditions cannot be avoided set a space of 1U or more between this device and other devices f f Do not use the device under the condition with the intake exhaust ports of ...

Page 23: ... to GND first f f Video signals containing too much jitter may cause the images on the screen to randomly wobble or wafture In this case a time base corrector TBC must be connected f f Some computer models are not compatible with the device f f Use a cable compensator when you connect external devices such as a video player to the device using long cables Otherwise the device may not display the i...

Page 24: ... Clear to send 8 RTS Request to send 9 NC Communication conditions for the RS232 terminal Signal level RS 232C compliant Baud rate 115 200 bps Parity None Character length 8 bits Stop bit length 1 bit Flow control None Connecting equipment to this device The device has slots for connecting input and output interface boards By installing various types of optional interface boards that are compatibl...

Page 25: ...llowing when connecting a VCR g g A VCR with built in time base corrector TBC g g A time base corrector TBC between the device and the VCR f f If nonstandard burst signals are connected the image may be distorted In such case connect the time base corrector TBC between the device and the external devices f f To assure continued performance and FCC compliance use only high quality DVI D interface c...

Page 26: ...INPUT 3 1 2 4 3G SDI INPUT ST 3G SDI INPUT 1 2 DVI U INPUT STATUS DVI U INPUT DVI U INPUT STATUS DVI U INPUT DVI U SCALED OUTPUT STATUS DVI U SCALED OUTPUT DVI U SCALED OUTPUT STATUS DVI U SCALED OUTPUT DIGITAL LINK DIGITAL LINK DIGITAL LINK DIGITAL LINK 1 2 3 4 USB RS232 LAN 3G SDI signals SD SDI signals or HD SDI signals Digital VCR for commercial use Digital VCR for commercial use Note f f Use ...

Page 27: ...le Computer DVI RGBHV 5 BNC conversion adaptor commercially available Attention f f To assure continued performance and FCC compliance use only high quality DVI D interface cable with two ferrite cores for connecting with the DVI U INPUT terminal Note f f The DVI U INPUT terminal can be connected to HDMI and DVI I compatible devices However images may not appear or may not be displayed properly on...

Page 28: ...ion adaptor commercially available DVI HDMI conversion adaptor commercially available Non DIGITAL LINK compatible flat panel display Non DIGITAL LINK compatible flat panel display Non DIGITAL LINK compatible projector Non DIGITAL LINK compatible projector Attention f f To assure continued performance and FCC compliance use only high quality DVI D interface cable with two ferrite cores for connecti...

Page 29: ...tup menu Network Setup to DIGITAL LINK f f Ask a qualified technician or your dealer to laying the cable for DIGITAL LINK connection Image and sound may be disrupted if cable transmission characteristics cannot be obtained due to inadequate wiring f f For DIGITAL LINK connection use a LAN cable that conforms with the following conditions g g Compatible with the CAT5e or a higher standard g g Shiel...

Page 30: ...will be out of warranty f f A Panasonic recommended twisted pair cable transmitter receiver is required when connecting the device to Panasonic s display projector or flat panel display that is not compatible with DIGITAL LINK For twisted pair cable transmitters receivers of other manufacturers of which the operation has been verified refer to the Panasonic website http panasonic net avc projector...

Page 31: ...d computer environment for connection Before connecting the device to your computer make sure to check the following settings r r LAN settings Computer with a built in LAN function f f Is the LAN function enabled Computer without a built in LAN function f f Is the LAN adaptor properly recognized by the system f f Is the LAN adaptor enabled f f Install the driver for the LAN adaptor beforehand Chec...

Page 32: ...Software for Multi Window Processor x64 exe 64 bit within the uncompressed folders f f When the installer launches the installation screen English is displayed 2 Click the Next button f f The licensing agreement is displayed 3 Read the licensing agreement f f Be sure to read Software Licensing Agreement displayed on the installation screen or Software Licensing Agreement x page 16 4 Agree to the l...

Page 33: ...ng Windows applications The installation may not proceed if other software is left running Uninstalling the control software Attention f f The setting data saved on the control computer is not deleted even when the control software is uninstalled Before uninstalling the control software click General Local Data Management on the Settings page to delete all setting data saved on the control compute...

Page 34: ...ontrol Panel Uninstall a program and click Uninstall 2 Uninstall the control software by following the instructions on the screen English r r Windows XP 1 Select Control Software for Multi Window Processor from Start Control Panel Add or remove programs and click Delete 2 Uninstall the control software by following the instructions on the screen English ...

Page 35: ...ENGLISH 35 Chapter 3 Basic Operations This chapter describes basic operations to start with ...

Page 36: ...ct the power cord to the device 2 Connect the power plug to an outlet f f AC 100 V 240 V 50 Hz 60 Hz 3 Press the POWER switch towards the b side to turn on the power f f The power indicator BUSY R ON G will light in red and after a while will light in green Note f f When installing the optional POWER SUPPLY to form a 2 POWER SUPPLY configuration turn on both POWER SUPPLY units f f When the power i...

Page 37: ...off the power f f Confirm that the power indicator BUSY R ON G is turned off Attention f f When installing the optional POWER SUPPLY to form a 2 POWER SUPPLY configuration during the device installation remove the power cord connector from the AC IN terminal after turning off both POWER SUPPLY units to fully isolate them from the power supply POWER OFF ON AC IN 100 240Vac 50 60Hz 12V POWER OFF ON ...

Page 38: ...ice to the control computer using a serial cable 1 Connect the control computer f f Connect the device to the control computer using an RS 232C compliant straight through cable 2 Configure the control computer s communication settings f f Refer to Communication conditions for the RS232 terminal x page 24 for setting details Note f f The IP address of the LAN terminal on the CPU board section of th...

Page 39: ...able password is the user name pw For example if the user name is admin the password will be adminpw 3 Work Offline Starts the control software in offline mode Operations will be limited This can be selected when the setting data is saved on the control computer In this case you do not need to enter User name and Password 4 Login After entering the user name and password click this to log in 5 Set...

Page 40: ... the Layouts and Canvases coordinates Y axis Selecting Up will make the upper direction of the control software screen positive Selecting Down will make the lower direction of the control software screen positive 4 Click the OK button f f This confirms the changes to the settings Note f f The IP address of the LAN terminal on the CPU board section of the device is set to 192 168 0 10 by default To...

Page 41: ...OK 4 Log into the control software f f The control software starts and the Layouts page will be displayed Refer to Settings x page 43 for details on how to use the control software Note f f If you use the setting data saved on the device it takes some time to load the setting data Therefore it takes for a while to make the software operation available You can reduce the time to load the data by sa...

Page 42: ...to be saved f f Use single byte alphabets numeric digits and underbars _ for a name Up to 19 characters can be entered Use the alphabets for the first character f f As a name for the setting data to be saved the serial number of the device is automatically added before the entered string 3 Click the OK button f f The current working setting data is saved to log out f f Click the Exit button to log...

Page 43: ...ENGLISH 43 Chapter 4 Settings This chapter describes the settings and adjustments you can make using the control software ...

Page 44: ...f You can exit the control software by clicking the Logout button x page 42 Sending commands to the device After logging into the control software most commands are not sent to the device until you click the Take All button If the Undo button is clicked the displayed items return to the settings at the moment when the Take All button was last clicked If the Undo All button is clicked all items ret...

Page 45: ...delete the data 5 Maximum log messages Sets the number of communication log items to be displayed You can set a number from 1 000 to 100 000 6 Positive Y Direction Select the direction of the Layouts and Canvases coordinates Y axis Selecting Up will make the upper direction of the control software positive Selecting Down will make the lower direction of the control software positive 7 Backup To SD...

Page 46: ...BHV RGsB and YCBCR YPBPR in Input Type are selected Color Scale Enables you to correct the color by converting the scale when the color scale of the input source is not appropriate If you set this to Auto the most appropriate color conversion according to the input method will be selected If the color scale is not appropriate even when Auto is set select a suitable color scale other than Auto For ...

Page 47: ...ich the monitors or projectors that are connected to this device support If you configure multiple windows on multiple monitors or projectors set the same resolutions for output devices on the same output boards 1 Click the Outputs button on the Settings page 2 Select the output device to be used from the output device list f f Here a DVI U output device is selected 3 Configure the output device O...

Page 48: ... you may want to have these outputs co timed The device therefore permits an output to be locked to an input of the same resolution There are the Genlock button and Genlock source selection for each output The source selection is usually set to NULL 1 Click the Outputs button on the Settings page 2 Select the output source to be used from the output device list 3 Click the setting field of Genlock...

Page 49: ...e entered Use the alphabets for the first character 3 Zoom Zooms in or out the display in a layout window Slide the zoom bar or input a value to adjust Quick zoom in and out is possible using a mouse with a scroll wheel 4 Clear Undoes changes made on the Layouts page 5 Grid Setup Displays grid lines in the layout window x page 51 6 Layout window Lays out output devices 7 Setting area Adjusts a lay...

Page 50: ...ut device closer to the actual position in the layout window by moving the arrows minutely to make fine adjustment Positioning Mode When adjusting positioning select Physical to move the layout window Select Image to move positioned output devices Rotation Rotates the positioned output devices Slide the bar or input the angle of rotation to adjust Resolution Set the resolution of an output device ...

Page 51: ...Using the Base Size function you can lay out multiple output devices in different sizes easily Set any number for a base output device except for 0 00 to Base Size on the Outputs tab in the source area and enter the size ratio for the opposed output device to Relative Size on the Add Output screen With this operation you can adjust the image size to fit the one displayed on another output device A...

Page 52: ...splayed in the setting area 8 Adjust Black Level Boost x page 54 9 Click the Projector Alignment button f f When all adjustments are completed release the lock performed in Step 1 10 Click the Take All button f f All settings of the newly configured layout are sent to this device If there are other outputs a maximum four layouts can be configured Edge Alignment Arrange projectors correctly and per...

Page 53: ... small corrections SCurve When arrangement of all projectors is completed correct luminance so that the images blend naturally at the blending portion You should now feed in a flat brightness image onto the whole layout Currently this will require an external video source to set up a canvas with this layout and place a large single window of this source to cover the whole layout ...

Page 54: ...djust SCurve Gamma Correct variability in gamma values among projectors For the setting items of Gamma R G and B gamma values are displayed separately Change the input source from white to red green or blue If there is a projector output with different luminance then select the output in the layout window only the output becomes red and input the appropriate gamma value to adjust the luminance and...

Page 55: ... currently selected canvas The canvas name can be changed Use single byte alphabets numeric digits and underbars _ for a name Up to 19 characters can be entered Use the alphabets for the first character 3 Zoom Zooms in or out the display in the canvas window Slide the zoom bar or input a value to adjust Quick zoom in and out is possible using a mouse with a scroll wheel 4 Clear Undoes changes made...

Page 56: ...larged to fit the window The aspect ratio of the image before the edges are cut out is not maintained Size Set the size of the window by inputting a value Position Horizontal Set the distance between the horizontal center of the window and the 0 point on the X axis in the canvas window by inputting a value Vertical Set the distance between the vertical center of the window and the 0 point on the Y...

Page 57: ...s selected and a grid is set whether to position the window with automatic positioning function or position it at any place in the canvas window by drag and drop operation can be selected Presets When the canvas window is used information of windows positioned on the Canvases page can be saved and called back later Presets can be called any time from the Presets tab in the source area and applied ...

Page 58: ...uttons is clicked the device calls the preset and the output window position recreates the preset condition 2 Window Inputs Current Displays which input is being displayed in each window in the current preset Required Inputs are displayed in alphabetical order You can change inputs for windows This operation is performed by moving a window to a new window 3 Switching mode Immediate Sends changed c...

Page 59: ...on are synchronized with this device so that the setting status becomes the same as that of the device 3 Command input column Input commands 4 Send Sends commands input in the command input column to this device 5 Save Log Saves communication log Data is all saved in a simple text file Note f f The device will reply to commands in various ways A successful command may be replied by the Info where ...

Page 60: ...Chapter 4 Settings Logout 60 ENGLISH Logout Log out from the control software Refer to Closing the control software x page 42 for details on operation ...

Page 61: ...ENGLISH 61 Chapter 5 Maintenance This chapter describes inspection when there are problems and maintenance methods ...

Page 62: ... wipe with a cloth moistened with water and well wrung out and then dry off with a dry cloth g g Do not use benzene thinner or rubbing alcohol other solvents or household cleaners Doing so may deteriorate the outer case g g When using chemically treated dust cloths follow the instructions written on the packaging f f When the device is used for a prolonged time dirt and dust may adhere to the air ...

Page 63: ...Center Windows Firewall 3 When the Windows Firewall window is displayed click Exceptions tab Add Program 4 When the Add Program window is displayed click Multi Window Processor If Multi Window Processor is not in the program list click Browse to select PJMC exe and then click Open and click OK 5 Multi Window Processor is displayed in the Programs and Services field 6 Select Multi Window Processor ...

Page 64: ...xe and then click Open Multi Window Processor is displayed in the application list 5 Multi Window Processor is displayed in the Allowed apps and features list 6 Select the network to allow the connection from Private or Public and click to select the check box 7 Click OK in the Allow apps to communicate through Windows Firewall window 8 The control software is registered as an application in the i...

Page 65: ... describes how to attach optional accessories and the specifications and after sales service of the device Be sure to ask a qualified technician or your dealer when installing optional accessories such as the interface board or the POWER SUPPLY ...

Page 66: ...Analog RGB g g Y YCBCR YPBPR g g V Video S Video g g G 3G SDI 2 g g S HD SDI 3 SD SDI 4 Compatible signal Signal name Resolution Dots Scanning freq Dot clock freq MHz Compatible signal format 5 Horizontal kHz Vertical Hz D R Y V G S NTSC 720 x 480i60 720 x 480i 15 7 59 9 l PAL 720 x 576i50 720 x 576i 15 6 50 0 l 525i 480i 720 x 480i60 720 x 480i 15 7 59 9 13 5 l l l 625i 576i 720 x 576i50 720 x 57...

Page 67: ...0 x 960 60 0 60 0 108 0 l l SXGA 1280 x 1024p60 1 280 x 1 024 64 0 60 0 108 0 l l 1366 x 768 1366 x 768p60 1 366 x 768 47 7 59 8 84 8 l l SXGA 1400 x 1050p60 1 400 x 1 050 65 3 60 0 121 8 l l 1400 x 1050p75 1 400 x 1 050 82 3 74 9 156 0 l l WXGA 1440 x 900p60 1 440 x 900 55 9 59 9 106 5 l l UXGA 1600 x 1200p60 1 600 x 1 200 75 0 60 0 162 0 l l WSXGA 1680 x 1050p60 1 680 x 1 050 65 3 60 0 146 3 l l...

Page 68: ...80p29 97 1 920 x 1 080 33 7 30 0 74 2 l l 4 l 4 1125 1080 60p 1920 x 1080p60 1 920 x 1 080 67 5 60 0 148 5 l l 4 l 4 1920 x 1080p59 94 1 920 x 1 080 67 4 59 9 148 4 l l 4 l 4 1125 1080 50p 1920 x 1080p50 1 920 x 1 080 56 3 50 0 148 5 l l 4 l 4 VGA 640 x 480p60 640 x 480 31 5 59 9 25 2 l l 640 x 480p67 640 x 480 35 0 66 7 30 2 l l 640 x 480p73 640 x 480 37 9 72 8 31 5 l l 640 x 480p75 640 x 480 37 ...

Page 69: ...laced signals are connected flickering may occur on the projected image f f The compatibility status above applies only when interface boards compatible with each signal format are attached to the device f f Some signal formats require a conversion adaptor for connection with an external device f f When using the device with the following screen configurations while connecting to the projector PT ...

Page 70: ...Chapter 6 Appendix Dimensions 70 ENGLISH Dimensions Unit mm Front 177 3 6 31 32 313 3 12 11 32 294 3 11 19 32 101 7 4 7 9 32 482 4 19 464 8 18 5 16 435 6 17 5 32 10 13 32 37 7 1 15 32 ...

Page 71: ...rect attachment may result in failure to operate or malfunction Restrictions on interface board attachment slots This device has 16 slots to connect input and output interface boards with the following slot restrictions f f Slot1 and Slot2 are only for input interface boards Output interface boards cannot be installed f f Slot15 and Slot16 are only for output interface boards Input interface board...

Page 72: ...he device to remove 2 Attach the slot cover f f Attach the stored slot cover and tighten to secure with the two screws with toothed lock washers removed in Step1 f f To replace with another interface board follow the procedure in Installing the interface board Attention f f Make sure to attach a slot cover to empty slots f f Place the removed interface board in an antistatic bag to store Attaching...

Page 73: ...nterclockwise until it turns freely and then remove the POWER SUPPLY f f Hold the handles of the POWER SUPPLY and slowly remove 5 Attach the cover for the POWER SUPPLY attachment section f f Attach the stored cover for the POWER SUPPLY attachment section and tighten to secure with the two screws with toothed lock washers f f To replace with another POWER SUPPLY follow the procedure in Attaching th...

Page 74: ... HD SDI INPUT terminal 19 I Inputs 45 L LAN10 100 indicator 17 20 LAN LINK ACT indicator 17 20 LAN terminal 17 20 Layout Auxiliary functions 51 Creating 49 Layouts 49 List of compatible signals Input 66 Output 68 Live 58 Logout 60 M Main body 17 Maintenance 62 O Optional accessories 15 Outputs 47 Overview of operation 44 P Power cord 36 Power indicator 17 Power input indicator 18 20 Power output i...

Page 75: ... and the environment which could otherwise arise from inappropriate waste handling Please contact your local authority for further details of your nearest designated collection point Penalties may be applicable for incorrect disposal of this waste in accordance with national legislation For business users in the European Union If you wish to discard electrical and electronic equipment please conta...

Reviews: