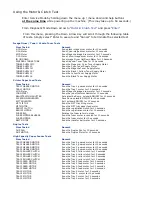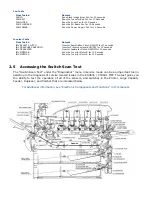
Using the Switch Scan Test
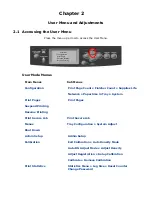
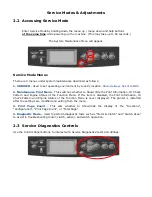
Enter Service Mode by holding down the menu up / menu down and help buttons
at the same time
while powering up the machine. (This may take up to 60 seconds.)
The System Maintenance Menu will appear.
From Diagnostic Mode, Down arrow to
“Switch Scan”
and press
“Enter”
From this menu, pressing the Down Arrow Key will scroll through the following table
of tests. Simply select “Enter to execute and “Cancel” to terminate the selected test.
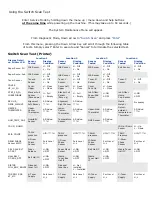
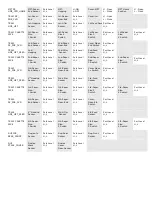
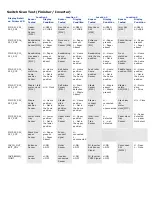
Switch Scan Test (Printer)
Location 1
Location 2
Location 3
Location 4
Display Detail
on Printer LCD
Sensor
Tested
Display
Condition
Sensor
Tested
Display
Condition
Sensor
Tested
Display
Condition
Sensor
Tested
Display
Condition
Paper Route: PU
IN1 Sensor
H - Off
L – On
IN2 Sensor
H - Off
L - On
WR Sensor
H - Off
L - On
Exit Sensor
H - Off
L - On
Paper Route: Sub
IN1 Sensor
H - Off
L - On
IN2 Sensor
H - Off
L - On
WR Sensor
H - Off
L - On
Toner Sensor
Toner K
Sensor
H - Off
L - On
Toner Y
Sensor
H - Off
L - On
Toner M
Sensor
H - Off
L - On
Toner C
Sensor
H - Off
L - On
COVER
UP_LU_FU
Cover
Upper
H - Open
L - Close
Cover Left
Upper
H - Open
L - Close
Cover
Face Up
H - Open
L - Close
STKF_FD_FU
JOBOFFHOME
Stacker Full
Sensor
(Face down)
H - Full
L - Empty
Stacker Full
Sensor
(Face up)
H - Full
L - Empty
Job Offset
Paper-End
Sensor
H:ON
L:OFF
Job Offset
Home
Pos. Sensor
H:ON
L:OFF
REG L/R_
DENS_WEIGHT
Alignment
Left Sensor
AD Value:
***H
Alignment
Right Sensor
AD Value:
***H
Media
Weight
Frequency
HEATER
THERMISTER
Upper
Center
Thermister
AD Value:
***H
Lower-
Center-
Thermister
AD Value:
***H
Upper-Side-
Thermister
AD Value:
***H
Detect-
ambient
temperature-
Thermister
AD Value:
***H
HUM_TEMP_OHP
Humidity
Sensor
AD Value:
***H
Temperature
Sensor
AD Value:
***H
OHP Sensor
AD Value:
***H
ID UP / DOWN
ID Up / Down
Sensor
H - Up
L – Down
RFID COLOR
TAG-K
presence
UID:****H
TAG-Y
presence
UID:****H
TAG-M
presence
UID:****H
TAG-C
Presence
UID:****H
DRUM PHASE
Sensor KYMC
K-Drum
Phase
Sensor
Port Level
H, L
Y-Drum
Phase
Sensor
Port Level
H, L
M-Drum
Phase
Sensor
Port Level
H, L
C-Drum
Phase
Sensor
Port Level
H, L
F-RLS SLK BLT
DT-DCT
Fuser
Release
H:ON
L:OFF
Paper Slack
Sensor
H:ON
L:OFF
Belt Hall IC
H:ON
L:OFF
Waste Toner
Hall IC
H:ON
L:OFF
HALL BELT_
DT-BOX_DCT
Belt Hall IC
H:ON
L:OFF
Waste
Toner Box
Hall IC
H:ON
L:OFF
Waste
Toner Hall
IC
H:ON
L:OFF
DISTNR
FULL_BOX_BOXSP
Disposal
toner full
H:ON
L:OFF
Disposal
toner box
H - Not
installed
L – Installed
TNR SPLY SNS
KY_MC
K-Toner
Supply
Port Level
H, L
Y-Toner
Supply
Port Level
H, L
M-Toner
Supply
Port Level
H, L
C-Toner
Supply
Port Level
H, L
Summary of Contents for C9800 Series
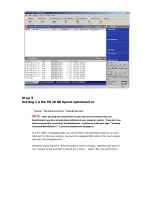
Page 30: ...Step 3 Setting up the ES 1000 Spectrophotometer...
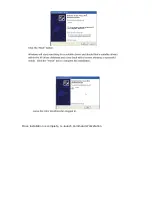
Page 31: ...Once installation is complete re launch Command Workstation...
Page 32: ......
Page 33: ......
Page 34: ......
Page 35: ......
Page 36: ......
Page 37: ......
Page 38: ......
Page 39: ......
Page 40: ......
Page 41: ......
Page 42: ......
Page 43: ......
Page 44: ......
Page 45: ......
Page 77: ...Close the side cover Carefully remove the jammed paper 4 3...
Page 83: ...Close the top cover and ensure that it is latched 12...
Page 87: ...Raise the front cover of the duplex unit Replace the two top covers 8 7...

