background image

Replacing toner bottles and staples and emptying punch waste containers

9

VarioLink 2221/2821/3621

9-9

Re

pla

c

in

g to

ne

r bo

tt

les and

 st

ap

les and

 e

m

pt

ying

 p

unch wast

e co

nt

ain

e

rs

Chapter 9

4

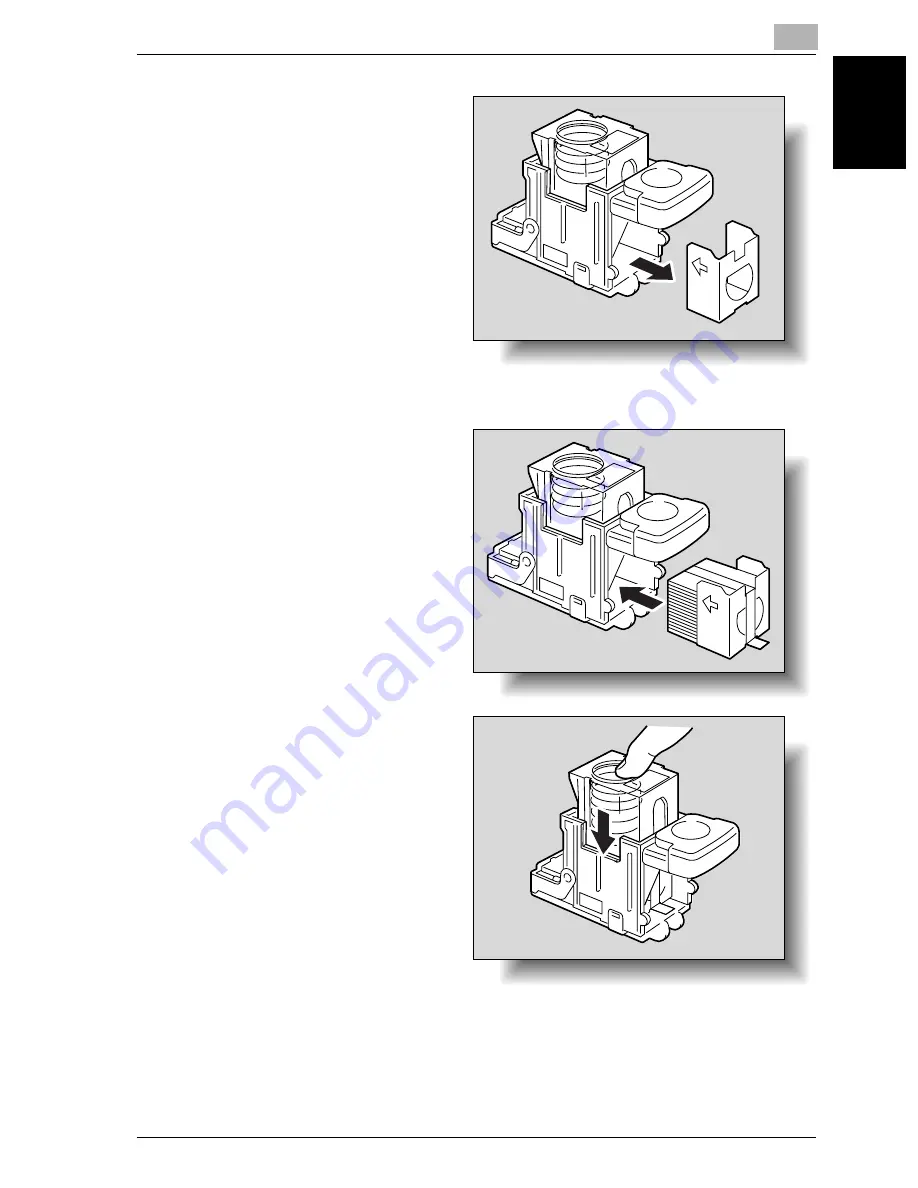
Remove the empty sta-
ple cartridge from the 
staple cartridge holder.

5

Insert the new staple 
cartridge into the staple 
cartridge holder.

Summary of Contents for VarioLink 2221

Page 1: ...Oc VarioLink 2221 VarioLink 2821 VarioLink 3621 The road to efficiency Copy Operations User s Guide...

Page 2: ...y e mail reminder Go to www oceusa com and click on Meter Reads You may also enter your readings by phone by calling 800 945 9708 1 Press Utility Counter on the control panel 2 Record the Total Counte...

Page 3: ...t in the designated holder so that it can easily be referred to when questions or problems arise during operation Views of the actual equipment may be slightly different from the illustrations used in...

Page 4: ...without modifica tion are permitted provided that the following conditions are met 1 Redistributions of source code must retain the above copyright notice this list of conditions and the following dis...

Page 5: ...soft com All rights reserved This package is an SSL implementation written by Eric Young eay crypt soft com The implementation was written so as to conform with Netscapes SSL This library is free for...

Page 6: ...ANTIES OF MERCHANTABILITY AND FITNESS FOR A PARTICULAR PURPOSE ARE DISCLAIMED IN NO EVENT SHALL THE AU THOR OR CONTRIBUTORS BE LIABLE FOR ANY DIRECT INDIRECT INCI DENTAL SPECIAL EXEMPLARY OR CONSEQUEN...

Page 7: ...x 18 Adding insertions such as colored paper within copies x 19 Inserting paper interleaves between copies of overhead projector transparencies x 19 Adding a binding margin to copies x 19 Erasing sect...

Page 8: ...CY DEVICES For U S A Users 1 9 INTERFERENCE CAUSING EQUIPMENT STANDARD ICES 003 ISSUE 4 For Canada Users 1 9 For users in countries subject to Class B regulations 1 9 For users in countries not subjec...

Page 9: ...t settings Automatic panel reset 2 27 Automatically returning to the screen given priority 2 27 Automatically conserving energy Low Power mode 2 28 Automatically conserving energy Sleep mode 2 28 Dark...

Page 10: ...tings 3 19 To select an Original Direction setting 3 20 Selecting the position of the binding margin Margin settings 3 21 To select a Margin setting 3 23 3 5 Selecting a Paper setting 3 24 Automatical...

Page 11: ...reserving a copy job 3 61 To reserve a copy job 3 61 3 12 Stopping deleting a job 3 63 To stop delete a copy job 3 63 4 Additional copy operations 4 1 Checking the copy settings Mode Check 4 2 To chec...

Page 12: ...a paper misfeed in the automatic duplex unit 5 12 To clear a paper misfeed in the bypass tray 5 13 To clear a paper misfeed in the 1st or 2nd tray 5 15 To clear a paper misfeed in the 3rd or 4th tray...

Page 13: ...paper size Custom Size settings 7 10 To store a non standard paper size Custom Size settings 7 12 To specify a setting for special paper Change Setting 7 15 7 3 Original documents 7 17 Documents that...

Page 14: ...ction 8 26 8 10 Printing copies overlapping a different image Image Overlay function 8 28 To store an overlay image Store Overlay 8 28 To recall an overlay image 8 31 To check the overlay image 8 33 8...

Page 15: ...Original Detection 11 10 Language Selection 11 10 Measurement Unit Setting 11 11 Machine Authentication PW Change 11 11 Default Setting Simplex Duplex 11 11 Auto Paper Auto Zoom 11 11 Priority Tray 1...

Page 16: ...29 11 8 Specifying account data settings 11 31 To display the desired account 11 31 To register an account 11 32 To manage an account 11 34 To delete an account 11 36 Allowing printing without authen...

Page 17: ...input screens mode 478 11 59 Specifying settings for limiting user authentication to only Scan functions mode 479 11 60 11 11 Specifying security settings Security Setting parameters 11 62 Before spec...

Page 18: ...pecifying separate horizontal and vertical zoom ratios By specifying separate horizontal and vertical zoom ratios copies of the doc ument can be resized as desired For details refer to page 3 34 Scann...

Page 19: ...pies Copies can be stapled together For details refer to page 3 55 Punching holes in copies Holes for filing can be punched in the copies For details refer to page 3 57 Center binding Copies can be fo...

Page 20: ...ng pages of various sizes A document with pages of various sizes can be scanned and copied togeth er For details refer to page 3 16 Adjusting copies according to the image quality of the original The...

Page 21: ...er interleaves between copies of overhead projector transparencies After each overhead projector transparency copy is printed a page can be added to the stack as an interleaf For details refer to page...

Page 22: ...document image can be repeatedly printed on a single sheet of paper For details refer to page 8 15 Separately copying a page spread A page spread such as in an open book or catalog can be copied onto...

Page 23: ...ument can be copied with the black and white colored areas of imag es inversed For details refer to page 8 35 Checking copy jobs The status of queued jobs can be checked For details refer to page 4 21...

Page 24: ...19 Interrupting a copy job The copy job being printed can be interrupted in order for a different copy job to be printed For details refer to page 4 7 Printing a proof copy Before printing a large num...

Page 25: ...ase set ting is selected the dark shadows around the docu ment or along the center of the document can be erased 4 Touch Enter Titles indicate the contents of the section Touch panel screens are shown...

Page 26: ...tails on replacing the toner bottle refer to To replace the toner bottle on page 9 4 The page shown above is an example only Text highlighted in this manner provides more detailed information concerni...

Page 27: ...ns User s Guide Box Operations This manual contains details on operating procedures for using the Box func tions Refer to this User s Guide for details on printing a proof copy or a locked job and on...

Page 28: ...o this User s Guide for details on operating procedures for the Fax functions when the fax kit is installed User s Guide Fax Driver Operations This manual contains function details on the fax driver w...

Page 29: ...ow Width and Length Whenever paper dimensions are mentioned in this manual the first value always refers to the width of the paper shown as Y in the illustration and the second to the length shown as...

Page 30: ...Introduction x 28 VarioLink 2221 2821 3621 Crosswise v If the width Y of the paper is longer than the length X the paper has a horizontal or land scape orientation indicated by v...

Page 31: ...indebtedness Stock certificates Legal documents Food stamps Postage stamps canceled or uncanceled Checks or drafts drawn by government agencies Internal revenue stamps canceled or uncanceled Passports...

Page 32: ...Introduction x 30 VarioLink 2221 2821 3621...

Page 33: ...1 Installation and operation precautions Chapter 1 Installation and operation precautions...

Page 34: ...ne Make sure you observe all of the precautions appear in each section of this manual KM_Ver 02E 2 Note Some parts of the contents of this section may not correspond with the purchased product Warning...

Page 35: ...rd supplied in the pack age If a power cord is not supplied only use the power cord and plug that is specified in POWER CORD INSTRUCTION Failure to use this cord could result in a fire or electrical s...

Page 36: ...and may result in fire or shock If proper wall outlet is not available the customer shall ask qualified electrician for the installation Do not use a multiple outlet adapter nor an ex tension cord in...

Page 37: ...Failure to do this could result in a fire or electrical shock CAUTION Do not tug the power cord when unplugging Pulling on the power cord could damage the cord resulting in a fire or electrical shock...

Page 38: ...nd then call your authorized service representative CAUTION After installing this product mount it on a se cure base If the unit moves or falls it may cause personal injury Do not place the product in...

Page 39: ...power cord from the power outlet and then call your authorized service representative If you keep on using it as is a fire or electrical shock could result Do not keep using this product if this produ...

Page 40: ...toner units and PC drum units near a floppy disk or watch that are susceptible to magnetism They could cause these products to malfunction When moving the machine CAUTION Whenever moving this product...

Page 41: ...rol Any changes made by the purchaser or user without first contacting the manufacturer will be subject to penalty under FCC regulations This device must be used with shielded interface cables The use...

Page 42: ...peration This machine is certified as a Class 1 laser product This means the machine does not produce hazardous laser radiation Internal laser radiation Maximum Average Radiation Power 28 9 W at the l...

Page 43: ...tached to laser products marketed in the United States This is a semiconductor laser The maximum power of the laser diode is 5mW and the wavelength is 770 795 nm For European users This is a semicondu...

Page 44: ...minen muulla kuin t ss k ytt ohjeessa mainitulla tavalla saattaa altistaa k ytt j n turvallisuusluokan 1 ylitt v lle n kym tt m lle la sers teilylle VARNING Om apparaten anv nds p annat s tt n i denn...

Page 45: ...the machine as shown be low Ozone release 7 CAUTION Locate the Machine in a Well Ventilated Room A negligible amount of ozone is generated during normal operation of this machine An unpleasant odor ma...

Page 46: ...contact our dealers regrading the prop er handling of end of life electric and electronic equipments Recycling of this product will help to conserve natural resources and prevent potential negative c...

Page 47: ...eration precautions Chapter 1 For EU member states only This product complies with RoHS 2002 95 EC Directive This device is not intended for use at a video workstation in compliance with BildscharbV D...

Page 48: ...bels appear on this machine at the follow ing positions Be very careful that an accident does not occur when operations such as re moving paper misfeeds are performed The area around the fusing unit i...

Page 49: ...chine operation consumables replenishing part replace ment and regular maintenance can easily be performed adhere to the rec ommended space requirements detailed below 2 Reminder Be sure to allow a cl...

Page 50: ...operation of the machine are as follows Temperature 50 F 10 C to 89 6 F 32 C with fluctuations of no more than 18 F 10 C within an hour Humidity 15 to 85 with fluctuations of no more than 20 within a...

Page 51: ...2 Before making copies Chapter 2 Before making copies...

Page 52: ...t name Description Main unit The document is scanned by the scanner sec tion and the scanned image is printed by the printer section Referred to as the machine or main unit throughout the manual 1 Ori...

Page 53: ...parator JS 502 Allows printed pages to be separated Pull the lever when taking out the paper Referred to as the job separator throughout the manual 8 Finisher FS 530 Feeds out printed pages The Sort s...

Page 54: ...By expanding the memory the number of scanned pages that can be stored in the mem ory can be increased Referred to as the expansion memory throughout the manual 17 Fax Multi Line ML 502 Installed to i...

Page 55: ...copying 2 Power auxiliary power key Press to turn on and off machine operations for example for copying printing or scanning When turned off the machine enters a state where it conserves energy 3 Auto...

Page 56: ...rge sized paper is to be loaded 8 Adjustable document guides Adjust to the width of the paper 9 Paper stopper Prevents printed pages from falling out of the output tray Use when the optional job separ...

Page 57: ...ed document See page 3 10 3 Switchback unit Built into the printer to turn over the paper dur ing double sided printing 4 Automatic duplex unit Turns over the paper for double sided printing 5 Right s...

Page 58: ...l subscriber line 13 TEL PORT2 jack Used for connecting the cord from the tele phone 14 LINE PORT2 jack Used for connecting the general subscriber line 15 IEEE1284 port type C Used for connecting a pa...

Page 59: ...r flashes to indicate the status of the machine 2 Adjustable document guide Adjusted to the width of the document See page 3 8 3 Document feed tray Loaded with the documents to be scanned fac ing up 4...

Page 60: ...ion 1 4th tray Used for storage when the single paper feed cabinet is installed Can be loaded with up to 500 sheets of paper when the double paper feed cabinet is installed 2 3rd tray Can be loaded wi...

Page 61: ...lease button Pressed in order to pull out the LCT 6 LCT Can be loaded with up to 2 500 sheets of paper No Part name Description 1 Copy output tray Collects copies 2 Misfeed clearing door Opened when c...

Page 62: ...wered when clearing paper misfeeds within the finisher 4 Dial FN2 Turned when clearing paper misfeeds within the finisher 5 Hole punch waste container Removed when emptying hole punch waste that has a...

Page 63: ...Do not place objects below the output trays of the finisher 9 Dial Turned to move the staple cartridge holder to ward you when replacing the staple cartridge or clearing jammed staples 10 Dial FN5 Tu...

Page 64: ...up in green For details refer to the User s Guide Network Scanner Operations and the User s Guide Ad vanced Scan Operations 5 Fax Scan key Press to enter Fax Scan mode While the machine is in Fax Sca...

Page 65: ...orange copying can not begin Press to restart a stopped job For details on jobs refer to Job List screens on page 4 21 12 Main Power indicator Lights up in green when the machine is turned on with th...

Page 66: ...ure to the touch panel otherwise it may be scratched or damaged Never push down on the touch panel with force and never use a hard or pointed object to make a selection in the touch panel Detail A fun...

Page 67: ...the corre sponding screen for specifying the settings 3 Status display area The amount of memory space available in addi tion to icons indicating the status of jobs and the machine are displayed 4 Mix...

Page 68: ...eived Indicates that computer data waiting to be printed remains Indicates that the selected paper tray is empty Indicates that the toner bottle must be replaced Indicates that the imaging unit must b...

Page 69: ...ow to scroll left When the left edge of the screen is reached the screen is scrolled down one line and the right edge is displayed Touch in this area to scroll down and to the left Touch in this area...

Page 70: ...rol panel can be adjusted to any of three angles Adjust the control panel to the angle that allows for easy operation To adjust the angle of the control panel 1 Pull the control panel re lease lever t...

Page 71: ...2 To adjust the control panel to an even steeper angle pull the control panel release lever to ward you and then push down on the control panel The control panel stops at the lower position 3 To retu...

Page 72: ...ower key To turn on the machine The main power switch turns on off all functions of the machine Normally the main power switch is turned on The Power auxiliary power key turns on off machine operation...

Page 73: ...ol panel or touch panel and those that are selected when the Reset key is pressed to cancel all settings specified from the control panel or touch panel The default settings can be changed For more de...

Page 74: ...the warm up screen is displayed the Basics screen appears After the message Now warming up Ready to scan is displayed the message Ready to copy appears The indicator on the Start key lights up in gree...

Page 75: ...then press the Start key After the machine has finished warming up the jobs will automati cally be printed in the order that they were queued How is the printing of a job stopped Press the Stop key Fo...

Page 76: ...achine with the main power switch or the Power auxiliary power key while it is making copies or printing otherwise a pa per misfeed may occur Do not turn off the machine with the main power switch or...

Page 77: ...atic panel reset operation is performed and whether or not it is performed can be set from Utility mode For de tails refer to Auto Reset on page 11 13 Whether or not the automatic panel reset operatio...

Page 78: ...e can receive jobs while it is warming up The touch panel comes on again and after the machine has fin ished warming up it is ready to begin printing within 14 seconds at normal room temperature 73 4...

Page 79: ...is performed for a specified length of time the touch panel goes off and the machine enters a mode where it conserves energy The power conservation effect is slightly reduced however the machine can q...

Page 80: ...chine can only be used by users registered with machine authentication 0 When machine authentication settings have been specified only users that enter user names and passwords registered with user au...

Page 81: ...h Login If the user name or password was incor rectly entered the in put screen appears again Type in the correct user name and password and then touch Login Instead of touching Login press the Access...

Page 82: ...g settings for machine authentication refer to Specifying account data settings on page 11 31 For details on logging on when external server authentication settings have been specified refer to Contro...

Page 83: ...rver authentication settings have been specified only users who enter user names and passwords registered with external server user authentication can use this machine 0 Contact the network administra...

Page 84: ...lection appears with the name of the default server Touch Domain Selection to display the list of domains reg istered with Active Directory and then select the desired domain However if multiple domai...

Page 85: ...and password and then touch Login Instead of touching Login press the Access key to com plete the operation The User Authentication screen disappears and the Basics screen ap pears 6 Make copies using...

Page 86: ...settings can be specified using the User Authentication parameters in Administrator mode available from the Util ity mode Settings should be specified by the administrator For details on specifying s...

Page 87: ...ounts can use this machine In addition the number of prints produced with each account can be controlled This is account track 0 When account track settings have been specified only users that enter r...

Page 88: ...nd then touch Enter 5 Press the Access key If the account name or password was in correctlyentered the input screen appears again Type in the correct account name and password and then press the Acces...

Page 89: ...irmation to log off 8 Touch Yes and then touch Enter The Account Track screen appears Detail For details on specifying account track settings refer to Specifying ac count data settings on page 11 31 T...

Page 90: ...ouch User Name For details on speci fying settings for ex ternal server authentication refer to To register a user with external server authentication on page 11 40 If Active Directory was selected in...

Page 91: ...ies 2 VarioLink 2221 2821 3621 2 41 Before making copies Chapter 2 2 Type in a user name specified with external server authentication and then touch Enter 3 Touch Password 4 Type in the password and...

Page 92: ...ype in the correct user name and password and then touch Login Instead of touching Login press the Access key to com plete the operation The user authentication screen disappears and the Basics screen...

Page 93: ...d then touch Enter 10 Press the Access key If the account name or password was in correctlyentered the input screen appears again Type in the correct account name and password and then press the Acces...

Page 94: ...gs can be speci fied in Administrator mode available from the Utility mode Settings should be specified by the administrator 2 Note If machine authentication settings have been specified with user aut...

Page 95: ...and a maximum of 1 000 account names can be registered 1 Touch User Name Machine authentica tion settings can be specified using the User Authentication parameters in Ad ministrator mode available fro...

Page 96: ...ng copies 2 46 VarioLink 2221 2821 3621 Before making copies Chapter 2 2 Type in a user name specified with machine authentication and then touch Enter 3 Touch Password 4 Type in the password and then...

Page 97: ...ype in the correct user name and password and then touch Login Instead of touching Login press the Access key to com plete the operation The user authentication screen disappears and the Basics screen...

Page 98: ...d then touch Enter 10 Press the Access key If the account name or password was in correctlyentered the input screen appears again Type in the correct account name and password and then press the Acces...

Page 99: ...e Ac cess key A message appears re questing confirmation to log off 13 Touch Yes and then touch Enter The User Authentication screen appears Detail Machine authentication and account track settings ca...

Page 100: ...been specified with user authentica tion the settings can be synchronized with the account track settings Users can log on from the User Authentication screen 0 Contact your administrator for passwor...

Page 101: ...appears again Type in the correct user name and password and then touch Login Instead of touching Login press the Access key to com plete the operation If an account synchronized with machine authenti...

Page 102: ...g settings for machine authentication refer to Specifying account data settings on page 11 31 For details on logging on when external server authentication settings have been specified refer to Contro...

Page 103: ...mode settings have been specified with machine authen tication to display a list of user names the desired user name can be se lected from a list Touch User List touch the button for the desired user...

Page 104: ...or 2nd tray Follow the procedure described below to load paper into the 1st and 2nd trays or into the optional double paper feed cabinet 3rd and 4th trays To load paper 1st or 2nd tray 1 Pull out the...

Page 105: ...printed on the side facing up when the package was unwrapped faces up Do not load so many sheets of paper that the top of the stack is higher than the mark A maximum of 500 sheets can be loaded How i...

Page 106: ...th your hands If the lateral guides are not positioned correctly for the loaded paper the paper size will not be correctly detected Be sure to adjust the lateral guides to the size of the loaded paper...

Page 107: ...LCT To load paper LCT 0 If the Power auxiliary power key is turned off even though the main power switch is on the LCT cannot be pulled out even after the tray re lease button is pressed Be sure that...

Page 108: ...when the package was un wrapped faces up Do not load so many sheets that the top of the stack is higher than the mark A maximum of 2 500 sheets can be load ed How is curled paper loaded Flatten the p...

Page 109: ...ot to touch the Film with your hands Detail For details on the paper that can be loaded into the LCT refer to Copy paper original documents on page 7 2 2 Note If the machine has entered Sleep mode the...

Page 110: ...d paper bypass tray 1 Open the bypass tray When loading large sized paper pull out the tray extension 2 With the side to be printed on facing down insert the paper as much as possible into the feed sl...

Page 111: ...Before making copies 2 VarioLink 2221 2821 3621 2 61 Before making copies Chapter 2 4 Select the paper type What paper type is selected when label sheets are loaded Select Thick...

Page 112: ...per sizes refer to Copy paper on page 7 2 2 Reminder When loading postcards load them in the w orientation as shown Do not load postcards in the v orientation A maximum of 50 postcards can be loaded i...

Page 113: ...me wrinkled or a paper misfeed may occur When loading envelopes load them with the flap side up as shown If the envelopes are loaded with the flap side down a paper misfeed may oc cur The flap side of...

Page 114: ...heets so that the side to be printed on faces down A maximum of 50 label sheets can be loaded into the bypass tray 2 Reminder A maximum of 150 sheets of thin paper can be loaded into the bypass tray 2...

Page 115: ...making copies 2 VarioLink 2221 2821 3621 2 65 Before making copies Chapter 2 Detail For details on specifying the paper size for the bypass tray refer to To specify the paper size Change Setting on pa...

Page 116: ...2 Before making copies 2 66 VarioLink 2221 2821 3621 Before making copies Chapter 2...

Page 117: ...3 Basic copy operation Chapter 3 Basic copy operation...

Page 118: ...dure describes how to copy a single sided document us ing basic copy operations 2 Note Some settings cannot be used together For details on the settings that cannot be combined refer to Operations tha...

Page 119: ...le double sided settings for originals and copies on page 3 39 For details on selecting the quality of the document and the copy density refer to Specifying document quality density settings on page 3...

Page 120: ...For details refer to Scanning the next document during printing reserving a copy job on page 3 61 2 Note If the optional hard disk drive is installed Save in User Box appears in the Copy mode screen I...

Page 121: ...ecified last is given priority The setting specified first is canceled The setting specified first is given priority A warning message appears 2 Note Depending on the combined operations and the selec...

Page 122: ...3 Basic copy operation 3 6 VarioLink 2221 2821 3621 Basic copy operation Chapter 3 2 Set the Book Copy function The 4 in 1 setting is au tomatically canceled and the Book Copy function is set...

Page 123: ...procedure for selecting the Corner Staple setting after setting the Booklet function is described below 1 Set the Booklet func tion 2 Select the Corner Sta ple setting The message This mode is not av...

Page 124: ...r machine may occur However a document that exceeds 80 pages can be scanned in separate batches For details refer to Scanning a document in separate batches Separate Scan setting on page 3 12 0 If the...

Page 125: ...uides against the edges of the docu ment For details on load ing documents of mixed sizes refer to Copyingdocuments of mixed sizes Mixed Original setting on page 3 16 For details on select ing the ori...

Page 126: ...glass In addition do not press down extremely hard on a book spread placed on the original glass otherwise the original glass may be damaged 0 For thick books or large objects make the copy without c...

Page 127: ...f the binding margin Margin settings on page 3 21 For transparent or translucent docu ments place a blank sheet of paper of the same size as the document over the document For bound docu ments spread...

Page 128: ...f 80 document pages can be loaded into the ADF at one time However by copying with the Separate Scan setting a document that ex ceeds 80 pages can be scanned and treated as a single copy job In additi...

Page 129: ...s on the types of documents that can be loaded into the ADF refer to Original documents on page 7 17 Repeat step 2 until all pages of the document have been scanned The amount of memory available can...

Page 130: ...how to place single sided document pages on the original glass to make double sided copies 1 Lift open the original cover or ADF 2 Position the first page or the first side of the document face down...

Page 131: ...Start key Scanning begins The message To con tinue scanning replace original and press Start appears 7 Position the second page or second side of the document onto the original glass and then press t...

Page 132: ...ng o Possible Not possible To copy documents with the Mixed Original setting 0 The possible combinations of document sizes differ depending on the widest document loaded position of the adjustable doc...

Page 133: ...djustable doc ument guides against the edges of the docu ment Load the document pages into the ADF so that the top of the pages is toward the back or the left side of the machine If the document is no...

Page 134: ...the top of the stack is higher than the mark otherwise a document misfeed or dam age to the document or machine may occur However a document that exceeds 80 pages can be scanned in separate batches Fo...

Page 135: ...copies may not be printed in the correct page order or correct front and back page arrangement 2 Note The factory default setting is the first setting with the top of the document at the top toward th...

Page 136: ...the document on page 3 8 1 Position the document to be copied 2 In the Basics screen touch Combine Origi nals The Combine Originals screen appears 3 Touch Original Direc tion The Original Direction s...

Page 137: ...inding margin for the even num bered pages can be adjusted 2 Note As the factory default OFF is selected for the Margin setting Document Binding Margin Position Icon Description Select this setting if...

Page 138: ...3 Basic copy operation 3 22 VarioLink 2221 2821 3621 Basic copy operation Chapter 3 Double sided copies of single sided documents Icon Description ABC DEF DEF ABC...

Page 139: ...to be copied When loading a document with a binding margin position the top of the document toward the back of the machine 2 In the Basics screen touch Combine Origi nals The Combine Originals screen...

Page 140: ...setting was selected the Zoom setting 1 0 is selected However the software switch settings can be used to allow the Auto Zoom setting and the Auto Paper Select setting to be selected at the same time...

Page 141: ...Refer to Manually selecting the desired paper size on page 3 25 Manually selecting the desired paper size The paper size can be specified for copying By also selecting the Auto Zoom setting the most a...

Page 142: ...3 Basic copy operation 3 26 VarioLink 2221 2821 3621 Basic copy operation Chapter 3 2 Select the paper tray loaded with the desired paper...

Page 143: ...e time If the Auto Zoom set ting is selected while the Auto Paper Select setting was selected the Paper screen appears In the Paper screen specify the desired Paper setting However the software switch...

Page 144: ...3 Basic copy operation 3 28 VarioLink 2221 2821 3621 Basic copy operation Chapter 3 2 Touch Auto Zoom...

Page 145: ...Specifying the same zoom ratio as the document 1 0 setting A copy that is the same size as the document 1 000 is produced 0 Touch to enlarge the zoom ratio and touch to reduce the zoom ratio in 0 001...

Page 146: ...ment size 0 The zoom ratio of the Minimal setting can be changed between 0 900 and 0 999 For details on changing the zoom ratio for the Minimal set ting or programming custom zoom ratios refer to Stor...

Page 147: ...ed or reduced in 0 001 increments in order to copy at the desired size 1 In the Basics screen touch Zoom The Zoom screen ap pears 2 Adjust the zoom ratio Touch to in crease the zoom ra tio and touch t...

Page 148: ...st suitable zoom ratios for copying from common standard document sizes to standard paper sizes are preset 0 Touch to enlarge the zoom ratio and touch to reduce the zoom ratio in 0 001 increments 1 In...

Page 149: ...width ratio 1 In the Basics screen touch Zoom The Zoom screen ap pears 2 Touch XY Zoom The XY Zoom screen ap pears 3 Using the keypad type in the desired zoom ra tio If a value outside the allowable...

Page 150: ...page 3 37 Specifying separate horizontal and vertical zoom ratios Individual Zoom settings By using the keypad separate zoom ratios can be typed in directly for the horizontal direction between 0 250...

Page 151: ...ing the keypad type in the desired zoom ra tios for side X and side Y between 0 250 and 4 000 If a value outside the allowable range is specified the mes sage Input Error appears Type a val ue within...

Page 152: ...dition stored copy zoom ratios can be changed 0 Stored zoom ratios can be changed to desired zoom ratios For details on storing zoom ratios refer to Storing the desired zoom ratio on page 3 37 0 The z...

Page 153: ...m ratio Two frequently used zoom ratios and the zoom ratio for the Minimal setting can be stored 0 The zoom ratios 1 000 1 000 and 0 930 have been stored When a new zoom ratio is stored it overwrites...

Page 154: ...able range is specified the mes sage Input Error appears Type a val ue within the allowa ble range If the value was in correctly entered press the C clear key in the keypad to erase the value and then...

Page 155: ...tings are available originals and copies Original copy settings Description Single Sided Single Sided Select this setting to produce single sided copies from sin gle sided documents Single Sided Doubl...

Page 156: ...etails on specifying the position of the binding margin refer to Selecting the position of the binding margin Margin settings on page 3 21 For details on specifying the document orientation refer to S...

Page 157: ...Sided Copy setting is selected specify the position of the binding margin and the loading orientation for the document otherwise the copies will not be printed as desired For details on specifying the...

Page 158: ...peration Chapter 3 2 Select the double sided copy settings according to the loaded document For a single sided document touch Single Sided under Orig and Double Sided under Copy For a double sided doc...

Page 159: ...mphlets or catalogs Select this setting when copying printed documents such as pamphlets or catalogs Select this setting to produce better reproductions of half tone document images photographs etc th...

Page 160: ...on page 3 8 1 Position the document to be copied 2 In the Basics screen touch Quality Density The Quality Density screen appears 3 Touch the button for the quality setting most ap propriate for the l...

Page 161: ...nsity setting and the density selected when the Auto set ting is selected can be changed from the Utility mode For details refer to Default Copy Output Levels on page 11 14 1 In the Basics screen touc...

Page 162: ...mmended zoom ratios for each setting are listed below 2 in 1 0 707 4 in 1 0 500 The machine can be set so that the recommended zoom ratios are not recalled For details refer to Zoom Ratio for Combine...

Page 163: ...ded Single Sided Two single sided documents is copied onto one double sided sheet Single Sided Double Sided Four single sided documents are copied onto one double sid ed sheet Double Sided Single Side...

Page 164: ...pied onto one single sid ed sheet Single Sided Double Sided Eight single sided documents are copied onto one double sided sheet Double Sided Single Sided Two double sided documents are copied onto one...

Page 165: ...py settings 1 In the Simplex Duplex screen select the appropriate settings under Orig and Copy for the desired combined copy For details refer to page 3 39 2 In the Basics screen touch Combine Origi n...

Page 166: ...ped in an alternating crisscross pattern crisscross sorting and crisscross grouping Letter or 5 1 2 8 1 2 paper is used Paper of the same size and type is loaded with the w orientation in one paper tr...

Page 167: ...ch set of copies is fed out shifted to separate them Crisscross Sorting Each set of copies is fed out in an alternating crisscross pattern to separate them Group Select this setting to separate the co...

Page 168: ...the copies with a staple in the upper left corner 2 Staples Select this setting to bind the copies with two staples Center Binding Crease and 2 Staples settings The copies are folded in half then sta...

Page 169: ...s are met Letter or 5 1 2 8 1 2 paper is used Paper of the same size and type is loaded with the w orientation in one paper tray and with the v orientation in another tray The Auto Paper Select settin...

Page 170: ...finisher is installed printed copies will be fed out and grouped in an alternating crisscross pattern if the following conditions are met Letter or 5 1 2 8 1 2 paper is used Paper of the same size and...

Page 171: ...tween 7 1 4 inch and 11 3 4 inch The paper length must be between 5 1 2 inch and 17 inch If the Mixed Original setting is selected all copies must be printed with paper of the same width If a staple s...

Page 172: ...are bound together with a staple in the upper left corner If 2 Staples is se lected Position Set ting appears in the screen To select the binding position continue with step 3 If a staple setting is...

Page 173: ...punch settings Detail If a punch setting is to be selected select the orientation in which the document is positioned If an Original Direction setting is not selected holes may not be punched in the...

Page 174: ...o cancel the punch setting touch Hole Punch again to deselect it 3 Touch Position Setting and then select the de sired position Touch Auto to auto matically determine the position of the punched holes...

Page 175: ...ok let copies Booklet function on page 8 22 0 The position of the fold and the center staples can be adjusted from the Utility mode For details refer to Crease Center Staple on page 11 17 1 Select the...

Page 176: ...oLink 2221 2821 3621 Basic copy operation Chapter 3 3 The Finishing screen ap pears Touch 2 Staples and Crease To cancel center binding touch 2 Staples and Crease again to deselect them 4 Touch Enter...

Page 177: ...ued 0 A copy job can be reserved after scanning of the loaded document is fin ished 0 A copy job cannot be reserved while a document is being scanned 0 For details on positioning the document refer to...

Page 178: ...3 Basic copy operation 3 62 VarioLink 2221 2821 3621 Basic copy operation Chapter 3 3 Press the Start key 4 After the current copy job is finished the next copy job begins...

Page 179: ...scanned or a job is being printed After the message Copy cycle temporarily suspended appears scanning and printing stops The Stop screen ap pears 2 Perform the desired operation To delete a stopped or...

Page 180: ...3 Basic copy operation 3 64 VarioLink 2221 2821 3621 Basic copy operation Chapter 3...

Page 181: ...4 Additional copy operations Chapter 4 Additional copy operations...

Page 182: ...tional copy operations Chapter 4 4 Additional copy operations 4 1 Checking the copy settings Mode Check From the Check Job Details screens the current copy settings can be checked and changed if desir...

Page 183: ...Additional copy operations 4 VarioLink 2221 2821 3621 4 3 Additional copy operations Chapter 4 The Check Job Details screen appears...

Page 184: ...ht of the screen title To display the previous screen touch Back To display the next screen touch Fwd If the setting for a function has been changed from the default the button for that function appea...

Page 185: ...e test prints 1 Position the document to be copied Refer to page 3 8 for details The Proof Copy function can be used only if the machine has been set for 2 or more copies 2 Select the desired copy set...

Page 186: ...he Proof Copy key to print another proof copy If copying stops while the Proof copy screen is displayed or while changing settings after the proof copy was print ed press the Reset key A screen for st...

Page 187: ...ts up in green and printing of the current job stops What happens if the Interrupt key is pressed while a document is being scanned Pressing the Interrupt key returns all copy settings except the numb...

Page 188: ...istered copy programs can be recalled and used for copying To register a copy program 1 Using the touch panel and control panel keys specify the copy settings to be registered in the copy program Can...

Page 189: ...g confirmation to over write the program To overwrite the pro gram touch Yes and then touch En ter To cancel the registration touch No and then touch Enter What if programs have already been registere...

Page 190: ...y or the Mode Memory key Can the specified settings for a copy program be checked To check the pro gram copy settings before recalling the copy program refer to Checking the copy set tings Mode Check...

Page 191: ...o checking the copy settings The copy settings to be registered as a copy program can be checked 1 Press the Mode Memo ry key The Program screen ap pears 2 Touch Check 3 Touch the program number butto...

Page 192: ...recall the regis tered copy settings and display the Basics screen again 5 Touch Enter The Program screen appears again Detail There are three Check Program screens Touch Fwd to display the next scre...

Page 193: ...er 4 3 Touch the program number button regis tered with the copy set tings to be deleted A message appears re questing confirmation to delete the copy pro gram 4 Touch Yes and then touch Enter To stop...

Page 194: ...on contains details on the procedures for specifying control panel settings and adjusting the touch panel To display the Accessibility Settings screen 1 Press the Accessibility key The Accessibility S...

Page 195: ...is touched to return to the Basics screen the Basics screen is displayed with the settings specified in the Accessibility Settings screen applied To set the Screen Mode function Select whether the scr...

Page 196: ...default setting for Interval is 0 1 second 1 Display the Accessibility Settings screen For details refer to page 4 14 2 Touch Key Speed Settings The Key Speed Settings screen appears 3 Touch and to sp...

Page 197: ...efault setting is OFF 1 Display the Accessibility Settings screen For details refer to page 4 14 2 Touch Extend Auto Reset The Extend Auto Reset screen appears 3 Select the setting for the desired len...

Page 198: ...copying is finished 0 The factory default setting is 3 sec 1 Display the Accessibility Settings screen For details refer to page 4 14 2 Touch Notification Screen The Notification Screen screen appears...

Page 199: ...lfunction occurs 0 The factory default setting is Normal 1 Display the Accessibility Settings screen For details refer to page 4 14 2 Touch Sound Setting The Sound Setting screen appears 3 Touch Norma...

Page 200: ...sound produced when a touch panel button is touched and of the alarm that is sounded when a malfunction oc curs 0 The factory default setting is High 1 Display the Accessibility Settings screen For d...

Page 201: ...Jobs are printed starting with the one at the top of the Print Order list Multi job feature While one job is being printed another job can be queued A maximum of 5 copy jobs can be queued When one jo...

Page 202: ...nal copy operations Chapter 4 Detail For details on the Com tab of the Job List screen refer to the User s Guide Facsimile Operations For details on the Doc tab of the Job List screen refer to the Use...

Page 203: ...ars 2 Check the job being per formed Touch and to display a dif ferent screen A maximum of 8 jobs being performed can be displayed Detail A job being performed or a job waiting to be performed such as...

Page 204: ...ck the printing order Touch and to display a dif ferent screen The printing order for a maximum of 8 jobs can be displayed Detail A job being performed or a job waiting to be performed such as a queue...

Page 205: ...eted 1 Touch Job List The Job List screen ap pears 2 Select the job that you wish to delete If the job that you wish to delete is not displayed touch and until the desired job is displayed The screen...

Page 206: ...onal copy operations 4 26 VarioLink 2221 2821 3621 Additional copy operations Chapter 4 Detail A job can also be deleted after the Stop key is pressed For details refer to Stopping deleting a job on p...

Page 207: ...5 Troubleshooting Chapter 5 Troubleshooting...

Page 208: ...oubleshooting 5 1 When the message Malfunction detected appears Call technical representative If a malfunction that cannot be corrected by the user occurred the message Malfunction detected Please cal...

Page 209: ...e screen 2 Turn the machine off by using the Power auxiliary power key and the main power switch 3 Unplug the machine 4 Contact the technical representative and inform them of the malfunc tion code 2...

Page 210: ...nue until the misfeed is ade quately cleared Location of paper misfeed indicates the location of the paper misfeed In addition a lit o indicates areas where paper may have been misfed and that should...

Page 211: ...eed in the 1st tray page 5 15 3 A paper misfeed in the fusing unit page 5 8 4 A paper misfeed in the bypass tray page 5 13 5 A paper misfeed in the 2nd tray page 5 15 6 A paper misfeed in the 3rd or 4...

Page 212: ...k 2221 2821 3621 Troubleshooting Chapter 5 To clear a paper misfeed in the ADF 1 Pull up the lever for the misfeed clearing cov er and then open the cover 2 Carefully pull out any misfed paper 3 Swing...

Page 213: ...cu ments 5 While supporting the document feed tray with your right hand carefully pull out any misfed documents 6 Return the document guide lever to its original position and then close the misfeed cl...

Page 214: ...Pull up the right side door release lever and then open the right side door 7 CAUTION The area around the fusing unit is extremely hot Touching any part other than those indicated may result in burns...

Page 215: ...ing Chapter 5 2 Carefully pull out any misfed paper Decreased copy quality may result if the surface of the image transfer roll er is touched Be careful not to touch the surface of the image trans fer...

Page 216: ...2221 2821 3621 Troubleshooting Chapter 5 4 Carefully remove any misfed paper 5 Open the switching guide and then care fully pull out any mis fed paper in the switchback unit 6 Carefully pull out any m...

Page 217: ...hooting Chapter 5 7 Carefully pull out any misfed paper around the image transfer roll er 8 Carefully remove any misfed paper 9 Close the right side door Detail For details on the positions of paper m...

Page 218: ...ing unit The paper is folded or shredded by the roller in the fusing unit The paper that was removed tore and partly remains in the fusing unit To clear a paper misfeed in the automatic duplex unit 1...

Page 219: ...Troubleshooting Chapter 5 To clear a paper misfeed in the bypass tray 1 Remove all paper from the bypass tray 2 If misfed paper cannot be pulled out pull the lever for the sliding plate of the bypass...

Page 220: ...ing Chapter 5 3 Press down on the sliding plate with your left hand and carefully pull out any misfed pa per 4 Return the bypass tray to its original position Detail For details on the positions of pa...

Page 221: ...Troubleshooting Chapter 5 To clear a paper misfeed in the 1st or 2nd tray 1 Open the bypass tray 2 Pull up the lower right side door release le ver and then open the lower right side door of the paper...

Page 222: ...1 2821 3621 Troubleshooting Chapter 5 3 Carefully pull out any misfed paper 4 Close the lower right side door 5 Close the bypass tray Detail For details on the positions of paper misfeeds refer to Pap...

Page 223: ...3rd or 4th tray 1 Pull up the lower right side door release le ver and then open the lower right side door of the paper feed unit 2 Carefully pull out any misfed paper 3 Close the lower right side do...

Page 224: ...in the LCT 1 Pull up the lower right side door release le ver and then open the lower right side door of the paper feed unit 2 Carefully pull out any misfed paper 3 Close the lower right side door Det...

Page 225: ...Troubleshooting 5 VarioLink 2221 2821 3621 5 19 Troubleshooting Chapter 5 To clear a paper misfeed in the finisher 1 Open the front door 2 Lower lever FN1 and then pull out any mis fed paper FN1...

Page 226: ...ting 5 20 VarioLink 2221 2821 3621 Troubleshooting Chapter 5 3 Turn dial FN2 4 If the punch unit is in stalled pull out the hole punch waste container 5 Lower lever FN3 and then pull out any mis fed p...

Page 227: ...nit is installed insert the hole punch waste container into its original position 8 Lower lever FN4 9 Turn dial FN5 or dial FN6 and then pull out any misfed paper 10 Return lever FN4 to its original p...

Page 228: ...2221 2821 3621 Troubleshooting Chapter 5 To clear a paper misfeed in the mailbin kit 1 Open the front door 2 Turn dial FN5 or dial FN6 to feed out any misfed paper 3 While pressing down lever FN7 pull...

Page 229: ...apter 5 4 Pull handle FN8 to open the misfeed clearing door 5 Pull out any misfed pa per in the mailbin 6 Close the misfeed clearing door 7 Close the front door Detail For details on the positions of...

Page 230: ...oubleshooting 5 24 VarioLink 2221 2821 3621 Troubleshooting Chapter 5 To clear a paper misfeed in the saddle stitcher 1 Open the front door 2 Turn dial FN5 or dial FN6 to feed out any misfed paper FN6...

Page 231: ...5 3 Remove all paper from the output tray 4 Open the misfeed clearing door and then pull out any mis fed paper 5 Close the misfeed clearing door 6 Close the front door Detail For details on the posit...

Page 232: ...fter printing the message Replenish paper appears To replenish paper Check which paper tray appears highlighted in the touch panel and then load it with paper Detail For details on loading paper into...

Page 233: ...ge Not enough remaining memo ry appears This machine uses the memory to produce copies Since the amount of memory available is limited the message The job has been deleted Not enough remaining memory...

Page 234: ...toner appears about 500 Letter pages can be printed When the message appears prepare to replace the toner bottle accord ing to your maintenance agreement When the message There is no Toner appears the...

Page 235: ...pty the message Stapler empty appears Replace the staple cartridge Example Message when the finisher has run out of staples 2 Reminder Be sure to replace the staple cartridge only after the message ap...

Page 236: ...utput is too dark Is the copy density set too dark Touch Light in the Density screen to copy at the desired copy density See page 3 45 Was the document not pressed close enough against the original gl...

Page 237: ...ly positioned against the edges of the document Slide the adjustable docu ment guides against the edges of the document Was curled paper loaded into the paper tray Flatten the paper before loading it...

Page 238: ...your administrator ADF The document is not fed Is the ADF slightly open Securely close the ADF Is the document one that does not meet the speci fications Check that the document is correctly placed o...

Page 239: ...Troubleshooting 5 VarioLink 2221 2821 3621 5 33 Troubleshooting Chapter 5 If the problem is not corrected after the described operation is performed contact your technical representative...

Page 240: ...ed Type in your user name and password See Controlling machine use with user authen tication machine authentica tion on page 2 30 Input Account Name and Pass word to login Account track settings have...

Page 241: ...aple cartridge For details on replacing the staple cartridge refer to Re placing the staple cartridge on page 9 7 Misfeed detected Since a paper misfeed occurred the machine is unable to make copies C...

Page 242: ...5 Troubleshooting 5 36 VarioLink 2221 2821 3621 Troubleshooting Chapter 5...

Page 243: ...6 Specifications Chapter 6 Specifications...

Page 244: ...24 lb thick paper 24 1 4 to 55 3 4 lb thin paper 13 1 4 to 14 3 4 lb special paper overhead projector transparencies post cards envelopes label sheets Can only be fed through the bypass tray Copy size...

Page 245: ...ds or less with Letter v paper fed from the 1st tray VarioLink 3621 4 8 seconds or less with Letter v paper fed from the 1st tray Copy speed VarioLink 2221 22 ppm with Letter v VarioLink 2821 28 ppm w...

Page 246: ...methods Standard methods Single sided and double sided documents Mixed Original function Combination of single sided and double sided documents Document types Single sided Plain Paper 9 1 4 to 34 lb D...

Page 247: ...5 1 2 8 1 2 v 5 1 2 8 1 2 w 11 17 w o o Letter v o o Legal w o o o o o Letter w o o o o o 5 1 2 8 1 2 v o o o 5 1 2 8 1 2 w o Specifications Paper types Plain paper 15 to 24 lb Paper sizes 11 17 w Leg...

Page 248: ...ets 21 1 4 lb Lower tray 4th tray 500 sheets 21 1 4 lb Power requirements Supplied from main unit Power consumption Less than 15 W Dimensions 22 1 2 W 22 3 4 D 11 3 4 H Weight Approx 57 1 4 lb Unit st...

Page 249: ...v 5 1 2 8 1 2 w v Paper capacity Output tray 1 Plain paper 15 to 24 lb 200 sheets Thick paper 24 1 4 to 55 3 4 lb overhead projector transparencies postcards envelopes or label sheets 20 sheets Output...

Page 250: ...pes Plain paper 15 to 24 lb Paper sizes 11 17 Letter w Paper capacity Plain paper 15 to 24 lb Maximum 200 sheets or 20 sets Staple settings Number of bound pages 2 to 15 sheets Dimensions 17 1 2 W 8 D...

Page 251: ...24 1 2 W 19 3 4 D 15 1 4 H Weight Approx 17 1 2 lb unit weight Approx 26 1 2 lb or less gross weight Power requirements Supplied from finisher Specifications Number of bins 1 bin Paper types Plain pap...

Page 252: ...6 Specifications 6 10 VarioLink 2221 2821 3621 Specifications Chapter 6...

Page 253: ...7 Copy paper original documents Chapter 7 Copy paper original documents...

Page 254: ...1 2 13 w 11 17 w to 5 1 2 8 1 2 w v Legal w Letter w v Executive w v 1st tray A3 w B4 w to B5 w 8 1 2 13 w 11 17 w to 5 1 2 8 1 2 w v Legal w Letter w v 2nd tray 3rd tray 11 17 w Legal w Letter w v 5...

Page 255: ...itcher SD 507 Folding binding A3 w B4 w A4 w B5 w 11 17 w 11 14 w Letter w 7 1 4 10 to 11 3 4 17 Mailbin kit MT 502 7 1 4 7 1 4 to 11 3 4 11 3 4 Punch settings 7 1 4 7 1 4 to 11 3 4 11 3 4 with the 2...

Page 256: ...15 lb to 24 lb Paper source Bypass tray 150 sheets 50 sheets 150 sheets 150 sheets 1st tray 500 sheets 500 sheets 2nd tray 500 sheets 500 sheets 3rd tray 500 sheets 500 sheets 4th tray 500 sheets 500...

Page 257: ...is not automatically se lected when the Auto Paper Select setting is spec ified or when the paper trays are switched automatically Envelope Select this setting when envelopes are loaded A paper tray...

Page 258: ...s still blank Paper that has been printed on by a heat transfer printer or an inkjet printer Paper that is either extremely thick or extremely thin Folded curled wrinkled or torn paper Paper that has...

Page 259: ...paper tray is automatically selected so printing can continue If the optional LCT is installed a maximum of 3 650 copies with Letter v paper can be made continuously Operating Conditions The paper is...

Page 260: ...into the bypass tray refer to Loading paper into the bypass tray on page 2 60 To specify the paper size Change Setting Standard paper sizes can be specified for the paper loaded into the bypass tray...

Page 261: ...ze of paper loaded into the bypass tray be se lected For details refer to To specify a setting for special paper Change Setting on page 7 15 6 Touch Enter The Paper screen appears again The paper size...

Page 262: ...n standard paper size Custom Size settings Non standard sized paper can be loaded only into the bypass tray If non standard sized paper is loaded it will be necessary to specify the pa per size 1 In t...

Page 263: ...o select it and then use the keypad to type in the length of side Y between 3 56 and 11 68 If Inch Fraction was selected as the measurement units touch X or Y to position the cursor in the input box a...

Page 264: ...ze Custom Size settings Two non standard paper sizes for the bypass tray can be stored Storing paper sizes that are used often allows the paper size to be quickly selected without having to re enter t...

Page 265: ...Size Registra tion The Size Registration screen appears 6 Type in the length X and width Y of the pa per Make sure that X is selected and then use the keypad to type in the length of side X between 5...

Page 266: ...to be stored If a button is pressed where no size is stored the stored paper size appears on the button to indicate that a size has been stored How is the stored paper size recalled Touch 1 or 2 in th...

Page 267: ...lected au tomatically with the Auto Paper Select setting or the automatic paper tray switching feature However a paper tray set to Single Sided Only is given priority when the Auto Paper Select settin...

Page 268: ...pass tray is set 2 Reminder If overhead projector transparencies or thick paper is loaded into the by pass tray be sure to select the corresponding paper type otherwise a paper misfeed may occur Detai...

Page 269: ...documents of mixed sizes There are limits on the types of documents that can be loaded with each method Normal method For documents of mixed sizes Single sided documents Double sided documents Docume...

Page 270: ...es or diazo photosensitive paper Coated documents such as carbon backed paper Documents printed on paper thicker than 34 1 4 lb Documents that are bound for example with staples or paper clips Documen...

Page 271: ...per size is loaded the Auto Paper Se lect and Auto Zoom settings cannot be used since the document size cannot be detected automatically If a document of non standard paper size is loaded select the s...

Page 272: ...7 Copy paper original documents 7 20 VarioLink 2221 2821 3621 Copy paper original documents Chapter 7...

Page 273: ...8 Application functions Chapter 8 Application functions...

Page 274: ...on Front Cover With Image The first page of the document is copied onto the front cover page Blank The front cover page is added at the begin ning of the copy Back Cover None A back cover page is not...

Page 275: ...e Scan setting on page 3 12 2 Load the paper for the cover pages and the paper for the main body of the document into separate paper trays Use paper with the same size for the cover pages and for the...

Page 276: ...over Paper The Cover Paper screen appears 6 Select the paper tray loaded with the paper for the cover pages 7 Touch Enter and then touch Enter in the next screen that appears 8 Specify any other desir...

Page 277: ...the copy as an insertion sheet Select either With Image or Blank to specify whether or not a page of the document is copied onto the insertion sheet 4 4 3 3 4 4 4 4 3 3 2 2 7 7 8 5 5 6 3 3 4 1 1 2 1 1...

Page 278: ...document contains more than 80 pages refer to Scanning a document in separate batches Separate Scan setting on page 3 12 2 Load the paper for the insertion sheets and the paper for the main body of th...

Page 279: ...of the in sertion sheet If Blank is selected the insertion sheet is added at the location where the separator was inserted To cancel the Insert Sheet function touch OFF 5 Touch the button under Inser...

Page 280: ...o 1 and cannot be changed 1 Position the document to be copied For details on positioning the document refer to Feeding the doc ument on page 3 8 2 Load the overhead projector transparencies into the...

Page 281: ...re inserted alternating with over head projector trans parencies and the same document page is printed on a transparency and an interleaf If Blank is selected blank interleaves are inserted between th...

Page 282: ...8 Application functions 8 10 VarioLink 2221 2821 3621 Application functions Chapter 8 8 Specify any other desired copy settings 9 Press the Start key Copying begins...

Page 283: ...can be adjusted without creating a filing margin To copy using the Page Margin function 1 Position the document to be copied For details on positioning the document refer to Feeding the doc ument on...

Page 284: ...f the filing margin Can only the orientation of the image be adjusted Set the width of the filing margin to 0 to adjust only the orientation of the image during double sided copying The margin positio...

Page 285: ...ed areas around the document such as the transmission information on received faxes and the shadows of punched holes To copy using the Edge Frame Erase function 1 Position the document to be copied Fo...

Page 286: ...the Edge Frame Erase func tion touch OFF 4 Touch and to specify the width of the area to be erased 5 Touch Enter 6 Specify any other desired copy settings 7 Using the keypad type in the desired numbe...

Page 287: ...d scanning area can be printed on a single sheet of paper To copy using the Image Repeat function 1 Position the document to be copied For details on positioning the document refer to Feeding the doc...

Page 288: ...nned If Auto Detect is selected the area of a standard docu ment size is scanned Continue with step 8 If Oversized Paper is selected the size can be selected or a non standard size can be entered The...

Page 289: ...correct value If the Image Repeat function is registered with a program both standard sizes and non standard sizes can be registered For de tails on registering programs refer to Registering copy prog...

Page 290: ...pages or both on the same page In addition settings can be specified for the Page Order and Book Erase functions The following Book Copy settings are available Setting Description Separation Separate...

Page 291: ...For details on positioning the document refer to Feeding the doc ument on page 3 8 2 Load the paper to be used into the desired paper tray 3 Touch Application and then touch Book Copy Repeat The Book...

Page 292: ...te sheets of paper in the same page order as the document If Page Order is set to Standard the left and right pages of the spread are copied onto the front and back sides of a single sheet of paper If...

Page 293: ...lect the paper tray loaded with the paper 9 Specify any other desired copy settings 10 Using the keypad type in the desired number of copies 11 Press the Start key Copying begins 2 Note For details on...

Page 294: ...ltiple of 4 document pages is required with a single sided document and a multiple of 2 document pages is required with a double sided document If there are not enough pages blank pages are auto matic...

Page 295: ...positioning the document refer to Feeding the doc ument on page 3 8 2 Touch Application and then touch Book Copy Repeat The Book Copy Repeat screen appears 3 Touch Booklet To cancel the Book let funct...

Page 296: ...ailable To print the distribution number Set Numbering function 0 The distribution number is normally printed as a three digit number If Starting Number is set to 1 001 is printed 1 Position the docum...

Page 297: ...If the optional hard disk drive is installed the Image Overlay function can be used For details re fer to Printing cop ies overlapping a different image Im age Overlay function on page 8 28 The Set N...

Page 298: ...Text Density to specify the density of the printed distribution number 6 Touch Enter and then touch Enter in the next screen that appears 7 Specify any other desired copy settings 8 Using the keypad t...

Page 299: ...ired set ting under Pages If Pages is set to First page only the stamp is only printed on the first page of the copy If All Pag es is selected the stamp is printed on all pages To cancel the Stamp fun...

Page 300: ...ng copies To store an overlay image Store Overlay 0 The Store Overlay function is available only if optional hard disk is in stalled 1 Position the overlay document to be stored on the hard disk For d...

Page 301: ...e that an image has been stored To store the image with a number where an image is already stored delete the image touch Set and then touch the button for the number To delete the image touch Delete a...

Page 302: ...to po sition the cursor in the input box and then touch or to specify the length A value outside the allowable range cannot be entered To change the entered value press the C clear key and then en ter...

Page 303: ...k is in stalled 1 Position the document to be copied For details on positioning the document refer to Feeding the doc ument on page 3 8 2 Touch Application and then touch Image Set tings The Image Set...

Page 304: ...lay image is only print ed overlapping the first page of the copy If All Pages is selected the overlay image is printed overlapping all pages To cancel changes to the settings touch Cancel 7 Touch Ent...

Page 305: ...een 0 The Image Overlay function is available only if optional hard disk is in stalled 1 Touch Application and then touch Image Set tings To check the image from the Store Over lay screen display the...

Page 306: ...the button for the number stored with the image To cancel the Image Overlay function touch OFF 4 Select a paper tray load ed with paper To cancel changes to the settings touch Cancel 5 Press the Star...

Page 307: ...gradations of the image inversed To copy using the B W Reverse setting 1 Position the document to be copied For details on positioning the document refer to Feeding the doc ument on page 3 8 2 Touch A...

Page 308: ...to continue scanning the document To scan documents continuously Touch Application and then touch Separate Scan To cancel the Sepa rate Scan setting touch Separate Scan again to dese lect it Detail Fo...

Page 309: ...9 Replacing toner bottles and staples and emptying punch waste containers Chapter 9 Replacing toner bottles and staples and emptying punch waste containers...

Page 310: ...rs Detail First the message Please exchange toner appears and then the mes sage There is no Toner appears and the machine stops operating The number of pages that can be printed after the message Plea...

Page 311: ...toner bottles Do not throw toner or the toner bottle into a fire Toner expelled from the fire may cause burns 7 CAUTION Precautions for toner spills Be careful not to spill toner inside the machine or...

Page 312: ...o replace the toner bottle 1 Open the machine s front door 2 Pull the toner hopper out toward you as far as possible 3 While pulling on the han dle flip up the toner bot tle holder 4 Carefully pull ou...

Page 313: ...ainst a hard surface such as a desk or table four or five times and then hit the other end four or five times The toner within the toner bottle may have become com pacted If it has be sure to shake th...

Page 314: ...oner bottle and then slowly pull it off to ward you 9 Insert the toner hopper until it snaps into place 10 Close the front door 2 Reminder When the front door is closed toner replenishing begins autom...

Page 315: ...ainers Chapter 9 9 2 Replacing the staple cartridge When the staple cartridge runs out of staples the message shown below ap pears Example Message when the finisher has run out of staples Detail Be su...

Page 316: ...ontainers 9 8 VarioLink 2221 2821 3621 Replacing toner bottles and staples and emptying punch waste containers Chapter 9 2 Push up the staple car tridge holder and then remove it toward you 3 Press in...

Page 317: ...containers 9 VarioLink 2221 2821 3621 9 9 Replacing toner bottles and staples and emptying punch waste containers Chapter 9 4 Remove the empty sta ple cartridge from the staple cartridge holder 5 Inse...

Page 318: ...aples and emptying punch waste containers Chapter 9 6 Carefully remove the stopper 7 Insert the staple car tridge holder and then push it down until it locks into place 8 Close the front door To repla...

Page 319: ...ainers 9 VarioLink 2221 2821 3621 9 11 Replacing toner bottles and staples and emptying punch waste containers Chapter 9 2 Press in the area marked PUSH to unlock the staple cartridge holder 3 Remove...

Page 320: ...emptying punch waste containers 9 12 VarioLink 2221 2821 3621 Replacing toner bottles and staples and emptying punch waste containers Chapter 9 4 Load the new staple car tridge into the staple car tri...

Page 321: ...punch waste containers Chapter 9 6 Insert the staple car tridge holder and then push it up until it locks into place When inserting the staple cartridge holder be sure to in sert it so that it faces...

Page 322: ...te containers Chapter 9 9 3 Clearing a staple jam If a staple jam occurs the message shown below appears For a staple jam in the saddle stitcher 2 Reminder Be careful when clearing jammed staples sinc...

Page 323: ...tainers 9 VarioLink 2221 2821 3621 9 15 Replacing toner bottles and staples and emptying punch waste containers Chapter 9 To clear jammed staples in finisher 1 Remove all paper from the finisher 2 Ope...

Page 324: ...and emptying punch waste containers Chapter 9 4 Turn dial FN2 If the punch unit is in stalled pull out the hole punch waste container 5 Lower lever FN3 and then remove any paper 6 Return levers FN1 a...

Page 325: ...21 3621 9 17 Replacing toner bottles and staples and emptying punch waste containers Chapter 9 7 Lower lever FN4 8 Turn dial FN5 or dial FN6 and then pull out any paper 9 Return lever FN4 to its origi...

Page 326: ...nd staples and emptying punch waste containers Chapter 9 11 Push up the staple car tridge holder and then remove it toward you 12 Raise the shutter of the staple cartridge holder and then pull out one...

Page 327: ...and staples and emptying punch waste containers Chapter 9 15 Close the front door 2 Reminder If stapling still cannot be resumed even after performing the above pro cedure contact your technical repr...

Page 328: ...and emptying punch waste containers Chapter 9 3 Turn dial FN2 If the punch unit is in stalled pull out the hole punch waste container 4 Lower lever FN3 and then remove any paper 5 Return levers FN1 a...

Page 329: ...1 3621 9 21 Replacing toner bottles and staples and emptying punch waste containers Chapter 9 6 Lower lever FN4 7 Turn dial FN5 or dial FN6 and then pull out any paper 8 Return lever FN4 to its origin...

Page 330: ...output tray and then push down the staple car tridge holder and re move it 11 Raise the shutter of the staple cartridge holder and then pull out one sheet of staples 12 Return the shutter to its orig...

Page 331: ...toner bottles and staples and emptying punch waste containers Chapter 9 14 Return the copy output tray to its original position 15 Close the misfeed clearing door 16 Close the front door 2 Reminder If...

Page 332: ...es and emptying punch waste containers Chapter 9 9 4 Emptying the waste containers If the hole punch waste container in punch unit installed on finisher becomes full the message shown below appears To...

Page 333: ...ioLink 2221 2821 3621 9 25 Replacing toner bottles and staples and emptying punch waste containers Chapter 9 2 Pull out the hole punch waste container 3 Empty the hole punch waste container 4 Insert t...

Page 334: ...9 Replacing toner bottles and staples and emptying punch waste containers 9 26 VarioLink 2221 2821 3621 Replacing toner bottles and staples and emptying punch waste containers Chapter 9...

Page 335: ...10 Care of the machine Chapter 10 Care of the machine...

Page 336: ...ection describes the procedures for cleaning each part Housing Clean the surface of the housing by wiping it with a soft cloth dampened with a mild household detergent 2 Reminder Be sure to turn off t...

Page 337: ...ink 2221 2821 3621 10 3 Care of the machine Chapter 10 Original glass Clean the surface of the original glass by wiping it with a soft dry cloth 2 Reminder Never use solvents such as benzene or thinne...

Page 338: ...o hard on a key in the control panel or on the touch panel may damage them In addition never use a mild household detergent glass cleaner benzene or thinner to clean the control panel or touch panel D...

Page 339: ...d by wiping it with a soft cloth dampened with a mild household deter gent Left partition glass Clean the Left partition glass when the optional ADF is installed Clean the Left partition glass by wipi...

Page 340: ...he total number of prints since counting started can be viewed To view the contents 1 Press the Utility Counter key 2 Touch Check Detail The Counter screen appears 3 Touch Exit and then touch Enter in...

Page 341: ...10 7 Care of the machine Chapter 10 10 3 When the message Preventative Maintenance is re quired appears If the message Preventative Maintenance is required appears contact your service representative...

Page 342: ...10 Care of the machine 10 8 VarioLink 2221 2821 3621 Care of the machine Chapter 10...

Page 343: ...11 Utility mode Chapter 11 Utility mode...

Page 344: ...stalled For details refer to the corresponding page for the button The names of buttons marked with 2 may be different when fax kit is in stalled For details on the buttons marked with 3 refer to the...

Page 345: ...Simplex Duplex Auto Paper Auto Zoom Priority Tray Special Paper Setting Zoom Ratio for Combine Booklets 3 6 Low Power Mode Sleep Mode LCD Back Light OFF Auto Reset Auto Reset when Accountischanged 4...

Page 346: ...Alarm Volume Line Monitor Sound 1 Job Complete Beep Panel Cleaning Toner Supply Memory RX ON OFF 3 POP3 RX 3 Admin Management 7 p 11 21 Admin 1 Initial Setting p 11 23 Date Time Setting Date Time Sett...

Page 347: ...r Registra tion Account Track Setting 1 p 11 31 Account Data Reset All Counters TX Settings 3 Quality Mode Default Quality Default Density Communica tion Mode Comm Menu TX TSI TX Time Infor mation Rot...

Page 348: ...net Mask Gateway Self Domain Name Network Board Set DNS Settings Machine Name SMTP Settings SMTP Server Address E Mail Address POP3 Settings POP3 Server Address POP3 User Name POP3 Pass word Auto RX C...

Page 349: ...tration IP Relay Station Setting Relay Result Port Printer Setting 5 Timeout Software SW p 11 50 No Matching Paper in Tray Setting Ping 4 Security Setting Enhance Se curity 1 Delete Job 4 Unlock SSL T...

Page 350: ...e Chapter 11 Overwrite A4 Letter Document Hold Time PostScriptError Report Default Set Basic Tray Paper Size Original Direc tion Print Method of Sets Font Font Symbol Set Number Lines Font Size CR LF...

Page 351: ...settings settings selected when the machine is turned on can be specified The following procedure describes how to display the User s Choice screens and specify its settings To specify User s Choice...

Page 352: ...the machine then the dis play language is changed it will no longer be possible to log on to the machine normally with the next authentication In this case it will be nec essary to change the softwar...

Page 353: ...The password entered for machine au thentication with user authentication can be changed Current Password Type in the currently specified ma chine authentication password New Password Type in the new...

Page 354: ...ecial Paper Set ting One of the following special paper set tings can be selected for each paper tray A paper tray set for special paper is not selected automatically when the Auto Paper Select settin...

Page 355: ...th of time be tween 1 and 240 minutes until the ma chine enters Sleep mode 1 minute Tab Parameter Description Default setting 3 6 LCD Back Light OFF Specify the desired length of time be tween 1 and 2...

Page 356: ...left Lower right Upper left Lower left Upper right Lower right Upper left Upper right Lower left Lower right Tab Parameter Description Default setting 4 6 Default Quality Density Modes Densi ty Selec...

Page 357: ...d when two or more pages are copied Tab Parameter Description Default setting 4 6 Print Density Select one of the following as the default printing density 2 1 0 1 2 0 Tab Parameter Description Defaul...

Page 358: ...multi port is installed 1 output tray 1 Faxes Prints Select the output tray for data re ceived from the network 1 output tray 1 Copier Printer Printer Specify the output tray for com puter printouts 1...

Page 359: ...y not operate correctly if it is turned on immediately after being turned off For details on turning the machine off and on refer to Turning on the main power and the auxiliary power on page 2 22 Tab...

Page 360: ...one of the following as the mode given priority Copy Printer Copy Tab Parameter Description Default setting 6 6 Image Quality ADF Select one of the following as the image quality level for the ADF Le...

Page 361: ...ibes how to display the User Management screen and specify its settings To specify user management settings 1 Press the Utility Counter key The Utility Counter screen appears 2 Touch User Manage ment...

Page 362: ...ription Default setting Confirmation Beep Specify the volume between 0 and 5 of the tone produced when a key is pressed 3 Alarm Volume Specify the volume between 0 and 5 of the tone produced when an a...

Page 363: ...settings can no longer be specified In this case the administrator access code cannot be specified again For de tails contact your technical representative To display the Administrator Management scre...

Page 364: ...Management screen touch Enter in each screen until the Basics screen appears The Administrator Man agement 1 or Adminis trator Management 2 screen appears Detail For details on the administrator acce...

Page 365: ...n and then touch Initial Settings For details on displaying the Administrator Management 1 screen refer to Displaying the Administrator Management screen on page 11 21 The Initial Settings screen appe...

Page 366: ...ng Date Time Setting Date Time Setting Specify the year month day hour 24 hour time format and minutes for the machine s internal clock Time Zone Specify the time zone between 12 00 and 13 00 in 30 mi...

Page 367: ...tor Management 1 screen and then touch Ad min Set For details on displaying the Administrator Management 1 screen refer to Displaying the Administrator Management screen on page 11 21 The Administrato...

Page 368: ...Current Code Type in the currently specified admin istrator access code New Code Type in the new administrator access code Retype New Code Type in the new administrator access code again for confirmat...

Page 369: ...ings in the User Au thentication ON OFF screen Detail If an authentication method is set the authentication screen is displayed while this machine is in standby In order to use this machine when user...

Page 370: ...henti cation Account Track and Syn chronize parame ters The Synchronize pa rameter can be spec ified only if the User Authentication and Account Track parameters have been set For details on specifyin...

Page 371: ...one of the following as the user authen tication method ON External Server Select this setting to apply the user authentication function of an external server ON MFP Select this setting to apply the m...

Page 372: ...y mode 11 30 VarioLink 2221 2821 3621 Utility mode Chapter 11 2 Note The Allow Print without Authentication parameter does not appear if ON External Server was selected in the User Authentication ON O...

Page 373: ...mum of 1 000 accounts can be registered on this machine 1 Display the Administrator Management 1 screen and then touch Ac count User Auth For details on displaying the Administrator Management 1 scree...

Page 374: ...word and number of prints allowed can be specified for each account using this machine 0 A maximum of 1 000 accounts can be registered on this machine 0 If user authentication and account track are sy...

Page 375: ...s 5 Type in the password up to 8 characters long and then touch Enter Touch New Pass word type the new password into the screen that ap peared and then touch Enter Touch Confirm New Password type the...

Page 376: ...To exit the Account Authentication screen touch Enter in each screen until the Basics screen appears The screen for selecting an account number appears again The new account is registered 2 Note The...

Page 377: ...cted account to 0 touch Yes Touch Counter to display the Counter screen which con tains the counters for the selected ac count In the Counter screen touch Fwd to display the next screen or touch Back...

Page 378: ...on page 11 31 The Detail screen appears 2 Touch Delete Account If this machine is be ing used with ac count track settings specified Delete Ac count does not ap pear for accounts that have been au th...

Page 379: ...the Administrator Management screen on page 11 21 The Account Authentication screen appears 2 Touch Allow Print with out Authentication The Allow Print without Authentication screen appears 3 Touch ON...

Page 380: ...thentication appears in the Account Authen tication screen If ON MFP was selected Machine Auth Setting ap pears in the Account Authentication screen For details refer to Specifying the account authent...

Page 381: ...e to log on with external server authentication Selecting the following settings may reduce the logon time Specify a server compatible with Active Directory for DNS server ad dress 1 With DNS server a...

Page 382: ...r to Specifying user authentication settings on page 11 38 2 Touch General Set tings The General Settings screen appears 3 Select the authentication system and then touch Enter To cancel changes to th...

Page 383: ...hange Setting To change the name of a registered domain select the button of the domain whose name is to be changed and then touch Change Setting To delete a registered domain name select the button o...

Page 384: ...screen touch Enter in each screen until the Basics screen appears The external server user is registered To register a user with machine authentication A user can be registered when machine authentica...

Page 385: ...to type in the user number The User Reg screen appears 4 Touch User Informa tion The User Info screen appears 5 Touch User Name If machine authenti cation and account track are synchro nized Account...

Page 386: ...and then touch Enter in the next screen that ap pears Touch New Pass word type the new password into the screen that ap peared and then touch Enter Touch Confirm New Password type the new password aga...

Page 387: ...can be specified so that user names and passwords registered with user authentication can be used in LDAP searches For details on the software switch settings refer to Specifying software switch setti...

Page 388: ...or machine authentication For details on displaying the User Authentication screen refer to Specifying user authentication settings on page 11 38 2 Touch User Registra tion A screen for selecting a us...

Page 389: ...s can be printed if only user authentication settings have been specified Touch Clear Counter to display a message confirming that the counters will be reset To reset all counters for the selected use...

Page 390: ...ge 11 38 2 Touch User Registra tion To immediately dis play the desired user touch User Number and then use the keypad to type in the user number A screen for selecting a user number appears 3 Select...

Page 391: ...21 2821 3621 11 49 Utility mode Chapter 11 5 Select Yes and then touch Enter To exit the User Au thentication screen touch Enter in each screen until the Ba sics screen appears A screen for selecting...

Page 392: ...EX Selection hexadecimal numbers Parameter Description Mode Selection Specify the three digit number for the parameter that you wish to specify with the software switch settings Bit Selection The bits...

Page 393: ...tware SW The soft SW Setting screen appears 3 Touch Mode Selection and then use the keypad to type in the mode number 8 0000 1000 08 9 0000 1001 09 10 0000 1010 0A 11 0000 1011 0B 12 0000 1100 0C 13 0...

Page 394: ...ecify the hex value touch HEX Selection specify the value by either using the keypad or touching A through F and then touch Enter 5 To change the setting for a different mode repeat steps 3 and 4 6 To...

Page 395: ...method for displaying enlargements of screens Settings at time of purchase Specifying the setting The shaded cells indicate the settings selected at the time of purchase Bit 7 6 5 4 3 2 1 0 Setting 0...

Page 396: ...y enlarged when the Enlarge Display key is pressed 0 Waits for instructions on the area of the screen to be dis played enlarged 1 Enlarges the upper left corner of the screen 5 4 3 2 1 0 000000 Do not...

Page 397: ...rchase Specifying the setting The grayed out cells are the settings at the time of purchase Bit 7 6 5 4 3 2 1 0 Setting 0 1 0 1 0 0 0 0 HEX 50 Bit Description Setting Description 7 6 5 010 Do not chan...

Page 398: ...ase 5 Specify whether or not all settings in the Basics screen are re set when copying is finished using the ADF 0 Automatic panel reset operation is not per formed 1 Automatic panel reset operation i...

Page 399: ...e User s Guide Network Scanner Operations Specifying whether to enable access locks and password rules and specifying the method for deleting image data mode 469 Specify whether to lock access if the...

Page 400: ...ssword rules refer to Password rules on page 11 70 Bit Description Setting Description 7 Specify whether to lock access when a password account track and administra tor passwords is en tered incorrect...

Page 401: ...in input screens mode 478 Specify the deleting method for Del in input screens Select whether the character at the cursor s position or the character to the left of the cursor is deleted Settings at t...

Page 402: ...t cells are the settings at the time of purchase Bit Description Setting Description 7 Specify the deleting method for Del in in put screens 0 Deletes the character at the cursor s posi tion 1 Deletes...

Page 403: ...the setting Detail If user authentication is limited to Scan functions touch Account User Auth in the Administrator Management 1 screen and then select Exter nal Server as the user authentication met...

Page 404: ...le from the machine If there are settings that are incompatible with Enhance Security En hance Security cannot be set to ON 2 Note The settings that must be specified or are forcibly set cannot be cha...

Page 405: ...efer to the User s Guide Box Operations Parameters that are changed when Enhance Security is set When Enhance Security is set to ON settings for the following parame ters are forcibly changed in order...

Page 406: ...ity fea tures are applied HDD Backup Utility HDD Twain Box Operator Data Administrator Specifying the Enhance Security parameter Settings can be specified to enhance security for using the machine 0 I...

Page 407: ...he instruc tions provided in the message so that the Enhance Security pa rameter can be used The message To enable the Encryption setting turn off the power switch and after a while turn it on Please...

Page 408: ...that the access lock does not apply to them and they can be unlocked The access lock applies to the following passwords However the adminis trator password cannot be set so that the access lock does...

Page 409: ...tication does not appear The Security Setting screen appears again 2 Note If the password is not authenticated even after the operation has been set so that the access lock is no longer applied resta...

Page 410: ...data when disposing of the machine Do not perform this operation in any other circumstances Wait at least two minutes after turning on the machine before deleting all of the data Do not touch the mac...

Page 411: ...If a job is being performed the message Cannot start because there is an unfinished job appears Touch Enter to return to the previous screen make sure that the job is completed and then select the Ove...

Page 412: ...Enhance Security is set to ON Conditions of the password rules Passwords that the password rules apply to Limitations on the number of characters Limitations on registering changing 8 alphanumeric ch...

Page 413: ...are limited Be sure that the administrator password that is specified is an adminis trator access code that meets the password rules If Administrator mode is entered using an administrator password th...

Page 414: ...11 Utility mode 11 72 VarioLink 2221 2821 3621 Utility mode Chapter 11...

Page 415: ...12 Appendix Chapter 12 Appendix...

Page 416: ...gister one touch recipients The keypad can also be used to type in numbers The following procedure describes how to enter characters in the User Name screen when registering users for user authenticat...

Page 417: ...touch and to move the cursor to the character to be changed touch Del and then type in the desired letter or number The software switch settings can be used to change how characters are deleted For de...

Page 418: ...f time Auto Paper Select Select this setting to detect the document placed on the original glass or loaded into the ADF then automatically select paper of the same size if 1 0 is selected or select th...

Page 419: ...n to print copies with one of the preset stamps such as TOP SECRET COPY or PROOF Set the Image Overlay function to print copies overlapping a differ ent scanned image Insert Image Set this function to...

Page 420: ...d before printing a large number of copies This prevents copy errors from occurring in a large number of copies Punch Select the setting to punch holes in the copies for filing Quality Select the sett...

Page 421: ...tray switching feature 7 7 B B W reverse setting 8 35 Basics screen 2 17 Book copy function 8 18 Booklet function 8 22 Bypass tray 2 60 C Call technical representative 5 2 Center binding 3 52 Cleaning...

Page 422: ...8 N Non sort setting 3 50 O OHP interleave function 8 8 Operating environment 1 18 Options 2 2 Original direction settings 3 19 Original glass 3 10 7 19 Output tray OT 602 2 12 6 8 P Paper 2 54 2 57...

Page 423: ...3 39 Single sided copies 3 40 Sleep 2 28 Software switch settings 11 50 Sort setting 3 51 3 53 Space requirements 1 17 Special paper 7 5 7 15 Stamp function 8 24 Staple jam 9 15 Stapling 3 52 3 55 T T...

Page 424: ...12 Appendix 12 10 VarioLink 2221 2821 3621 Appendix Chapter 12...

Page 425: ...Printing for Professionals Beyond the Ordinary...

Reviews: