2-24 General Description
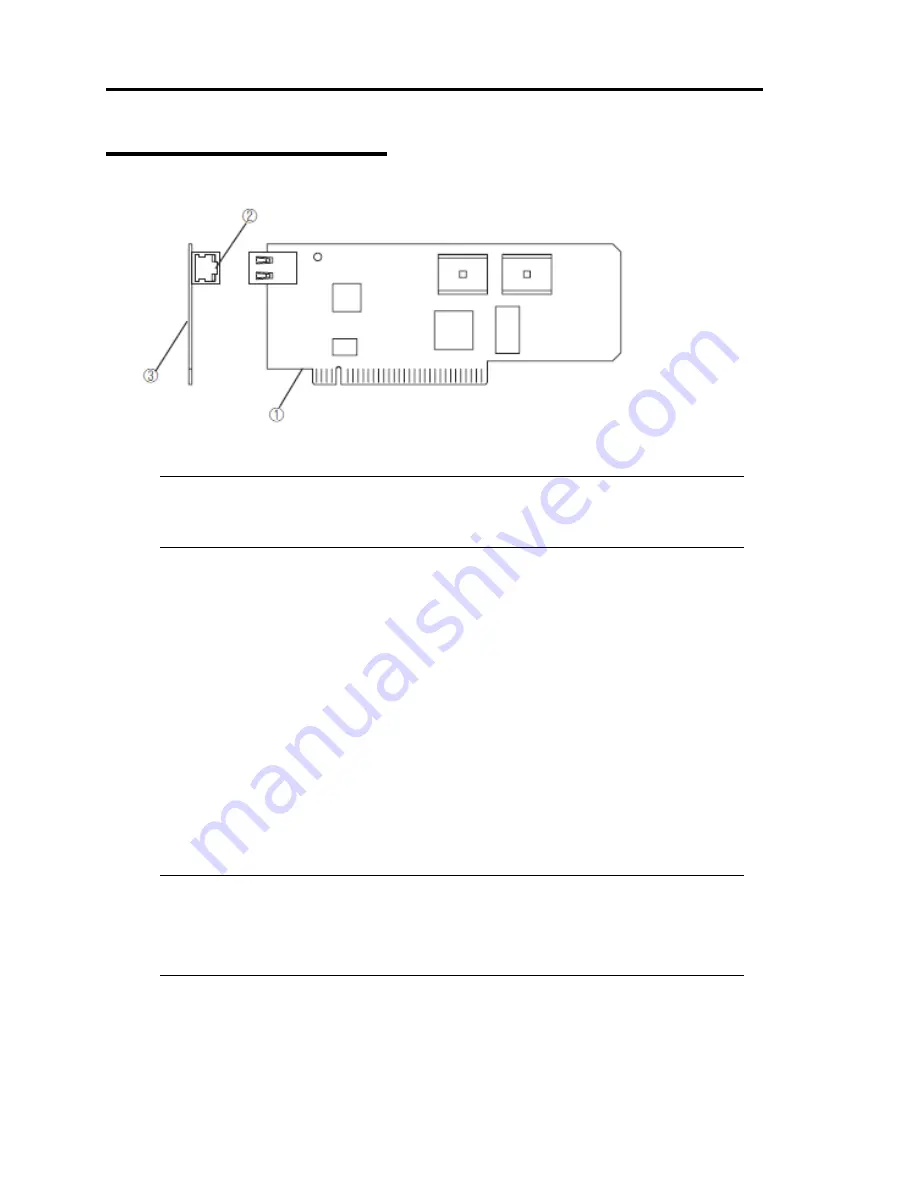
ft Remote Management Card
(1)
Edge connecting to a server
This edge of the card connects to the connector for this card in this device.
IMPORTANT:
Attaching this card to a slot or device other than those specified may cause problems. Do
not attach this card to any non-specified slot or device.
(2)
Management LAN port
This port supporting 100Mbps/10Mbps is used to connect to a network. You cannot use this
port to connect to a telephone line directly. This port is also used for management by NEC
DianaScope, the management software shipped with the server.
LINK/ACT LED
This LED indicates the network port status. When power is supplied to this card and a
connected device such as a hub and they are connected properly, the LED illuminates in
green (LINK). When the network port is sending/receiving data successfully the LED
blinks in green (ACT).
Speed LED
This LED indicates the network interface on which network port’s communication
mode is running. When the LED illuminates in amber, it indicates the network interface
is working on 100Mbps. If the LED does not illuminate, it indicates the network
interface is working on 10Mbps.
IMPORTANT:
The speed and duplex settings of the management LAN port are fixed to the auto
negotiation mode, and the settings cannot be changed manually.
Set the link partner side (switch and hub) to the auto negotiation mode, too.
(3)
MAC address
The label containing MAC address information is attached on the other side of this card. You
can also check the MAC address on the BIOS setup screen on the server.
ᴾ
Summary of Contents for EXP320A
Page 15: ......
Page 22: ...Precautions for Use 1 3 Rack model Front Rear ...
Page 24: ...Precautions for Use 1 5 Water Cooling kit ...
Page 52: ...Precautions for Use 1 33 ء ข Δ ਢ ڼط ข س ऱధჾࢨਚᎽΔ ڇঁܛ অଥཚၴփՈ گ ፂଥ၄ ش Ζ ...
Page 68: ...General Description 2 13 Rack model with the front door open ...
Page 73: ...2 18 General Description Rear View Tower model ᴾ Rack model ...
Page 110: ...Windows Setup and Operation 3 15 7 Configure the mirror of the extended volume ...
Page 128: ...Windows Setup and Operation 3 33 4 The confirmation dialog box appears Click Yes button ᴾ ᴾ ...
Page 164: ...System Configuration 4 27 Exit Move the cursor onto Exit to display the Exit menu ...
Page 225: ...4 88 System Configuration This page is intentionally left blank ᴾ ...
Page 286: ...Installing and Using Utilities 5 61 Sample screen of Server Maintenance Utility ...
Page 327: ...6 14 Maintenance This page is intentionally left blank ...
Page 381: ...7 54 Troubleshooting This page is intentionally left blank ...
Page 424: ...Specifications A 3 ...
Page 425: ......


