background image

FAX

Chapter1

FAX Chapter1 

 Basic Fax Features

3-26

Document glass 

→ 

ADF

1

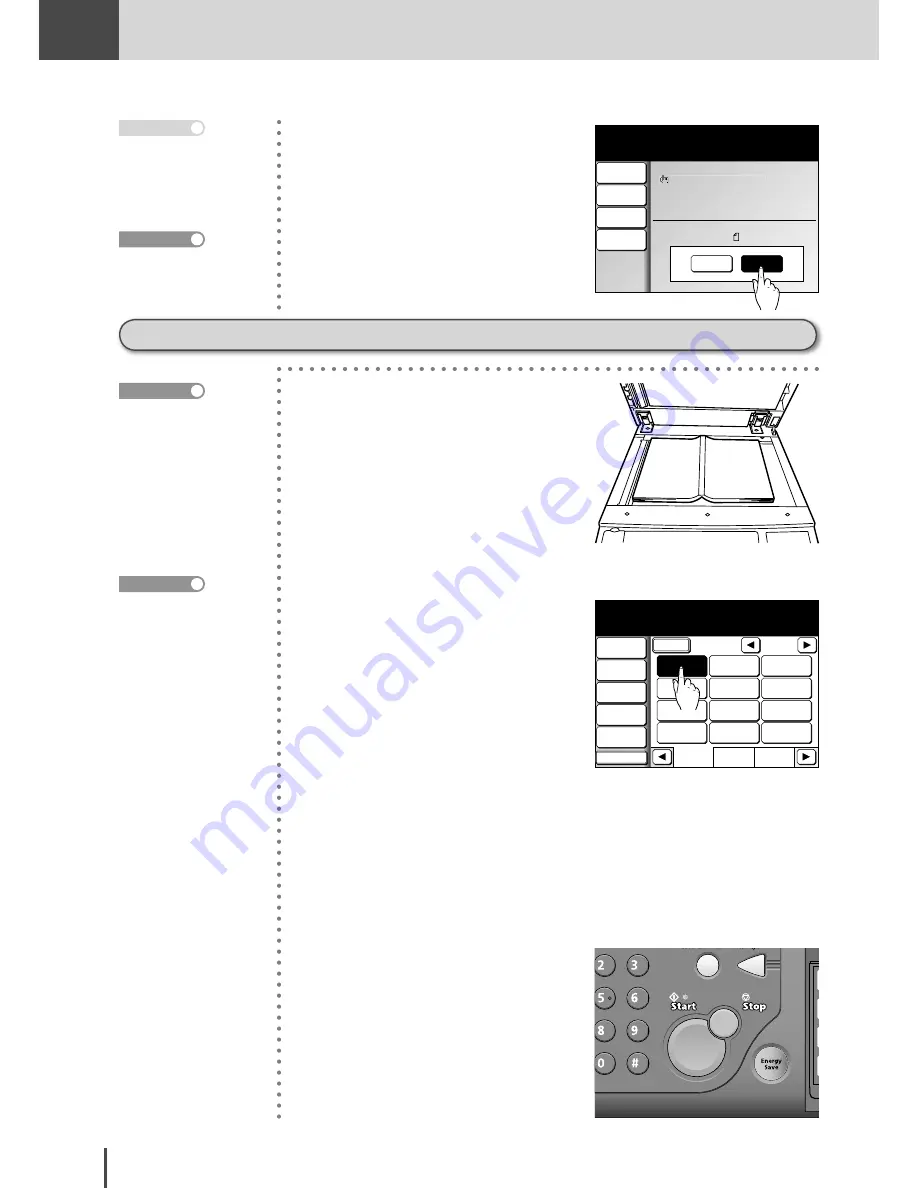
  Load the document.

2

  (1) Press 

FAX

.

Fax Ready Mode

1/2

Numeric

List

Index

All

AB

Atlanta

Office

New York

Office

Los Angels

Office

Chicago

Office

Houston

Office

Seattle

Office

London

Office

Paris

Office

Hong Kong

Office

Tokyo

Office

Domestic

Sales Dep

Overseas

Sales Dep

Contrast

Normal

Resolution

Normal

Monitor

Tx Report

OFF

Others

Fax Ready

Sep 24 2004 01:30pm      Memory   100% 

Broadcast

OFF


(2) Specify the location.


   Proceed to step 3 when using 

the numeric keypad or speed-
dial  to  specify  the  receiving 
party.


   Proceed to step 4 when using 

a  one-touch  key  or Address 
Book to specify the receiving 
party.

3

  Press 

START

.

How  to  load  document 
(see page 1-42)

Reference

Methods  for  specifying 
the  location  are  as  fol-
lows:
·  Specify  using  the  nu-

meric keypad (see page 
3-8)

·  Specify  using  the  one-

touch  keys  (see  page 
3-10)

·  Specify using speed-dial 

(see page 3-10)

·  Specify  using  the  Ad-

dress  Book  (see  page 
3-12)

·  When specifying multi-

ple locations, use Broad-
cast Tx (see page 3-58) 
or  Groups  tx  (see  page 
3-61).

Reference

Page :001
Doc.Size:Letter

Comm.No.:001
  001:Atlanta   Office

Tx Start

Next Doc

Enlarge Tx

100%

Contrast

Normal

Resolution

Normal

Scan Size

Auto

Set next document.

Set the document and press [Start]

Sep 24 2004 01:30pm      Memory    99% 

7

  Press 

[Tx  Start]

  when  all  the 

documents  have  been  scanned. 
Transmission will begin.

·  Press 

STOP

 to cancel the 

scan.

·  Transmission  will  also 

begin  when 

START

  is 

pressed.

Note

For  canceling  the  trans-
mission,  refer  to  page 
3-28.

Reference

Summary of Contents for MFX-2830

Page 1: ...Chapter1 Chapter2 Chapter3 Chapter4 Basic Copy Features Advanced Copy Features Function Settings Maintenance and Troubleshooting Chapter1 Chapter2 Chapter3 Advanced Copy Settings Getting Started Appen...

Page 2: ...t is especially effective when transmitting halftone grayscale image document This manual and any updates to it can be found online at www muratec com Go to the Products section of this site then clic...

Page 3: ...81 2 Department List 3 Not registered 4 Not registered 5 Not registered 6 Not registered Run Select the program number Select Enter to return to the previous menu Enter COPY F A X Department Code Wit...

Page 4: ...ory 100 Copy Ready 001 Set F A X Speed Dialing Users can program up to 500 frequently di aled fax numbers into the speed dial directo ry allowing for easy one touch transmission to important contacts...

Page 5: ...ng Scan Print Menu Fax Tx F A X Security Reception With security reception enabled users can re ceive fax documents into password protected storage This ensures that received jobs are viewed by author...

Page 6: ...coming faxes as two sid ed printouts for additional savings see page 2 67 for instruction 1 2 1 2 1 2 1 2 Paper Cassettes The MFX 2830 can be customized to meet your output needs Whether you print tho...

Page 7: ...paper cassette 1 30 Loading paper into large capacity cassette 1 31 Loading paper into bypass tray 1 32 How to load paper into bypass tray by pa per type 1 34 Bypass paper registration 1 37 How to Loa...

Page 8: ...Zoom to match paper size Automatic mag ni cation 2 16 Zoom by specifying magni cation Set mag ni cation 2 18 Performing zoom copy 2 20 Finishing 2 22 Interrupt Copy 2 24 Checking Copy Print Queue 2 26...

Page 9: ...For top binding 2 81 Changing paper 2 83 Changing magni cation 2 84 When setting image layout 2 85 Card Copy 2 86 Function Combination List 2 88 Display for advanced copy function that cannot be combi...

Page 10: ...sing speed dial 3 10 Transmitting using address book 3 12 Redialing 3 18 Memory over ow 3 20 Transmitting manually 3 21 Changing Document Scan in Mid Scan Mixed Transmission 3 24 ADF Document glass 3...

Page 11: ...eleting forwarding conditions 3 84 Printing a list of forwarding conditions 3 85 Fax forwarding settings 3 87 Preventing Received Documents from Being Read by Others Security Reception 3 88 Security r...

Page 12: ...send faxes 3 140 Using dial pre x to make a phone call 3 141 Masking the PIN 3 142 What is PIN masking 3 142 Setting PIN mask 3 143 Entering speed dials Mode 1 3 144 Entering program one touch keys M...

Page 13: ...g speed dial list 3 172 Registering Program One Touch 3 174 Entering Editing 3 174 Entering delayed transmission 3 176 Entering polling reception 3 177 Entering F code transmission 3 178 Entering F co...

Page 14: ...using department man agement function 4 18 Printing department list 4 20 Deleting accumulated data 4 22 Protecting department management settings 4 23 Printing List of Documents Stored in Memory 4 24...

Page 15: ...14 Replacing toner bottle 5 15 Replacing drum cartridge 5 17 Maintenance 5 19 Clean outside of the unit 5 19 Cleaning ADF glass Document glass 5 20 Cleaning platen cover 5 22 Cleaning document feeder...

Page 16: ...CONTENTS Appendix a1 Main Speci cations a2 Main unit a2 Option related a3 Index a6 Appendix This chapter describes the speci cations of the machine and the index...

Page 17: ...X Chapter1 FAX Chapter1 Basic Fax Features 3 40 Receiving Faxes Auto receiving mainly for fax Fax ready mode Use the Reception Mode at the User Install setting to set the machine to Fax Ready Mode see...

Page 18: ......

Page 19: ...sette 1 30 Loading paper into large capacity cassette 1 31 Loading paper into bypass tray 1 32 How to load paper into bypass tray by paper type 1 34 Bypass paper registration 1 37 How to Load Document...

Page 20: ...be connected to a compatible modular jack that is also compliant See installation instructions for details If this equipment MFX 2830 causes harm to the phone network the phone company will notify yo...

Page 21: ...chine you should complete the following steps For in structions on programing this information the TTI into your fax machine see page 1 56 FCC Part 15 This equipment has been tested and found to compl...

Page 22: ...tation including prepayment of freight and insurance charges of the product to and from an autho rized service center designated by Muratec is the responsibility of the Customer 4 If Muratec provides...

Page 23: ...ntial damages and some States do not allow limitations on how long an implied warranty lasts so the above limitations or exclusions may not apply to you This warranty gives you speci c legal rights an...

Page 24: ...tment of Health and Human Services DHHS This means that the device does not produce hazardous laser radiation The label shown below indicates compliance with the CDRH regulations and must be attached...

Page 25: ...dard modular phone jack also known as an RJ 11 Clean Dust buildup can damage your machine Periodically clean your machine as described in the operating instruc tions Do not use a dust cover which can...

Page 26: ...pronged 120 V electrical outlet to power your machine Using any other electrical outlet will damage to your machine For domestic use only Never use your machine outside the country in which you pur c...

Page 27: ...om the outlet Electrical storms can cause electrical shock or damage the machine Never handle your machine or power cord with wet hands Never touch your machine or power cord if your hands are wet All...

Page 28: ...indicates how to avoid personal injury Important This describes conditions or incorrect operations that could cause damage to your machine Note Note Describes the additional operating notes for each...

Page 29: ...symbol When using the ADF When using the document glass Width Length Width Length When the document has a length shorter than its width we use symbol When using the ADF When using the document glass W...

Page 30: ...1 12 Getting Started Getting Started Part Names and Functions 9 8 2 3 7 6 5 4 Equipment con guration 15 1...

Page 31: ...nting possible 7 Switchback Unit This is used to reverse or sort the paper It is required when the machine is equipped with the duplex unit or the 2 Bin tray 8 2 Bin Tray This sorts the output paper i...

Page 32: ...ate 9 Right Lower Cover Release Lever C2 Pull up on this to open the right lower cover 10 Paper Level Indication Window The red shown in this area increases as the level of the paper in the paper tray...

Page 33: ...he back of the left side 22 Counter This counts the total number of sheets printed 23 Toner Hopper This is pulled out to change the toner bottle 24 Power Switch This switch is used to turn the machine...

Page 34: ...nected when network related options are installed 30 Phone 1 Jack This is used to connect the optional handset 31 Phone 2 Jack This is used to connect an external phone such as an answering machine 32...

Page 35: ...4ht Paper Cassette for the 2 cassette cabinet Cabinet for the 1 cassette cabinet This can be used to store extra paper 3 Right Lower Door Release Lever C4 This lever allows access to jammed paper Dupl...

Page 36: ...approximately 2 500 sheets of letter sized paper 2 Drawer Release Button Press this when adding paper 3 Right Lower Door Open this when there is a paper jam 2 Bin tray No Name Function 4 2 Bin Tray Bi...

Page 37: ...ved data is being placed into memory 10 RESET Press this to stop the operation or to delete and initialize the settings 11 VOICE GUIDANCE Press this to hear how to remove a paper jam or an explanation...

Page 38: ...hed with this manual together LTR LTR LGL 11x17 DuplexCopy OFF Contrast Auto Doc Type Auto Zoom 100 Finishing No Sort Others Memory 100 Copy Ready 001 Set Fax Ready Mode 1 2 Numeric List Index All AB...

Page 39: ...Main Unit Icon Name Function Message Area This displays the current status operation instructions error messages and other informa tion Set Number This displays the number of copies Main Unit Icon Thi...

Page 40: ...ndby screen Message Area Standby Status Time Display and Memory Destination Keys Name Function Message Area This displays the current status operation instructions error messages and other informa tio...

Page 41: ...ayed in grey and cannot be selected Also when a function setting key is se lected the key colors will be displayed in reverse The contents of the setting key Soft Key displayed in the standby screen c...

Page 42: ...er related switches the power switch and ENERGY SAVE This is turned on the rst time you use the machine Normally this switch is left on Turn off the machine if you need to physically move it or it wil...

Page 43: ...een when the machine is in the Low Power Mode When any key or the touch screen is pressed while in the Low Power Mode the machine will wake up and re turn to the normal standby state Sleep Mode To put...

Page 44: ...n paper Recycled paper 56 to 90 g m2 Approx 500 sheets Large capacity cassette Letter Plain paper Recycled paper 56 to 90 g m2 Approx 2 500 sheets Bypass tray Paper size Paper type Paper weight Paper...

Page 45: ...already been printed on once Even OHP lm that was output without printing on it cannot be reused Paper printed on by a thermal printer or an inkjet printer Paper that is too thick or too thin Paper th...

Page 46: ...matic paper supply the machine must be set to Select Print Cassette see page 4 31 Reference If special paper such as OHP lm or label sheets is loaded in the bypass tray Automatic paper supply could be...

Page 47: ...paper is curled flatten it out before placing it in the cassette Load the paper so that it does not go higher than the mark or exceed the speci ed number of sheets Align the guide plate firmly against...

Page 48: ...tte to be loaded Slide the guide plate to align it to the proper paper size Mylar Do not touch with your hands 2 Load the paper with the side to be printed on side facing up when the wrapping was open...

Page 49: ...rawer release button Mylar Do not touch with your hands 2 Load the paper with the side to be printed on side facing up when the wrapping was opened facing up and load it into the right side of the pap...

Page 50: ...ng custom size paper the paper size must be registered see page 1 37 Reference Extension tray Bypass tray 1 Open the bypass tray Extension tray When loading paper that is larger than the bypass tray o...

Page 51: ...size that differs from the registered paper size see page 1 37 is loaded the message at right is displayed 2 To change the paper size to the automatically detected size press Yes LTR LTR LGL 11x17 Con...

Page 52: ...e bypass tray open the ex tension tray Guide plate 2 Align the guide plate to the pa per size and load the paper by inserting its edge all the way to the back Load the paper so that it does not go hig...

Page 53: ...s If air remains in the envelopes or the flaps stick up the envelopes could become wrinkled or jammed Do not load more than 10 envelopes at a time Note Note Do not load the enve lopes in the direction...

Page 54: ...page 1 38 Reference After loading the sheets set the paper type of the bypass paper setting to Paste Board see page 1 38 Reference For OHP lm 1 When loading OHP film load it to match the orientation o...

Page 55: ...Copy Functions User Install Group Name Store Doc Settings Management Scanner Settings Settings Counter Select item to edit Paper Settings Fax Functions 2 Press Paper Settings Enter Bypass Paper List P...

Page 56: ...ypass Paper Select item to edit Enter 6 Press Paper Type Paper Size Letter Paper Type Plain Custom 1 Size 8 5x11 0 Custom 2 Size 8 5x11 0 Custom 3 Size 8 5x11 0 Bypass Paper Select the paper type and...

Page 57: ...and select Enter 9 1 Press Length Enter Width 11 0 Length 08 5 Ppr If you use the paper for PC Print set the length longer than width Custom 1 Size Use the arrows or numeric keypad to input the width...

Page 58: ...es 279 mm 17 0 inces 432 mm Loading standard position For the ADF When scanning just one sheet For automatic continuous scanning Maximum Vertical 11 7 inches horizontal 35 4 inches 11 7 inches 25 6 in...

Page 59: ...7 Document precautions The following documents cannot be loaded in the ADF Please use the document glass Torn documents or those with holes in them Extremely wrinkled or curled documents Moistened doc...

Page 60: ...DF 1 Place the surface to be copied or transmitted upward and load it all the way to the back on the left side of the machine The loaded document will be copied or transmitted from the top of the stac...

Page 61: ...ase Appendix How to Load Document When placing the document on the document glass 1 Open the platen cover place the surface to be copied or transmitted downward and align the document to the loading g...

Page 62: ...r Symbol Space 1 2 3 4 5 6 7 8 9 0 Q W E R T Y U I O P _ Z X C V B N M A S D F G H J K L Edit window This displays the en tered characters Cursor keys They move the character entry position Clear Pres...

Page 63: ...T Y U I O P _ Z X C V B N M A S D F G H J K L 1 Select the characters to be en tered from the character panel Entering lower case letters 3 24 ABC_ Clear Cancel Enter Name Lower Symbol Space 1 2 3 4 5...

Page 64: ...ol Space 1 2 3 4 5 6 7 8 9 0 Q W E R T Y U I O P _ Z X C V B N M A S D F G H J K L 1 Select Symbol 4 24 1 4 ABC _ Clear Cancel Enter Name Alpha Space 2 Select the symbol or special char acter to be en...

Page 65: ...eypad 1 Enter numbers pressing the numeric keypad Entering numbers from the character panel 6 24 ABC123_ Clear Cancel Enter Name Lower Symbol Space 1 2 3 4 5 6 7 8 9 0 Q W E R T Y U I O P _ Z X C V B...

Page 66: ...enter the char acter The last entered charac ter can be deleted by just pressing Clear Note Deleting characters 5 24 ABC _DE Clear Cancel Enter Name Lower Symbol Space 1 2 3 4 5 6 7 8 9 0 Q W E R T Y...

Page 67: ...ers 4 24 ABD _E Clear Cancel Enter Name Lower Symbol Space 1 2 3 4 5 6 7 8 9 0 Q W E R T Y U I O P _ Z X C V B N M A S D F G H J K L 1 Use to move the cursor to the position you want to in sert the ch...

Page 68: ...which the machine is connected If the wrong setting is made tele phoning and faxing cannot be performed Reception mode Select the desired reception mode from Fax Ready Mode Tel Ready Mode Tel Fax Read...

Page 69: ...ngs Settings Paper Settings Counter Select item to edit Fax Functions User Install 2 Press User Install Language English Time Setting 2004 09 24 13 30 Set Daylight Saving OFF Comm Line Tone Reception...

Page 70: ...uage Spanish French English 2 1 Select the language 2 Press Enter after selecting the language The voice guidance is available only in English Note Setting the current time Set the current time in the...

Page 71: ...Select ON OFF and select Enter Enter 1 2 Language English Set Daylight Saving OFF Enter Cancel Set Daylight Saving OFF ON 2 1 Select ON to make the day light saving time valid and OFF to make it inval...

Page 72: ...rence 1 Press Reception Mode Language English Time Setting 2004 09 24 13 30 Set Daylight Saving OFF Comm Line Tone Reception Mode Fax Ready Mode TTI Enter Edit User Install Select reception mode Enter...

Page 73: ...mode Sets the priority to recieving calls not faxes Faxes cannot be received when no one is in Receiving a phone call with priority given to fax see page 3 41 Fax Tel ready mode Fax priority The mach...

Page 74: ...refer to How to Enter Characters on page 1 44 Reference Setting dial tone detection Select if you set the dial tone detection Select OFF normally 1 Press Dial Tone Detection Time Setting 2004 09 24 13...

Page 75: ...ccount dep Enter Cancel Standard TTI 2 1 Select the TTI 2 Press Enter after selecting Setting the standard TTI Select the TTI normally used Setting the TTI number 1 Press TTI Number Language English T...

Page 76: ...press the voice guidance key to receive instruction Play Stop Repeat Speed Dial Enter Guidance Paper Jam Sample Example of operations that utilize voice guidance Press Speed Dial Enter to display the...

Page 77: ...ment has been left on the glass when a docu ment has been left on the glass For Error Reset Guidance and Notice Guidance guidance automatically starts depending on the machine status regardless of VOI...

Page 78: ...The next number will move up into the vacant space Enter Enter Edit Delete Delete And Move Up Insert Speed Dial Select item to edit 2 Press Enter Edit Enter Edit Select a number to enter edit Enter 1...

Page 79: ...e Select item to edit Enter 4 Press the function you want to set Function Description Setting OP Guidance Mode Set the operation guidance mode Auto Manual OP Guidance Volume Set the operation guidance...

Page 80: ...glass after copying SETTING Management Guidance Notifica tion Volume see page 1 61 Loading paper in the bypass tray Complete beep see page 4 35 When copying completes Output Setting SETTING Management...

Page 81: ...etting 2 4 Setting reset 2 6 Rotate copy 2 6 Memory over ow during copying 2 7 How to Perform Basic Copy 2 8 Next document setting 2 9 Copying using both document glass and ADF 2 12 Copy reservation 2...

Page 82: ...s not working properly be cause the scanner is operating or the platen cover is open LTR LTR LGL 11x17 DuplexCopy OFF Contrast Auto Doc Type Auto Zoom 100 Finishing No Sort Others 001 Set Copy Ready M...

Page 83: ...e paper LTR LTR LGL 11x17 DuplexCopy OFF Contrast Auto Doc Type Auto Zoom 100 Finishing No Sort Others 001 Set Copy Ready Memory 99 Paper size is unsuitable Copying with autoselected paper Copy contin...

Page 84: ...pe from the touch screen Auto Priority is given to text to auto matically scan the document at a suitable setting Default Text Photo The document is scanned at a setting suitable for documents contain...

Page 85: ...esired contrast from the touch screen The contrast can be automati cally selected or manually se lected from 5 levels to match the document Auto The document is automatically scanned at a suitable con...

Page 86: ...he same orientation as the document the machine will auto matically rotate the image to make copying possible The direction of rotation is counterclockwise During zoom in out copying the image will be...

Page 87: ...the memory is available before try ing to copy again When the memory over ows during the second page or later of the document scan LTR LTR LGL 11x17 Scanning Scan Pages 1 PrintPages 1 Copie 1 2 Duplex...

Page 88: ...s case press the touch screen to select the cassette containing the paper you want to copy on Copying cannot be performed when a real time transmission has been scheduled see page 3 62 Operating tips...

Page 89: ...see page 2 30 Duplex Copy see page 2 67 Booklet Copy see page 2 78 or Card Copy see page 2 86 to scan a different document The Next document default setting is No when using the ADF and Yes when usin...

Page 90: ...11x17 Complete Next Doc Zoom Auto Contrast Auto Doc Type Auto Set next document Set next doc Memory 94 6 Press Next Doc Scanning of the next document will begin 7 Copying will start when scan ning ha...

Page 91: ...Memory 98 3 Press START 4 When scanning has been com pleted load the next document if a book set the next page in place LTR LTR LGL 11x17 Complete Next Doc Zoom Auto Contrast Auto Doc Type Auto Set n...

Page 92: ...Scanning Scan Pages 1 PrintPages 1 Copie 1 1 Next doc Memory 98 4 When the document has been loaded into the ADF press Yes during scanning 5 When scanning has been com pleted load the next document L...

Page 93: ...to Zoom 100 Finishing No Sort Others Copy Reserve Ready Complete Scan Pages 3 PrintPages 3 Copie 1 1 001 Set This will reserve the job proceed Yes No 5 Press Yes to perform Copy res ervation Scanning...

Page 94: ...uch screen select the cassette containing the paper you want to use for copying 3 Press START to begin copying How to load document see page 1 42 Set the document type and contrast as neces sary see p...

Page 95: ...s tray Guide plate 3 Align the guide plate to the pa per size Place the printing sur face downward and load the pa per by inserting its edge all the way to the back LTR LTR LGL 11x17 Copy Ready 001 Se...

Page 96: ...Paper speci cation automatic magni cation zoom Legal 121 77 11 17 Letter This allows zoom copying to be performed by setting the magnification at 1 increments Zoom to match paper size Automatic magni...

Page 97: ...11x17 Letter 50 11x17 H LTR Auto 2 Press Auto 3 Press Enter LTR LTR LGL 11x17 LTR DuplexCopy OFF Contrast Auto Doc Type Auto Zoom Auto Finishing No Sort Copy Ready 001 Set Others Memory 100 3 Select t...

Page 98: ...aper setting has been set to Auto From the touch screen select the cas sette containing the paper you want to use for coping Operating tips 1 Load the document 2 When the paper setting is not set to A...

Page 99: ...arrows or numeric keypad to select the zoom ratio and select Enter Zoom 100 Zoom Enlarge 77 Legal Letter 121 Legal 11x17 100 25 400 Cancel 77 Enter 129 Letter 11x17 154 H LTR Legal Reduce 64 11x17 Let...

Page 100: ...ion 1 Load the document 2 Use the numeric keypad to enter the number of copies LTR LTR LGL 11x17 DuplexCopy OFF Contrast Auto Doc Type Auto Zoom 100 Finishing No Sort Others Copy Ready 003 Set Memory...

Page 101: ...Copy Ready 003 Set Use the arrows or numeric keypad to select the zoom ratio and select Enter Zoom 100 Zoom Enlarge 77 Legal Letter 121 Legal 11x17 100 25 400 Cancel 50 Enter 129 Letter 11x17 154 H LT...

Page 102: ...pied document can be seperated into the correct page order This eliminates the need to hand sort the document after copying The default sort value can be set see page 2 96 Operating tips No sort The p...

Page 103: ...Sort Others Copy Ready Select the desired sorting method and select Enter 001 Set Finishing No Sort Sort Cancel Enter 2 Press Sort to turn sorting on LTR LTR LGL 11x17 DuplexCopy OFF Contrast Auto Doc...

Page 104: ...resolution Interrupting is not available during advanced copying or while setting functions Operating tips LTR LTR LGL 11x17 DuplexCopy OFF Contrast Auto Doc Type Auto Zoom 100 Finishing No Sort Othe...

Page 105: ...e during copy print ing it continues to print the copy Note 5 1 When copying has been com pleted press INTERRUPT LTR LTR LGL 11x17 Zoom 100 Contrast Auto Doc Type Auto Copy Ready Set the document From...

Page 106: ...when the copying is not yet completed 1 Press SETTING Enter Speed Dial Copy Functions User Install Counter Group Name Paper Settings Store Doc Settings Fax Functions Scanner Settings Settings Select i...

Page 107: ...In This Case Appendix 2 27 Press RESET to return to the standby screen The reserved copies waiting to print will be printed au tomatically based on the order of scanning Note Checking Copy Print Queu...

Page 108: ...COPY Chapter1 Basic Copy Features 2 28...

Page 109: ...Positive 2 62 Recopying Previous Copy Job Last Job 2 64 How to perform last job copy 2 64 Deleting last job document 2 66 Duplex Copying 2 67 Types of duplex copying 2 67 How to bind copied documents...

Page 110: ...4 and 8 The automatic magni cation will be set at the moment combined copy is set even if an optional copy magni cation is set Set the optional magni cation while setting the combined copy The copied...

Page 111: ...2 31 Combined Copy 1 1 Press COPY LTR LTR LGL 11x17 DuplexCopy OFF Contrast Auto Doc Type Auto Zoom 100 Finishing No Sort Others Copy Ready 001 Set Memory 100 2 Press Others Paper Auto Margin OFF Repe...

Page 112: ...ne Doc Direction Selecting the paper 4 3 2 Line No Position 1 3 1 4 2 Enter Layout Mode 1 Ratio Auto Paper Letter Combine 4 in 1 Combine Adjust settings and select Enter To go back select Combine Doc...

Page 113: ...copied image Line No Position Enter Layout Mode 1 Ratio Auto Paper Letter Combine 4 in 1 Combine Adjust settings and select Enter To go back select Combine Doc Direction 4 3 2 1 4 3 2 1 4 1 When enter...

Page 114: ...ition 4 2 1 Default The position of the document can be arranged 3 2 Select the position you want to change Line Yes Enter Layout Mode 1 Ratio Auto Paper Letter of doc 4 in 1 Combine Select the page p...

Page 115: ...ut The images of combine copies are laid out evenly on the paper Line Yes Position Enter Ratio Auto Paper Letter Combine 4 in 1 Combine Adjust settings and select Enter To go back select Combine Doc D...

Page 116: ...1 Combine Adjust settings and select Enter To go back select Combine Doc Direction 4 3 2 1 4 2 3 1 Line Yes Position Enter Layout Mode 2 Ratio Auto Paper Letter of doc 4 in 1 Combine Use the arrows or...

Page 117: ...t tings Load the document as shown in the screen dis play document orienta tion Note Next document can be set to scan multiple doc uments see page 2 9 Copying using both ADF and the document glass is...

Page 118: ...ate copying is not available Load the document as shown in the screen display When the number of repeats is 4 load them in the same orientation as the paper and when it is 2 or 8 load them in the oppo...

Page 119: ...rd Copy OFF Enter EraseBordr OFF EraseCentr OFF Last job Copy Functions Select the number of times you want the image to duplicate and select Enter Repeat OFF Enter Cancel Repeat OFF x2 x4 x8 2 1 Sele...

Page 120: ...select the paper press Pa per No Enter Mode 1 Ratio Auto Paper Letter Repeat x4 Repeat Select the paper source and select Enter 1 Paper LTR LTR LGL 11x17 Cancel Enter 2 Select the paper 3 Press Enter...

Page 121: ...nd select Enter To go back select Repeat Doc Direction 1 1 1 1 1 Line No 4 1 To enter a separator line press Line Enter Layout Mode 2 Ratio Auto Paper Letter Repeat x4 Repeat Select Yes No and select...

Page 122: ...es are laid out evenly on the paper Enter Ratio Auto Paper Letter Repeat x4 Repeat Adjust settings and select Enter To go back select Repeat Doc Direction 1 1 1 1 1 Line Yes Layout Mode 1 5 1 To set t...

Page 123: ...1 1 Line No Layout Mode 1 Zoom Enlarge 77 Legal Letter 121 Legal 11x17 100 25 400 Cancel 129 Enter 129 Letter 11x17 154 H LTR Legal Reduce 64 11x17 Letter 50 11x17 H LTR Auto 2 Select the magnificatio...

Page 124: ...The copied image might have areas missing depending on the paper and document The ADF is not available The series copy is available only from the document glass Operating tips 1 1 Press COPY LTR LTR L...

Page 125: ...inding document Right binding document 2 1 Select the binding direction of the loaded document 2 Press Enter 2 1 1 2 Enter Ratio Auto Paper Letter Doc Bind Left SeriesCopy Adjust settings and select E...

Page 126: ...agnification 2 1 1 2 Enter Ratio Auto Paper Letter Doc Bind Left SeriesCopy Use the arrows or numeric keypad to select the zoom ratio and select Enter Bind position Result Zoom Enlarge 77 Legal Letter...

Page 127: ...FAX Chapter4 Common Settings In This Case Appendix 2 47 Series Copy Press RESET to cancel the series copy settings Note LTR LTR LGL 11x17 Contrast Auto Doc Type Auto Others Copy Ready 001 Set Zoom 12...

Page 128: ...for erasing document shadows are Erase Border which erases the shadow around the border and Erase Center which erases the shadow in the center To erase the shadow around the bor der or in the center...

Page 129: ...Nega Posi OFF Copy Functions Select item to edit Paper Auto Repeat OFF SeriesCopy OFF EraseCentr OFF EraseBordr OFF 3 Press EraseBordr Combine OFF TopUp Copy OFF Card Copy OFF Enter Last job XY Zoom...

Page 130: ...ON EraseBordr Adjust settings and select Enter To go back select EraseBordr 3 1 Press T B Border T B Border 0 2 R L Border 0 2 Enter EraseBordr ON EraseBordr Use the arrows or numeric keypad to enter...

Page 131: ...nd select Enter To go back select EraseBordr 1 Press R L Border Enter EraseBordr ON EraseBordr T B Border 0 4 R L Border 0 2 Use the arrows or numeric keypad to enter the setting and select Enter Ente...

Page 132: ...Card Copy OFF Enter EraseBordr OFF Last Job XY Zoom OFF Nega Posi OFF Copy Functions Select item to edit Paper Auto Repeat OFF SeriesCopy OFF EraseCentr OFF 3 Press EraseCentr Combine OFF TopUp Copy O...

Page 133: ...k select EraseCentr 3 1 Press EraseWidth 2 Use the numeric keypad or to set the area to be erased 3 Press Enter Enter EraseCentr ON EraseWidth 0 1 EraseCentr Use the arrows or numeric keypad to enter...

Page 134: ...set Erase Border or Erase Center respectively see page 2 48 The ADF is not available The TopUp copy is available only from the document glass Operating tips 1 1 Press COPY LTR LTR LGL 11x17 DuplexCop...

Page 135: ...Auto Repeat OFF SeriesCopy OFF EraseCentr OFF TopUp Copy OFF Enter Cancel Scan Size OFF H LTR 11x17 Custom1 Letter H LTR Card Custom2 Letter Legal Check Enter Scan Size Letter TopUp Copy Select Enter...

Page 136: ...LTR LGL 11x17 DuplexCopy OFF Contrast Auto Doc Type Auto Zoom 100 Finishing No Sort Copy Ready 001 Set Others Memory 100 2 Press Others Combine OFF TopUp Copy OFF Card Copy OFF Enter EraseBordr OFF La...

Page 137: ...ric keypad to adjust the margin and select Enter Enter Cancel Right Input range 0 0 1 0 0 2 2 Use the numeric keypad or to enter the margin value 3 Press Enter Enter Margin ON Left 0 2 Right 0 2 Top 0...

Page 138: ...rtical and horizontal magni cations separately XY magni cation Copying can be done with the vertical and horizontal magni cation ratio speci ed separately The magni cation can be speci ed regardless o...

Page 139: ...magnifications OFF XY XY inch Enter Cancel XY Zoom 4 1 Press XY 2 Press Enter XY Zoom XY Ratio X 100 Ratio Y 100 Doc Enter XY Zoom Adjust the X and Y axis and select Enter 5 1 Select the magnification...

Page 140: ...FF Contrast Auto Doc Type Auto Zoom 100 Finishing No Sort Others Copy Ready 001 Set Memory 100 2 From the touch screen select the cassette containing the paper you want to use for copying Combine OFF...

Page 141: ...Width 04 5 Ppr Width 04 5 Doc Length 03 2 Ppr Length 03 2 XY Zoom Use the arrows or numeric keypad to enter the width and select Enter Enter Cancel Doc width Input range 0 1 50 0 04 8 2 Use the numer...

Page 142: ...nishing No Sort Others Copy Ready 001 Set Memory 100 2 Press Others Combine OFF TopUp Copy OFF Card Copy OFF Enter EraseBordr OFF Last Job XY Zoom OFF Nega Posi OFF Copy Functions Select item to edit...

Page 143: ...mmon Settings In This Case Appendix 2 63 Copying with Black and White Areas Reversed Negative Positive LTR LTR LGL 11x17 DuplexCopy OFF Contrast Auto Doc Type Auto Zoom 100 Finishing No Sort Others Co...

Page 144: ...if the free memory space is not enough The memory hold time can be set as well In addition Last Job copying can be prohibited by setting the hold time to 0 minute see page 2 97 The default hold time i...

Page 145: ...on Settings In This Case Appendix 2 65 Recopying Previous Copy Job Last Job If you make an incorrect entry overwrite it with the correct entry Press RESET to cancel the settings Note Enter EraseDoc Pr...

Page 146: ...t Job XY Zoom OFF Nega Posi OFF Copy Functions Select item to edit Paper Auto Repeat OFF SeriesCopy OFF EraseCentr OFF Margin OFF 2 1 Press Last Job Enter EraseDoc Press START to copy 001 pages immedi...

Page 147: ...tional duplex unit is installed Duplex copying of one sided document Duplex copying of duplex document Use the ADF to feed the duplex document and make duplex copies Duplex copying of right and left p...

Page 148: ...blank space in binding side see page 2 96 Top binding Document Top binding Select this when binding on the top side of the copy The copy back side is rotated 180 from the front side when copied Settin...

Page 149: ...nction Doc Direction 1 2 2 2 1 4 1 Press Doc Bind to set the document binding 2 1 1 Enter CopyMethod 2 1sided Doc Bind Top DuplexCopy 2 2 Select the bound originals binding position and select Enter D...

Page 150: ...el CopyMethod OFF 1 2sided 2 2sided 2 1sided Book Face Book F B 3 1 Press 2 2 sided 2 Press Enter Enter CopyMethod 2 2sided Doc Bind Right Left DuplexCopy Select Enter to save the setting Select CopyM...

Page 151: ...ter4 Common Settings In This Case Appendix 2 71 Duplex Copying LTR LTR LGL 11x17 DuplexCopy 2 2sided Contrast Auto Doc Type Auto Zoom 100 Finishing Sort Others Copy Ready 001 Set Memory 100 5 Press En...

Page 152: ...ter 001 Set Enter Cancel CopyMethod OFF 1 2sided 2 2sided 2 1sided Book Face Book F B 3 1 Press 1 2 sided 2 Press Enter Enter CopyMethod 1 2sided Bind Right Left DuplexCopy 2 1 Select Enter to save th...

Page 153: ...FAX Chapter4 Common Settings In This Case Appendix 2 73 Duplex Copying LTR LTR LGL 11x17 Contrast Auto Doc Type Auto Zoom 100 Finishing Sort Copy Ready 001 Set Others Memory 100 DuplexCopy 1 2sided 5...

Page 154: ...2sided 2 1sided Book Face Book F B 3 1 Select Book Face 2 Press Enter Enter CopyMethod Book Face Ratio Auto Doc Bind Left DuplexCopy 1 2 1 2 2 Doc Direction Select Enter to save the setting Select Co...

Page 155: ...keypad to select the zoom ratio and select Enter Doc Bind Left Zoom Enlarge 77 Legal Letter 121 Legal 11x17 100 25 400 Cancel 129 Enter 129 Letter 11x17 154 H LTR Legal Reduce 64 11x17 Letter 50 11x17...

Page 156: ...sided 2 2sided 2 1sided Book Face Book F B 3 1 Select Book F B 2 Press Enter Enter 1 1 2 CopyMethod Book F B Ratio Auto Doc Bind Left DuplexCopy Select Enter to save the setting Select CopyMethod and...

Page 157: ...ion Enter 2 1 2 1 3 CopyMethod Book F B Ratio Auto Doc Bind Left DuplexCopy Use the arrows or numeric keypad to select the zoom ratio and select Enter 3 Doc Direction Zoom Enlarge 77 Legal Letter 121...

Page 158: ...hich the paper is set Select the paper to perform Top binding Select other than paper to perform right and left binding Left binding Binding position Document insertion direction Copy Select left bind...

Page 159: ...hers Memory 100 Copy Ready 001 Set 2 From the touch screen select a paper other than the paper LTR LTR LGL 11x17 DuplexCopy OFF Contrast Auto Doc Type Auto Zoom 100 Finishing No Sort Others Memory 100...

Page 160: ...ct the binding position 2 Press Enter LTR LTR LGL 11x17 Contrast Auto Doc Type Auto Others Memory 100 Copy Ready 001 Set DuplexCopy 1 2sided Zoom Auto Finishing Sort 6 Press Enter twice to return to t...

Page 161: ...hers DuplexCopy OFF Zoom 100 Finishing No Sort 2 From the touch screen select the paper LTR LTR LGL 11x17 Contrast Auto Doc Type Auto Memory 100 Copy Ready 001 Set Others DuplexCopy OFF Zoom 100 Finis...

Page 162: ...5 1 Select Top 2 Press Enter LTR LTR LGL 11x17 Contrast Auto Doc Type Auto Memory 100 Copy Ready 001 Set Others DuplexCopy 1 2sided Zoom Auto Finishing Sort 6 Press Enter twice to return to standby sc...

Page 163: ...to change the pa per when setting booklet 2 1 Enter Mode 1 Ratio Auto Paper Letter Bind Type Left Booklet Select the paper source and select Enter Paper LTR LTR LGL 11x17 Cancel Enter 2 1 Select the...

Page 164: ...Type Left Booklet Use the arrows or numeric keypad to select the zoom ratio and select Enter Doc Direction Zoom Enlarge 77 Legal Letter 121 Legal 11x17 100 25 400 Cancel 129 Enter 129 Letter 11x17 154...

Page 165: ...out evenly on the paper 8 1 2 2 1 7 3 4 5 Enter Ratio Auto Paper Letter Bind Type Left Booklet Adjust settings and select Enter To go back select Bind Type Doc Direction Layout Mode 2 1 Press Layout...

Page 166: ...d cause eye damage ADF is not available Copying is available only from the document glass Operating tips 1 1 Press COPY 2 Press Others Margin OFF Combine OFF Repeat OFF SeriesCopy OFF TopUp Copy OFF C...

Page 167: ...Card Type Card Card Copy Select Enter to continue To go back select Card Type Paper Letter 3 Select the paper Refer to the previous page and select paper or any other than paper corresponding to your...

Page 168: ...Repeat copy 2 repeats 4 repeats 8 repeats Series copy Duplex copy 1 Sided document duplex Duplex document duplex Duplex document 1 sided Facing documents duplex Front and back document duplex Booklet...

Page 169: ...ments duplex Front and back document duplex Booklet copy XY zoom XY zoom inch Automatic paper selection Manual Custom paper selection Automatic magni cation Select magni cation Zoom Bypass Paper suppl...

Page 170: ...Canceling one of combined advanced copy functions To cancel an advanced copy setting that is part of a combination enter the advanced copy setting screen and switch it off Example When combine copy a...

Page 171: ...ing is can celed Individual function cancellation method Function Procedure Doc type Doc type Auto Enter Contrast Contrast Auto Enter Duplex DuplexCopy CopyMethod OFF Enter Zoom Zoom 100 Enter Finishi...

Page 172: ...COPY Chapter2 Advanced Copy Features 2 92...

Page 173: ...1 FAX Chapter2 FAX Chapter3 FAX Chapter4 Common Settings In This Case Appendix Advanced Copy Settings COPY Chapter3 COPY Copy Functions Settings 2 94 Sample copy function settings 2 94 Default setting...

Page 174: ...return to the standby screen The default values are re established if the machine is left without any operation for a designated period of time Copy screen automatic reset Factory defaults are the se...

Page 175: ...nter Default Settings Select item to edit 3 Select the function you want to set from the touch screen Enter Erase Border Contrast Auto Sortt NoSort Margin Erase Center Default Settings Select the docu...

Page 176: ...setting a margin in ad vanced copy In addition the top bottom right and left margin widths can be set as default values Specifying the margin ON OFF Setting the margin width default value Left right t...

Page 177: ...be set when setting the separator line for combine copy or repeat 0 01 to 0 05 0 01 Last job hold time This sets the length of time for which the previously copied job is stored in memory Setting the...

Page 178: ...Macro List 3 Press Copy Settings Enter Copy Settings Function List Fax Settings Scanner Settings System Settings Settings List Select item to edit Store Doc List Department List Macro List Yes No Cop...

Page 179: ...ss ADF 3 26 Canceling Checking the Communication Document 3 28 FAX CANCEL JOB CONFIRM 3 28 Canceling Reviewing communication document 3 28 Canceling Checking broadcast transmission by location 3 30 Di...

Page 180: ...ic List Index All ABC Atlanta Office New York Office Los Angels Office Chicago Office Houston Office Seattle Office London Office Paris Office Hong Kong Office Tokyo Office Domestic Sales Dep Overseas...

Page 181: ...nstall Management Fax Function Scanner Settings Management Fax Function Scanner Settings Fax Functions Select item to edit 1 2 Enter Redial Program One Touch TTI ON Batch Tx Speed Dial FaxFrwrd OFF Fa...

Page 182: ...Numeric List Index All ABC Atlanta Of fice New York O ffice L os Angel s Office Chicago Of fice Houston Of fice Seattle Of fice London Off ice Paris Offi ce Hong Kong Office Tokyo Offi ce Domestic S a...

Page 183: ...after scanning the document into memory This allows you to take the document and leave without waiting for the transmission to end to save time For Memory transmission when the image is corrupted by l...

Page 184: ...s completed Dialing symbols Inserting the dialing symbols when entering the receiver s number allows a variety of functions to be added Dialing symbols can also be used when setting speed dial Key nam...

Page 185: ...Dep Contrast Normal Resolution Normal Monitor Tx Report OFF Others Fax Ready Sep 24 2004 01 30pm Memory 100 Broadcast OFF 2 Press Others 3 1 Press or Fax Functions Select item to edit 2 2 Enter F Code...

Page 186: ...itor Tx Report OFF Others Fax Ready Sep 24 2004 01 30pm Memory 100 Broadcast OFF 3 Set the resolution and contrast as necessary Speed Dial Copy Function Group Name Paper Settings Store Doc Settings Ma...

Page 187: ...ial see page 3 10 Specify using the Ad dress Book see page 3 12 When specifying multi ple locations use Broad cast Tx see page 3 58 or Group Tx see page 3 61 Press RESET to cancel the settings Referen...

Page 188: ...one touch 01 is the same as the location entered for speed dial 001 1 Load the document 2 Press FAX 3 Set the resolution and contrast as necessary 4 Press the one touch key regis tered as location The...

Page 189: ...ax Function Scanner Settings Fax Functions Select item to edit 1 2 Enter Program One Touch TTI ON Batch Tx Fax Copy OFF Group Tx Enlarge TX 100 Delayed Tx OFF Cover Page OFF FPolling OFF Scan Size Aut...

Page 190: ...ook Address Books displays the registered speed dial list in the registering order the alphabetical order or by groups in the touch screen From the Address Book you can select the location from a list...

Page 191: ...n according to the registering order Up to 500 speed dials can be registered The numbers registered in speed dial 001 to 048 are the same as one touch numbers 01 to 48 Note Before selecting the loca t...

Page 192: ...begin Numeric list The registered speed dials are displayed in the speed dial number order The location can be directly speci ed from the touch screen There are 100 pages in the speed dial listing wit...

Page 193: ...at classi cation Note 1 Load the document 2 Press FAX 3 Set the resolution and contrast as necessary Index Chicago Office Domestic Sales Dep Fax Ready Mode Fax Ready Others EF CD GH Contrast Normal Re...

Page 194: ...estic Group B Fax Ready Mode Fax Ready Contrast Normal Resolution Normal Monitor Tx Report OFF Sep 24 2004 01 30pm Memory 100 Broadcast OFF Atlanta Office New York Office Los Angels Office Chicago Off...

Page 195: ...eattle Office London Office Paris Office Hong Kong Office Tokyo Office Domestic Sales Dep Overseas Sales Dep Contrast Normal Resolution Normal Monitor Tx Report OFF Others Fax Ready Sep 24 2004 01 30p...

Page 196: ...Domestic Sales Dep Overseas Sales Dep Contrast Normal Resolution Normal Monitor Tx Report OFF Others Fax Ready Sep 24 2004 01 30pm Memory 100 Broadcast OFF 3 Press Others Program One Touch Speed Dial...

Page 197: ...Index All AB Contrast Normal Resolution Normal Monitor Tx Report OFF Others Broadcast OFF Atlanta Office New York Office Los Angels Office Chicago Office Houston Office Seattle Office London Office P...

Page 198: ...ssage is printed with the page number in which the memory ovger owed Wait until space clears in the mem ory or use real time transmission to retransmit the document from the printed page number Page 0...

Page 199: ...Mode 1 2 Numeric List Index All AB Atlanta Office New York Office Los Angels Office Chicago Office Houston Office Seattle Office London Office Paris Office Hong Kong Office Tokyo Office Domestic Sales...

Page 200: ...cking up the handset to make the call if the receiving party is using manual reception have that party prepare to re ceive the fax 7 When you hear the other fax ma chine answer press START The transmi...

Page 201: ...ffice Seattle Office London Office Paris Office Hong Kong Office Tokyo Office Domestic Sales Dep Overseas Sales Dep Tone Volume Middle Redial Monitor Speed Dial Others _ Tel 1 During on hook press Vol...

Page 202: ...1 Press FAX Fax Ready Mode 1 2 Numeric List Index All AB Atlanta Office New York Office Los Angels Office Chicago Office Houston Office Seattle Office London Office Paris Office Hong Kong Office Tokyo...

Page 203: ...ce Enlarge Tx 100 Contrast Normal Resolution Normal Scan Size Auto Scanning Press Stop to Stop Next doc Sep 24 2004 01 30pm Memory 99 4 Press Yes while scanning the document 5 When scanning is complet...

Page 204: ...ing party 3 Press START How to load document see page 1 42 Reference Methods for specifying the location are as fol lows Specify using the nu meric keypad see page 3 8 Specify using the one touch keys...

Page 205: ...he scan Note For canceling the trans mission refer to page 3 28 Reference 4 When scanning is completed place the next document in the ADF Page 001 Doc Size Letter Comm No 001 001 Atlanta Office Tx Sta...

Page 206: ...commands JOB CONFIRM will illuminate If there is no document with delayed commands FAX CANCEL JOB CONFIRM will not illuminate Note Illuminates Canceling Reviewing communication document The operation...

Page 207: ...4 To cancel the communication select the communication docu ment to be canceled Enter 1 2 Delayed Commands 005 25 11 00 BrdCast Delayed Commands Select the location to cancel the transmission Yes No...

Page 208: ...ands 2 Press Delayed Commands Enter 1 2 Delayed Commands 001 24 15 00 BrdCast Delayed Commands 005 25 11 00 BrdCast Delayed Commands Select the location to cancel the transmission 3 The communication...

Page 209: ...smission Yes No Detail Communicating 002 24 13 47 BrdCast OK to delete 1 Press Detail Each location specified by broad cast transmission will be displayed Reserved Location which has not yet been call...

Page 210: ...d Commands Select the location to cancel the transmission Yes No OK to delete 3 Press Yes The selected com munication document will be deleted 6 Press Enter to return to the list of communication rese...

Page 211: ...and printed 1 Press FAX CANCEL JOB CON FIRM Enter 1 2 Delayed Commands 005 25 11 00 BrdCast Delayed Commands Select the location to cancel the transmission Yes No OK to delete 2 1 If there is a curren...

Page 212: ...e communication results select the communica tion results to be displayed Enter 1 2 007 TX New York Office 006 TX Houston Office 005 TX L os Angels Office 004 TX Houston Office 003 TX New York Office...

Page 213: ...ter1 FAX Chapter2 FAX Chapter3 FAX Chapter4 Common Settings In This Case Appendix 3 35 2 The communication results will be printed Printout Example T x R e s u l t w i l l b e printed for transmission...

Page 214: ...mitted 1 Press LIST Enter Speed Dial Group Journal List Settings List List Select item to edit Other Lists 2 Press Journal List Enter Command List Journal Report Journal List Select item to edit 3 Pre...

Page 215: ...there are not delayed commands No command stored will be displayed Note Canceling Checking the Communication Document Printout Example 1 2 3 4 1 No Comm 001 Command No Batch No 01 Batch transmission...

Page 216: ...unctions Group Name Paper Settings Store Doc Settings Management Fax Functions User Install Counter Scanner Settings Settings Select item to edit 2 Press Store Doc Settings Enter Store Delete Print St...

Page 217: ...ling Checking the Communication Document Enter 1 2 Delayed Commands 001 24 15 00 BrdCast Delayed Commands 005 25 11 00 BrdCast Command Doc Delayed Commands 001 24 15 00 BrdCast Would you like to print...

Page 218: ...ngs 2 Fax reception will begin You can pick up the hand set while the machine is ringing to talk on the phone Note To make the machine ring you need to make the settings for the handset or the fax rin...

Page 219: ...to them The optional handset is required to answer phone calls see page 1 13 Operating tips Receiving faxes 1 Fax reception will start immedi ately without ringing Answering phone calls 1 Your machine...

Page 220: ...required to answer phone calls see page 1 13 Operating tips When you hear fax tones beep beep beep it is a fax call coming in When you answer the call using the handset press START When you answer th...

Page 221: ...gs for the handset or the fax ring er on the machine See 4 35 The number of rings can be changed from 1 to 10 see page 3 196 Reference The continuous ringing means the caller is mak ing a phone call t...

Page 222: ...handset or the fax ringer on the ma chine see page 1 13 page 4 35 Operating tips Receiving faxes 1 The answering machine rings for a predetermined number of times We are not in at the moment 2 The an...

Page 223: ...ge is played Within 10 seconds Recording a message 3 Answering machine starts re cording a message When the caller is manu ally transmitting the an swering machine will pick up and play the answer ing...

Page 224: ...Mode at the User Install setting to set the machine to Tel Ready Mode see page 1 54 If there is a document in the ADF the transmission will start by pressing START Make sure there are no documents in...

Page 225: ...handset When the caller is man ually transmitting there might be no sound when the handset is picked up so con rm on the phone if no one is on the line before pressing START When you hear fax tones be...

Page 226: ...MEMORY RECEIVE lamp will remain illuminated Leave the machine power ON when replacing paper and toner The memory can receive and hold a maximum of 250 communications and approximately 2 533 A4 size Mu...

Page 227: ...dit Management 2 Press Management 3 1 Press Management Select item to edit Enter 3 3 Jobs Waiting to Print Print Mask 3 mm PIN Mode OFF 2 Press Jobs Waiting to Print FaxReceive Document Reserved Copy...

Page 228: ...margin When the document length exceeds the effective record area but is within the reduction margin reduction or cut off is performed to t the contents onto one sheet but when the document is longer...

Page 229: ...ecord area to t onto 1 sheet so the reduction rate of the pages may vary even when print ed on the same sheet When a document that is larger than the Half letter size is received and the size of the p...

Page 230: ...er than the reduction margin Reduced to 1 2 and merged onto 1 sheet Reduced to fit onto 1 sheet In original dimensions In original dimensions In original dimensions In original dimensions Might be sli...

Page 231: ...ansmitted document is automatically selected for re ceived documents If paper of the same size is not available the following priority will be used to select the paper Out of paper reception will be p...

Page 232: ...handset Or press Monitor 2 Specify the location A Numeric keypad Press the numeric keypad or handset dial keys to enter the other party s number B One Touch key Press the one touch key if the receiv i...

Page 233: ...istered before hand Speed Dial Input range 001 500 001 Atlanta Office 001 Enter Cancel C Speed Dial 1 Press Speed Dial 2 Use the numeric keypad or to enter the speed dial num ber 3 Press Enter 1 2 Num...

Page 234: ...er is turned OFF Note Adjusting volume The small switches on the side of your machine s handset adjust the ringer volume and the re ceiver volume Ringer Volume Control Adjust the ringer volume to one...

Page 235: ...g polling documents storage 3 94 Printing out scheduled polling documents 3 95 Polling 3 96 Performing F Code Communications 3 98 What are F code transmissions 3 98 Sub addresses and passwords 3 98 Fu...

Page 236: ...on see page 3 5 or polling see page 3 96 while a broadcast communication is in progress will interrupt the broadcast communication and run the transmission or polling prior to it It is help ful when y...

Page 237: ...cation to check delete a location Location Atlanta Office New York Office Los Angels Office Chicago Office Houston Office Seattle Office London Office Paris Office Hong Kong Office Tokyo Office Domest...

Page 238: ...t destinations by just pressing the corresponding receiving parties in the Ad dress Book list Fax Ready Mode 1 2 Numeric List Index All AB Broadcast ON Contrast Normal Resolution Normal Monitor Tx Rep...

Page 239: ...ers Fax Ready Sep 24 2004 01 30pm Memory 100 2 1 Press FAX 2 Press Others Redial Program One Touch Speed Dial Fax Copy OFF Delayed Tx OFF FPolling OFF Enlarge TX 100 TTI ON Batch Tx TTI Select Default...

Page 240: ...with other functions broadcasts polling F code transmissions F code polling fax copy Operating tips 1 Load the document 2 Press FAX Fax Ready Mode 1 2 Numeric List Index All AB Atlanta Office New Yor...

Page 241: ...ouston Office Seattle Office London Office Paris Office Hong Kong Office Tokyo Office Domestic Sales Dep Overseas Sales Dep Broadcast ON Contrast Normal Resolution Normal Monitor Tx Report OFF Others...

Page 242: ...batch transmission you need to create batch transmission boxes in advance Batch transmission boxes can be created up to 5 Registering batch transmission boxes 1 Press SETTING Enter Speed Dial Copy Fu...

Page 243: ...ss book 2 Press Enter Box Name Select item to edit Select Enter to continue Enter 1 003 Los AngelsOffice Tx Time 01 00 00 7 1 Press Tx Time Box Name Use the numeric keypad or cursor keys to input the...

Page 244: ...ter 1 AABBCC Tx Time 30 10 00 Box Name AABBCC 9 A list of the entered information is displayed 10To continue on and register other batch transmission boxes press Enter then repeat from step 5 Press RE...

Page 245: ...list 1 Press LIST Enter Speed Dial Group Journal List Settings List List Select item to edit Other Lists 2 Press Other Lists Enter Batch Tx Doc Other Lists Select item to edit Program One Touch Batch...

Page 246: ...ettings Management Scanner Settings Settings Paper Settings Fax Functions Counter Select item to edit 2 Press Fax Functions Enter Default Settings Program One Touch Cover Page Other Settings Fax Funct...

Page 247: ...transmission boxes in which any docu ments are stored cannot be deleted Press No to cancel the deletion Note Note Press RESET to return to the standby screen Note 2 BBCCDD 3 FFGGHH 4 5 Delete Select...

Page 248: ...anta Office New York Office Los Angels Office Chicago Office Houston Office Seattle Office London Office Paris Office Hong Kong Office Tokyo Office Domestic Sales Dep Overseas Sales Dep Contrast Norma...

Page 249: ...ment you can delete or check it using FAX CAN CEL JOB CONFIRM see page 3 28 Note Batch Tx To store a document selsct Yes To cancel this operation select No Enter 2 BBCCDD 3 FFGGHH 4 5 1 AABBCC Yes No...

Page 250: ...n which the documents you want to print out are stored 01 Already stored 02 Not registered 03 Not registered 04 Not registered 05 Not registered Batch Tx Doc Enter 06 Not registered Select file 1 7 6...

Page 251: ...4 Press Batch Tx Doc 4 5 Batch Tx Doc Enter 1 AABBCC 2 BBCCDD 3 FFGGHH 5 Select the batch transmission box in which the documents you want to delete are stored 01 Already stored 02 Not registered 03...

Page 252: ...List Select item to edit Other Lists 2 Press Other Lists Enter Other Lists Select item to edit Program One Touch Block Junk Fax F Code Doc Batch Tx Box F Code Box Fax Forward Cover Page Batch Tx Doc...

Page 253: ...Getting Started COPY Chapter1 COPY Chapter2 COPY Chapter3 FAX Chapter1 FAX Chapter2 FAX Chapter3 FAX Chapter4 Common Settings In This Case Appendix 3 75 Bundling Faxes Sending to the Same Location Ba...

Page 254: ...ettings Settings Paper Settings Fax Functions Counter Select item to edit 2 Press Fax Functions Enter Default Settings Program One Touch Cover Page Other Settings Fax Functions Select item to edit F C...

Page 255: ...Group Journal List Settings List List Select item to edit Other Lists 2 Press Other Lists Enter Other Lists Select item to edit Program One Touch Block Junk Fax F Code Doc Batch Tx Box F Code Box Fax...

Page 256: ...FAX Chapter2 FAX Chapter2 Advanced Fax Features 3 78 Printout Example...

Page 257: ...layed Tx OFF FPolling OFF Enlarge TX 100 TTI ON Batch Tx TTI Select Default Scan Size Auto Polling OFF Enter 1 2 Fax Functions Select item to edit FaxFrwrd OFF SecurltyRx OFF Group Tx Redial Cover Pag...

Page 258: ...ady mode Operating tips Entering forwarding conditions Enter the following contents Individual Set this to ON to enable fax forwarding for each individual forwarding destination If the overall fax for...

Page 259: ...dex All AB Atlanta Office New York Office Los Angels Office Chicago Office Houston Office Seattle Office London Office Paris Office Hong Kong Office Tokyo Office Domestic Sales Dep Overseas Sales Dep...

Page 260: ...ys forwarded Select item to edit Select Enter to continue Enter 01 001 002 006 Auto Print OFF Individual ON Time Everyday 8 1 Press Time Enter the forwarding time and select Enter Enter 01 001 002 006...

Page 261: ...Mon 18 00 Tue 06 00 Auto Print OFF 10 1 Press Auto Print Select ON OFF and select Enter Enter 01 001 002 006 Individual ON Time Mon 18 00 Tue 06 00 TTI Number 1234 5678 Auto Print OFF Enter Cancel Aut...

Page 262: ...ss Delete Select the forwarding location to delete Enter Delete 5 Select the forwarding condition number you want to delete Select the forwarding location to delete Enter Delete Yes No Would you like...

Page 263: ...ttings List List Select item to edit Other Lists 2 Press Other Lists Enter Other Lists Select item to edit Program One Touch Block Junk Fax F Code Doc Batch Tx Box F Code Box Cover Page Batch Tx Doc F...

Page 264: ...FAX Chapter2 FAX Chapter2 Advanced Fax Features 3 86 Printout Example...

Page 265: ...to enable the individual forwarding conditions to ON Faxes will be forwarded according to the entered conditions 1 Press SETTING 2 Press Fax Functions 3 Press Fax Forward Enter Enter Edit Delete Fax...

Page 266: ...er Set the protect passcode in advance see page 4 36 When the protect passcode is deactivated security reception is also deactivated When security reception is set to ON it will start at the speci ed...

Page 267: ...Line up OFF Protect Passcode Copy Protect OFF Cost Management Management Select ON OFF and select Enter Enter 2 3 Depart Management SecurityRx OFF Enter Cancel SecurityRx OFF ON 5 1 Select ON to star...

Page 268: ...s Fax Functions Counter Select item to edit 2 Press Store Doc Settings Enter Store Doc Settings Select item to edit Select Enter to continue Store Delete Print 3 Press Print Enter Polling Doc F Code D...

Page 269: ...c Batch Tx Doc Print Enter the Passcode and select Enter Sucurity Rx Doc Yes No Security Rx Doc Would you like to print 6 Press Yes to print out docu ments received during security reception 7 Receive...

Page 270: ...ey can be sent automatically by an other machine s operation The phone call is charged to another party Polling document storage 1 Load the document 2 Press SETTING Enter Speed Dial Copy Functions Use...

Page 271: ...gs In This Case Appendix 3 93 Polling Communications Enter Store Bulletin Box Doc Polling Doc Select item to edit Select Enter to continue 5 Press Polling Doc Enter Store Bulletin Box Doc Polling Doc...

Page 272: ...ttings Enter Store Doc Settings Select item to edit Select Enter to continue Store Delete Print 3 Press Delete Enter Bulletin Box Doc Scan Box Doc Delete Batch Tx Doc Polling Doc Select item to edit S...

Page 273: ...er Settings Settings Paper Settings Fax Functions Counter Select item to edit 2 Press Store Doc Settings Enter Store Doc Settings Select item to edit Select Enter to continue Store Delete Print 3 Pres...

Page 274: ...ce Tokyo Office Domestic Sales Dep Overseas Sales Dep Contrast Normal Resolution Normal Monitor Tx Report OFF Others Fax Ready Sep 24 2004 01 30pm Memory 100 Broadcast OFF 2 Press Others Program One T...

Page 275: ...ns using FAX CANCEL JOB CONFIRM see page 3 28 Press RESET to cancel the settings Reference Prog One Touch Speed Dial TTI ON Batch Tx TTI OFF Stamp OFF Enter 1 2 Fax Functions Select ON OFF and select...

Page 276: ...u can utilize security box communications bulletin box communications and relay command communications regardless of the manufacturer or machine type Up to 20 F code boxes can be entered Registering F...

Page 277: ...for communications has an F code bulletin box set documents can be sent to the bulletin box The stored documents in the bulletin box can be retrieved polling by specifying the sub address of that box...

Page 278: ...ote 1 Press SETTING Enter Speed Dial Copy Functions User Install Group Name Store Doc Settings Management Scanner Settings Settings Paper Settings Fax Functions Counter Select item to edit 2 Press Fax...

Page 279: ...Chapter1 FAX Chapter2 FAX Chapter3 FAX Chapter4 Common Settings In This Case Appendix 3 101 Performing F Code Communications Enter Secure Box Bulletin Box Relay Box 01 Select box type 6 Select the typ...

Page 280: ...Clear Enter I D Code _ Cancel 3 1 Use the numeric keypad to enter the I D code 4 digits 2 Press Enter 4 Enter the box name Sub Address 0123456789 Password I D Code Secure Box Select item to edit Enter...

Page 281: ...Password 1 Press Password Sub Address 0123456789 I D Code Secure Box If a password is required enter the password and select Enter Enter Hold time 0 Day Box Name Atlanta Office Password Enter Cancel...

Page 282: ...Input range 00 31 03 Days Enter 00 to skip time setting 2 Enter the hold time using the numeric keypad or then press Enter Sub Address 0123456789 I D Code Secure Box Select item to edit Enter Box Name...

Page 283: ...to enter the sub address 2 Select Enter 3 Enter the box name Sub Address 000111222333 Password Auto Print OFF Bulletin Box Select item to edit Enter 1 2 Rx Protect OFF OverWrite OFF Box Name 1 Press B...

Page 284: ...ected reception Sub Address 000111222333 Auto Print OFF Bulletin Box Select item to edit Enter 1 2 OverWrite OFF Box Name New York Office Password 123456789 Rx Protect OFF 1 Press Rx Protect Sub Addre...

Page 285: ...Protect OFF Auto Print OFF Enter Cancel Auto Print OFF ON 2 Select either ON or OFF then press Enter Setting overwrite Sub Address 000111222333 Bulletin Box Select item to edit Enter 1 2 Box Name New...

Page 286: ...tin Box Select item to edit Enter 2 2 Erase Tx Doc OFF 1 Press then press Erase Tx Doc I D Code Bulletin Box Select ON OFF and select Enter Enter 2 2 Erase Tx Doc OFF Enter Cancel Erase Tx Doc OFF ON...

Page 287: ...ect Enter Atlanta Office New York Office Los Angels Office Chicago Office Houston Office Seattle Office London Office Paris Office Hong Kong Office Tokyo Office Domestic Sales Dep Overseas Sales Dep 3...

Page 288: ...rint OFF Box Name London Office Password 1 Press Password Sub Address 345345345 TTI Type Not set Relay Box If a password is required enter the password and select Enter Enter 1 2 Auto Print OFF Box Na...

Page 289: ...Enter 1 2 Auto Print OFF Box Name London Office Password 123456789 TTI Type Not set 1 Press TTI Type Sub Address 345345345 Relay Box Select item to edit Enter 1 2 Auto Print OFF Box Name London Offic...

Page 290: ...ter 2 2 I D Code 1 Press then press I D Code Relay Box Enter I D Code password Enter 2 2 I D Code Clear Enter I D Code _ Cancel 2 Enter the I D code 4 digits using the numeric keypad then press Enter...

Page 291: ...lect item to edit Enter Edit Delete 4 Press Delete 02 New York Office 03 London Office Delete Select a box to delete Enter 1 4 01 Atlanta Office 05 04 06 5 Select the F code box you want to delete 02...

Page 292: ...oc Batch Tx Box F Code Box Fax Forward Cover Page Batch Tx Doc 3 Press F Code Box 02 New York Office 03 London Office Delete Enter I D Code Enter 1 4 01 Atlanta Office 05 04 06 Yes No 01 Atlanta Offic...

Page 293: ...ter2 FAX Chapter3 FAX Chapter4 Common Settings In This Case Appendix 3 115 Performing F Code Communications Other Lists Select item to edit Program One Touch Block Junk Fax F Code Doc Batch Tx Box F C...

Page 294: ...ice London Office Paris Office Hong Kong Office Tokyo Office Domestic Sales Dep Overseas Sales Dep Contrast Normal Resolution Normal Monitor Tx Report OFF Others Fax Ready Sep 24 2004 01 30pm Memory 1...

Page 295: ...Tx ON OverseasTx OFF Dialing Options Fax Functions Select item to edit Auto Rx ON DuplexScan OFF Memory Tx ON 2 2 2 Press Enter 6 Press Enter to return to the standby screen 7 Enter the other party s...

Page 296: ...mal Monitor Tx Report OFF Others Fax Ready Sep 24 2004 01 30pm Memory 100 Broadcast OFF 2 Press Others Program One Touch Speed Dial Fax Copy OFF Delayed Tx OFF FPolling OFF Enlarge TX 100 TTI ON Batch...

Page 297: ...x Functions Select item to edit 1 2 Program One Touch Speed Dial Fax Copy OFF Delayed Tx OFF FPolling ON Enlarge TX 100 TTI ON Batch Tx TTI Select Default Scan Size Auto Polling OFF FaxFrwrd OFF Secur...

Page 298: ...gistered in F code boxes see page 3 105 Operating tips 1 Load a document 2 Press SETTING Enter Speed Dial Copy Functions User Install Group Name Management Scanner Settings Settings Paper Settings Cou...

Page 299: ...Atlanta Office 05 04 06 Clear Enter I D Code _ 7 Use the numeric keypad to enter the I D code 4 digits if it has been set Enter Bulletin Box Doc Select document storage method Add Over Write Over wri...

Page 300: ...on information will be printed out Check the box number listed and print out the stored documents Security box reception Received in bulletin box Operating tips 1 Press SETTING Enter Speed Dial Copy F...

Page 301: ...ric keypad to enter the I D code 4 digits if it has been set All stored documents 01 Already stored 02 Not registered 03 Not registered 04 Not registered F Code Doc Enter 05 Not registered 1 6 7 Selec...

Page 302: ...s Enter Store Doc Settings Select item to edit Select Enter to continue Print Store Delete 3 Press Delete Enter Delete Scan Box Doc Batch Tx Doc Bulletin Box Doc Polling Doc Select item to edit Select...

Page 303: ...enter the I D code 4 digits if it has been set All stored documents 01 Already stored 02 Not registered 03 Not registered 04 Not registered Bulletin Box Doc Enter 05 Not registered 1 6 7 Select the ap...

Page 304: ...st 1 Press LIST Enter Speed Dial Group Journal List Settings List List Select item to edit Other Lists 2 Press Other Lists Enter Other Lists Select item to edit Program One Touch Block Junk Fax Batch...

Page 305: ...2 FAX Chapter3 FAX Chapter4 Common Settings In This Case Appendix 3 127 Performing F Code Communications Enter Other Lists Select item to edit Program One Touch Block Junk Fax Batch Tx Box F Code Box...

Page 306: ...le Office London Office Paris Office Hong Kong Office Tokyo Office Domestic Sales Dep Overseas Sales Dep Contrast Normal Resolution Normal Monitor Tx Report OFF Others Fax Ready Sep 24 2004 01 30pm Me...

Page 307: ...tep 8 If you select it by other methods proceed to step 7 7 Press START LTR LTR LGL 11x17 001 Set Paper Auto Contrast Normal Resolution Fine Zoom 100 Finishing No Sort Fax Copy Press Start to perform...

Page 308: ...e Left binding Stored images How to load the document Document Right binding Printed at destination as this image Top binding 2 2 1 2 1 1 Place the document in the ADF 2 1 Press FAX 2 Press Others Ove...

Page 309: ...Sales Dep Overseas Sales Dep Contrast Normal Resolution Normal Monitor Tx Report OFF Others Fax Ready Sep 24 2004 01 30pm Memory 99 Press Location to check delete a location Broadcast ON Location 6 Sp...

Page 310: ...Office New York Office Los Angels Office Chicago Office Houston Office Seattle Office London Office Paris Office Hong Kong Office Tokyo Office Domestic Sales Dep Overseas Sales Dep Contrast Normal Res...

Page 311: ...set 2 Press Enter Fax Ready Mode 1 2 Numeric List Index All AB Atlanta Office New York Office Los Angels Office Chicago Office Houston Office Seattle Office London Office Paris Office Hong Kong Offic...

Page 312: ...gal Letter Letter Legal 11 17 Scanning direction Only the part corresponding to the size set is scanned The standard loading position becomes the scanning standard Only the width of the size set is sc...

Page 313: ...Size H LTR Fax Copy OFF FPolling OFF Polling OFF 5 1 The size to be scanned is now set 2 Press Enter Fax Ready Mode 1 2 Numeric List Index All AB Atlanta Office New York Office Los Angels Office Chica...

Page 314: ...se OneLine DRD your phone company must set up your distinctive ring service When sign ing your contract also check the ring pattern allocated Operating tips Ring pattern Your fax has eight possible di...

Page 315: ...unctions 3 Press Other Settings Redial Interval 1 Min Set DRD Other Settings Select item to edit Enter 1 3 Dialing Pause 2 Second of Redials 2 Times Block Junk Fax of Rings 2 Times 4 Press Set DRD Rin...

Page 316: ...attern A Set DRD Select the ring pattern and select Enter Enter DRD OFF Cancel Ring Pattern D E F G H A B C Enter 2 Press Enter If your phone company gives you only very general ring pattern speci cat...

Page 317: ...Settings 4 1 Press Enter 3 3 ECM Mode ON Service Mode OFF Other Settings Select item to edit Receive Time Stamp OFF PreFix 2 Press PreFix 5 1 Enter the phone network ac cess number using the numer ic...

Page 318: ...using the nu meric keypad DuplexScan OFF OverseasTx OFF Enter 2 2 Fax Functions Auto Rx ON Memory Tx ON F Code Tx OFF Dialing Options Enter Cancel Fax No N123456789_ Clear Pause PreFix Tone Edit 2 Pre...

Page 319: ...Office Los Angels Office Chicago Office Houston Office Seattle Office London Office Paris Office Hong Kong Office Tokyo Office Domestic Sales Dep Overseas Sales Dep Tone Volume Set Middle Speed Dial...

Page 320: ...rs in length It also can include the or symbols and it can be entered from the numeric keypad There are three possible settings for the PIN mask Off Turns off the PIN mask feature Any PIN you enter wi...

Page 321: ...agement Select item to edit Enter 3 3 PIN Mode OFF Jobs Waiting to Print 3 1 Press or 2 Press PIN Mode Print Mask 3 mm Management Select PIN mode Enter 3 3 PIN Mode OFF Jobs Waiting to Print OFF Mode1...

Page 322: ...PIN Name New York Office Group No 01 02 03 2 While setting up the machine asks you to enter the PIN Select PIN and press Enter Enter PIN Enter 002 New York Office Fax No 2222 2222 PIN Name New York Of...

Page 323: ...e Domestic Sales Dep Overseas Sales Dep Cancel Enter Dialing Options Group Tx Speed Dial Prog One Touch Others Enter Cancel Fax No 98776544 12345678_ Clear PreFix Tone Pause For example to dial 987765...

Page 324: ...London Office Paris Office Hong Kong Office Tokyo Office Domestic Sales Dep Overseas Sales Dep Contrast Normal Resolution Normal Monitor Tx Report OFF Others Fax Ready Broadcast OFF Enter Cancel Fax...

Page 325: ...touch screen shows 1 2 Numeric List Index All ABC Atlanta Office New York Office Los Angels Office Chicago Office Houston Office Seattle Office London Office Paris Office Hong Kong Office Tokyo Office...

Page 326: ...the batch transmission should go 1 2 Numeric List Index All ABC Atlanta Office New York Office Los Angels Office Chicago Office Houston Office Seattle Office London Office Paris Office Hong Kong Offi...

Page 327: ...FAX Chapter3 FAX Managing Communications 3 150 Printing journal report 3 150 Printing journal report automatically 3 152 How to read journal report 3 153 Transmission con rmation report setting 3 154...

Page 328: ...nt sent received faxes in total The journal records faxes beyond the last 100 are automatically erased in turn with each new fax sent received The journal report is generally printed out in the time o...

Page 329: ...ppendix 3 151 Managing Communications Command List Journal Report Journal List Select item to edit Enter 3 Press Journal Report Tx Report Rx Report Journal Report Select item to edit Enter Tx Rx Repor...

Page 330: ...nner Settings Settings Paper Settings Counter Select item to edit Fax Functions Management 2 Press Management Soft Key Auto Reset Time Sound Settings Guidance Energy Save Mode Auto Print Journal OFF M...

Page 331: ...he completion of communications 6 No of pages Number of pages communicated 7 Dept When Department Management has been set the department number is recorded here 8 Result Communications results as foll...

Page 332: ...her Settings Fax Functions Select item to edit F Code Box Batch Tx Box 3 Press Default Settings Enter Resolution Normal Contrast Normal Memory Tx ON Default Settings Select item to edit Cover Page OFF...

Page 333: ...Los Angels Office Chicago Office Houston Office Seattle Office London Office Paris Office Hong Kong Office Tokyo Office Domestic Sales Dep Overseas Sales Dep Contrast Normal Resolution Normal Monitor...

Page 334: ...e blocks any faxes from those numbers The nal four to eight digits of the applicable fax numbers are registered Up to 50 contacts fax numbers can be entered Mode 3 This method is a combination of meth...

Page 335: ...tings of Redials 2 Times Redial Interval 1 Min Block Junk Fax of Rings 2 Times Set DRD Dialing Pause 2 Second Enter Enter 1 3 Other Settings Select item to edit 4 Press Block Junk Fax Setting OFF Ente...

Page 336: ...enter edit Enter Enter Edit 01 8 Press edit box Enter the last 4 8 digits of the number and select Enter Enter Enter Edit 01 Enter Cancel 01 11223344_ Clear 9 1 Using the numeric keypad enter the last...

Page 337: ...k Fax Select item to edit Select Enter to continue 5 Press Delete 01 11223344 01 12345678 03 22233344 Delete Enter Select a number to delete Select Enter to continue 6 Select the number you want to de...

Page 338: ...her Lists Enter Other Lists Select item to edit Batch Tx Box Cover Page Block Junk Fax Program One Touch F Code Doc F Code Box Fax Forward Batch Tx Doc 3 Press Block Junk Fax Enter Other Lists Select...

Page 339: ...list 3 169 Deleting speed dials and moving up the num bers 3 171 Printing speed dial list 3 172 Registering Program One Touch 3 174 Entering Editing 3 174 Entering delayed transmission 3 176 Entering...

Page 340: ...entered in speed dial Prepare the necessary information in advance Number of contact Up to 40 digits can be set Name of contact Up to 24 characters can be set Group No Group numbers are entered here...

Page 341: ...New York Office 003 L os Angels Office 004 Chicago Office 005 Houston Office 006 Enter Edit Enter 1 84 Use the numeric keypad or touchscreen options to enter data and select Enter PreFix Tone Pause E...

Page 342: ...No 6666 6666 Name Seattle Office Group No 006 Seattle Office Select the line item you want to edit Select Enter to continue Enter 1 Press Group No Fax No 6666 6666 Name Seattle Office Group No 006 Se...

Page 343: ...u want to edit Select Enter to continue Enter 8 A list of the entered information is displayed 9 To continue to enter other speed dials press Enter then repeat from step 4 Press RESET to return to the...

Page 344: ...ast OFF Fax Ready Mode Sep 24 2004 01 30pm Memory 100 2 Press an unregistered speed dial When selecting from the one touch keys Entering for unregistered speed dial numbers 001 to 048 can be performed...

Page 345: ...se the numeric keypad to enter the contact s fax number 1 100 Numeric List Index All ABC Fax Ready 006 Seattle Office 007 008 009 010 Contrast Normal Resolution Normal Monitor Tx Report OFF Others Bro...

Page 346: ...elect item to edit Delete and Move Up The next number will move up into the vacant space 3 Press Delete 001 Atlanta Office 002 New York Office 003 Los AngelsOffice 004 Chicago Office 005 Houston Offic...

Page 347: ...d dial numbers entered in the program one touch keys If the numbers are changed re enter the program one touch keys 1 Press SETTING Enter Speed Dial Copy Functions User Install Group Name Store Doc Se...

Page 348: ...s Office 004 Chicago Office Enter 1 84 PreFix Tone Pause Enter Cancel Fax No _ Clear 6 Now follow the procedure for entering the selected speed dial which is identical to steps 5 to 9 on pages 3 163 t...

Page 349: ...ect item to edit Delete and Move Up The next number will move up into the vacant space 3 Press Delete And Move Up 001 Atlanta Office 002 New York Office 003 Los AngelsOffice 004 Chicago Office 005 Acc...

Page 350: ...ton Office 006 6 The selected speed dial is deleted and all the following speed dials will be moved up by one position 7 To continue to delete other speed dials repeat from step 4 to 5 Press RESET to...

Page 351: ...List Select item to edit Other Settings Speed Dial Would you like to print Yes No 3 Press Yes Enter Speed Dial Group List Journal List Settings List List Select speed dial list order and select Enter...

Page 352: ...ber or name by overwriting or deleting the existing in formation in each step 1 Press SETTING Enter Speed Dial Copy Functions User Install Group Name Store Doc Settings Management Scanner Settings Set...

Page 353: ...ex All AB Others Prog One Touch Cancel Enter Enter location and select Others to Set functions To go back select Cancel Dialing Options Group Tx Speed Dial Atlanta Office New York Office Los Angels Of...

Page 354: ...r numeric keypad to adjust the time setting and select Enter Enter Cancel Delayed Tx 30 13 30 Day Hour Minute 9 Use or the numeric key pad to enter the transmission time Speed Dial Group Name Paper Se...

Page 355: ...OFF FPolling OFF F Code Tx OFF Function Select ON OFF and select Enter Enter Cancel Polling OFF ON 9 Press ON Speed Dial Group Name Paper Settings Store Doc Settings Enter Delayed Tx OFF Polling ON F...

Page 356: ...umeric keypad to enter the sub address number Speed Dial Group Name Paper Settings Store Doc Settings Enter Delayed Tx OFF Polling OFF FPolling OFF F Code Tx OFF Function Use the numeric keypad to ent...

Page 357: ...and select Enter Enter Cancel Password 11221122_ Clear 12Press Enter to return to the screen in step 8 Speed Dial Group Name Paper Settings Store Doc Settings Enter Delayed Tx OFF Polling OFF FPolling...

Page 358: ...eypad to enter the sub address number Speed Dial Group Name Paper Settings Store Doc Settings Enter Delayed Tx OFF Polling OFF FPolling OFF F Code Tx OFF Function Use the numeric keypad to enter the s...

Page 359: ...and select Enter Enter Cancel Password 112233_ Clear 12Press Enter to return to the screen in step 8 Speed Dial Group Name Paper Settings Store Doc Settings Enter Delayed Tx OFF Polling OFF FPolling...

Page 360: ...to edit 2 Press Fax Functions Enter Default Settings Program One Touch Cover Page Other Settings Fax Functions Select item to edit F Code Box Batch Tx Box Fax Forward 3 Press Program One Touch Enter E...

Page 361: ...se Appendix 3 183 1 1111 2222 2 3333 4444 3 Select the number to delete Select Enter to continue Enter 4 Delete 1 1111 2222 Would you like to delete Yes No 6 Press Yes to delete 7 To continue to delet...

Page 362: ...Lists Select item to edit Program One Touch Block Junk Fax F Code Doc Batch Tx Box F Code Box Fax Forward Cover Page Batch Tx Doc 3 Press Program One Touch Enter Other Lists Select item to edit Progr...

Page 363: ...Fax Settings Getting Started COPY Chapter1 COPY Chapter2 COPY Chapter3 FAX Chapter1 FAX Chapter2 FAX Chapter3 FAX Chapter4 Common Settings In This Case Appendix 3 185 Printout Example Registering Prog...

Page 364: ...OFF Others Fax Ready Sep 24 2004 01 30pm Memory 100 Broadcast OFF 3 Press Others Program One Touch Speed Dial Fax Copy OFF Delayed Tx OFF FPolling OFF Enlarge TX 100 TTI ON Batch Tx TTI Select Default...

Page 365: ...FAX Chapter3 FAX Chapter4 Common Settings In This Case Appendix 3 187 Registering Program One Touch 2 3333 4444 3 5555 6666 4 7777 8888 1 1111 2222 Program One Touch Select a program one touch key Ent...

Page 366: ...ial Copy Functions User Install Group Name Store Doc Settings Management Scanner Settings Settings Paper Settings Fax Functions Counter Select item to edit 2 Press Group Name 01 Domestic 02 Group A 03...

Page 367: ...n Settings In This Case Appendix 3 189 Entering Group Names Press RESET to return to the standby screen Note 01 Domestic 02 Group A 03 Group B 04 Group Name Enter 1 6 05 06 Select the group number you...

Page 368: ...2 Press Group 01 Domestic 02 Asia 03 Group A 04 Group Enter 1 6 05 06 3 Press the group number you want to print out 01 Domestic 02 Asia 03 Group A 04 Group Enter 1 6 05 06 02 Asia Would you like to...

Page 369: ...er4 Fax Settings Getting Started COPY Chapter1 COPY Chapter2 COPY Chapter3 FAX Chapter1 FAX Chapter2 FAX Chapter3 FAX Chapter4 Common Settings In This Case Appendix 3 191 Entering Group Names Printout...

Page 370: ...4 35 Reference Setting example An example of default settings for resolution when sending a fax and how to perform the settings is given below 1 Press SETTING Enter Speed Dial Copy Functions User Inst...

Page 371: ...ument type you can reduce the time and effort required when making changes Normal Fine S Fine Photo Background Contrast This sets the default level for contrast when a document is scanned By setting i...

Page 372: ...Speed Dial Copy Functions User Install Group Name Store Doc Settings Management Scanner Settings Settings Paper Settings Fax Functions Counter Select item to edit 2 Press Fax Functions Enter Default S...

Page 373: ...Set DRD Use the arrows or the numeric keypad to select the interval and select Enter Enter Cancel Redial Interval Input range 1 5 3 Min 5 1 Use or the numeric keypad to set the time be tween redial a...

Page 374: ...arper than with 400 dpi however it may result in memory over ow when the document is sent 600dpi 400dpi Rx Reduction Rate Select from Auto which automatically selects the magni cation accord ing to th...

Page 375: ...3 139 The connection number as Dial PreFix No can be entered to allow easy access to other phone networks Reference Providers See page 3 139 Receive Time Stamp If this is set to ON the received date y...

Page 376: ...to edit Other Lists 2 Press Settings List Enter Copy Settings Function List Fax Settings Settings List Select item to edit Scanner Settings Store Doc List Department List Macro List System Settings 3...

Page 377: ...Fax Settings Getting Started COPY Chapter1 COPY Chapter2 COPY Chapter3 FAX Chapter1 FAX Chapter2 FAX Chapter3 FAX Chapter4 Common Settings In This Case Appendix 3 199 Printing Fax Settings List Print...

Page 378: ...FAX Chapter4 Fax Settings 3 200...

Page 379: ...anagement 4 12 Register department numbers and names 4 14 Deleting department numbers and names 4 16 Department management settings 4 17 Faxing and copying using department management function 4 18 Pr...

Page 380: ...be entered in each key One step is equivalent to one selection or press of a key When steps are being entered in Macros the machine will emit a beeping sound and the screen keys COPY FAX SCANNER and...

Page 381: ...ed 1 Not registered Yes No 1 Not registered Do you want to enter edit After registering the process select Macro to save 4 Press Yes LTR LTR LGL 11x17 DuplexCopy OFF Contrast Auto Doc Type Auto Zoom 1...

Page 382: ...rocedures will be also entered Note When you have entered START The following message is displayed if START is pressed during an operation LTR LTR LGL 11x17 Doc Type Auto DuplexCopy OFF Contrast Auto...

Page 383: ...ormal Marco Select item to edit Delete Enter Edit Edit Title 3 Press Edit Title Edit Title Select a macro number to edit the title Enter 1 Sort Copy Reduce 81 6 Not registered 3 Not registered 4 Not r...

Page 384: ...r Edit Edit Title Delete 3 Press Delete Delete Select the macro number you want to delete Enter 1 Sort Copy Reduce 81 6 Not registered 3 Not registered 4 Not registered 5 Not registered 2 Department L...

Page 385: ...item to edit Other Lists Settings List 2 Press Settings List Enter Copy Settings Function List Fax Settings System Settings Settings List Select item to edit Scanner Settings Macro List Store Doc List...

Page 386: ...e 81 6 Not registered 3 Not registered 4 Not registered 5 Not registered 2 Department List Select the program number Select Enter to return to the previous menu 2 Press the macro key you want to run S...

Page 387: ...the program number Select Enter to return to the previous menu Enter 1 Sort Copy Reduce 81 6 Not registered 3 Not registered 4 Not registered 5 Not registered 2 Department List 2 Press Enter Enter Run...

Page 388: ...uto Doc Type Auto Zoom 100 Finishing No Sort Others Memory 100 Copy Ready 001 Set Example of Copy standby screen Soft key 1 Soft key 2 Soft key 3 Soft key 4 Soft key 5 1 Press SETTING Enter Speed Dial...

Page 389: ...r Cancel 1 Doc Type Doc Type Contrast Paper Zoom Finishing Combine Repeat SeriesCopy Margin EraseBordr EraseCentr TopUp Copy 6 1 Select the function you want to be displayed as a soft key 2 Press Ente...

Page 390: ...e 4 14 3 Turn on the Department Management Function see page 4 17 4 Use a department number to make copies and send faxes see page 4 18 5 Check the Department List for operation conditions see page 4...

Page 391: ...it Enter Copy 0 00 Page 4 Press Copy to register the copy charge and press Fax to regis ter the fax charge Cost Management Enter per page fax charge Enter Fax 0 00 Page Copy 0 00 Page Enter Cancel Fax...

Page 392: ...TING 2 Press Management Protect Passcode Management Select item to edit Enter 2 3 Copy Protect OFF SecurityRx OFF Line up OFF Cost Management Depart Management 3 1 Press or 2 Press Depart Management E...

Page 393: ...7 The department code is regis tered Next register the depart ment name Press Department Name 9 20 Domestic Sales_ Clear Cancel Enter Department Nam Upper Symbol Space 1 2 3 4 5 6 7 8 9 0 q w e r t y...

Page 394: ...t item to edit Protect OFF Delete 4 Press Delete 002 DEF Delete Select a number to delete Enter 001 Equipment 003 GHI 5 Select the department you wish to delete 002 DEF Delete Select a number to delet...

Page 395: ...3 1 Press or 2 Press Depart Management Enter Counter Reset Enter Edit Depart Management Select item to edit Protect OFF Delete Setting 4 Press Setting Enter Fax OFF Setting Select item to edit Copy OF...

Page 396: ...fice Houston Of fice Seattle Of fice London Off ice Paris Offi ce Hong Kong Office Tokyo Offi ce Domestic S ales Dep Overseas S ales Dep Broadcast OFF Contrast Normal Doc Type Standard Offhook Tx Repo...

Page 397: ...100 Sort NoSort Others Enter the department code and select Enter 001 Set Enter Cancel Depart Management Input range 000000000 999999999 000000000 3 Use or the numeric keypad to enter the department...

Page 398: ...ings List 2 Press Settings List Enter Copy Settings Fax Settings System Settings Settings List Select item to edit Scanner Settings Macro List Function List Department List Store Doc List 3 Press Depa...

Page 399: ...ds If the fax ex ceeds the maximum time it does not count further 5 Comm Pages Total printed pages of fax reception Counts the pages up to 999999 pages If the fax ex ceeds the maximum time it does not...

Page 400: ...Press Depart Management Enter Enter Edit Depart Management Select item to edit Protect OFF Delete Setting Counter Reset 4 Press Counter Reset Enter Enter Edit Depart Management Select item to edit Pro...

Page 401: ...2 Press Depart Management Enter Enter Edit Depart Management Select item to edit Delete Setting Protect OFF Counter Reset 4 Press Protect Enter Enter Edit Depart Management Enter the Passcode and sel...

Page 402: ...t List 3 Press Store Doc List Enter Settings List Select item to edit Copy Settings Fax Settings System Settings Scanner Settings Store Doc List Macro List Function List Department List Yes No Store D...

Page 403: ...gs In This Case Appendix 4 25 Printing List of Documents Stored in Memory Printout Example 1 2 3 4 1 Type This column shows the document type such as Polling Doc 2 Data KB This column shows how much m...

Page 404: ...ch screen You can check the total number of pages printed and scanned on the machine If the machine is used for duplex printing or scanning each side of the document will count as one print scan Meani...

Page 405: ...int Total or Scan Total 4 The number of pages used for each function will be displayed Enter Counter Print Total 00000000 Scan Total 00000000 Copy 00003715 Fax List 00002972 PC Print 00008637 Print To...

Page 406: ...Sample settings In this example settings are made for list paper 1 Press SETTING Enter Speed Dial Copy Functions User Install Group Name Store Doc Settings Management Scanner Settings Settings Paper S...

Page 407: ...cassette for the paper to be used in printing lists Selecting by paper size List Paper Select item to edit Enter Select by Cassette OFF Select by Paper Size Auto 1 Press Select by Paper Size List Pap...

Page 408: ...by Cassette OFF 1 Press Select by Cassette List Paper Select the desired cassette and select Enter Enter Select by Paper Size Auto Select by Cassette OFF Cancel Select by Cassette Cassette 4 Cassette...

Page 409: ...will automatically print the list on paper from a different cassette 3rd and 4th paper cassettes are displayed when installed in the machine Note Note Selecting by paper size AUTO Letter Legal 11 17 H...

Page 410: ...cannot specify the cassette you set to OFF for fax printing Note Note Settings ON OFF Select Cassette Cassette 1 Cassette 2 Cassette 3 Cassette 4 Bypass tray Prints to the top page ON OFF When turned...

Page 411: ...y functions and for functions designed to make operations easier Sample settings In this example settings are made for copy protect 1 Press SETTING Enter Speed Dial Copy Functions User Install Group N...

Page 412: ...and select Enter Enter 2 3 Line Up OFF Protect Passcode Copy Protect OFF Cost Management Depart Management Enter Cancel Copy Protect The selection of the Copy Mode screen can be prohibited OFF ON 5 P...

Page 413: ...time 1 to 10 minutes 3 minutes Sound Settings This allows you to set the various sounds Buzzer and Key Touch Volume You can adjust the volume of the various sounds emitted by the ma chine Key Touch T...

Page 414: ...de or sleep mode to normal state or vice versa Start Time When this is set to ON it sets the time for low power mode to start Reset Time When this is set to ON it sets the time for energy save mode to...

Page 415: ...stores and does not print documents received after security recep tion starting time This function makes it possible to store in memory faxes received at night for example when no one is in the of ce...

Page 416: ...Device Management can be printed out for checking 1 Press LIST Enter Speed Dial Group Journal List Settings List List Select item to edit Other Lists 2 Press Settings List Enter Copy Settings Functio...

Page 417: ...hapter4 Common Settings In This Case Appendix 4 39 Enter Settings List Select item to edit Copy Settings Function List Fax Settings Scanner Settings Store Doc List Department List Macro List System Se...

Page 418: ...st Enter Copy Settings Fax Settings Settings List Select item to edit Scanner Settings Macro List Function List System Settings Store Doc List Department List 3 Press Function List Enter Settings List...

Page 419: ...and Fax Function Settings Getting Started COPY Chapter1 COPY Chapter2 COPY Chapter3 FAX Chapter1 FAX Chapter2 FAX Chapter3 FAX Chapter4 Common Settings In This Case Appendix 4 41 Device Management Se...

Page 420: ...Common Settings for Copy and Fax Function Settings 4 42...

Page 421: ...r jam occurs in the large capacity cassette 5 11 Document Jams 5 12 Replacing Drum Cartridge Toner Bottle 5 14 Drum cartridge Toner bottle 5 14 Replacing toner bottle 5 15 Replacing drum cartridge 5 1...

Page 422: ...ring the guidance Note You can make the voice guidance start automatically by setting the OP Guid ance Mode to Auto see page 1 61 Reference CAUTION The fuser unit and the area around it are extremely...

Page 423: ...COPY Chapter3 FAX Chapter1 FAX Chapter2 FAX Chapter3 FAX Chapter4 Common Settings In This Case Appendix 5 3 Paper Jams If paper jam occurs in the fusing area Right cover release lever C1 1 Pull the r...

Page 424: ...Bin tray mounts the switchback unit Note Fuser guide 3 Open the fuser tray 4 Gently remove the jammed pa per If a switchback unit is installed Branch guide 5 Open the branch guide and gen tly pull ou...

Page 425: ...Appendix 5 5 Paper Jams 6 Gently pull out the paper jammed in the fuser unit 7 Gently remove the paper jammed at the transfer roller If the paper is as described below contact your Muratec dealer Pape...

Page 426: ...In This Case In This Case Maintenance and Troubleshooting 5 6 If a duplex unit is installed 8 Gently remove the paper jammed in the guide 9 Close the right cover A duplex unit is optional Note...

Page 427: ...3 FAX Chapter1 FAX Chapter2 FAX Chapter3 FAX Chapter4 Common Settings In This Case Appendix 5 7 Paper Jams If paper jam occurs in the duplex unit Duplex unit cover C5 1 Open the duplex unit cover C5 2...

Page 428: ...emove the paper in the bypass tray Slide plate 2 If you cannot remove the paper pull the knob C3 on the slide plate in the bypass tray and pull the slide plate towards you 3 Push down on the slide pla...

Page 429: ...on Settings In This Case Appendix 5 9 Paper Jams If paper jam occurs in the paper cassettes cassette 1 and cassette 2 1 Open the bypass tray Right lower cover 2 Pull the lever C2 on the right lower co...

Page 430: ...and Troubleshooting 5 10 If paper jam occurs in the paper cassettes cassette 3 and cassette 4 Right lower door 1 Pull the lever C4 on the right lower door and open the cover 2 Gently pull out the jamm...

Page 431: ...FAX Chapter1 FAX Chapter2 FAX Chapter3 FAX Chapter4 Common Settings In This Case Appendix 5 11 Paper Jams If paper jam occurs in the large capacity cassette Right lower door 1 Pull the lever C4 on th...

Page 432: ...document If the document cannot be re moved go to step 3 If the document jams an alarm will sound and a message will be displayed Remove the pa per carefully following the procedure Document jam Docum...

Page 433: ...to store Yes No Document jam Document jam 5 1 When the error message shown at right is displayed the remaining pages of the document can continue to be scanned 2 Press Yes to continue scan ning Contin...

Page 434: ...replaced after around 14 000 A4 sized copies made at a toner coverage of 6 Do not expose the drum cartridge to direct sunlight or strong light Do not expose it to ordinary indoor lighting for more tha...

Page 435: ...le 4 Pull out the empty toner bottle slowly The toner coverage is a value that indicates the amount of toner applied when printing a single page The number of pages previously described is only a roug...

Page 436: ...and down ve times Toner hopper Seal 7 With the seal on the toner bottle facing up set it in the toner hop per Seal Toner holder 8 Tilt it down until the toner holder locks Grab the seal on the toner b...

Page 437: ...rage is closed Do not turn off the power or open any other covers when supplying the toner Note Note Toner holder Toner hopper 9 Return the toner hopper until it clicks 10Close the front cover Replaci...

Page 438: ...ails of the unit and set the drum cartridge in the unit 5 Press down on the blue hook on the drum cartridge until it clicks 6 Close the right cover A new drum detected Press START 7 The screen to conf...

Page 439: ...ntenance Perform the following maintenance to ensure the unit functions properly all the time 1 Dip a soft cloth in a mild clean ing solution and wring it out thoroughly before wiping the unit with it...

Page 440: ...black line or other unwanted markings printed in copies or the re ceived document by receiving party To maintain high picture quality clean the ADF glass and document glass at least once a month Dirt...

Page 441: ...pter3 FAX Chapter4 Common Settings In This Case Appendix 5 21 Maintenance Cleaning contact glass inside the cover Wipe the ADF glass inside the cover ADF cover release lever A1 1 Lift the ADF cover re...

Page 442: ...and cov er pad A dirty platen cover plate or cover pad will cause black lines or other unwanted markings printed in copies or the received document by receiving party To maintain high picture quality...

Page 443: ...A dirty document feeder roller will not only make the document dirty but also cause black lines or other unwanted markings printed in copies or the received document by receiving party It can also cau...

Page 444: ...imes Input the receiving party s fax number and send the doc ument again If this message appears again call the receiving party to ask them to check the status of their machine 2 Check the phone line...

Page 445: ...edly contact your Muratec dealer Your machine s settings do not match with the receiving party s Check the settings on the receiving machine If the receiv ing party has special settings ask them to re...

Page 446: ...rty is ask them to resend the document R 1 5 Due to a line error communication failed If you know whom the sending party is ask them to resend the document If this error occurs repeatedly contact your...

Page 447: ...he speci ed cassette is pulled out Be sure to close the cassette Copy protected An attempt was made to change to the Copy screen in the copy protect mode 4 37 Document jam The document has jammed Take...

Page 448: ...INTERRUPT is pressed during printing this message is dis played until further operation is possible Preparing The printer is not ready to print Once it is ready the message will disappear please wait...

Page 449: ...e numeric keypad cannot be used 3 109 Command is full The number of reserved command has exceeded 100 Up to 100 re served commands can be registered Wait until the current reserved operations are comp...

Page 450: ...n though no transmis sions have been reserved 3 34 No Document No document in the F Code box Check the F Code reception information Print out the F Code document list and check to see if there is a do...

Page 451: ...e recipient for the reserved transmission has not been regis tered yet Set Fax Tel Ready Mode Attempting to turn on all fax forward settings in Tel mode Fax forward cannot be used in Tel mode Call for...

Page 452: ...paper in bypass tray The paper in the bypass tray has run out Supply paper to the by pass tray 1 32 Load paper for duplex copying Paper inappropriate for duplex copy Duplex copy is not available for t...

Page 453: ...paper Press Yes to continue copying 1 29 Please enter a value between 25 400 The entered ratio is incorrect Enter the size that will result in a correct ratio 2 20 2 58 Please input ratio within 25 4...

Page 454: ...pying During printing a list Printing will stop During the power failure Copy Cannot copy Fax transmission Cannot transmit Fax reception Cannot receive Making phone calls Cannot make phone calls Recei...

Page 455: ...munication 2 Name Registered in the following order 1 TTI number registered for the contact name 2 Space 3 Mode Resolution in the communication 4 Start Time The time the communication started 5 Time T...

Page 456: ...correctly 1 16 Is the type of phone line set cor rectly Make sure all settings match the phone line properties 1 53 The phone does not work Is the machine in the middle of transmitting a document Wait...

Page 457: ...th 120 mm These pages should be set on the document glass and kept separate from the other pages 1 42 Does not send even if dialing the num ber Is the type of phone line set cor rectly Make sure all s...

Page 458: ...and the wall outlet Make sure the line is connected correctly 1 16 Is the memory full Check how much memory is left Manual reception does not work Did you press START after putting the handset down P...

Page 459: ...paper other than that speci ed in this manual Use the paper speci ed in this man ual 1 26 White or black spots appear PRINTER You are using the wrong type of pa per Use the right type of paper 1 26 T...

Page 460: ...Contact your Muratec dealer Is the document facing the right side Set the document correctly 1 42 There are blank spots PRINTER PRINTER The paper is damp Replace with a new paper 1 29 You are using th...

Page 461: ...3 4 5 20 The edges of paper are dirty PRINTER The platen cover pad is dirty Clean the platen cover pad 5 22 Are you copying onto paper larger than the document With the ratio set to 100 Select paper...

Page 462: ...In This Case Maintenance and Troubleshooting 5 42...

Page 463: ...g Started COPY Chapte1 COPY Chapte2 COPY Chapte3 FAX Chapte1 FAX Chapte2 FAX Chapte3 FAX Chapte4 Common settings In This Case Appendix Appendix Main Speci cations a2 Main unit a2 Option related a3 Ind...

Page 464: ...card A6 F4 Executive Executive CM10 DL Custom Width 5 5 17 0 inches Length 3 9 11 7 inches Paper storage capacity Paper cassette Plain paper recycled paper 500 sheets 64 g m2 Bypass tray Plain paper r...

Page 465: ...1 Communication with machines not equipped with this mode is not available 2 Based on transmission of ITU T Test Document 1 to a Muratec fax machine Your transmission times will vary but your fax mac...

Page 466: ...r type Plain paper recycle paper Power Supplied from main unit Power consumption 10 W or lower Weight Approx 2 2 Kg 4 9 lb Machine dimensions W3 5 H16 5 D14 0 inches W89 H419 D358 mm Switchback Unit o...

Page 467: ...er2 COPY Chapter3 FAX Chapter1 FAX Chapter2 FAX Chapter3 FAX Chapter4 Common Settings In This Case Appendix a5 Main Speci cations 25 7 654 mm 23 7 602 mm 25 9 658 mm 43 7 1111 mm 33 7 856 mm 10 255 mm...

Page 468: ...96 Directional ratio magni cation 2 58 Directional size magni cation 2 60 Duplex 2 67 Erase border erase center 2 48 Erasing document shadows 2 48 Erasing the shadow around the document Topup copy 2...

Page 469: ...rding received documents Deleting forwarding conditions 3 84 Entering forwarding conditions 3 80 Printing a list of forwarding conditions 3 85 Settings 3 87 G Group Entering group names 3 188 Group tr...

Page 470: ...Rotate copy 2 6 Rotate transmission 3 196 S Safety information 1 5 Scan compression mode 2 97 Scan size xed transmission 3 134 Sectional transmission 3 134 Security reception Printing out reception do...

Page 471: ...MAI order number OMMFX2830 MML item number DA1 90100 60 Muratec America Inc 2004 Printed in Japan C Muratec America Inc 3301 E Plano Parkway Suite 100 Plano Texas 75074 http www muratec com...

Reviews: