Dual In-Line Memory Modules (DIMMs)
133
5
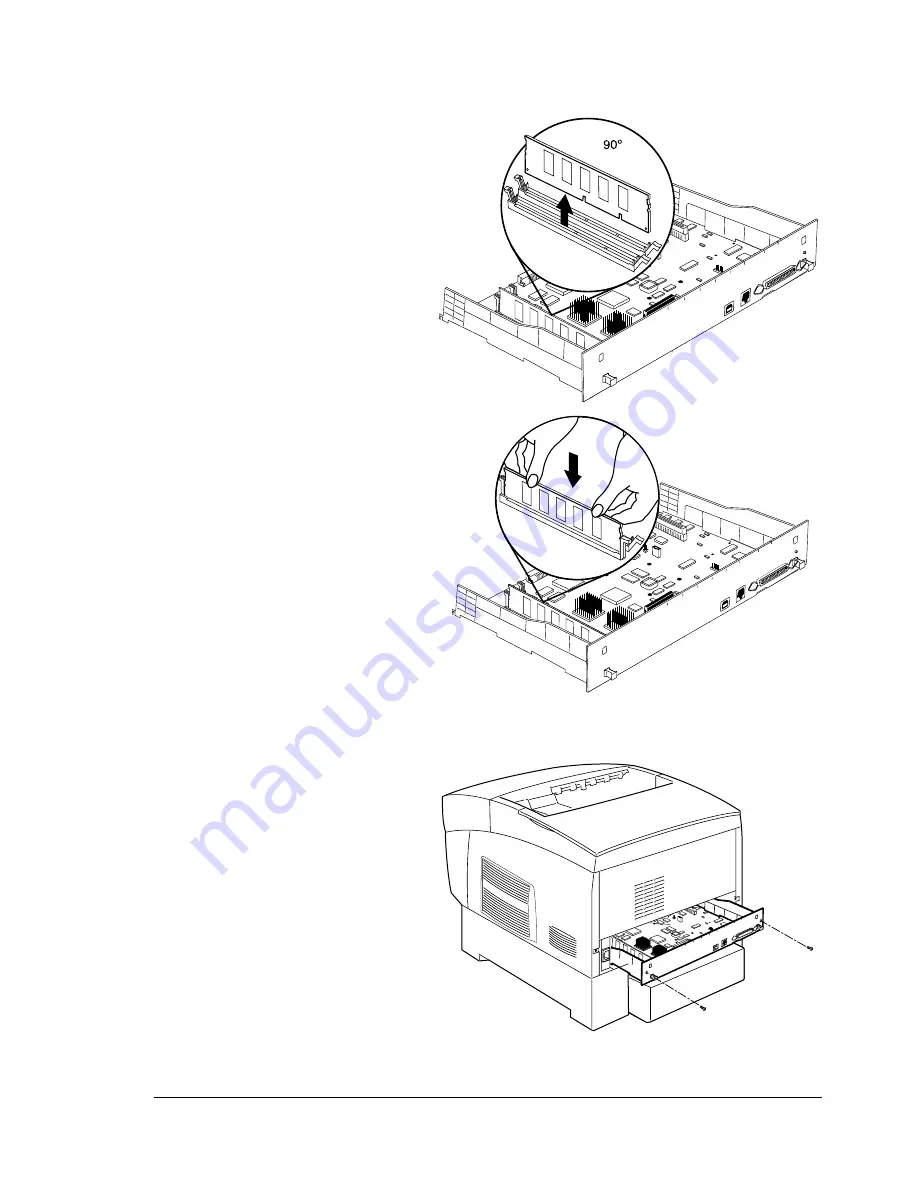
If you need to remove a DIMM before installing one, remove it as follows;
otherwise, skip to step 6.
a
Using both thumbs,
pull the latches (one
on each side of the
DIMM connector)
outward.
b
Lift the DIMM straight
out of the DIMM con-
nector.
6
Insert the new DIMM
straight down into the
DIMM connector until
the latches snap into the
locked position.
Observe the keyed side
of the DIMM to align it
with the connector.
When seated, the DIMM
stands upright, firmly in
place. If you cannot
snap the DIMM into
place, do not force it.
Reposition it, making sure that the bottom of the DIMM is seated com-
pletely in the connector.
7
Reinstall the controller
board into the printer.
Gently slide the
controller board into
the printer’s tracks
until it is fully seated,
and then tighten the
two screws.
8
Reconnect all
interface cables.
IIIIIIIIII
IIIIII
IIIIII
IIIIIIIII
IIIIIIIIII
IIIIII
IIIIIIII
IIIIIII
IIIIIII
IIIIIIIII
IIII
IIIIII
III
IIIIIIIII
IIIIIII
IIIIIIIIII
IIIIII
IIIIII
IIIIIIIII
IIII
IIIIIII
IIIIIIII
IIIIIIIIII
IIIIII
III
IIIIII
IIIIIIIIIIIIIIIIIIIIIIIIIIIIIIIIIIIIIIIIIIIIIII IIIIIIIIIIIIIIIIIIIIIIIIIIIIIIIIIII IIIIIIIII
................................................
........................
..........
................................................
........................
..
........
........
........
........
........
........
........
..
........
........
......
....
......
................................................
........................
..........
IIIIIIIIIIIIIIIIIIIIIIIIIIIIIIIIIIIIIIIIIIIIIII IIIIIIIIIIIIIIIIIIIIIIIIIIIIIIIIIII IIIIIIIII
IIIIIIIIIIIIIIIIIIIIIIIIIIIIIIIIIIIIIIIIIIIIIII IIIIIIIIIIIIIIIIIIIIIIIIIIIIIIIIIII IIIIIIIII
................................................ ........................ ..........
................................................ ........................ ..........
IIIIIIIIIIIIIIIIIIIIIIIIIIIIIIIIIIIIIIIIIIIIIII IIIIIIIIIIIIIIIIIIIIIIIIIIIIIIIIIII IIIIIIIII
IIIIIIII
IIIIIIII
IIIIIIII
IIIIIIII
IIIIIIII
IIIIIII
III
IIIIIIII
IIIIIIII
IIIIIIII
IIIIIIII
II
IIIIIII
IIIIIIII
IIIIIIII
IIIIIIII
IIIIIIII
IIIIIIII
IIIIIII
III
IIIIIIII
IIIIIIII
IIIIIIII
IIIIIIII
II
IIIIIII
Summary of Contents for MAGICOLOR 3300
Page 1: ...magicolor 3300 User s Guide 1800712 001A...
Page 8: ......
Page 9: ...1 Software Installation...
Page 20: ......
Page 21: ...2 Using Media...
Page 52: ......
Page 53: ...3 Color Printing...
Page 59: ...4 Replacing Consumables...
Page 80: ......
Page 81: ...5 Maintaining the Printer...
Page 88: ......
Page 89: ...6 Troubleshooting...
Page 133: ...7 Installing Accessories...
Page 157: ...A Technical Specifications...
Page 186: ......
Page 194: ......


