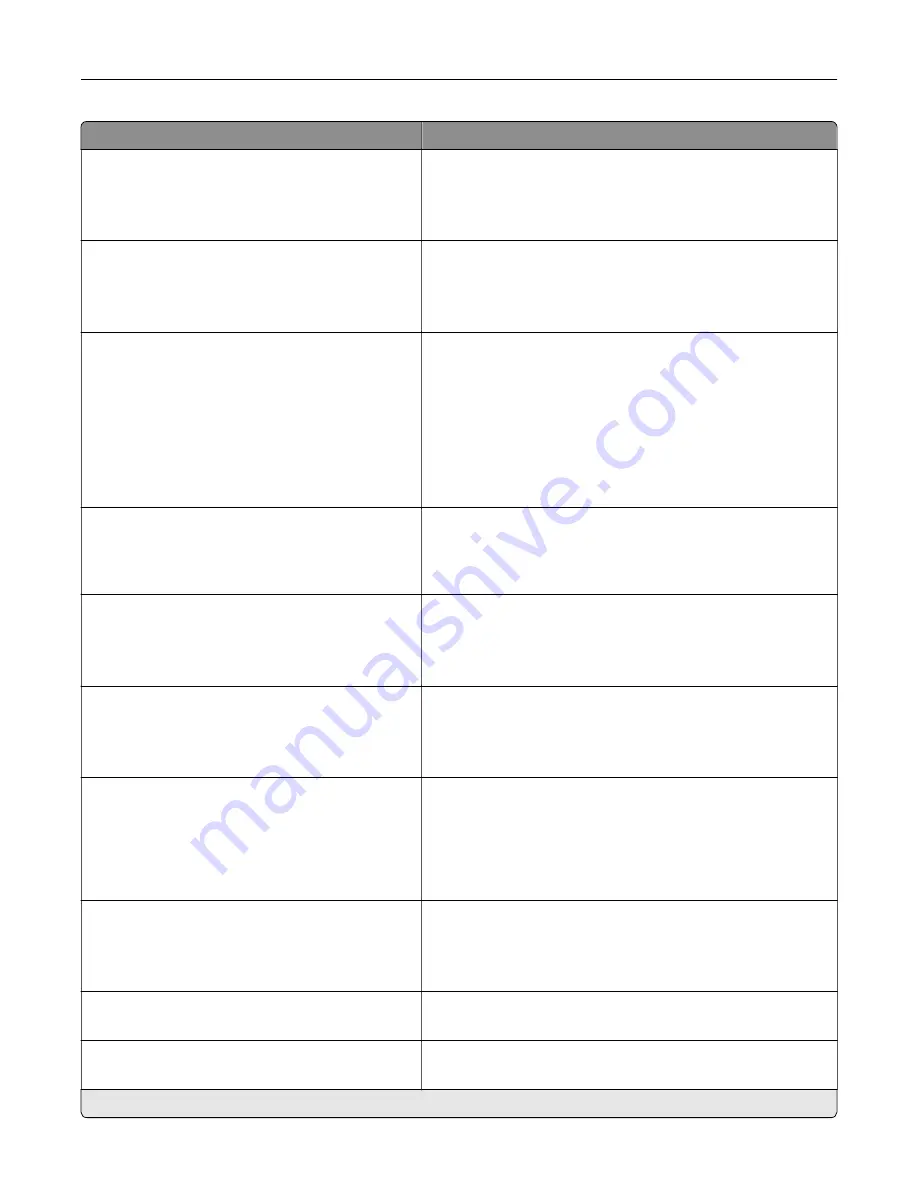
Menu item
Description
Fax Configuration
Fax Storage Location
NAND
Disk*
Set the storage location for all faxes.
Note:
This menu item appears only when a hard disk is
installed.
Print Configuration
Black Only Mode
Off*
On
Print non
‑
copy jobs in grayscale.
Print Configuration
Color Trapping
Off
1
2*
3
4
5
Enhance the printed output to compensate for misregistration
in the printer.
Print Configuration
Font Sharpening
0–150 (24*)
Set a text point-size value below which the high
‑
frequency
screens are used when printing font data.
For example, if the value is 24, then all fonts sized 24 points or
less use the high
‑
frequency screens.
Device Operations
Quiet Mode
Off*
On
Set the printer to operate in Quiet Mode.
Note:
Enabling this setting slows down the overall
performance of the printer.
Device Operations
Panel Menus
Enable*
Disable
Enable access to the control panel menus.
Device Operations
Safe Mode
Off*
On
Set the printer to operate in a special mode, in which it attempts
to continue offering as much functionality as possible, despite
known issues.
For example, when set to On, and the duplex motor is
nonfunctional, the printer performs one
‑
sided printing of the
documents even if the job is two
‑
sided printing.
Device Operations
Minimum Copy Memory
80 MB*
100 MB
Set the minimum memory allocation for storing copy jobs.
Device Operations
Clear Custom Status
Erase user
‑
defined strings for the Default or Alternate custom
messages.
Device Operations
Clear all remotely
‑
installed messages
Erase messages that were remotely installed.
Note:
An asterisk (*) next to a value indicates the factory default setting.
Understanding the printer menus
79
Summary of Contents for XC8155
Page 66: ...5 Touch Scan Here If necessary change the scan settings 6 Scan the document Scanning 66 ...
Page 176: ...3 Remove the pick roller 4 Unpack the new pick roller Maintaining the printer 176 ...
Page 195: ...2 Open door G 3 Pull out the staple cartridge holder Maintaining the printer 195 ...
Page 218: ...2 Open door G 3 Pull out the staple cartridge holder Clearing jams 218 ...
Page 222: ... Area J1 Areas J3 and J4 Areas J5 and J6 3 Close door J Clearing jams 222 ...
Page 227: ...5 Insert the staple cartridge holder 6 Close door J Clearing jams 227 ...
Page 287: ...4 Open the covers at the side of the caster base 5 Open door C Upgrading and migrating 287 ...


