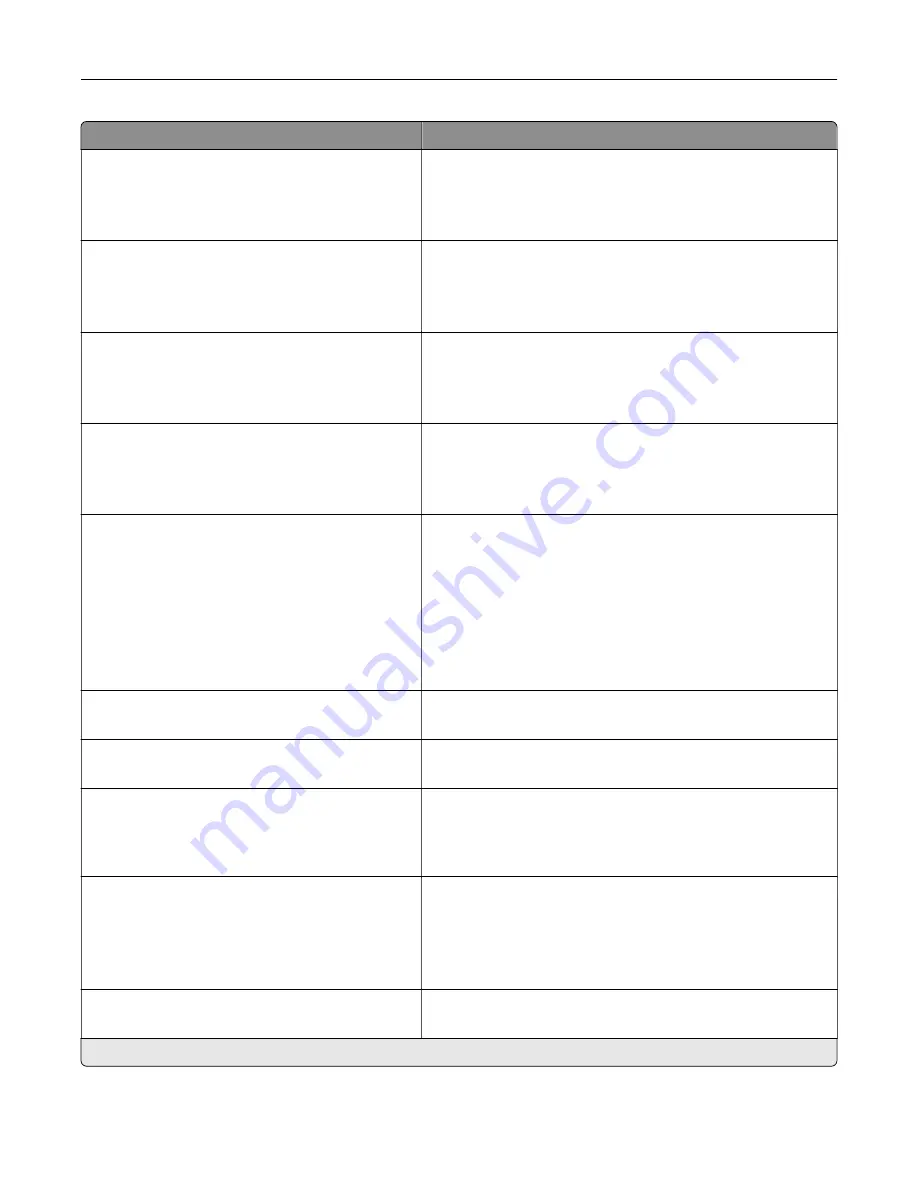
Menu item
Description
Device Operations
Automatically Display Error Screens
Off
On*
Show existing error messages on the display after the printer
remains inactive on the home screen for a length of time equal
to the Screen Timeout setting.
Device Operations
Honor orientation on fast path copy
Off*
On
Enable the printer to use the orientation setting under the Copy
menu when sending quick copy jobs.
Device Operations
Automatic Media Type Detection
Off
On*
Set the printer to detect the paper type of a page being loaded.
Device Operations
Enable Optional Parallel Port
Off*
On
Enable the optional parallel port.
Toner patch sensor setup
Calibration frequency preference
Disabled
Fewest color adjustments
Fewer color adjustments
Normal*
Better color accuracy
Best color accuracy
Set the printer to put down the correct amount of toner to
maintain color consistency.
Toner patch sensor setup
Full calibration
Run the full color calibration.
Toner patch sensor setup
Print TPS information page
Print a diagnostic page that contains information on toner patch
sensor calibration.
Scanner Configuration
Scanner Manual Registration
Print Quick Test
Print a Quick Test target page.
Note:
Make sure that the margin spacing on the target page
is uniform all the way around the target. If it is not, then the
printer margins must be reset.
Scanner Configuration
Scanner Manual Registration
Front ADF Registration
Rear ADF Registration
Flatbed Registration
Manually register the flatbed and ADF after replacing the ADF,
scanner glass, or controller board.
Scanner Configuration
Reset Maintenance Counter
Reset the counter after replacing the ADF maintenance kit.
Note:
An asterisk (*) next to a value indicates the factory default setting.
Understanding the printer menus
80
Summary of Contents for XC8155
Page 66: ...5 Touch Scan Here If necessary change the scan settings 6 Scan the document Scanning 66 ...
Page 176: ...3 Remove the pick roller 4 Unpack the new pick roller Maintaining the printer 176 ...
Page 195: ...2 Open door G 3 Pull out the staple cartridge holder Maintaining the printer 195 ...
Page 218: ...2 Open door G 3 Pull out the staple cartridge holder Clearing jams 218 ...
Page 222: ... Area J1 Areas J3 and J4 Areas J5 and J6 3 Close door J Clearing jams 222 ...
Page 227: ...5 Insert the staple cartridge holder 6 Close door J Clearing jams 227 ...
Page 287: ...4 Open the covers at the side of the caster base 5 Open door C Upgrading and migrating 287 ...


