Sequencer P1: EQ/Vector/Controller 1–5: Vector Volume Control
455
Equal Amount
[Off, On]
This applies only when
On
.
When
Equal Amount
is
On
, the Vector will fade
between all four Vector axes while maintaining a total
amount of 100%. This provides a smooth fade between
the different sounds, and is the type of volume control
used by classic vector synths.
Note that this will work best when the Programs
assigned to each of the four axes have equivalent
volumes. For instance, you might create a Song with
four Programs, each sounding at the same volume and
assigned to a different axis. You could then add a fifth
Program, assign it to one of the axes, and then reduce
the volumes of both Programs on that axis by 50%–so
that their combined volume is the same as any one of
the other Programs.
Also, when this is checked, the
parameters will be grayed out, since
Equal Amount
sets them automatically.
When
Equal Amount
is
Off
, the individual Track
parameters determine the way in
which Vector position affects volume.
Note:
For an interesting variation on this effect, turn
Equal Amount
Off
, and instead set all of the Track
Center Volumes
to
50%
. The Tracks will still fade
together smoothly, but with a more gentle effect
towards the extremes of the Vector axes.
1–5b: Vector Graphic
Vector Graphic
This shows a diagram of the vector space, including
the five points of the Vector EG (labeled 0–4) and the
current position of the Vector Joystick (labeled J).
The transitions between the EG’s points are shown by
black lines, and the loop transition is shown by a gray
line.
Show Volume Image
[Off, On]
The vector graphic includes an image representing the
Vector Volume Control settings for the current Track
(see
, below). You can use the
Show
Volume Image
check-box to toggle this part of the
graphic on and off.
Track Select
[01…16]
This selects the Track whose volume image will be
shown.
Show Point
[VJS, Vector EG Point 0…4]
You can view the volume and CC values for the
current position of the Vector Joystick, or for any of the
EG’s five points. This selects the point whose values
will be shown.
Track Volume & CC Display
This read-only display shows the volume and CC
values for the current Vector point, as selected by the
Show Point parameter, above.
Track 01
VJS Assign
[Off, +X, –X, +Y, –Y]
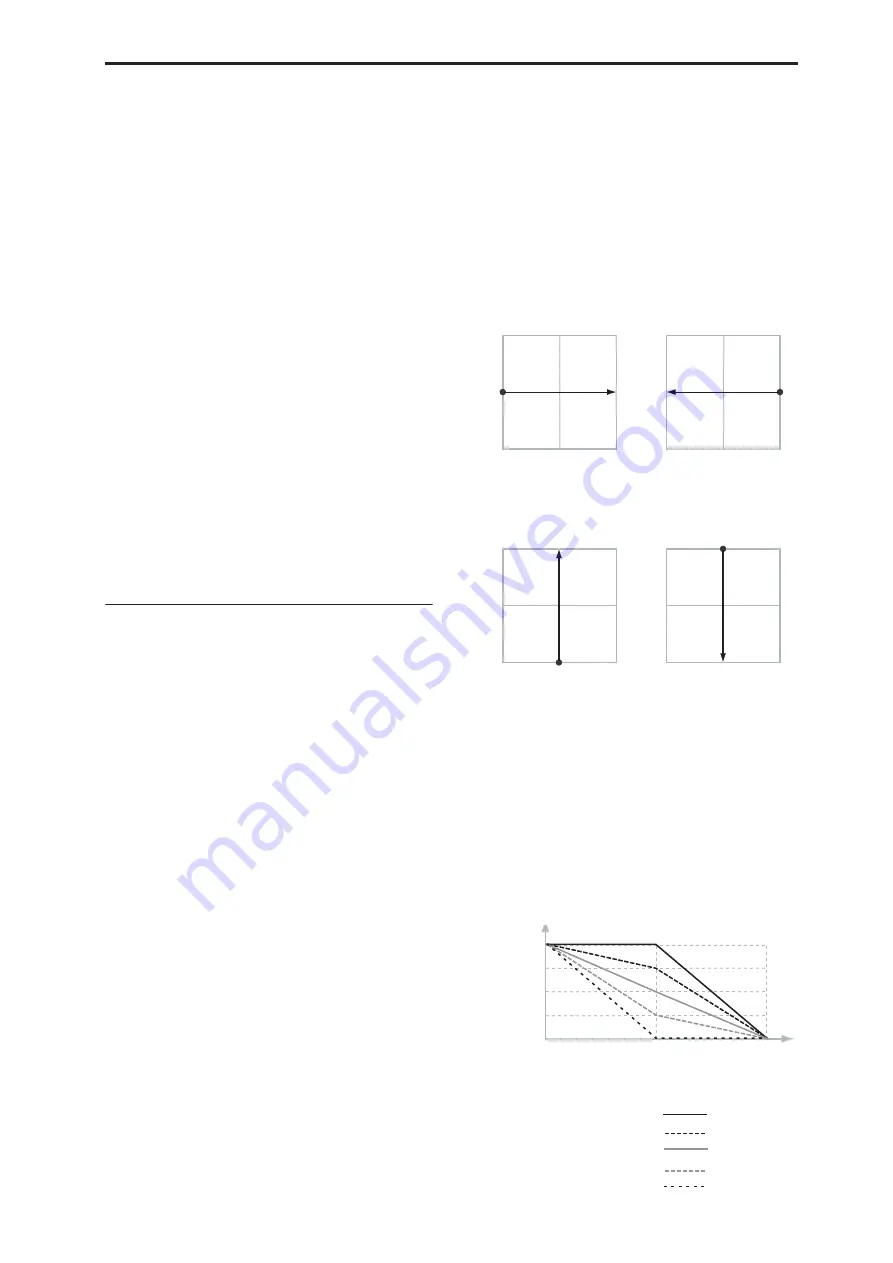
This assigns an axis of the Vector to control the Track’s
volume. See the diagram “VJS Assign and Program
Volume,” below, for more details.
Off
means that the Vector position will not affect the
Track’s volume.
VJS Assign and Program Volume
Center Volume
[0, 25, 50, 75, 100%]
This sets the volume of Track 1 at the center point. It
applies only when
Off
.
The volumes at the extreme ends of the axis are fixed,
depending on the setting of the
For instance, if
VJS Assign
is set to –X, the Track will
always be at 100% volume on the left side, and 0%
(silent) on the right side.
This parameter applies only to the Song Vector Volume
control, and does not change the Program’s individual
Vector Volume settings.
Track Center Volume, VJS Assign = –X
+127
–127
0
+X
0%
100%
+127
–127
0
–X
100%
0%
Program volume increases
from left to right.
Program volume increases
from right to left.
+127
–127
0
+Y
0%
100%
+127
–127
0
–Y
100%
0%
Program volume increases
from bottom to top.
Program volume increases
from top to bottom.
Volume 50%
100%
0%
Vector X-axis position
-127
0
+127
Center Volume Values:
100
75
50
25
0
Summary of Contents for Electronic Keyboard
Page 1: ...Parameter Guide Parameter Guide ...
Page 2: ......
Page 180: ...Program mode EXi 170 ...
Page 290: ...EXi STR 1 Plucked String 280 ...
Page 572: ...Sequencer mode 562 ...
Page 700: ...Global mode 690 ...
Page 751: ...Insert Effects IFX1 IFX12 Routing 741 Fig 2 3a Fig 2 3b ...
Page 902: ...Effect Guide 892 ...


