63
Mit der Taste
[
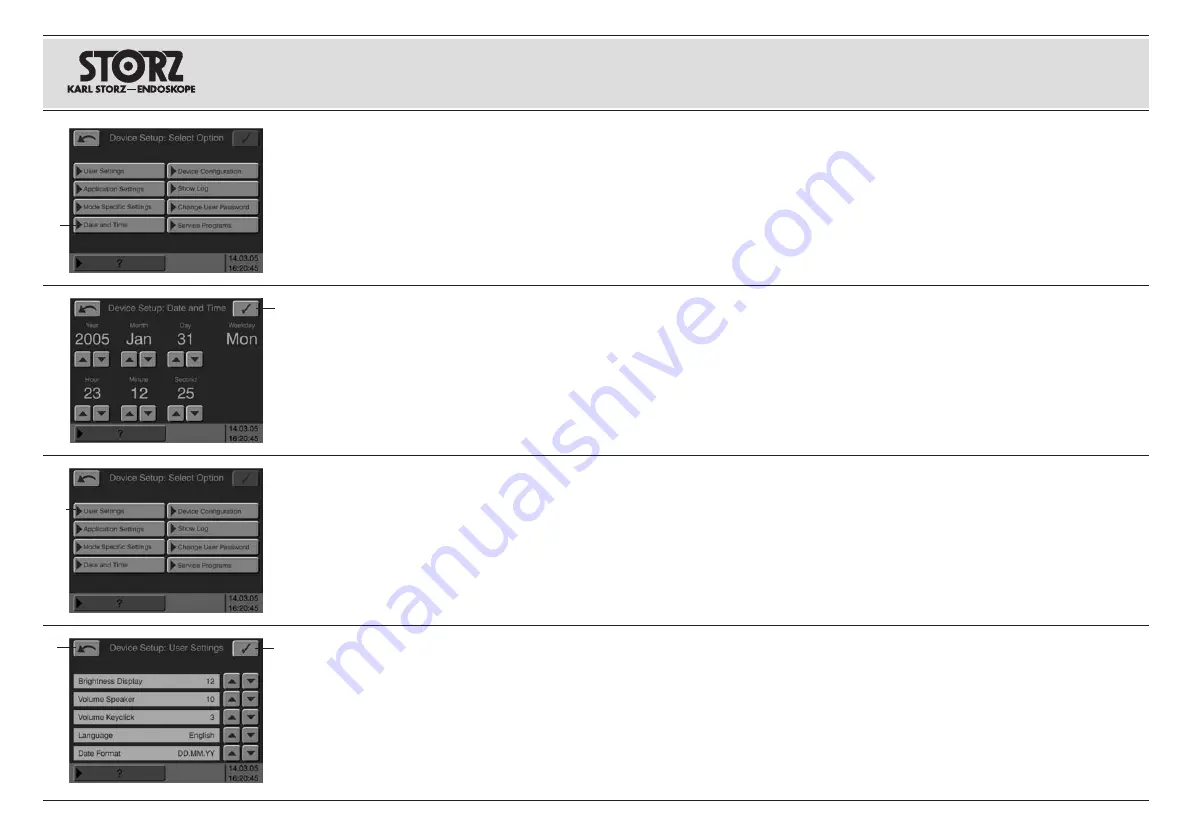
„Datum und Uhrzeit“ wechselt
man zum Bildschirm, in dem Datum und Uhrzeit
eingestellt werden.
Mit den Pfeil-Tasten unter den Feldern sind die
Einstellungen vorzunehmen. Nach der
Einstellung werden mit der Taste
E
die Werte
gespeichert und es erfolgt ein automatischer
Rücksprung zum Bildschirm
„Geräteeinstellungen: Auswahl Optionen“.
Hinweis:
Der Wochentag errechnet sich aus
dem Kalender. Hierfür ist keine Einstellung not-
wendig.
Das Format für die Darstellung des Datums kann
ebenfalls festgelegt werden. Mit der Taste
„Anwendereinstellungen“
]
kommt man zum
Bildschirm „Anwendereinstellungen“.
Mit den Pfeil-Tasten neben dem Feld „Date
Format“ wird das Format für das Datum ausge-
wählt: TT:MM:JJ, MM:TT:JJ oder JJ:MM:TT.
Mit Betätigung der Taste
E
werden die ausge-
wählten Eigenschaften dauerhaft gespeichert.
Mit Betätigung der Taste
R
gelangt man zurück
zum Bildschirm „Anwendereinstellungen“. Eine
weitere Betätigung bewirkt den Sprung zurück
zum Bildschirm „Prozedur-Liste“.
With the button
[
‘Date and Time’ the user can
switch to the screen used to set the date and
time.
The settings can be made using the arrow but-
tons under the fields. After selection, button
E
is
used to save the specifications, and the system
automatically returns to the ‘Device Setup: Select
Option’ screen.
Note:
The day of the week is calculated using
the calendar. Selection is not necessary here.
The format for display of the date can also be
selected. With the button ‘User Settings’
]
the
user can access the ‘User settings’ screen.
The arrow keys next to the field ‘Date Format’
are used to select the format for the date:
DD:MM:YY MM:DD:YY or YY:MM:DD.
If the user activates button
E
, the properties
selected will be permanently stored. If the user
activates button
R
, he will return to the screen
‘User Settings’. If the user activates this button
again, he will return to the ‘Procedure List’.
E
E
R
Con la tecla “Fecha y hora”
[
se conmuta a la
pantalla, en la que se ajustan la fecha y la hora.
Con las teclas de flecha bajo los paneles se rea-
lizan los ajustes. Tras el ajuste, se graban las
especificaciones mediante la tecla
E
y se pro-
duce un retorno automático a la pantalla
“Ajustes de aparato: selección opciones”.
Nota:
El día de la semana se calcula utilizando
el calendario. Para ello no se precisa de ningún
ajuste.
Se puede seleccionar también el formato para la
representación de la fecha. Con la tecla “Ajustes
de usuario”
]
se conmuta a la pantalla “Ajustes
de usuario”.
Con las teclas de flecha junto al panel “Date
Format” se selecciona el formato para la fecha:
DD:MM:YY, MM:DD:YY o YY:MM:DD.
Al accionar la tecla
E
se graban permanente-
mente las características seleccionadas.
Accionando la tecla
R
se retorna a la pantalla
“Ajustes de usuario”. Otro accionamiento produ-
ce el retorno a la pantalla “Lista de procedimien-
tos”.
[
]
Installation and
operating instructions
Aufstellen und
Bedienungshinweise
Montaje e instrucciones
operativas
Summary of Contents for 205352 20-1
Page 8: ......
Page 9: ...AUTOCON II 400 AUTOCON II 400 AUTOCON II 400 20 5352 20 11x 20 5352 20 11x 20 5352 20 11x ...
Page 10: ......
Page 13: ...III Geräteabbildungen Photographs of the equipment Imágenes del equipo ...
Page 14: ...IV W R Q Geräteabbildungen Photographs of the equipment Imágenes del equipo I O Y U T E ...
Page 146: ......
Page 152: ......
Page 156: ......
Page 158: ......
Page 172: ......
Page 186: ...Figure 4 11 Figure 4 12 Figure 4 13 4 14 12 06 V1 0 AUTOCON II 400 MODEL 205352 20 1 ...
Page 192: ......
Page 198: ......
Page 200: ......
Page 202: ......
Page 203: ......


