


-
10
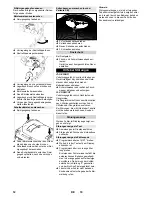
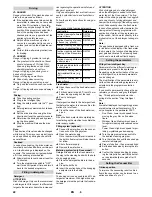
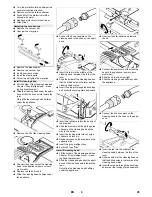
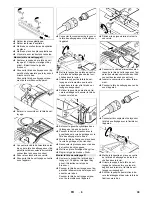
Insert the cylinder pin into the boring of
the drawbar.
Slide the drawbar with the pin the guide
channel on the cleaning head all the
way to the bottom and lock.
Repeat process on the drawbar on the
opposite side.
Insert the grey intelligent key.
Set brush type "Brush".
Press in the locking plate and swivel the
drawbar upward.
The subsequent removal will take place in
the opposite order of the installation.
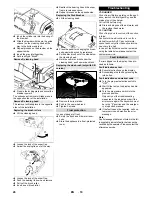
The removal will take place in the opposite
order of the installation.
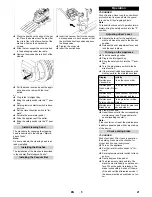
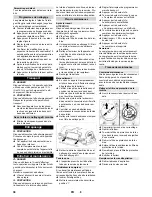
Lift the cleaning head.
Loosen the lock of the wiper flap.
Swivel the wiping flap out of the way.
Loosen the lock of the wiper flap.
Push the bearing lid down and remove.
Pull out the brush roller.
Insert a new brush roller.
Reattach the bearing lid and the wiper
flap in reverse sequence.
Repeat process on the opposite side.
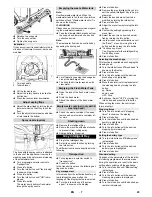
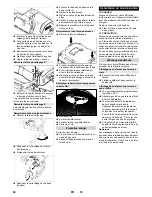
Lift the cleaning head.
Press the pedal for changing the brush-
es downward beyond its resistance.
Pull the disc brush out of the side below
the cleaning head.
Hold the new disc brush under the
cleaning head, push upward and lock.
Loosen 3 screws.
Remove the wiper blade.
Push in the new side brush.
Tighten 3 screws.
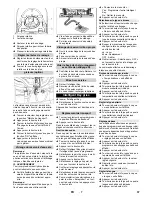
In case of danger of frost:
Empty the fresh and dirt water reser-
voirs.
Store the appliance in a frost-protected
room.
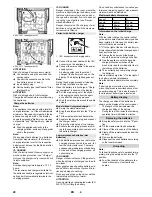
DANGER
Risk of injury! Before working on the appli-
ance, remove the Intelligent Key and the
mains plug of the charger.
Pull out the battery plug.
Drain and dispose of the dirt water and
the residual fresh water.
몇
CAUTION
Risk of injury due to overrun of the suction
turbine.
Suction turbine will continue to run for a
while after switch-off. Carry out mainte-
nance tasks only after the suction turbine
has come to a halt.
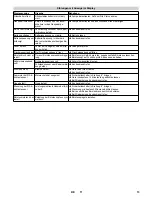
In case of faults that cannot be remedied
using the table below please contact the
customer service.
If errors appear on the display, then pro-
ceed as follows:
Execute instructions on the display.
Acknowledge the fault by pressing the
info button.
Turn the program selection switch to
"OFF".
Wait till the text on the display has dis-
appeared.
Turn the programme switch into the
previous position.
Only carry out the troubleshooting
measures in the indicated order if the
error occurs again. The key switch must
be in the "0" position and the emergen-
cy stop button pressed.
If the fault cannot be repaired, call cus-
tomer service and mention the error
message.
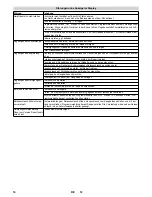
Note:
Fault messages that are not listed in the fol-
lowing table indicate faults that cannot be
rectified by the operator. Please contact the
aftersales service.
Remove D cleaning head
Remove R cleaning head
Replacing the brush rollers
Replacing the Disk Brushes
Replacing the side brush (only with SB
version)
Frost protection
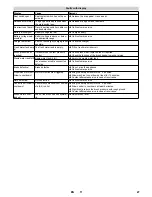
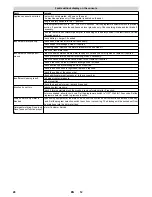
Troubleshooting
Fault indication
Fault indication as text
Fault indication as numerical code
26
EN
Summary of Contents for B 150 R
Page 2: ...2...
Page 161: ...5 30 0 0 Intelligent Key 1 0 0 Intelligent Key 1 2 0 161 EL...
Page 164: ...8 up down OFF OFF Intelligent Key 10 10 Adv 15 Intelligent Key R D 164 EL...
Page 165: ...9 R R Intelligent Key 1 YES K rcher Intelligent Key D 165 EL...
Page 166: ...10 Intelligent Key Disk Intelligent Key Intelligent Key Brush D D D 166 EL...
Page 167: ...11 3 3 Intelligent Key OFF 0 SB 167 EL...
Page 168: ...12 Timeout 0 15 A4 0 5 168 EL...
Page 169: ...13 1 OFF 10 D OFF 10 Dose Dose 169 EL...
Page 190: ...5 V 30 0 0 1 0 0 1 190 RU...
Page 192: ...7 3 Dose 0 FACT Fine Clean Whisper Clean Power Clean 10 5 1 2 1 ON 192 RU...
Page 193: ...8 Yes No up down OFF OFF 10 10 Adv 15 R D 193 RU...
Page 194: ...9 R R R 1 K rcher D 194 RU...
Page 195: ...10 Disk Brush R D R 195 RU...
Page 196: ...11 3 3 OFF 0 SB 196 RU...
Page 197: ...12 0 15 A4 0 5 197 RU...
Page 198: ...13 1 OFF 10 R OFF 10 Dose Dose 198 RU...
Page 317: ...5 30 0 0 1 0 0 1 317 BG...
Page 319: ...7 FACT Fine Clean Whisper Clean Power Clean 10 5 1 2 ON R 319 BG...
Page 320: ...8 up down OFF OFF 10 10 Adv 15 R D 320 BG...
Page 321: ...9 R R 1 YES K rcher D 321 BG...
Page 322: ...10 Disk Brush R D R 322 BG...
Page 323: ...11 3 3 OFF 0 SB 323 BG...
Page 324: ...12 0 15 A4 0 5 324 BG...
Page 325: ...13 1 OFF 10 R OFF 10 Dose Dose 325 BG...
Page 374: ...5 V 30 0 0 1 0 0 1 374 UK...
Page 376: ...7 FACT Fine Clean Whisper Clean Power Clean 10 5 1 2 1 ON R 376 UK...
Page 377: ...8 Yes No up down OFF OFF 10 10 Adv 15 R D 377 UK...
Page 378: ...9 R R 1 K rcher D 378 UK...
Page 379: ...10 Disk Brush R D R 379 UK...
Page 380: ...11 3 3 OFF 0 SB 380 UK...
Page 381: ...12 0 15 A4 0 5 381 UK...
Page 382: ...13 1 OFF 10 R OFF 10 Dose Dose 382 UK...
Page 385: ...eee PeDraaDr ass 385 AR...
Page 387: ...9 FOO 95 R FOO 95 esoD esoD 387 AR...
Page 388: ...FOO 5 5 95 A0 5 5 388 AR...
Page 389: ...xrpoa e R Bx 389 AR...
Page 390: ...eaoP R 390 AR...
Page 391: ...R R 9 SEB RARA ER e 391 AR...
Page 392: ...95 95 95 e R 392 AR...
Page 393: ...FO R pC nseF FOO FOO 393 AR...
Page 394: ...esoD 3 esoD 5 OAAF OaFD AeDeF naaoCDr AeDeF kseDr AeDeF 95 5 1 2 394 AR...
Page 396: ...9 5 5 9 396 AR...
Page 397: ...1 5 EN 50272 T3 A x 600 ss 396 ss 915 ss 936 ss 645 ss 325 ss V V 5 5 397 AR...
Page 399: ...1 2 3 4 5 6 7 1 2 3 4 5 6 7 8 399 AR...
Page 401: ...5 152659 5 5 5 05 9 401 AR...
Page 402: ......
Page 403: ......
Page 404: ...http www kaercher com dealersearch...


