J4350 and J6350 Services Router Getting Started Guide
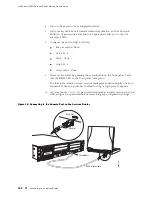
To connect to the J-Web interface through port 0 on the router (see Figure 35):
1.
On the management device, such as a PC or laptop, you use to access the
J-Web interface, verify that the address of the port that you connect to the
router is set to one of the following:
An Ethernet address on the
192.168.1/24
subnetwork other than
192.168.1.1
An Ethernet address from a DHCP server
2.
Turn off the power to the management device.
3.
Plug one end of the Ethernet cable into the Ethernet port on the management
device.
4.
Connect the other end of the Ethernet cable to the built-in Ethernet port
on the router.
5.
Power on the router by pressing the power button on the front panel.
6.
Wait until the
STATUS
LED on the front panel turns solid green.
7.
Turn on the power to the management device. The router assigns an IP
address to the management device within the
192.168.1.0/24
subnetwork if the
device is configured to use DHCP.
8.
From the management device, open a Web browser and enter the IP address
192.168.1.1
in the address field. The Set Up Quick Configuration page appears.
9.
Configure basic settings for your router as described in “Configuring Basic
Settings with J-Web Quick Configuration” on page 105.
NOTE:
You must manually configure the IP address for the management port
you are using before you save your initial configuration. When you save the
configuration for the first time, you will lose the connection to the router if you
have not manually configured the IP address. If you lose connection through the
management interface, you must connect through the console port.
100
Connecting to a Services Router
Summary of Contents for J4350
Page 14: ...J4350 and J6350 Services Router Getting Started Guide xiv Table of Contents...
Page 22: ...2 J series Overview...
Page 68: ...J4350 and J6350 Services Router Getting Started Guide 48 Field Replaceable PIMs...
Page 75: ...Services Router User Interface Overview Figure 25 J Web Layout Using the J Web Interface 55...
Page 88: ...J4350 and J6350 Services Router Getting Started Guide 68 Using the Command Line Interface...
Page 90: ...70 Installing a Services Router...
Page 100: ...J4350 and J6350 Services Router Getting Started Guide 80 Site Preparation Checklist...
Page 112: ...J4350 and J6350 Services Router Getting Started Guide 92 Powering a Services Router On and Off...
Page 144: ...J4350 and J6350 Services Router Getting Started Guide 124 Verifying Secure Web Access...
Page 162: ...142 Maintaining Services Router Hardware...
Page 194: ...J4350 and J6350 Services Router Getting Started Guide 174 Troubleshooting Hardware Components...
Page 204: ...184 J series Requirements and Specifications...
Page 220: ...J4350 and J6350 Services Router Getting Started Guide 200 ISDN RJ 45 Connector Pinout...
Page 267: ...Part 5 Index Index 247...
Page 268: ...248 Index...


