background image

2

USING A microSD CARD

2-14


Importing or Exporting a CSV format file

Please read this section before importing or exporting a 
Comma Separated Values (CSV) format file to or from 
the microSD card.
You can import or export the following data:
• Your Call Sign Memory
• Repeater List
• GPS Memory


D

Importing

TIP:

 Before importing, make a backup file of all the 

transceiver’s data to the microSD card in case of data 
loss.

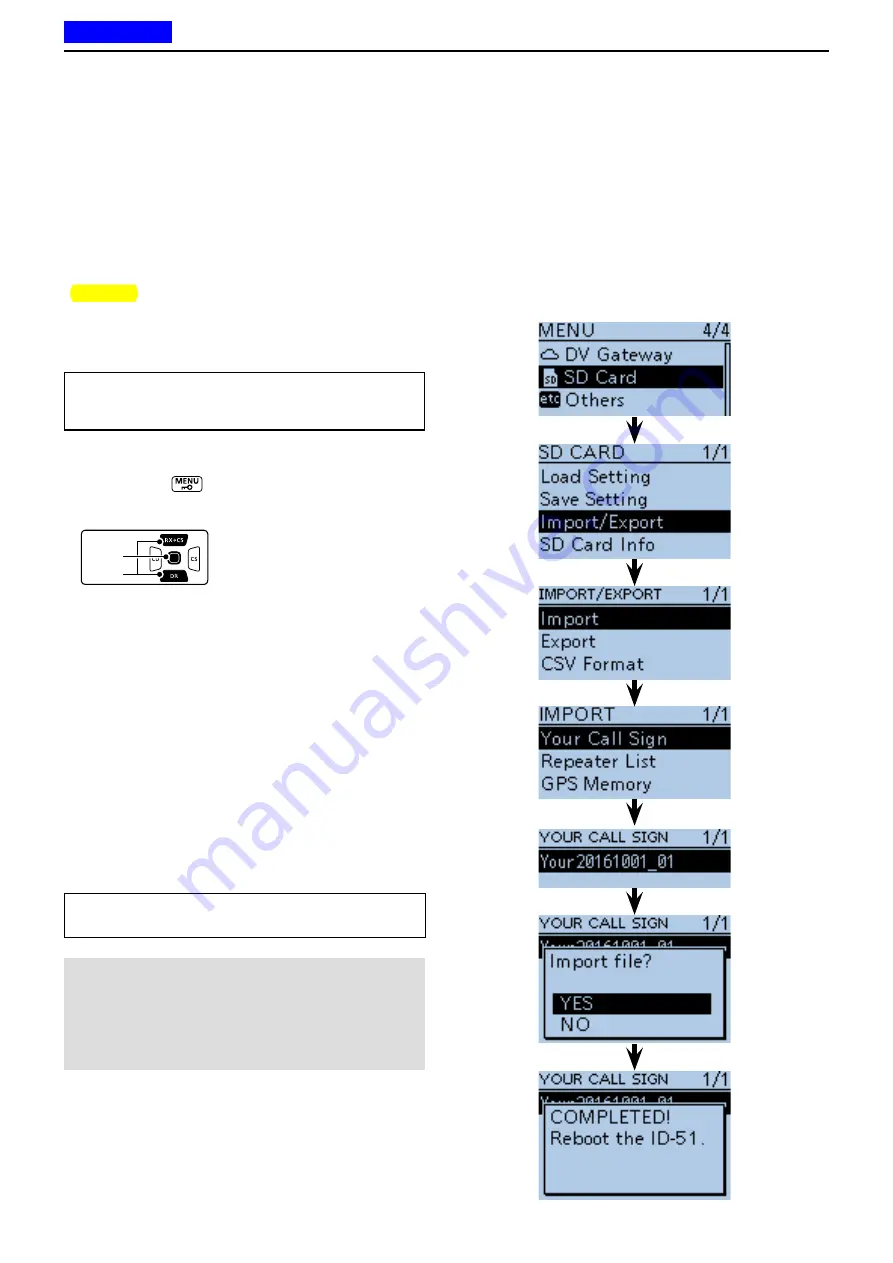
Example: Importing the Your Call sign memory.


q

 Push  [MENU]

 to enter the Menu screen.


w

 Push  D-pad(

) to select the root item (“SD Card”), 

and then push D-pad(Ent) to go to the next level.

D-pad

(

)

(Ent)

  ( MENU > SD Card > Import/Export > Import > 

Your 

Call Sign

)


e

 Refer to the menu sequence shown directly above 
and push D-pad(

) to select, and then push D-

pad(Ent) to enter, one or more times until the last 
screen is displayed.


r

Push D-pad(

) to select the CSV file to import.

 (

Example: 

Selecting “Your20161001_01”)


t

 Push  D-pad(Ent).

  •  “Import file?” appears.


y

 Push  D-pad(

) to select “YES,” and then push D-

pad(Ent).

  • Starts to import.
  •  

After importing ends, “COMPLETED! Reboot the ID-51.” 
appears.


u

To complete the importing, reboot the transceiver.

NOTE:

 The transceiver cannot display a file that has a 

file name longer than 16 characters.
In this case, rename it using 15 characters or less.
When you export the data in a CSV format file using 
the CS-51PLUS2 (contained in the CD), make sure to 
name it using 15 characters or less.

TIP:

 To import a Repeater List, see step 

t

 on page 

2-10 for details.

Previous view

Summary of Contents for ID-51A

Page 1: ... BASIC 7 D STAR INTRODUCTION 6 BC RADIO OPERATION 5 BASIC OPERATION 4 BATTERY CHARGING 3 PANEL DESCRIPTION 2 USING A MICROSD CARD 1 ACCESSORY ATTACHMENT 16 MENU SCREEN 17 OTHER FUNCTIONS 18 OPTIONS 19 SPECIFICATIONS INDEX INTRODUCTION To update the repeater list click here Instructions for advanced operations and additional details are described in this manual See the Basic manual to begin D STAR ...

Page 2: ...reset to the default value The current frequency offset Rotate DIAL then push D pad Ent Push QUICK Push D pad Ent DIAL The current frequency offset NOTE The frequency offset cannot be changed while using the DR function cy offset Depending on the frequency offset value the off band indication OFF appears on the display when PTT is pushed p 15 5 Previous view The Auto repeater function uses the pre...

Page 3: ...or search screen or advanced search screen Printing out the desired pages Click Print in File menu and then select the paper size and page numbers you want to print The printing setup may differ depending on the printer Refer to your printer s instruction manual for details Select A4 size to print out the page in the equal ized size Read Out Loud feature The Read Out Loud feature reads aloud the t...

Page 4: ...1 1 Section 1 ACCESSORY ATTACHMENT Antenna 1 2 Battery pack 1 2 Belt clip 1 3 Hand strap 1 3 Previous view ...

Page 5: ...l current still flows in the transceiver Remove the battery pack or case from the transceiver when not using it for a long time Otherwise the battery pack or installed batteries will become exhausted The battery protection function automatically sets transceiver to Low1 power 0 5 W when the temper ature is around 0 C 32 F or below In this case transmit power selections High Mid and Low2 are disabl...

Page 6: ...kes a click sound To detach the belt clip q q Remove the battery pack from the transceiver if it is attached p 1 2 w w Lift the tab up q and slide the belt clip in the direc tion of the arrow w Hand strap To facilitate carrying the transceiver slide the hand strap through the loop on the top of the rear panel as illustrated to the right Hand strap q w Tab Belt clip To attach To detach Battery pack...

Page 7: ... card 2 5 Saving data onto a microSD card 2 6 Saving with a different file name 2 8 Loading the saved data files that are on the microSD card 2 10 Backing up the data stored on the microSD card onto a PC 2 12 D D About the microSD card s folder 2 12 D D Making a backup file on your PC 2 13 Importing or Exporting a CSV format file 2 14 D D Importing 2 14 D D Exporting 2 15 Previous view ...

Page 8: ...ion Position data from the GPS receiver Position and time data from a GPS receiver that is in a log file as a route Voice Recorder The microphone audio Saving data onto the microSD card NOTE Before using the microSD card read the microSD card instructions thoroughly If you do any of the following the microSD card data may be corrupted or deleted Remove the microSD card from the transceiver while a...

Page 9: ... a microSD card is inserted completely close the micro SD slot cover as shown to the right Wrong Correct Close the cover leaving no gap Terminals facing the front microSD card micro SD slot Inserting the microSD card Slot cover NEVER forcibly or in versely insert the card It will damage the card and or the slot NOTE If you use a brand new microSD card format it by doing the steps below Formatting ...

Page 10: ...elect Format and then push D pad Ent The dialog Format OK appears t t Push D pad to select YES and then push D pad Ent to format The formatting starts and the display shows the format ting progress NEVER turn OFF the power while formatting y y After formatting the display automatically returns to the SD CARD menu u u Push MENU to exit the MENU screen Appears when the microSD card is inserted Shows...

Page 11: ... qPush MENU w w Push D pad to select the root item SD Card and then push D pad Ent D pad Ent e e Push D pad to select Unmount and then push D pad Ent The dialog Unmount OK appears r r Push D pad to select YES then push D pad Ent to unmount t t When unmounting is completed Unmount is com pleted is displayed and then the screen automati cally returns to the SD CARD menu y y Push MENU to exit the MEN...

Page 12: ... Card and then push D pad Ent D pad Ent e e Push D pad to select Save Setting and then push D pad Ent r r Push D pad to select New File and then push D pad Ent The FILE NAME screen is displayed The file name is automatically named in the following for mat Setyyyymmdd_xx yyyy Year mm month dd day xx serial number Example If a 2nd file is saved on October 1 2016 the file is named Set20161001_02 If y...

Page 13: ...lect Save Setting and then push D pad Ent r r Push D pad to select the desired file to be over written and then push D pad Ent Example Selecting Set20161001_01 The confirmation screen Overwrite appears t t Push D pad to select YES and then push D pad Ent to overwrite the setting file While saving a progress bar is displayed then the SD CARD screen is displayed after the save is completed y y Push ...

Page 14: ...tion window About text entry Push D pad to move the cursor forward or backward While selecting a character push QUICK to change the character to a upper case or lower case letter While selecting a digit push QUICK to open the in put mode selection window Push D pad to select the desired upper case letter lower case letter number or symbol To enter symbols select and then push D pad Ent to open the...

Page 15: ...of up to 15 characters including spaces Example My Data o oAfter entering the name push D pad Ent After pushing D pad Ent Save file appears D pad Ent 0 Push D pad to select YES and then push D pad Ent to save the file While saving a progress bar is displayed then the SD CARD screen appears after the save is completed 1Push MENU to exit the MENU screen Previous view ...

Page 16: ...lect the root item SD Card and then push D pad Ent D pad Ent e e Push D pad to select Load Setting and then push D pad Ent r r Push D pad to select the desired file to be load ed and then push D pad Ent Example Selecting Set20140801_01 The LOAD FILE screen appears t t Push D pad to select the desired loading con tent as shown below ALL Loads all memory channels item settings in the menu list and t...

Page 17: ...ted the skip settings of the Repeater List are retained p 9 39 i iPush D pad Ent Load file appears o o Push D pad to select YES then push D pad Ent to start the file check While checking the file CHECKING FILE and a prog ress bar are displayed 0After checking settings data loading starts While loading LOADING and a progress bar are dis played 1 After loading COMPLETED Reboot the ID 51 ap pears To ...

Page 18: ...g data is stored in the csv format i iReply folder Automatic reply data is stored in the wav format o oRxLog RX record log data is stored in the csv format 0 Setting folder The transceiver s setting data is stored in the icf format 1 Voice folder The recorded QSO audio date folders are created in the Voice folder 2 yyyymmdd folder Recorded audio file is stored in the wav format The folder name is ...

Page 19: ... eSelect Removable disk and then right click r rClick Copy t t Open the desired folder to copy to then right click and then click Paste to copy the data that is in the microSD card onto the hard disk Example Copying into the Backup folder in C drive y y When removing the microSD card from the PC click the microSD card icon in the task bar icon in the screen shot as shown to the right The screen sh...

Page 20: ...Your Call Sign e e Refer to the menu sequence shown directly above and push D pad to select and then push D pad Ent to enter one or more times until the last screen is displayed r rPush D pad to select the CSV file to import Example Selecting Your20161001_01 t t Push D pad Ent Import file appears y y Push D pad to select YES and then push D pad Ent Starts to import After importing ends COMPLETED R...

Page 21: ... D pad to select New File The FILE NAME screen appears The file name is automatically named in the following for mat Your yyyymmdd_xx yyyy Year mm month dd day xx serial number Rpt is displayed for a Repeater List and Gps is dis played for a GPS memory If you want to change the file name see page 2 8 for entry details t t Push D pad Ent Export file appears y y Push D pad to select YES and then pus...

Page 22: ...3 1 Section 3 PANEL DESCRIPTION Front top and side panels 3 2 Function display 3 5 Previous view ...

Page 23: ... While holding down this key rotate DIAL to ad just the squelch level p 5 8 yPOWER KEY Hold down for 1 second to turn the transceiver power ON or OFF p 5 2 uMENU LOCK KEY MENU Push to enter or exit the Menu screen p 16 2 Hold down for 1 second to toggle the Key Lock function ON or OFF p 5 12 iMODE SCAN KEY MODE SCAN Push to select the operating mode p 5 9 Selectable operating modes are AM FM FM N ...

Page 24: ... to audibly an nounce the displayed frequency operating mode or call sign p 17 6 6 MEMORY CALL SELECT MEMORY WRITE KEY M CALL S MW In the VFO mode push once to enter the Memory selection mode push again to en ter the Call channel mode p 8 3 For ID 51A only In the Call channel mode push once to enter the Weather channel mode Hold down for 1 second to enter the Select Memory Write mode p 12 4 7 VFO ...

Page 25: ...e in the DR screen or with the Menu screen or Quick Menu screen open push to move the value or option selector bar up p 16 2 0 EXTERNAL MICROPHONE SPEAKER JACK MIC SP Connect a cloning cable optional speaker micro phone or headset if desired See Section 18 for a list of available options TIP Be sure to turn OFF the power before connect ing or disconnecting optional equipment to or from the MIC SP ...

Page 26: ...ars when Packet Loss has occurred p 9 14 appears when the Automatic Reply function is selected p 9 11 tDUPLEX ICON p 15 5 DUP appears when plus duplex is selected and DUP appears when minus duplex is selected yBC RADIO ICON p 6 2 Appears when the BC radio is ON uGPS GPS ALARM ICON Appears while GPS function is in use p 10 2 Stays ON when the GPS receiver is activated and valid position data is rec...

Page 27: ...ing DTCS code and polarity Au dio is heard D TSQL D blinks When you transmit the selected DTCS code is superimposed on your normal signal When you receive the tone squelch opens only for a signal that includes a matching tone frequency Audio is heard T TSQL T blinks When you transmit the selected sub audible tone is superimposed on your normal signal When you receive the tone squelch opens only fo...

Page 28: ...when the Memory mode is selected 9S RF METER Shows the relative signal strength of the receive signal Shows the output power level of the transmit signal p 5 11 0POWER ICONS p 5 11 SLO appears when S low power is selected LO1 appears when low 1 power is selected LO2 appears when low 2 power is selected MID appears when mid power is selected No icon appears when high power is selected 1 MEMORY NAME...

Page 29: ...harging through the DC IN jack 4 3 D D Battery icon 4 3 D D Charging note 4 3 Optional battery case 4 4 D D Battery life 4 4 D D About the battery replacement 4 4 Charging with the optional desktop charger 4 5 D D Charging note 4 5 External DC power operation 4 6 D D Operating note 4 6 Previous view ...

Page 30: ...iver can be operated for a short time The battery is almost fully exhausted Charging is necessary The transceiver quickly becomes impossible to operate D D Battery icon The battery icon appears when the BP 271 or BP 272 Li ion battery pack is attached to the trans ceiver TIP See page 4 4 for the optional BP 273 battery case battery life NOTE When the BP 273 battery case is attached to the transcei...

Page 31: ...will not be charged completely or it will take much longer to charge When using an optional CP 12L CP 19R or OPC 254L the battery pack can be charged with the power ON But by default the battery pack cannot be charged with the power ON so you should turn OFF the power before charging p 16 79 Even if rechargeable batteries Ni Cd or Ni MH are installed in the optional BP 273 battery case they cannot...

Page 32: ...teries together Keep the battery terminals clean It s a good idea to occasionally clean them Never incinerate used battery cells since the internal battery gas may cause them to rupture Never expose a detached battery case to water If the battery case gets wet be sure to wipe it dry be fore using it Never use batteries whose insulated covering is damaged Remove the alkaline batteries when battery ...

Page 33: ...battery pack to the desktop charger when the transceiver is con nected to the DC power source This may cause the charger s malfunction and the charging indicator of the charger lights red In that case disconnect the power adapter from the charger and then reconnect the power adapter to the charger The optional CP 23L and OPC 515L can be used in stead of the supplied power adapter Connect one of th...

Page 34: ... 271 CP 12L Optional CP 19R Optional OPC 254L Optional to a cigarette lighter socket 12 V DC to a 12 V DC power source White Black _ to DC IN Transceiver D D Operating note The power source voltage must be between 10 0 16 0 V DC NEVER CONNECT OVER 16 V DC directly into the DC IN jack of the transceiver BE SURE to use a CP 12L CP 19R or OPC 254L when connecting a regulated 12 V DC power source Use ...

Page 35: ...5 7 Setting a frequency 5 8 Setting the squelch level 5 8 Selecting the operating mode 5 9 Monitor function 5 9 Selecting the Mode 5 10 D D VFO mode 5 10 D D Memory Call channel Weather channel mode 5 10 D D DR D STAR Repeater function 5 10 Transmitting 5 11 D D About transmit power levels 5 11 Key Lock function 5 12 ATT AIR function 5 12 Band Scope function 5 13 D D Sweep operation 5 13 Weather c...

Page 36: ...he squelch is closed hold down SQL while adjusting the audio level The display shows the volume level while adjusting Volume level display No audio Maximum audio When JA3YUA ID51 is set as your own MY call sign and note VOL TIP The opening message and power source volt age display options can be turned ON or OFF in the Display menu MENU Display Opening Message p 16 84 MENU Display Voltage Power ON...

Page 37: ...4 000 MHz 380 000 MHz to 479 000 MHz Some frequency ranges may be blocked depending on the transceiver s version Upper A band Lower B band D D MAIN band selection You can make a call only on the MAIN band Band selection operating frequency input using DIAL operating mode selection Memory channel selection memory write and band scope function can be made on the MAIN band Push MAIN to alternately se...

Page 38: ...le scan ning or by other factors SUB band mute status MAIN band SUB band DV mode DV mode FM N mode FM N mode DV mode FM N mode AIR band AIR band A B band selection in the DR screen The DR screen can be displayed on A band upper or B band lower When the DR screen is displayed on A band and the DR screen is selected in B band the previously dis played frequency or memory before entering the DR scree...

Page 39: ...nds or separately for each band in the MENU screen q q Push MENU to enter the Menu screen w w Push D pad to select the root item Sounds and then push D pad Ent to go to the next level D pad Ent MENU Sounds Volume Select e e Refer to the menu sequence shown directly above and push D pad to select and then push D pad Ent to enter one or more times until the last screen is displayed r r Push D pad to...

Page 40: ...neces sary w w Push QUICK to open the Quick Menu screen e e Push D pad to select Band Select and then push D pad Ent D pad Ent r r Push D pad to select the desired frequency band Selectable frequency bands differ depending on the transceiver version See the specifications for details p 19 2 t t Push D pad Ent to save the setting and exit the Quick Menu screen AIR band 144 MHz band 430 MHz band Pre...

Page 41: ... when the AIR band is selected D D Tuning step selection q q Push QUICK to open the Quick Menu screen w w Push D pad to select TS and then push D pad Ent D pad Ent e e Push D pad to select the desired tuning step r r Push D pad Ent to save the setting and exit the Quick Menu screen When 10 kHz tuning steps is selected the frequency changes in the 10 kHz steps Previous view ...

Page 42: ...on is not se lectable in the DV mode Automatic squelch Maximum level Setting a frequency q q When the VFO mode is selected push V MHz to select the 1 MHz or 10 MHz Quick Tuning function step or turn it OFF When the 1 MHz step is selected the frequency changes in 1 MHz steps When the 10 MHz step is selected the frequency changes in 10 MHz steps w wRotate DIAL to set the desired frequency The freque...

Page 43: ...rating modes are determined by the modulation of the transceiver signals The transceiver s operating modes are AM FM FM N and DV Push MODE one or more times to select the operating mode The AM mode can be used for only the AIR band 108 000 MHz to 136 995 MHz and AM BC radio 0 520 MHz 1 710 MHz When the GPS TX Mode is selected DV G or DV A appears instead of DV p 10 31 FM mode is selected FM N mode...

Page 44: ...t the Weather channel mode The Memory mode Call channel mode and Weather channel mode are alternately selected While in the Call channel mode the selected Call chan nel number C0 to C3 appears While in the Weather channel mode the selected weath er channel number WX 01 to WX 10 appears e eRotate DIAL to select a desired channel Only programmed Memory channels can be selected See page 12 4 for memo...

Page 45: ... the BP 273 is used Approximately 0 1 W S LOW fixed High power 5 W Mid power 2 5 W Low2 power 1 0 W S Low power 0 1 W R WARNING NEVER transmit for long periods of time During prolonged transmissions at high power or mid power the transceiver radiates heat to protect itself from overheating The transceiver s chassis will be come hot and may cause a burn To prevent overheating the default setting of...

Page 46: ...nal levels to prevent audio distortion This is useful when the transceiver receives a very strong air band signal or it is in very strong elec tromagnetic fields such as from a broadcasting station near your location The attenuation is about 30 dB and usable only in the AIR band q q Push QUICK to open the Quick Menu screen w w Push D pad to select ATT AIR and then push D pad Ent D pad Ent e e Push...

Page 47: ...unction Center frequency Example 146 010 MHz Example The tuning step is set to 10 kHz and a strong signal is received on 146 060 MHz Example Continuous sweep on 146 010 MHz While continuously sweeping When the sweeping stops rotate DIAL to move the sweep marker to a detect ed signal Depending on the presetting you may hear the signal audio About the sweep steps The specified tuning step in VFO mod...

Page 48: ...rt function is turned ON the se lected weather channel is monitored every 5 seconds for the announcement When the alert signal is detected ALT and the WX channel number are alternately displayed and a beep tone sounds until the transceiver is operated The previously selected used weather channel is checked periodically during standby or while scanning q q Push QUICK to open the Quick Menu screen w...

Page 49: ... 6 6 D D Setting the squelch level 6 7 D D Using the Monitor function 6 7 D D Setting a tuning step AM Only 6 8 Adding or editing a BC Radio memory 6 9 D D Using the BC Radio Memory 6 9 D D Add a BC Radio memory 6 9 D D Deleting a BC Radio memory 6 12 D D Editing a BC radio memory 6 13 D D Rearranging the display order of the BC Radio memory 6 14 Skip setting for the BC radio memory 6 15 Using the...

Page 50: ...e differs according to the trans ceiver s version D D Turning ON the BC Radio q qPush QUICK w w Push D pad to select BC Radio ON and then push D pad Ent D pad Ent e e The BC Radio pop up window appears and exits the Quick Menu screen appears Example While listening to FM A Station of the Memory bank A Appears NOTE This transceiver does not have a built in bar an tenna for AM broadcast band recepti...

Page 51: ...adio frequency To save the selected frequency hold down S MW for 1 second to program it into the lowest memory chan nel of the selected bank Memory bank mode The BC Radio Memory bank mode is very useful to quickly select often used frequency settings When the Memory bank mode is selected and the selected memory channel number appear Basic operation Continued D D Listening to the BC Radio while mon...

Page 52: ...w Push D pad to select Bank Select and then push D pad Ent D pad Ent e e Push D pad to select the desired bank and then push D pad Ent r r The memory channel in the selected bank appears and the transceiver exits the Quick Menu screen Rotate DIAL to select a memory channel Push MODE to select the FM or AM mode Basic operation Continued D D Selecting the bank in the Memory bank mode DIAL Memory ban...

Page 53: ... a BC Radio signal While in the Tuning mode hold down or to start searching the broadcast signal When is held down a down scan starts and when is held down an up scan starts When a signal is received the scanning stops on the fre quency To cancel scanning push or CLR FM mode AM mode Whilesearch ing a signal When a signal is received Previous view ...

Page 54: ... FM mode w wPush QUICK e e Push D pad to select ATT FM and then push D pad Ent When the AM mode is selected in step q select ATT AM D pad Ent r r Push D pad to select the attenuator ATT FM OFF The attenuator is OFF 30dB The attenuation is about 30 dB ATT AM OFF The attenuator is OFF Auto The attenuation is automatically switched be tween OFF and 30 dB maximum depend ing on the received signal stre...

Page 55: ...r strong signals AUTO shows automatic level adjustment by a noise pulse counting system OPEN shows a continuously open setting DIAL SQL D D Using the Monitor function This function is used to listen to weak BC Radio sig nals without disturbing the squelch setting or having to manually open the squelch Hold down SQL to monitor the operating frequen cy The 1st segment of the S meter blinks SQL When ...

Page 56: ...n the se lected tuning step q q Push MODE to select the AM mode w wPush QUICK e e Push D pad to select TS and then push D pad Ent D pad Ent r r Push D pad to select the desired tuning step be tween 1 0 kHz 9 0 kHz and 10 0 kHz t t Push D pad Ent to save and exit the Quick Menu screen When the 10 0 kHz step is selected The frequency changes in the selected tuning step Previous view ...

Page 57: ...Radio memory Continued on the next page BC Radio Memory A Area 1 C Area 3 B Area 2 D Area 4 Z FM AM FM A Station FM B Station FM C Station AM A Station AM B Station AM C Station D D Using the BC Radio Memory A total of 26 banks are selectable for BC Radio Mem ory You can assign up to 50 BC Radio memory chan nels to each bank for easy memory management A maximum of 500 memories can be assigned to t...

Page 58: ...it push QUICK to open the input mode selection window A space can be entered in any input mode Rotate DIAL counterclockwise to enter a space Push CLR to delete the selected character or hold down CLR to continuously delete the characters first to the right and then to the left of the cursor See page 2 8 for entry details o Push D pad to move the cursor to the second digit 0 Repeat steps i and o to...

Page 59: ...annel in the BC Radio memory OFF You can select the channel in the BC Radio memory Skip The channel does not appear in the BC Radio memory 9After selecting push D pad Ent 5 Writing BC Radio Memory 0 Push D pad to select Add Write and then push D pad Ent If a previously added BC Radio memory is edited select Overwrite 1 Push D pad to select YES and then push D pad Ent To cancel the entered data q q...

Page 60: ...then push D pad Ent r r Push D pad to select the BC Radio group that includes the memory you want to delete and then push D pad Ent t t Push D pad to select the memory channel to be deleted y y Push QUICK u u Push D pad to select Delete and then D pad Ent i i Push D pad to select YES and then push D pad Ent The selected BC Radio memory is deleted Adding or editing BC Radio memory Continued Select ...

Page 61: ... the memory you want to edit and then push D pad Ent t t Push D pad to select the memory to be edited y yPush QUICK u u Push D pad to select Edit i i Push D pad to select the desired item and then push D pad Ent See pages 6 9 to 6 11 for entering details o o After editing the display returns to the BC RADIO MEM EDIT screen 0 Push D pad to select Overwrite and then push D pad Ent 1 Push D pad to se...

Page 62: ...elect the BC Radio memory to be moved y yPush QUICK u u Push D pad to select Move and then push D pad Ent DESTINATION blinks on the upper left of the LCD i i Push D pad to select the location to insert the memory you want to move which will be above the memory name selected in this screen and then push D pad Ent The selected memory contents are inserted above the destination memory name When Move ...

Page 63: ...udes the BC Radio memory you want to set the skip setting on and then push D pad Ent t t Push D pad to select the BC Radio memory to be skipped y yPush QUICK u u Push D pad to select SKIP and then push D pad Ent SKIP appears on the selected memory Push QUICK and select SKIP again then push D pad Ent to cancel the skip setting Skip setting for the BC radio memory TIP In the BC radio win dow push QU...

Page 64: ...pad to select BC Radio Mode then push D pad Ent D pad Ent BC radio mode screen is displayed Appears Select BC Radio Mode screen TIP To cancel the BC Radio mode push QUICK and select Normal Mode In the exclusive BC Radio mode the other modes are in a sleep state To operate the transceiver in a normal way push QUICK and then select Normal Mode Previous view ...

Page 65: ...he power save function to reduce current drain and conserve battery power when the BC Radio is ON q qPush MENU w w Push D pad to select the root item BC Radio and then push D pad Ent to go to the next screen D pad Ent MENU BC Radio BC Radio Set Power Save BC Radio e e Refer to the menu sequence shown directly above and push D pad to select and then D pad Ent to enter one or more times until the la...

Page 66: ...until the last screen is displayed r r Push D pad to select the Auto Mute timer to between 0 and 10 seconds in 1 second steps or OFF OFF The Auto Mute function is OFF The BC Radio audio is not muted even if the transceiver receives a signal on the MAIN or SUB band The BC Radio audio is muted when the transceiver transmits 0 to 10sec The BC Radio audio is automatically muted when the transceiver tr...

Page 67: ...olume Select and then push D pad Ent r r Push D pad to select whether or not to indepen dently adjust the audio output level All The audio output level of the BC Radio A band and B band are adjusted at the together BC Radio Separate The audio output level of the BC Radio is separately adjusted The audio output level of A band and B band are adjusted together Separate The audio output level of the ...

Page 68: ... to select the root item Sounds and then push D pad Ent D pad Ent e e Push D pad to select BC Radio Level and then push D pad Ent r r Rotate DIAL to adjust 5 to 1 The BC Radio audio output level is higher than the A and B bands audio 0 The BC Radio audio output level is same as the A and B bands audio 1 to 5 The BC Radio audio output level is lower than the A and B bands audio t tPush MENU to exit...

Page 69: ...epeater function 7 2 Ways to Communicate using the DR function 7 3 To begin the digital mode communication in other than the DR function you can use the VFO mode Memory mode and Call channel mode This manual describes focuses on the DR function op eration which can be set up easily and if you want to use in other than the DR function see the procedures as described to the right For a Local area ca...

Page 70: ... function With this function you can select the preprogrammed repeater or frequency in FROM the access repeater or simplex and UR call sign in TO destination as shown to the right Destination Repeater Station Access repeater or Simplex In the DR screen IMPORTANT Before starting D STAR the following steps are needed STEP 1 Entering your call sign MY into the transceiver STEP 2 Registering your call...

Page 71: ... use the DR function pp 9 24 to 9 34 Before operating in the duplex mode be sure to check whether the repeater is busy or not If the repeater is busy wait until it is clear or ask for a break using a method acceptable to your local procedures The transceiver has a Time Out Timer function for DV operation The timer limits a continuous transmission Warn ing beeps will sound approximately 30 seconds ...

Page 72: ... is the reflector 8 16 D D Linking to a reflector 8 17 D D Using a reflector 8 18 D D Unlinking a reflector 8 19 D D Reflector Echo Testing 8 19 D D Requesting repeater information 8 20 Updating the Repeater List 8 21 IMPORTANT The Repeater List described in this manual may differ from your transceiver s Repeater List contents Although Japanese repeaters are used in the setting examples the Japane...

Page 73: ...arches for near by repeaters by using your location and the repeater s location that is entered in the Re peater List and then lists them You can also find only FM repeaters using the Near Repeater FM scan Search for the nearest repeater p 8 5 Searches for the nearest repeater by us ing your location and the repeater s location where entered in the Repeater List The nearest repeaters in your trans...

Page 74: ...r access repeater and then push D pad Ent Example Hirano y y If the selected repeater s name is displayed in FROM on the DR screen the access repeater set ting is completed Setting FROM Access repeater Continued D D Using the preloaded Repeater List FROM is selected Repeater area Repeater call sign Completed How to change the repeat er group While in the DR screen push QUICK to open the Quick menu...

Page 75: ...ning The repeaters in the Repeater List are sequentially dis played t t When the transceiver receives a signal from a re peater the scan stops Push CLR to cancel the DR scan The scan pauses when a signal is received The scan resumes the same as other scans p 16 18 While receiving a repeater signal Means JM1ZLK is using the Hirano repeater While scanning TIP The DR scan scans simplex frequen cies i...

Page 76: ... or not the GPS receiver is receiving your position and time The GPS icon blinks when searching for satellites The GPS icon stops blinking when the minimum number of needed satellites is found It may take only a few seconds to calculate your position But depending on the environment it may take a few min utes If you have difficulties receiving we recommend that you try a different location The ico...

Page 77: ...ater and then push D pad Ent Example Hirano Hirano is displayed in FROM NOTE When the position data accuracy level is set to Approximate the direction data is not displayed if the distance to the repeater is under 5 kilometers 3 1 miles p 9 33 Completed Shows the distance and direction from your position to the repeater Shows the call sign of Hirano430 NOTE When using the Repeater Search function ...

Page 78: ...ect TX History and then push D pad Ent r r Push D pad to select the desired TX history and then push D pad Ent TX History DV Displays the TX history of the DV repeaters TX History FM Displays the TX history of the FM repeaters r r Push D pad to select Hirano and then push D pad Ent Hirano is displayed in FROM FROM is selected Completed Setting FROM Access repeater Continued D D Using the TX Histor...

Page 79: ...rectly input the destination repeater call sign Setting TO Destination The destination repeater or station must be set in TO when you make a call in the DV mode You have seven ways to set the destination Click the title as shown below to jump to the specified page How to switch the repeater group When Local CQ or Gateway CQ is se lected you can change the repeater group In the DR screen push QUICK...

Page 80: ... through your local area access repeater q qHold down for 1 second The DR screen appears w w Push D pad to select TO Destination and then push D pad Ent D pad Ent e e Push D pad to select Local CQ and then push D pad Ent CQCQCQ is displayed in TO Example Making a Local area call by accessing the Hirano repeater Completed Previous view ...

Page 81: ...UP screen is displayed r r Push D pad to select the repeater group where your destination repeater is listed and then push D pad Ent Example 11 Japan t t Push D pad to select the destination repeater and then push D pad Ent Example Hamacho Hamacho is displayed in TO Example Making a gateway CQ call to Japan Hama cho from the Hirano repeater Completed TIP After selecting a repeater you can select o...

Page 82: ...old down for 1 second The DR screen appears w w Push D pad to select TO and then push D pad Ent D pad Ent e e Push D pad to select Your Call Sign and then push D pad Ent r r Push D pad to select the destination and then push D pad Ent Example TOM TOM is displayed in TO TIP After selecting a destination you can select other stations in your transceiver by rotating DIAL Example Select TOM from the Y...

Page 83: ... and then push D pad Ent D pad Ent e e Push D pad to select RX History and then push D pad Ent r r Push D pad to select the destination and then push D pad Ent Example TOM TOM is displayed in TO Setting TO Destination Continued D D Using RX History Example Select TOM from RX History Completed The call sign of the selected sta tion is displayed TIP To add the RX HISTORY data to memory push QUICK on...

Page 84: ...pad Ent e e Push D pad to select TX History and then push D pad Ent r r Push D pad to select the destination and then push D pad Ent Example Dallas Dallas is displayed in TO Setting TO Destination Continued D D Using TX History Example Select the Melbourne repeater in the TX History Completed Dallas repeater s call sign is displayed The Sub name is dis played when a repeat er is selected TIP You c...

Page 85: ...he right and then to the left of the cursor y y Push D pad to move the cursor to the second digit u u Repeat steps t and y to enter a call sign of up to 8 characters including spaces Example First J then M then 1 then Z then L then K i iAfter entering push D pad Ent twice to save JM1ZLK is displayed in TO After entering you can correct the call sign in the DI RECT INPUT UR screen The entered call ...

Page 86: ...ps t and y to enter a name of up to 8 characters including spaces Example First J then P then 3 then Y then D then H i iAfter entering push D pad Ent twice JP3YDH is displayed in TO After entering you can correct the call sign in the DI RECT INPUT RPT screen The entered call sign remains on the DIRECT INPUT RPT screen until entering a new call sign The following settings are also correct The repea...

Page 87: ...n as the D STAR reflector system The D STAR reflector system enables a num ber of D STAR repeaters around the world to link to a reflector This means that when you transmit through a D STAR repeater linked to a reflector your voice can be heard on other repeaters linked to the reflector and you can hear other stations that are connected to the reflector when they transmit Reflector INTERNET INTERN...

Page 88: ...sh D pad to select TO and then push D pad Ent D pad Ent e e Push D pad to select Reflector and then push D pad Ent The REFLECTOR screen appears r r Push D pad to select Link to Reflector and then push D pad Ent t t Push D pad to select Direct Input and then push D pad Ent y y Push D pad to select the reflector number Example 010 u u Push D pad to move the cursor i i Push D pad to select module let...

Page 89: ... The transceiver returns to the DR screen Link to Reflector and REF002AL are displayed in TO u u Hold down PTT to link to the reflector The TX RX indicator lights red Reflector operation D D Linking to a reflector Continued D D Using a reflector Before using a reflector be sure to your repeater is linked to the reflector q q Hold down for 1 second The DR screen appears w w Push D pad to select TO ...

Page 90: ...d down PTT to unlink the reflector The TX RX indicator lights red D D Reflector Echo Testing This function is a useful check of how well your signal is getting into the repeater and you can use it to verify that your repeater is operating normally q q Hold down for 1 second The DR screen appears w w Push D pad to select TO and then push D pad Ent D pad Ent e e Push D pad to select Reflector and th...

Page 91: ...o select TO and then push D pad Ent D pad Ent e e Push D pad to select Reflector and then push D pad Ent The REFLECTOR screen appears r r Push D pad to select Repeater Information t t PushD pad Ent The transceiver returns to the DR screen Repeater Information and I are displayed in TO y y Hold down PTT to send the repeater information command The TX RX indicator lights red u u Release PTT to hear ...

Page 92: ...M and manuals in the Icom website screen The displayed contents may differ TIP This instruction manual describes when the file name is 51P2_USA_160913 zip and a card reader is used for example w Decompress the compressed file that is downloaded from the Icom website 51P2_USA_160913 folder will be created on the same place where the downloaded file is saved 2 Inserting the microSD card into a PC e ...

Page 93: ...Setting folder in the ID 51 folder of the microSD card TIP You can copy one or more ICF files in the fold er but the transceiver loads only one file Click Click microSD card Transceiver from the Card reader PC 4 Inserting the microSD card y Remove the microSD card from the PC and insert the card into the transceiver s slot See page 2 3 for details of inserting and removing the microSD card Saving ...

Page 94: ...t item SD Card and then push D pad Ent D pad Ent o Push D pad to select Load Setting and then push D pad Ent 0 Push D pad to select the ICF file to be loaded and then push D pad Ent Example Selecting 51P2_USA_160913 icf The LOAD FILE screen appears 1 Push D pad to select Repeater List Only and then push D pad Ent Updating the Repeater List Continued Previous view ...

Page 95: ...cted the skip settings of the Repeater List are retained p 9 39 4Push D pad Ent Load file appears 5 Push D pad to select YES then push D pad Ent to start the file check While checking the file CHECKING FILE and a prog ress bar are displayed 6After checking settings data loading starts While loading LOADING and a progress bar are dis played 7 After loading COMPLETED Reboot the ID 51 ap pears To com...

Page 96: ... 9 21 D D Pocket beep function with the digital code squelch 9 21 Viewing the call signs 9 22 Repeater List 9 23 D D Repeater List contents 9 23 Entering information into Repeater List 9 24 D D Required items for the communication cases 9 24 D D New repeater entry 9 25 Editing a Repeater List 9 35 Deleting a Repeater List 9 36 Rearranging the repeater display order 9 37 Adding Repeater information...

Page 97: ...ckward While selecting a character push QUICK to change the character to an upper case or lower case letter While selecting a digit push QUICK to open the input mode selection window A space can be selected in any input mode Rotate DIAL counterclockwise to enter a space Push CLR to delete the selected character or hold down CLR to continuously delete the characters first to the right and then to t...

Page 98: ...the message transmission function select OFF t t After selecting push D pad Ent y yPush MENU to exit the MENU screen RX message display function As the default the received message is automatically displayed and scrolled on the LCD To not display and scroll the received message turn OFF the RX message display function in RX Mes sage of the MENU screen p 16 82 MENU Display RX Message The received m...

Page 99: ...tion and then push D pad Ent D pad Ent e e Push D pad to select TX Message and then push D pad Ent r r Push D pad to select message memory number 1 t tPush QUICK y y Push D pad to select Clear and then push D pad Ent u u Push D pad to select YES and then push D pad Ent i iPush MENU to exit the MENU screen Example To delete the TX message JAPAN TOM from message memory number 1 Previous view ...

Page 100: ...s when a repeater uplink signal is received r r Push D pad Ent to show the contents of the RX his tory t t Push D pad to view other RX history content CALLER Shows the call sign of the caller station and any note entered after the call sign CALLED Shows the call sign of the called station RXRPT1 Shows the call sign of the repeater that was accessed by the caller station If it was a call through a ...

Page 101: ...nd then push D pad Ent to delete TIP RX RPT1 setting may differ depending on the communication form JG3LUK is listening JG3LUK is listening JG3LUK is listening CALLER YOUR STATION RXRPT1 RXRPT2 CALLED JM1ZLK calling from JP1YIU port A JM1ZLK calling from JP1YIU port A JM1ZLK calling from JP1YIU port A INTERNET INTERNET CALLED RXRPT2 RXRPT1 CALLER YOUR STATION GW Example When a Gateway call is rece...

Page 102: ...in standby push PTT to transmit The TX RX indicator lights red BK blinks on the station that receives the break in call i iRelease PTT to receive Wait for a reply call from the station o o After receiving the reply call communicate normally 0 To cancel the BK function select OFF in BK as in step t or turn OFF the power How to use Break in While using digital call sign squelch the squelch never ope...

Page 103: ...ed w w Push D pad to select FROM and then push D pad Ent D pad Ent e e Push D pad to select Repeater List and then push D pad Ent r r Push D pad to select 11 Japan and then push D pad Ent t t Push D pad to select Hamacho and then push D pad Ent Hamacho is displayed on FROM y yPush MENU u u Push D pad to select the root item DV Set and then push D pad Ent i i Push D pad to select EMR and then push ...

Page 104: ...ct the root item DV Set and then push D pad Ent D pad Ent e e Push D pad to select EMR AF Level and then push D pad Ent r r Push D pad to adjust the EMR audio output level between 0 minimum and 39 maximum in single digit steps Default 19 t tPush MENU to exit the MENU screen Display type setting To see repeater names call signs and so on better you can change the letter size in the DR screen Defaul...

Page 105: ...ush D pad to select ON t tPush MENU to exit the MENU screen When an FM signal is received in the DV mode the DV and FM icons sequentially blink and the transceiver re ceives the signal in the FM mode When digital call sign squelch DSQL or digital code squelch CSQL is selected the transceiver does not receive FM signals even if this function is ON You can silently wait for calls from others These i...

Page 106: ...he internal GPS receiver p 9 13 When OFF or Manual is set in GPS Select the internal GPS receiver is temporarily turned ON When External GPS is set in GPS Select the transceiver transmits your position But if the external GPS receiver is not connected the internal GPS receiver will be enabled t tPush MENU to exit the MENU screen TIP To record the voice signal You can record a voice announcement fo...

Page 107: ...l Only one announcement can be recorded The current contents will be overwritten if you record again t tPush MENU to exit the MENU screen D D Playing back the recorded voice audio The recorded voice audio for the Auto Reply function can be played back q qPush MENU w w Push D pad to select the root item Voice Memo and then push D pad Ent e e Push D pad to select DV Auto Reply and then push D pad En...

Page 108: ...sition Then the transceiver automatically replies with a mes sage as described below TIP When the internal GPS receiver is temporarily turned ON and valid data is received the transceiver automatically replies if a call addressed to your own call sign is received again Reply message list when no valid position is re ceived Message Status No Position When no position is received Old Position 2 minu...

Page 109: ...in the DV Data TX item of the MENU screen p 16 61 MENU DV Set DV Data TX Before transmission the transceiver sends approximate ly 500 milliseconds of carrier sense Configure the serial data communication software as follows Port The COM port number which is used by the ID 51A E 1 Baud rate 4800 9600 bps 2 Data 8 bit Parity None Stop 1 bit Flow control Xon Xoff 1 Depending on the PC environment the...

Page 110: ...d push D pad to select and then D pad Ent to enter one or more times until the last screen is displayed r r Push D pad to select ON and then push D pad Ent t tPush MENU to exit the MENU screen NOTE When using the DV Fast Data and if you want to send the GPS data to other transceivers that can not receive the DV Fast Data confirm the GPS Data Speed is set to Slow in the MENU screen p 16 62 MENU DV ...

Page 111: ... call sign is announced Default ON All When a DV call is received the calling station s call sign is announced t t Push MENU to save and exit the MENU screen When a DV call is received the standby beep sounds and after approximately 1 second the call sign is an nounced The transceiver has other Speech functions DIAL speech function The frequency or repeater call sign is announced 1 second after DI...

Page 112: ... push D pad Ent r r Push D pad to select ON Default ON t tPush MENU to exit the MENU screen y y While holding down rotating DIAL to select the station call sign After releasing the selected station call sign is an nounced When ON is selected Beeps While holding down Beeps After releasing JG3LUK DIAL NOTE While the call sign is being announced you cannot hear any received audio and the audio is not...

Page 113: ...apanese Default English t tPush MENU to exit the MENU screen A call sign is announced in the selected language D D Phonetic Code setting for the Speech al phabet character The speech alphabet characters can be set to phonetic code This setting is used for all Speech functions q qPush MENU w w Push D pad to select the root item SPEECH and then push D pad Ent D pad Ent e e Push D pad to select Alpha...

Page 114: ...screen Speech function Continued D D Speech level selection The speech volume level can be set to between 0 mini mum and 9 maximum This setting is used for all Speech functions q qPush MENU w w Push D pad to select the root item SPEECH and then push D pad Ent D pad Ent e e Push D pad to select SPEECH Level and then push D pad Ent r r Push D pad to set the speech volume level to be tween 0 minimum ...

Page 115: ...the audio is heard When the received signal s call sign does not match digi tal call sign squelch does not open however the S RF meter shows the received signal level D D Pocket beep function with the digital call sign squelch When a received signal is addressed to your own call sign the transceiver emits beep tones for 30 seconds and S blinks Push PTT to answer or push D pad Ent to stop the beeps...

Page 116: ... to select a digital code between 00 and 99 for the digital code squelch function 0 Push MENU to save and exit the MENU screen 1 When the received signal includes a matching code the squelch opens and the audio is heard When the received signal s code does not match the digital code squelch does not open However the S RF meter shows the received signal strength D D Pocket beep function with the di...

Page 117: ...GN screen can be displayed in the DR VFO Memory or Call channel mode To select the name display mode push QUICK and then push D pad to select Name Display After selecting push D pad Ent e e Push CLR to return to the previous screen Destination call sign Access repeater call sign Gateway repeater call sign Your own call sign While operating D STAR in the Memory mode Previous view ...

Page 118: ... Access repeater s input frequency 1 p 9 30 DUP Duplex direction 1 p 9 31 OFFSET FREQ Frequency offset 1 p 9 31 MODE 2 p 9 32 TONE 2 p 9 32 Repeater Tone 2 p 9 32 POSITION Position data accuracy level p 9 33 LATITUDE Latitude position of the repeater p 9 33 LONGITUDE Longitude position of the repeater p 9 33 UTC OFFSET UTC Offset p 9 34 1 Appears only when the USE FROM option is set to YES 2 Appea...

Page 119: ...n repeater Used for DV simplex Used as an FM repeater Used for FM simplex TYPE DV Repeater DV Repeater DV Simplex FM Repeater FM Simplex NAME SUB NAME CALL SIGN N A N A GW CALL SIGN For a Gateway call N A N A N A GROUP USE FROM FREQUENCY DUP N A N A OFFSET FREQ N A N A MODE N A N A N A TONE N A N A N A RPT TONE N A N A N A POSITION LATITUDE LONGITUDE UTC OFFSET Must be entered Possible to enter N ...

Page 120: ... pad Ent The REPEATER LIST EDIT screen is displayed Continued on the next page When you want to add a new repeater by editing a repeater memory contents select Edit In this case after editing be sure to select Add Write If you select Overwrite the original repeater entered contents are overwritten Select 2 Selecting the communication type u Push D pad to select TYPE and then push D pad Ent to ente...

Page 121: ...er to an upper case or lower case letter While selecting a digit push QUICK to open the input mode selection window A space can be entered in any input mode Rotate DIAL counterclockwise to enter a space Push CLR to delete the selected character or hold down CLR to continuously delete the characters first to the right and then to the left of the cursor See page 2 8 for entry details 2 Push D pad to...

Page 122: ...haracter to an upper case or lower case letter While selecting a digit push QUICK to open the input mode selection window A space can be entered in any input mode Rotate DIAL counterclockwise to enter a space Push CLR to delete the selected character or hold down CLR to continuously delete the characters first to the right and then to the left of the cursor See page 2 8 for entry details 7 Push D ...

Page 123: ...uously delete the characters first to the right and then to the left of the cursor 2 Push D pad to move the cursor to the second digit 3 Repeat steps 1 and 2 to enter a name of up to 8 characters including spaces 4After entering the call sign push D pad Ent Example JP1YYY A is entered Continued on the next page TIP Be sure to add a repeater node port letter as the 8th digit in the call sign field ...

Page 124: ...ously delete the characters first to the right and then to the left of the cursor 7 Push D pad to move the cursor to the second digit 8 Repeat steps 6 and 7 to enter a name of up to 8 characters including spaces The 8th digit in the gateway repeater call sign is set to only G or a space 9 After entering the gateway repeater call sign push D pad Ent 7 Viewing the repeater group In this item you can...

Page 125: ... select USE FROM and then push D pad Ent D pad Ent 3 Push D pad to select YES and then push D pad Ent You can select the entered repeater as an access re peater FROM 9 Entering the access repeater frequency 4 Push D pad to select FREQUENCY and then push D pad Ent to enter the frequency edit mode A cursor appears and blinks 5 Rotate DIAL to enter the 100 MHz digit of the fre quency 6 Push to move t...

Page 126: ...ffset amount DUP The transmit frequency shifts up from the receive frequency by the offset amount 1 After setting push D pad Ent 11 Entering the frequency offset The offset value is automatically set when the ac cess repeater frequency is entered in 9 Entering the access repeater frequency The default value differs depending on the transceiver version If necessary you can change the frequency offs...

Page 127: ...r OFF and then push D pad Ent OFF Turn the tone function OFF TONE Select when the repeater requires an access tone TSQL Select when you want to use the tone squelch operation in simplex 3 Setting the repeater tone This setting is required when Setting the tone above is set to TONE or TSQL t Push D pad to select REPEATER TONE and then push D pad Ent to enter the tone selection mode y Push D pad to ...

Page 128: ...pproximate or Exact is selected in 12 Setting the Position data accuracy level 0 Push D pad to select LATITUDE and then push D pad Ent to enter the latitude data edit mode A cursor appears and blinks 1 Rotate DIAL to enter the latitude 2 Push to move the cursor backward or push to move the cursor forward 3 Repeat steps 1 and 2 to enter the latitude 4 After entering push D pad Ent 14 Entering the l...

Page 129: ...1 Rotate DIAL to enter the time difference between UTC and the local time 2 After entering push D pad Ent 16 Storing the Repeater List 3 Push D pad to select Add Write and then push D pad Ent 4 Push D pad to select YES and then push D pad Ent The entered contents are stored to the Repeater List and the display returns to the RPT LIST screen To cancel the entered data To cancel the entered data pus...

Page 130: ...ater group that in cludes the repeater you want to edit and then push D pad Ent t t Push D pad to select the repeater to be edited y yPush QUICK u u Push D pad to select Edit i i Push D pad to select the desired item and then push D pad Ent See pages 9 24 to 9 34 for entry details o o After editing the display returns to the REPEATER LIST EDIT screen 0 Push D pad to select Overwrite and then push ...

Page 131: ...d then push D pad Ent r r Push D pad to select the repeater group that includes the repeater you want to delete and then push D pad Ent t t Push D pad to select the repeater to be deleted y yPush QUICK u u Push D pad to select Delete and then push D pad Ent i i Push D pad to select YES and then push D pad Ent The repeater contents are deleted from the Repeater List and the display returns to the R...

Page 132: ... Ent t t Push D pad to select the repeater to be moved y yPush QUICK u u Push D pad to select Move and then push D pad Ent DESTINATION blinks on the upper left of the LCD i i Push D pad to select the location to insert the repeater you want to move which will be above the memory name selected in this screen and then push D pad Ent The selected repeater is inserted to above the destina tion repeate...

Page 133: ...nt i i Push D pad to select the repeater call sign you want to add to the Repeater List and then push D pad Ent When only one call sign is displayed directly push D pad Ent The display is switched from the RX HISTORY screen to the REPEATER LIST EDIT screen of the MENU The selected repeater call sign is automatically entered If necessary edit the contents pp 9 24 to 9 34 o o Push D pad to select Ad...

Page 134: ...to select Repeater List and then push D pad Ent r r Push D pad to select the repeater group that in cludes the repeater you want to set the skip setting on and then push D pad Ent t t Push D pad to select the repeater to be skipped during the DR scan y yPush QUICK u u Push D pad to select SKIP and then push D pad Ent SKIP appears on the selected repeater Push QUICK and select SKIP again then push ...

Page 135: ... select the repeater group to be skipped during the DR scan t tPush QUICK y y Push D pad to select SKIP All ON and then push D pad Ent SKIP appears on the selected repeater group Push QUICK again and select SKIP All OFF then push D pad Ent to cancel the skip setting Select the repeat er group to set the skip setting Appears TIP When you select Re peater List on the FROM SELECT screen you can set t...

Page 136: ...e cursor forward or backward While selecting a character push QUICK to change the character to an upper case or lower case letter While selecting a digit push QUICK to open the input mode selection window A space can be entered in any input mode Rotate DIAL counterclockwise to enter a space Push CLR to delete the selected character or hold down CLR to continuously delete the characters first to th...

Page 137: ...sh QUICK u u Push D pad to select Detail and then push D pad Ent The REPEATER DETAIL screen is displayed i iPush D pad Ent to return to the RPT LIST screen To view the repeater details screen when the DR screen is displayed q q Push QUICK to open the quick menu screen w w Push D pad to select Repeater Detail and then push D pad Ent The REPEATER DETAIL screen is displayed Repeater is set in FROM Re...

Page 138: ...cted character blinks Push D pad to move the cursor forward or backward While selecting a character push QUICK to change the character to an upper case or lower case letter While selecting a digit push QUICK to open the input mode selection window A space can be entered in any input mode Rotate DIAL counterclockwise to enter a space Push CLR to delete the selected character or hold down CLR to con...

Page 139: ...n K 5After entering push D pad Ent 6 Push D pad to select Add Write and then push D pad Ent 7 Push D pad to select YES and then push D pad Ent 8 Push MENU to exit the MENU screen DIAL To cancel the entered data To cancel the entered data push CLR to dis play Cancel edit Push D pad to select YES and then push D pad Ent to cancel entry and the display returns the YOUR CALL SIGN screen JM1ZLK is ente...

Page 140: ...r Call Sign and then push D pad Ent r r Push D pad to select the Your call sign you want to delete t tPush QUICK y y Push D pad to select Delete and then push D pad Ent u u Push D pad to select YES and then push D pad Ent The selected call sign is deleted from the memory and the display returns the YOUR CALL SIGN screen Deleting Your destination call sign Select the call sign you want to delete Ex...

Page 141: ...tPush QUICK y y Push D pad to select Move and then push D pad Ent DESTINATION blinks on the upper left of the LCD u u Push D pad to select the location to insert the call sign you want to move which will be above the memory name selected in this screen and then push D pad Ent The selected call sign is inserted to above the destina tion When Move End is selected the selected call sign is moved to t...

Page 142: ... ICF file to the transceiver using the CS 51PLUS2 1 or copy the ICF file to the microSD card 2 and then write to the transceiver 1 See the CS 51PLUS2 instruction manual when us ing the CS 51PLUS2 2 See page 2 10 when using the microSD card D D Opening the default Repeater List q qStart the CS 51PLUS2 See the CS 51PLUS2 instruction manual for how to in stall the software w w Click Open to open the ...

Page 143: ...ng on JP1YIU port A for a local call JM1ZLK listening on JP1YIU port A for a local call His setting is incorrect I cannot access the repeater Example JM1ZLK wants to make a Local Area call Hamacho repeater Hamacho area Hirano repeater Hirano area Called Caller JM1ZLK JM1ZLK s setting The destination TO setting is incorrect Correct setting To make a Local Area call set the destina tion TO to CQCQCQ...

Page 144: ...mory 10 13 D D Entering the GPS group name 10 18 D D Deleting GPS data 10 19 D D Rearranging the display order of the GPS memory 10 20 D D Setting the GPS alarm 10 21 Transmitting GPS data D PRS and NMEA 10 23 D D Type of position data 10 23 Transmitting D PRS DV A data 10 24 D D D PRS 10 24 D D Operating D PRS DV A 10 24 D D Setting D PRS DV A 10 25 D D Displaying your position using a mapping pr...

Page 145: ...ulties receiving we recommend that you try a different location The icon does not appear when GPS Select item is set to Manual GPS GPS Set GPS Select GPS Indicator item is set to OFF GPS GPS Set GPS Indicator Set the GPS Select item to External GPS when an external GPS receiver is connected GPS Receiver To the RS 232C Port Tothe DATA jack Cable Less than ø 6 0 mm Connection RS 232C DB 9 female To ...

Page 146: ...on the received signal some data may not be displayed p 10 6 RX Position 2 Displays the caller station s call sign SSID course speed TX power lev el height antenna gain antenna direction temperature rainfall wind direction wind speed barometric pressure humidity and Time stamp Depending on the received signal some data may not be displayed p 10 6 Your station GPS memory Tokyo Big Sight GPS alarm T...

Page 147: ...ude Longitude and Grid Locator are displayed Also the Distance and Direction from you to the location is displayed ALM Position The position of the GPS memory lo cation for the GPS alarm function in Latitude Longitude and Grid Loca tor are displayed Also the Distance and Direction from you to the loca tion is displayed r r Push CLR to cancel the GPS POSITION screen and return to the operating scre...

Page 148: ...cific position data An event notice earthquake information satellite track information and so on can be transmitted You can add a time stamp data to the object signal Item A station transmitting specific position data not containing time data Position information such as a traffic ac cident lighthouse antenna or DV access point location and so on can be transmit ted You cannot add a time stamp to ...

Page 149: ...ion OFF Data extension Course Speed Data extension Power Height Gain Directivity Data extension OFF Data extension Course Speed Data extension Power Height Gain Directivity Weather Compass Latitude Longitude Grid locator Altitude Distance Direction Speed Power Height Gain Directivity Temperature Rainfall Wind direction Wind speed Barometric pressure Humidity Symbol SSID Time stamp Call sign Displa...

Page 150: ...Stamp Displays the time that the caller acquired the position data D D TX format D PRS Position Base The following items are displayed when the caller s TX format is D PRS Position Base Compass Displays the caller s direction from your position Symbol Displays the caller s D PRS symbol Latitude Displays the caller s latitude Longitude Displays the caller s longitude GL Displays the grid locator ba...

Page 151: ... the Object station s antenna was pointing GPS Time Stamp Displays the time that the caller sent the Object station s data D D TX format D PRS Item The following items are displayed when the caller s TX format is D PRS Item Compass Displays the Item station s direction from your position Symbol Displays the Item station s D PRS symbol Latitude Displays the Item station s latitude Longitude Display...

Page 152: ...t the caller s area WIND DIR Displays the wind direction at the caller s area WIND SPD Displays the wind speed at the call er s area BARO Displays the barometric pressure at the caller s area GPS Time Stamp Displays the time that the caller acquired the weather data D D TX mode NMEA The following items are displayed when the caller s TX mode is NMEA Compass Displays the caller s direction from you...

Page 153: ...M74SO D D Changing the Compass Direction You can change the compass direction between Head ing Up North Up and South Up q q While the MY RX1 MEM or ALM screen is dis played push QUICK w w Push D pad to select Compass Direction and then push D pad Ent D pad Ent e e Push D pad to select the compass direction and then push D pad Ent Heading Up The compass always points to your heading course directio...

Page 154: ...ORY EDIT screen is displayed The position information Latitude Longitude is automat ically added See pages 10 13 to 10 17 for details on editing position data y y Push D pad to select Add Write then push D pad Ent The confirmation screen Add Write appears u u Push D pad to select Yes and then push D pad Ent The added GPS Memory is saved as 00 and the previ ously saved memory numbers are moved up T...

Page 155: ...n satellite number SAT The quantity of tracking satellites Altitude The altitude of your station The altitude is only displayed when more than 4 satellites are tracked When less than 3 satellites are tracked ft is dis played Longitude Latitude Longitude and Latitude of your station e e Push QUICK to exit the GPS INFO screen N W E S Elevation angle 30 degree line Elevation angle 60 degree line Elev...

Page 156: ...ing GPS Memory and entering the edit mode qPush MENU w Push D pad to select the root item GPS and then push D pad Ent D pad Ent e Push D pad to select GPS Memory and then push D pad Ent r Push D pad to select No Group and then push D pad Ent All the previously added GPS memories are displayed t Push QUICK y Push D pad to select Add and then push D pad Ent The GPS MEMORY EDIT screen is displayed GP...

Page 157: ...lecting a digit push QUICK to open the input mode selection window A space can be entered in any input mode Rotate DIAL counterclockwise to enter a space Push CLR to delete the selected character or hold down CLR to continuously delete the characters first to the right and then to the left of the cursor See page 2 8 for entry details o Push D pad to move the cursor to the second digit 0 Repeat ste...

Page 158: ...cursor forward or back ward to select and edit the hour minute or second 0 Repeat steps 8 and 9 to enter GPS Memory time 1After entering push D pad Ent 5 Entering the GPS latitude 2 Push D pad to select LATITUDE and then push D pad Ent The latitude edit screen is displayed 3Rotate DIAL to edit the latitude A latitude between 0 00 00 to 90 00 00 can be entered If ddd mm ss is selected in the Latitu...

Page 159: ...gitude 1After entering push D pad Ent 7 Entering the GPS altitude 2 Push D pad to select ALTITUDE and then push D pad Ent The Altitude edit screen is displayed 3Rotate DIAL to toggle between plus and minus 4 Push D pad D to move the cursor forward or back ward to select a digit 5Rotate DIAL to edit the altitude You can enter between 32808 and 32808 feet 6 Repeat steps 4 and 5 to enter the GPS Memo...

Page 160: ...mory is edited select Overwrite Add write appears 2 Push D pad to select YES and then push D pad Ent To cancel the entered data q q To cancel the entered data push CLR to display Cancel edit w w Push D pad to select YES and then push D pad Ent to cancel edit ing and return to the GPS Memory s channel list screen Example When HOME is saved in NO GROUP Previous view ...

Page 161: ...rd or backward While selecting a character push QUICK to change the character to an upper case or lower case letter While selecting a digit push QUICK to open the input mode selection window A space can be entered in any input mode Rotate DIAL counterclockwise to enter a space Push CLR to delete the selected character or hold down CLR to continuously delete the characters first to the right and th...

Page 162: ... y y Push D pad to select Delete All In Group and then D pad Ent u u Push D pad to select YES and then push D pad Ent All memories in the group are deleted To delete a specific GPS memory channel GPS memories can be deleted q q Select a specific memory as illustrated to the right and then push QUICK w w Push D pad to select Delete and then push D pad Ent The contents in the selected group are dele...

Page 163: ...PS memory to be moved y yPush QUICK u u Push D pad to select Move and then push D pad Ent DESTINATION blinks on the upper left of the LCD i i Push D pad to select the location to insert the memory you want to move which will be above the memory name selected in this screen and then push D pad Ent The selected memory contents are inserted above the destination memory name When Move End is selected ...

Page 164: ... D pad to select GPS Alarm and then push D pad Ent r r Push D pad to select Alarm Select and then push D pad Ent t t Push D pad to select Group and then push D pad Ent y y Push D pad to select All Memories and then push D pad Ent If you wish to set the alarm to a GPS Memory group select one between A to Z or No Group u u Push MENU to exit the Menu screen When either one of the stations in a specif...

Page 165: ...approximate 1 kilometer range GPS Alarm beeps once and when it is in the ap proximate 500 meter range beeps three times Default Both When the GPS alarm beeps GPS ALARM pops up on the screen and then the S icon blinks To cancel the GPS alarm repeat step t and select OFF Example Alarm Area RX Memory Alarm Setting is set to RX GPS Alarm beeping screen The pop up is displayed and beeps sound de pendin...

Page 166: ...tion data received from the internal or an external GPS receiver using the slow speed data packet space along with voice Mobile A station operating while moving You can transmit direction and speed in formation NMEA DV G A station transmitting position data NMEA0183 received from the inter nal or an external GPS receiver For users who have a D STAR transceiver model prior to the ID 51A E The GPS T...

Page 167: ...tails see the pages listed along with the steps 1 MY Your own call sign entering see page 2 of the Basic manual 2 Receiving GPS data p 10 2 3 Set GPS TX MODE to D PRS DV A p 10 25 4 Set TX information pp 10 25 to 10 28 You must set an SSID and symbol GPS GPS TX Mode D PRS DV A Complete You can transmit in D PRS NOTE If GPS select is set to Manual the position data entered in Manual Position is cha...

Page 168: ...en push D pad Ent The default setting is API51 DSTAR yPush D pad Ent to return to the previous screen 3 Setting the Symbol Select the desired symbol that represents your operat ing situation The selected symbol channel s symbols 1 4 are transmitted in addition to the position data u Push D pad to select Symbol and then push D pad Ent i Push D pad to select a symbol between 1 Per son 2 Bicycle 3 Ca...

Page 169: ...JA3YUA A 0 No SSID is added If a call sign includes a space any text or digit after the space will be deleted 1 15 Adds an SSID of 1 to 15 to your call sign Example SSID is 9 JA3YUA A JA3YUA 9 A Z Adds an SSID of A to Z to your call sign Example SSID is Z JA3YUA A JA3YUA Z 2After setting the SSID push D pad Ent About the SSID To assist in identifying a station s type designated call sign SSIDs are...

Page 170: ... case letters numbers or symbols The selected character blinks Push D pad to move the cursor forward or backward While selecting a character push QUICK to change the character to an upper case or lower case letter While selecting a digit push QUICK to open the input mode selection window A space can be entered in any input mode Rotate DIAL counterclockwise to enter a space Push CLR to delete the s...

Page 171: ...titude Set the altitude transmission 0 Push D pad to select Altitude and then push D pad Ent 1 Push D pad to select ON and then push D pad Ent NOTE If you transmit with the altitude setting ON the character string is included in a comment on the products that cannot display the altitude IC 9100 IC 80AD IC E80D ID 880H ID E880 IC 92AD IC E92D IC U82 IC V82 8 Setting the Data Extension Set the data ...

Page 172: ...Transmitting D PRS DV A data Continued Example Check your position on the APRS fi site q q Display a free APRS related map site on the inter net Example Search http aprs fi w wEnter your call sign in the Track callsign field e eClick Search The icon D PRS symbol is displayed on the map site You can check the location at a map site PC Your symbol Your call sign Enteryourcallsign and then click Sear...

Page 173: ...SSID eUnproto Address rD PRS Data type Position with time stamp Position without time stamp Object Item tObject Name Item Name yData Type Live Object Live Item _ Killed Object Killed Item uTime Stamp UTC h Hour Minute Second z Day Hour Minute iLatitude oSymbol 0Longitude 1Data Extension Course Speed Course 0 to 360 Speed 0 to 999 knots 2Data Extension PHG codes PHG codes definitions 3Altitude 9999...

Page 174: ...us 2D 3D COG True SOG knot Others RMC Mode Indicator GGA Number of satellites in use HDOP Geoidal separation Age of Differential GPS data GLL Mode Indicator VTG COG Magnetic north SOG km h Mode Indicator GSA ID numbers of satellites used in solution PDOP HDOP VDOP GSV Total number of sentences Sentence number Total number of sat ellites in view Satellite information ID Elevation Azimuth S N Conten...

Page 175: ...rs lower case letters numbers or symbols The selected character blinks Push D pad to move the cursor forward or backward While selecting a character push QUICK to change the character to an upper case or lower case letter While selecting a digit push QUICK to open the input mode selection window A space can be entered in any input mode Rotate DIAL counterclockwise to enter a space Push CLR to dele...

Page 176: ...S and then push D pad Ent D pad Ent e e Push D pad to select GPS Auto TX and then push D pad Ent r r Rotate DIAL to select a desired position data trans mit interval Selectable settings are OFF 5 10 30 seconds and 1 3 5 10 and 30 minutes If four GPS sentences are selected in GPS SENTENCE menu on page 16 49 5sec cannot be selected Selecting OFF cancels the GPS automatic transmis sion The GPS messag...

Page 177: ...en the microSD card is full this function will auto matically be paused The transceiver has an exclusive GPS logger mode where only the logger functions This mode is useful when you are traveling and don t want to use the transceiver for communication but you do want to use just a GPS logger See page 10 38 for details The GPS logger function stores your route as you move When the GPS Logger functi...

Page 178: ...e for the GPS Logger function The function records only the selected sentence so the data volume will be reduced See the contents table shown below before selecting q qPush MENU w w Push D pad to select the root item GPS and then push D pad Ent to go to the next screen MENU GPS GPS Logger Record Sentence e e Refer to the menu sequence shown directly above and push D pad to select and then D pad En...

Page 179: ... Click the Open folder to view files option to access the card The ID 51 folder appears y yDouble click the folder Eight folders appear u uDouble click the Gps folder The log files appear The files are named with the time the log was started in the following format yyyymmdd_hhmmss log yyyy year mm month dd day hh hour mm minute ss second i iImport the selected file to a mapping software You can se...

Page 180: ... code Blank shows when not positioned y Mode Indicator A A Autonomous mode D DGPS E Estimated dead reckoning mode N Data not valid R Almanac data u Check Sum 03 Error detection data started with hex code i End code Blank shows when not positioned q w r t y i u 0 1 e o D RMC sentence e g GPRMC 161229 487 A 3723 2475 N 12158 3416 W 0 13 309 62 011212 D 10 CR LF q VTG protocol header GPVTG w Course O...

Page 181: ...now functioning message appears then the GPS position is dis played to start the GPS Logger Only mode Also you can select the GPS Logger Only mode in the Menu screen p 16 42 MENU GPS GPS Logger GPS Logger Only To cancel the GPS Logger Only mode re boot the transceiver by turning it OFF and then ON again When the transceiver is tuned ON the normal GPS Logger restarts If the GPS Logger item in the M...

Page 182: ...ging the skip time 11 7 Deleting the recorded contents audio 11 8 Deleting the folder 11 9 Changing the recording mode 11 10 Continue to record even if no signals are received 11 11 Record the transmit and receive audio into the same file 11 12 Start to record when the PTT switch is pushed 11 13 Viewing the file information 11 14 Viewing the folder information 11 15 Voice Recorder function 11 16 D...

Page 183: ... Push D pad to select REC Start D pad Ent e e Push D pad Ent to start voice recording The transceiver displays Recording started and auto matically exits the Quick Menu screen appears while the transceiver is recording While in the stand by mode the recording is paused and appears Recording is continuous until you manually stop it or the card becomes full If the recording file s content reaches 2 ...

Page 184: ... select REC Stop e e Push D pad Ent to stop voice recording The transceiver displays Recording stopped and auto matically exits the Quick Menu screen TIP When the PTT Automatic Recording function is set to ON in the MENU screen the recording auto matically starts when PTT is pushed MENU VoiceMemo QSORecorder RecorderSet PTT Auto REC Previous view ...

Page 185: ...isplayed The folders are automatically created when you start recording The folder name is composed yyyymmdd y year m month d day r r Push D pad to select the folder that contains the file you want to play and then push D pad Ent The file list is displayed The file name is composed yyyy mm dd hh mm ss y year m month d day hh hour mm minute ss sec ond t t Push D pad to select the file that you want...

Page 186: ...file Fast forward the file When the playback is paused anywhere within the file push D pad to return to the beginning of the file and pause Push D pad Ent to play it back When the playback is paused at beginning of a file push D pad to move to the beginning of the previ ous file and pause Push D pad Ent to play it back D D Pause at the beginning of the next file Rewind the file When the playback i...

Page 187: ...ayback mark is displayed The mark disappears while doing fast forward rewind or pausing r Playing back time The playing back time is displayed t Repeater call sign name The repeater call sign used in the DV mode is dis played When the repeater name is programmed in your Re peater List the name is also displayed y Total time The file s total playing back time is displayed u Progress bar The playing...

Page 188: ...Ent to go to the next level D pad Ent MENU Voice Memo QSO Recorder Player Set Skip Time e e Refer to the menu sequence shown directly above and push D pad to select and then D pad Ent to enter one or more times until the last screen is displayed r r Push D pad to select the skip time of 3 seconds 5 seconds 10 seconds or 30 seconds and then push D pad Ent to save t t Push MENU to exit the Menu scre...

Page 189: ...nth d day r r Push D pad to select the folder including the file that you want to delete then push D pad Ent The file list is displayed The file name is composed yyyy mm dd hh mm ss y year m month d day hh hour mm minute ss sec ond t t Push D pad to select the file that you want to de lete then push QUICK to open the Quick Menu screen y y Push D pad to select Delete then push D pad Ent The confirm...

Page 190: ...ore times until the last screen is displayed The folder list is displayed The folders are automatically created when you start recording The folder name is composed yyyymmdd y year m month d day r r Push D pad to select the folder which you want to delete t t Push QUICK to open the Quick Menu screen y y Push D pad to select Delete then push D pad Ent The confirmation screen Delete folder appears u...

Page 191: ...screen w w Push D pad to select the root item Voice Memo and then push D pad Ent to go to the next level D pad Ent MENU Voice Memo QSO Recorder Recorder Set REC Mode e e Refer to the menu sequence shown directly above and push D pad to select and then D pad Ent to enter one or more times until the last screen is displayed r r Push D pad to select RX Only and then push D pad Ent to save t t Push ME...

Page 192: ... level D pad Ent MENU Voice Memo QSO Recorder Recorder Set RX REC Condition e e Refer to the menu sequence shown directly above and push D pad to select and then D pad Ent to enter one or more times until the last screen is displayed r r Push D pad to select Always and then push D pad Ent to save Always Recording continues even if no signals are received Squelch Auto The transceiver records audio ...

Page 193: ...eiver records the transmit and receive audio into each files The transceiver makes separate new files for trans mit and receive audio Default setting When you set the RX REC Condition item to Squelch Auto the transceiver records audio to the new file when the squelch is closed Voice Memo QSO Recorder Recorder set RX REC Condition t t Push MENU to exit the Menu screen NOTE Even if you set File Spli...

Page 194: ...e times until the last screen is displayed r r Push D pad to select OFF then push D pad Ent to save OFF The transceiver does not start to record when the PTT switch is pushed ON The transceiver starts to record when the PTT switch is pushed Default setting t t Push MENU to exit the Menu screen NOTE When you set PTT AUTO REC to ON see the notes below The transceiver also starts to record audio when...

Page 195: ... m month d day r r Push D pad to select the folder that contains the file you want to view and then push D pad Ent The file list is displayed The file name is composed yyyy mm dd hh mm ss y year m month d day hh hour mm minute ss sec ond t t Push D pad to select the file that you want to view the information on then push QUICK to open the Quick Menu screen y y Push D pad to select File Information...

Page 196: ...h D pad to select and then D pad Ent to enter one or more times until the last screen is displayed The folder list is displayed The folders are automatically created when you start recording The folder name is composed yyyymmdd y year m month d day r r Push D pad to select the folder want to view the folder information then push QUICK to open the Quick Menu screen t t Push D pad to select Folder I...

Page 197: ... D pad to select Record and then D pad Ent The VOICE RECORDER screen appears r r Push PTT to start recording Recording appears and the microphone audio record ing starts t t Push PTT again to stop The information screen appears y y Push MENU to exit the Menu screen NOTE While recording a QSO a voice recording cannot be made and the screen shown to the right appears In that case push MENU to exit t...

Page 198: ...y r r Push D pad to select the folder that contains the file you want to play and then push D pad Ent The file list is displayed The file name is composed yyyy mm dd hh mm ss y year m month d day hh hour mm minute ss sec ond t t Push D pad to select the file that you want to play then push D pad Ent to play it back The VOICE PLAYER screen is displayed and the file starts to playback The next file ...

Page 199: ...luding the file that you want to erase then push D pad Ent The file list is displayed The file name is composed yyyy mm dd hh mm ss y year m month d day hh hour mm minute ss second t t Push D pad to select the file that you want to erase then push QUICK to open the Quick Menu screen y y Push D pad to select Delete then push D pad Ent The confirmation screen Delete file appears u u Push D pad to se...

Page 200: ...t screen is displayed r r Push D pad to select the folder including the file that you want to erase then push D pad Ent The MIC Gain screen is displayed t t Push D pad to set the internal microphone sensi tivity to between 1 minimum sensitivity and 4 max imum sensitivity to suit your needs Higher values make the microphone more sensitive to your voice y y Push MENU to exit the Menu screen The sele...

Page 201: ... Voice Memo and then push D pad Ent to go to the next level D pad Ent MENU Voice Memo Voice Recorder Player Set Skip Time e e Refer to the menu sequence shown directly above and push D pad to select and then D pad Ent to enter one or more times until the last screen is displayed r r Push D pad to select the skip time of 3 5 10 or 30 seconds and then push D pad Ent to save t t Push MENU to exit the...

Page 202: ...rding The folder name is composed yyyymmdd y year m month d day r r Push D pad to select the folder including the file that you want to view the information then push D pad Ent The file list is displayed The file name is composed yyyy mm dd hh mm ss y year m month d day hh hour mm minute ss sec ond t t Push D pad to select the file that you want to view and then push QUICK to open the Quick Menu s...

Page 203: ...tem SD Card and then push D pad Ent e e Push D pad to select SD Card Info and then push D pad Ent D pad Ent The SD Card information screen appears r rPush D pad Ent to exit the information screen t t Push MENU to exit the Menu screen Viewing the microSD card s free space and recordable time Previous view ...

Page 204: ...d drive of the PC or the microSD card reader the screen appears as shown to the right The ID 51 folder appears e e Double click the ID 51 folder Double click Double click NOTE The steps to playback may differ depending on the software Therefore refer to the software s instruc tion manual for details If the file does not playback even if you double click it download an appropriate software like Win...

Page 205: ... D Memory or Call channel VFO 12 5 D D Memory or Call channel Another memory or Call channel 12 6 Setting a Memory bank 12 7 D D Assigning a memory channel to a memory bank 12 7 D D Directly entering into a memory bank 12 8 Selecting a Memory bank 12 9 Entering a memory bank scan name 12 10 D D Entering a memory name bank name or scan name 12 10 Selecting a memory name display 12 12 Clearing a Mem...

Page 206: ...FF Subaudible tone frequency tone squelch frequency or DTCS code with polarity Scan skip setting Memory bank Memory name Tuning step UR Station call sign R1 R2 call sign Digital Call sign squelch or Digital code squelch ON or OFF Digital code NOTE Memory data can be erased by static electric ity electric transients and other causes In addition they can be erased by a malfunction and during re pair...

Page 207: ...wRotate DIAL to select a desired memory channel Only programmed memory channels can be selected See page 12 4 for memory programming details DIAL Selecting a call channel Call channels are used for quick recall of most often used operating settings q q Push M CALL one or more times to select the Call channel mode Push M CALL again to select the Memory mode or Weather channel mode The Memory mode C...

Page 208: ... a desired channel to be pro grammed Example Channel 11 t t Hold down S MW for 1 second to program and then return to the VFO mode 3 beeps sound Before returning to the VFO mode the programmed memory contents are briefly displayed The Memory channel number automatically increases when continuing to hold down S MW for 1 second after programming DIAL Set 146 030MHz in the VFO mode Hold down S MW for...

Page 209: ... w w Hold down S MW for 1 second to enter the Select Memory write mode and copy the memory contents 1 short and 1 long beep sounds The memory channel number blinks e eRotate DIAL to select VFO r r Hold down S MW for 1 second to copy the se lected channel contents to the VFO The transceiver automatically returns to the VFO DIAL Select the memory or call channel to be copied Hold down S MW for 1 sec...

Page 210: ...ll be copied to the VFO e e Rotate DIAL to select the target Memory or Call channel Other channels shown below can be programmed r r Hold down S MW for 1 second again to copy 3 beeps sound The transceiver automatically selects the copied chan nel Copying memory and Call channel contents Continued DIAL Select the memory chan nel to be copied Hold down S MW for 1 second to enter the Select Memory wr...

Page 211: ...l is already assigned Push D pad to change the bank group or bank chan nel number selection o o Push D pad Ent to set and exit the Memory bank edit mode 0 Push D pad to select Write and then push D pad Ent The confirmation screen Overwrite appears 1 Push D pad to select YES and then push D pad Ent The selected memory channel is updated and assigned to the bank and then the transceiver returns to t...

Page 212: ...channel be tween 00 and 99 Example 01 The bank channel number blinks If the selected bank channel is already assigned the memory contents are displayed i i Hold down S MW for 1 second to program and then return to the VFO mode 3 beeps sound If an already assigned bank channel is selected in step u the memory contents will be overwritten into the memory channel and bank channel The Bank channel num...

Page 213: ...mory channels assigned to them are displayed t tPush D pad Ent to set y yRotate DIAL to select a desired bank channel Only assigned bank channels are displayed To return to the Memory channels display repeat steps w to e and select OFF in step r DIAL Push M CALL one or more times to select the Memory mode Push QUICK then push D pad to select Bank Select Rotate DIAL to select the bank group A Push ...

Page 214: ...o a bank SNAME appears only when the selected memory chan nel is a scan edge channel The same name is automati cally assigned to both scan edge channels A and B After pushing D pad Ent the cursor blinks on the first digit DIAL In the Select Memory Write mode select M CH000 and then push QUICK Push D pad to select Edit and then push D pad Ent Push D pad to select MNAME The cursor blinks on the firs...

Page 215: ...Repeat steps y and u to enter the desired channel name of up to 16 characters o o Push D pad Ent to save and exit the Memory name edit mode 0 Push D pad to select Write and then push D pad Ent The confirmation screen Overwrite appears 1 Push D pad to select YES and then push D pad Ent Returns to the screen viewed before entering the Select Memory write mode in step w Continued from the previous pa...

Page 216: ...Rotate DIAL to select a desired Display type and then push D pad Ent Freq Name OFF Displays only the frequency Freq Displays the large font sized frequency and small font sized memory name Name Displays large font sized mem ory name and a small font sized frequency Freq Name OFF Freq Name Example When Memory Name ID 51 is programmed into M CH 000 146 010MHz Push QUICK Push D pad to select a desire...

Page 217: ...he confirmation screen Clear appears D pad Ent t t Push D pad to select YES and then push D pad Ent to clear the contents After clearing the display returns to the Select Memory write mode To cancel the memory clearing select NO and push D pad Ent y y Push CLR to exit the Select Memory write mode Returns to the previous screen viewed before entering the Select Memory write mode in step q DIAL Exam...

Page 218: ... 13 3 D D Receive mode for a scan 13 3 D D When a signal is received 13 4 D D Scan name 13 4 D D Scan Stop Beep function 13 4 D D Scan function during Dualwatch operation 13 4 VFO scan 13 5 D D VFO mode scan 13 5 Setting and clearing the skip frequencies 13 7 D D Setting the skip frequencies 13 7 D D Clearing the skip setting 13 8 Memory scan 13 9 D D Memory skip scan 13 9 D D Memory bank scan 13 ...

Page 219: ... D Memory bank scan ALL Full bank scan p 13 10 Scans all banks BANK LINK Bank link scan p 13 10 Sequentially scans the banks which are set to link in the BANK LINK item in the MENU screen MENU Scan Bank Link BANK A Z Bank scan p 13 10 Scans the memory channels in the selected bank Duplex DUP scan The Duplex scan searches for both TX and RX fre quencies which are used in duplex operation p 15 4 15 ...

Page 220: ... tuning step is applied to the scan D D Skip function The skip function speeds up scanning by not scanning those frequencies set as skip channels D D Temporary Skip timer The Temporary Skip function temporarily skips unwant ed frequencies during a scan for the set period These settings can be changed in the MENU screen p 16 18 MENU Scan Temporary Skip Timer D D Receive mode for a scan The selected...

Page 221: ...ceived The function can be turned ON in the MENU screen p 16 90 MENU Sounds Scan Stop Beep D D Scan function during Dualwatch opera tion When the scan function is used during the dualwatch operation the SUB band audio signal may be muted depending on the operating band or mode And the audio output may be interrupted when the fre quency or operating mode is switched while scanning SUB band mute sta...

Page 222: ...et TONE Tone scan For tone squelch scanning D pad Ent t t Push D pad Ent to start the scan ALL The decimal point and ALL blinks BAND The decimal point and BND blinks P LINK0 9 P00 24 The decimal point and Scan edge number blink DUP The decimal point and DUP DUP blink If desired rotate DIAL to switch the scanning direction during a scan If desired push MODE to change the operating mode during a sca...

Page 223: ...an name is not assigned When the program link name is not assigned D D VFO mode scan continued Scan name Scan 0 When a program link name is assigned When a program link name is assigned the scan type can be set by selecting the program link name from the scan type list Step r on page 13 5 Scan edges Program link Program link name Link 0 NOTE The scan name is not displayed during a scan NOTE The pr...

Page 224: ...ond until the 3 beeps sound The memory channel number blinks When a signal is received during the scan the transceiv er attempts to program the frequency as a skip channel into empty memory channel 499 If channel 499 is already programmed the transceiver automatically searches backwards for a blank channel to program If no blank memory channel is found a beep sounds and no skip channel is programm...

Page 225: ...ad to select OFF OFF Cancel the skip setting SKIP Skipped during a memory scan PSKIP Skipped during both VFO and memory scans y y Push D pad Ent to save the selection The skip setting is canceled The channel that is programmed as a skip frequency Push M CALL then rotate DIAL to select the memory channel to clear its skip setting Push QUICK TIP The skip setting is also cancelled when the mem ory ch...

Page 226: ...an BAND Band memory scan MODE Mode memory scan DUP Duplex scan p 13 2 Appears only when duplex is set on the chan nel TONE Tone scan For tone scanning D pad Ent r r Push D pad Ent to start the scan If desired rotate DIAL to switch the scanning direction during a scan The scan resumes even while the MENU screen is dis played t t To cancel the scan hold down SCAN for 1 sec ond Pushing CLR also cance...

Page 227: ...yPush D pad to select the scan type ALL Full bank scan BANK LINK Bank link scan BANK A to Z Bank scan Only banks which contain a memory chan nel are displayed DUP Duplex scan p 13 2 Appears only when duplex is set on the channel TONE Tone scan For tone scanning u u Push D pad Ent to start the scan i i To cancel the scan hold down SCAN for 1 second Pushing CLR also cancels the scan NOTE The bank co...

Page 228: ... is programmed the scan type can be set by selecting the bank name from the scan type list Step y on page 13 10 When the bank name is programmed Bank name UHF Contest Memory scan D D Memory bank scan continued NOTE The bank name is not displayed during a scan Previous view ...

Page 229: ...e or more times to select the Memory mode w w Rotate DIAL to select the memory channel to be set as a skip channel e ePush QUICK r r Push D pad to select SKIP or PSKIP and then push D pad Ent OFF Cancel the skip setting SKIP Skipped during a memory scan PSKIP Skipped during both VFO and memory scans D pad Ent t t Push D pad Ent to save the selection The skip setting is set DIAL Setting the skip ch...

Page 230: ...fter the Temporary Skip time period passes or the scan is cancelled the Temporary Skip is also cancelled Setting the temporary skip function Example Full scan in the FM mode When a signal is received Blinks Blinks Blinks Blinks Push QUICK Push D pad to select then push D pad Ent TIP During Memory or DR scanning follow steps w and r to skip the channel for the set period Default 5 minutes Up to 5 T...

Page 231: ...Memory Bank scan 14 2 D D A frequency in FROM on the DR screen and a priority channel 14 3 D D DR scan and a priority channel 14 3 VFO frequency and a priority channel 14 4 VFO frequency and a Memory Bank scan 14 6 VFO scan and a priority channel 14 8 VFO scan and Memory Bank scan 14 10 A frequency in FROM on the DR screen and a priority channel 14 13 DR scan and a priority channel 14 16 Previous ...

Page 232: ...g on a VFO frequency A Memory scan or Bank scan can be selected VFO frequency and a Memory scan SKIP 0 1 2 499 M CH Receiving 5 seconds VFO mode VFO frequency and a Bank scan SKIP 00 01 02 99 Bank CH Receiving 5 seconds VFO mode D D VFO scan and a Memory Bank scan p 14 10 Sequentially checks the Memory or Bank channels ev ery 5 seconds during a VFO mode scan A Memory scan or Bank scan can be selec...

Page 233: ...ected M CH FROM on the DR screen and a Bank channel Receiving 5 seconds From on the DR screen Selected Bank CH FROM on the DR screen and a Call channel Receiving 5 seconds From on the DR screen CALL CH D D DR scan and a priority channel p 14 16 Checks a priority channel every 5 seconds during a DR scan A VFO frequency Memory channel Bank channel or Call channel can be selected as the priority chan...

Page 234: ...annel q Push M CALL one or more times to select the Call channel mode w Rotate DIAL to select the Call channel you want to watch 3 Start the Priority watch q Push QUICK w Push D pad to select PRIO Watch and then push D pad Ent e Push D pad to select ON or Bell ON When a signal is received on the priority channel the channel is automatically se lected Bell When a signal is received on the priority ...

Page 235: ...as for a normal scan p 16 18 When Bell is selected When a signal is received on the priority channel a beep sounds and the icon blinks Example Checks M CH 490 while receiving on 145 800 MHz Example Checks Bank CH D06 while receiving on 145 800 MHz Example Checks Call CH C3 while receiving on 145 800 MHz Example For a Memory channel Appears Checks the Memory chan nel every 5 seconds VFO frequency a...

Page 236: ...played c Push D pad to select a desired bank and then push D pad Ent If OFF is selected the bank selection is can celed 3 Start the Priority watch q Push QUICK w Push D pad to select PRIO Watch and then push D pad Ent e Push D pad to select ON or Bell ON When a signal is received on the priority channel the channel is automatically se lected Bell When a signal is received on the priority channel t...

Page 237: ...cted When a signal is received on the priority channel a beep sounds and the icon blinks Example Sequentially checks the Memory channels while receiving on 145 800 MHz Example Sequentially checks Bank channels while re ceiving on 145 800 MHz VFO frequency and a Memory Bank scan Continued Appears Checks the Memory chan nel every 5 seconds The Memory chan nels are sequential ly checked Checks the Ba...

Page 238: ...all channel you want to watch 2 Start the Priority watch q Push QUICK w Push D pad to select PRIO Watch and then push D pad Ent e Push D pad to select ON or Bell ON When a signal is received on the priority channel the channel is automatically se lected Bell When a signal is received on the priority channel the icon is displayed in the VFO mode r Push D pad Ent to start the Priority watch The PRIO...

Page 239: ...O scan and a priority channel Continued Checks the Bank channel every 5 seconds 4 During the Priority watch Checks the selected priority channel every 5 seconds while VFO scanning Appears Appears Checks the Memory chan nel every 5 seconds Example Checks M CH 490 while VFO scanning Example Checks Bank CH D06 while VFO scanning Appears Appears Blinks Example Checks Call CH C3 while VFO scanning Appe...

Page 240: ...the Memory and Bank zIn the Memory mode push QUICK x Push D pad to select Bank Select and then push D pad Ent The Bank list is displayed c Push D pad to select a desired bank and then push D pad Ent If OFF is selected the bank selection is can celed 2 Start the Priority watch q Push QUICK w Push D pad to select PRIO Watch and then push D pad Ent e Push D pad to select ON or Bell ON When a signal i...

Page 241: ...lected priority channel every 5 seconds while VFO scanning Hold down SCAN for 1 second Push D pad to select then push D pad Ent Blinks Blinks Example Checks the Memory channels while VFO scan ning Example Checks the Bank channels while VFO scanning Blinks Appears Checks the Memory chan nels every 5 seconds Blinks Appears Checks the Bank channels every 5 seconds Appears Appears NOTE Push CLR to can...

Page 242: ...automatically selected The PRIO icon blinks The scan pause timer and resume settings are the same as for a normal scan When BELL is selected When a signal is received on the priority channel a beep sounds and the icon blinks The VFO scan resumes Automatically selects the Memory channel Remains in the VFO mode Example For a Memory scan Blinks Blinks Blinks Blinks Previous view ...

Page 243: ...played c Push D pad to select a desired bank and then push D pad Ent If OFF is selected the bank selection is canceled D pad Ent To select a Call channel q Push M CALL one or more times to select the Call channel mode w Rotate DIAL to select the Call channel you want to watch 2 Select a repeater or a simplex frequency on the DR screen q Hold down for 1 second to turn ON the DR function w Push D pa...

Page 244: ... Appears Appears Checks the VFO frequen cy every 5 seconds Example Checks the M CH 490 every 5 seconds while receiving on a repeater or a simplex frequen cy Appears Appears Checks the M CH every 5 seconds Example Checks the Bank CH D06 every 5 seconds while receiving on a repeater or a simplex fre quency Appears Appears Checks the Bank CH ev ery 5 seconds Example Checks the Call CH C3 every 5 seco...

Page 245: ...nks The scan pause timer and resume settings are the same as for a normal scan When Bell is selected When a signal is received on the priority channel a beep sounds and the icon blinks Automatically selects the priority channel Remains on the DR screen Example For a Memory channel Blinks Blinks A frequency in FROM on the DR screen and a priority channel Continued Previous view ...

Page 246: ...channel q Push M CALL one or more times to select the Call channel mode w Rotate DIAL to select the Call channel you want to watch 2 Start the DR scan q Hold down for 1 second The DR screen appears w Hold down SCAN for 1 second e Push D pad to select the repeater type and then push D pad Ent The DR scan starts 3 Start the Priority watch q Push QUICK w Push D pad to select PRIO Watch and then push ...

Page 247: ...the DR scan Appears Appears Checks the VFO frequen cy every 5 seconds Example Checks the M CH 490 during the DR scan Blinks Appears Appears Checks the M CH 490 every 5 seconds Example Checks the Bank CH D06 during the DR scan Blinks Appears Appears Checks the Bank CH D06 every 5 seconds Example Checks the Call CH C3 during the DR scan Blinks Appears Appears Checks the Call CH C3 every 5 seconds Pr...

Page 248: ...rity watch Push it again to cancel the scan The scan pause timer and resume settings are the same as for a normal scan When Bell is selected When a signal is received on the priority channel a beep sounds and the icon blinks The DR scan resumes DR scan and a priority channel Continued Automatically selects the priority channel Remains on the DR screen Example For a Memory channel Blinks Blinks Pre...

Page 249: ...nput signal 15 3 Duplex operation 15 4 D D Setting the frequency offset 15 4 D D Setting the duplex direction 15 5 D D Duplex operation 15 5 Off band indication 15 5 Auto repeater function 15 6 D D Auto repeater setting 15 6 D D Frequency range and offset direction 15 6 1750 Hz tone 15 7 Previous view ...

Page 250: ...pears The frequency offset can be set in the Offset Freq screen p 15 4 MENU DUP TONE Offset Freq t t Push QUICK and push D pad to select TONE and then push D pad Ent D pad Ent y y Push D pad to select TONE and then push D pad Ent TONE appears The tone frequency can be set in the Repeater Tone screen 88 5 Hz is set by default p 16 16 MENU DUP TONE Repeater Tone u uCommunicate in the normal way For ...

Page 251: ...put frequency Hold down SQL to listen on the repeater input fre quency While monitoring the TX RX indicator lights green and an S RF meter dot blinks While monitoring the displayed frequency automatically changes to the transmit frequency repeater input fre quency When the other station s signal can be directly received move to a non repeater frequency and use simplex du plex OFF While monitoring ...

Page 252: ...uning step in the VFO mode is used when setting the frequency offset Pushing V MHz toggles the tuning digit as shown below TS 1 MHz 10 MHz The frequency changes according to the preset tuning steps p 5 8 y y Push MENU to exit the MENU screen To reset to the default value Push QUICK in step t as described above then push D pad Ent to reset to the default value The current frequency offset Rotate DI...

Page 253: ...from the receive frequency by the offset amount DIAL Off band indication If the transmit frequency is out of the amateur band the off band indication OFF appears on the display when PTT is pushed Check the frequency offset p 15 4 or duplex direction see above in this case Push D pad to select then push D pad Ent Push D pad to select then push D pad Ent D D Duplex operation q q Push MODE several ti...

Page 254: ... DUP is set D D Auto repeater setting q qPush MENU to enter the MENU screen w w Push D pad to select the root item Function and then push D pad Ent D pad Ent e e Push D pad to select Auto Repeater and then push D pad Ent r r Rotate DIAL to select the Auto repeater setting USA version OFF The Auto repeater function is OFF ON DUP Turns ON only the duplex operation Default ON DUP TONE Turns ON the du...

Page 255: ...50 Hz tone signal If OFF BAND appears check the frequency offset or shift direction pp 15 4 15 5 While transmitting the displayed frequency automati cally changes to the transmit frequency repeater input frequency i i Hold down SQL to check whether the other sta tion s transmit signal can be received directly or not by listening on the repeater input frequency While monitoring the TX RX indicator ...

Page 256: ...TX items 16 28 Broadcast BC Radio items 16 30 GPS items 16 32 Call sign items 16 51 RX History items 16 53 DV Memory items 16 56 My Station items 16 59 DV Set items 16 60 SPEECH items 16 66 DTMF T CALL items 16 68 QSO RX Log items 16 69 Function items 16 72 Display items 16 80 Sounds items 16 88 Time set items 16 92 DV Gateway items 16 94 SD Card items 16 95 Others items 16 97 Previous view ...

Page 257: ...4 through 16 15 for details of each item Enters Exits the Menu screen Goes back a level Return to thedefault setting Moves selector up Moves selector down Goes to the previous level Goes to the next level Set NOTE The Menu system is constructed in a tree structure You may go to the next tree level or go back a level depending on the selected item Previous view ...

Page 258: ...ously held down the items are quickly scrolled D pad Ent e e Push D pad to select Auto Power OFF and then push D pad Ent r r Push D pad to select 30min t t Push MENU to save and exit the Menu screen Menu item selection Continued D D Entering the Menu screen To return to the de fault setting push QUICK in step r to display De fault and then push D pad Ent Appears Previous view ...

Page 259: ...ich superimposes the CTCSS tone or subaudible tone the squelch tail noise of FM mode is suppressed on the RX side Selects DTCS both encoder decoder codes for DTCS squelch or the pocket beep function In this item set the scan options Scan Pause Timer Resume Timer Program Skip Bank Link Program Link 2sec 10sec 20sec or HOLD 0sec 2sec 5sec or HOLD OFF or ON A Z See page 16 20 for details of the prese...

Page 260: ...ed signal audio Records a voice audio to use the Auto Reply function in the DV mode Voice Recorder Record Play Files PLAY FILES 1 2 3 or 4 Sets the microphone sensitivity to suit your needs Plays or deletes the recorded audio Starts recording the microphone audio Player Set Skip Time 3sec 5sec 10sec or 30sec Sets the Skip time to rewind or forward the recorded audio when you push the fast re wind ...

Page 261: ...or ON BC Radio DESCRIPTIONS RANGE OR VALUE Default is shown in bold Turns the Power Save BC Radio func tion ON to save battery power or OFF Sets the timer to temporarily mute the BC Radio audio when receiving signals on the operating band Shows the BC Radio memory contents BC Radio ON BC Radio OFF BC Radio Mode Power Save BC Radio Turns the BC Radio ON or OFF Selects the BC Radio Mode with the tra...

Page 262: ...the DATA jack ON or OFF GPS Logger Record Interval Record sentence 1sec 5sec 10sec 30sec or 60sec RMC GGA GLL VTG OFF or ON GPS Memory GPS Information Displays the received GPS information GPS Position Displays your position RX station GPS memory and Alarm positions Shows the GPS memory contents Turns the GPS logger function ON or OFF to store your route as you move Selects the GPS Logger function...

Page 263: ... GPS Sentence GPS Message RMC GGA GLL VTG GSA GSV Transmits position data in selected GPS sentences Enters a GPS message to be transmit ted Turns OFF the GPS TX function Enters an unproto address or keep the default Unproto Address Selects whether to transmit the course and speed data or not Data Extension OFF or Course Speed Selects a format to transmit the current UTC time as a time stamp Time S...

Page 264: ...st described on this manual may differ from your preloaded list DESCRIPTIONS DESCRIPTIONS Displays the operating call signs Sets the operating call signs according to the type of call you want to make Displays the calls your transceiver received Stores station call signs Adds or edits a call sign Stores repeater information Adds or edits a repeater information See page 9 47 for details of the prel...

Page 265: ...me after releasing PTT when the DV Data TX is set to PTT and the DV data is sent by using DV Fast Data Digital Monitor Digital Repeater Set RX Record RPT RX Call Sign Write RX Repeater Write DV Auto Detect Auto Digital or Analog OFF or ON ALL or Latest Only OFF or Auto OFF or Auto OFF or ON Selects the DV mode RX monitoring when SQL is held down Turns the digital repeater setting function ON or OF...

Page 266: ...MF T CALL DTMF Memory DTMF Speed T CALL d0 d9 dA dD d or d In this item set the DTMF Memory functions 100ms 200ms 300ms or 500ms Shows a list of the DTMF memory channels The DTMF memory can store up to 24 digit DTMF code Selects the DTMF transfer speed DIAL SPEECH OFF or ON Turns the Dial Speech function ON or OFF MODE SPEECH OFF or ON Turns the Operating Mode Speech function ON or OFF QSO RX Log ...

Page 267: ... Gain Internal MIC Gain External Data Speed 1 2 4 1 2 4 4800bps or 9600bps Sets the internal microphone sensitiv ity to suit your preference Sets the external microphone sensitiv ity to suit your preference Selects the data transmission speed for low speed communication or between the DATA jack and external modules like a GPS receiver and so on Turns the VOX function ON or OFF Sets the VOX gain le...

Page 268: ...e of the transceiver Display Language English or Japanese Selects the display language in the DR function or Menu mode When English is selected in System Language this set ting will disappear Reply Position Display OFF or ON Selects to display the caller s position data when the data is included in the Auto Reply signal or not Menu items and Default settings Continued NOTE The default settings sho...

Page 269: ...N ON to me High Tone or ON to me Alarm High Tone Time Set Date Time GPS Time Correct UTC Offset Auto Power OFF In this item set the Time options OFF or Auto 14 00 0 00 14 00 OFF 30min 60min 90min or 120min DESCRIPTIONS RANGE OR VALUE Default is shown in bold Selects to mute the SUB band audio signal while receiving on the MAIN band and or sound a beep when a signal disappears on the SUB band Sub B...

Page 270: ...port File selection New File File selection Import ALL Except My Station Repeater List Only Your Call Sign Repeater List GPS memory Your Call Sign Repeater List GPS memory In this item set the microSD card options DESCRIPTIONS RANGE OR VALUE Default is shown in bold Loads the settings file to the transceiver Imports data to the transceiver Exports data from the transceiver Saves the settings as a ...

Page 271: ...ter access and other functions 50 tone frequencies 67 0 254 1 Hz are selectable TSQL Freq Default 88 5 DUP TONE TSQL Freq Select the tone frequency for the tone squelch or pocket beep 50 frequen cies 67 0 254 1 Hz are selectable Selectable repeater tone tone squelch frequencies Unit Hz 67 0 69 3 71 9 74 4 77 0 79 7 82 5 085 4 088 5 091 5 094 8 097 4 100 0 103 5 107 2 110 9 114 8 118 8 123 0 127 3 ...

Page 272: ...152 155 156 162 165 172 174 205 212 223 225 226 243 244 245 246 251 252 255 261 263 265 266 271 274 306 311 315 325 331 332 343 346 351 356 364 365 371 411 412 413 423 431 432 445 446 452 454 455 462 464 465 466 503 506 516 523 526 532 546 565 606 612 624 627 631 632 654 662 664 703 712 723 731 732 734 743 754 DTCS Polarity Default Both N DUP TONE DTCS Polarity Select the DTCS polarity to use for ...

Page 273: ...pears the scan resumes according to the scan Resume Timer setting 0sec The scan resumes immediately after the signal disappears 1 to 5sec The scan resumes 1 to 5 seconds after the signal disappears HOLD The scan remains paused for the Pause Timer setting even if the signal disappears NOTE Rotate DIAL to resume the scan The Resume Timer must be set shorter than the Pause Timer otherwise this timer ...

Page 274: ...e Memory Chan nel screen OFF The transceiver scans all frequencies without skipping ON The transceiver does not scan frequencies set as PSKIP frequen cies When the skip setting is ON PSKIP appears on the channel number Bank Link Default A Z Scan Bank Link Select banks to be scanned during a Bank Link Scan The Bank Link function scans all channels in the selected banks Select a desired bank A to Z ...

Page 275: ... quency may differ depending on the transceiver version A link setting can be added when more than two pairs of Program Scan Edge chan nels are entered p 13 2 Push Program Link number screen NOTE The Add item will not be displayed when only one pair of pro grammed scan edge channels are entered or no programmed scan chan nel 00 to 24 is left to add to the selected link channel Adding a Scan Edge c...

Page 276: ... example A The selected digit blinks Push D pad to move the cursor forward or back ward While selecting a character push QUICK to change the character to an upper case or lower case letter While selecting a digit push QUICK to open the input mode selection window A space can be selected in any input mode Rotate DIAL counterclockwise to enter a space Push CLR to delete the selected character or hol...

Page 277: ...Memo QSO Recorder Play Files Performs the following steps to play back the recorded audio on the microSD card Push D pad Ent and folders on the microSD card are displayed These folders contain the stored files TIP Insert a microSD card into the transceiver before selecting these items Playing back q q Push D pad to select the folder that includes the desired file to play back and then push D pad E...

Page 278: ...hen transmitted while recording When OFF is selected in File Split the recording is paused After finishing the transmission the recording resumes When ON is selected in File Split a new file is automatically created and the transmitted voice audio is recorded into the new one RX REC Condition Default Squelch Auto Voice Memo QSO Recorder Recorder Set RX REC Condition Select whether or not the squel...

Page 279: ...n ON or OFF The transmission from the external speaker microphone VOX function and CI V command also starts recording OFF Turns the function OFF ON The recording automatically starts when PTT is pushed The recording will stop when No signal is transmitted for 10 seconds after releasing PTT No signal is received for 10 seconds after releasing PTT Frequency or operating mode is changed after releasi...

Page 280: ...d into the transceiver before selecting these items Do the following steps to play back the recorded audio onto the microSD card Playing back q q Push D pad to select the folder that includes the desired file to play back and then push D pad Ent D pad Ent w w Push D pad to select the file to play back and then push D pad Ent The VOICE PLAYER screen is displayed and the selected file is played back...

Page 281: ...suit your needs Higher values make the microphone more sensitive to your voice Skip Time Default 10sec Voice Memo Voice Recorder Player Set Skip Time Set the Skip Time to 3 5 10 or 30 seconds to rewind or skip forward for this set period when you push the fast rewind or fast forward key while playing the recorded voice audio See Operations while playing back for forwarding or rewinding operation p...

Page 282: ... microphone at your nor mal voice level DO NOT hold the transceiver too close to your mouth or speak too loudly This may distort your speech w w The recording stops after 10 second or when PTT is released NOTE The time display is different as shown below No audio was recorded No au dio file is saved While recording Recording time Recordable time Recorded time Recording stopped While playing back P...

Page 283: ... these items q q While holding down PTT speak at your normal voice level DO NOT hold the transceiver too close to your mouth or speak too loudly This may distort your speech w w The recording stops after 10 seconds or when PTT is released NOTE The time display is different as shown below No audio was recorded No au dio file is saved While recording Recording time Recordable time Recorded time Reco...

Page 284: ... TX Set Single TX The transceiver transmits the recorded voice audio once To cancel the voice transmission push CLR TIP You can transmit the recorded voice audio also from the QUICK MENU screen p 17 3 Repeat TX Voice TX TX Set Repeat TX The transceiver repeatedly transmits the recorded voice audio for up to 10 minutes at the specified interval in the Repeat Time item To cancel the voice transmissi...

Page 285: ... bank FREQUENCY Entered frequency For FM Between 76 0 and 108 0 MHz For AM Between 520 and 1710 kHz The frequency range you can enter differs depending on the transceiver s version SKIP Shows the skip status The Skip channel does not appear in the BC Radio memory Auto Mute Default 2sec BC Radio BC Radio Set Auto Mute Set the Auto Mute timer to between 0 and 10 seconds in 1 second steps or OFF OFF ...

Page 286: ...lliseconds during AM mode NOTE This function is disabled when the external power source is used BC Radio ON BC Radio BC Radio ON Turn ON the BC Radio When the transceiver receives 2 amateur bands on the MAIN band and SUB band you can still listen to the Broadcast BC Radio When the BC Radio is ON BC Radio OFF appears on the BC RADIO screen To turn OFF the BC Radio select BC Radio OFF In the QUICK M...

Page 287: ...nction will turn OFF the GPS receiver for this set period of time OFF The receiver is continuously ON 1 2 4 8min When the receiver cannot receive signals from a satellite for 5 minutes the GPS receiver power is turned OFF for the selected periods 1 2 4 or 8 minutes After this period the receiver resumes receiving Auto When the receiver cannot receive signals from a satellite for 5 minutes the GPS ...

Page 288: ...ching Connected Received Internal GPS Blinks Appears External GPS Not displayed Blinks Appears No icon appears when Manual is selected in the GPS select item GPS Out To DATA Jack Default OFF GPS GPS Set GPS Out To DATA Select whether or not GPS information from either the internal or external GPS receiver is output at the DATA jack TIP No data is output when OFF or Manual is selected in the GPS Se...

Page 289: ...tween 0 and 12 Altitude ft Non positioning 2D Tracking three satellite Positioning results 4 or more satellite tracking Latitude Non positioning Positioning results Longitude Non positioning Positioning results GPS Position GPS GPS Position Your current position received position or GPS memory alarm position infor mation is displayed p 10 3 Push D pad to select the screen to see the MY RX MEM and ...

Page 290: ...ude Longitude Displays the caller s longitude GL Displays the grid locator based on the caller s latitude and longitude ALT Displays the caller s altitude DST Displays the caller s distance from your position Call sign Displays the caller s call sign COURSE Displays the caller s direction over ground SPEED Displays the caller s speed GPS Time Stamp Displays the time that the caller acquired the po...

Page 291: ...rom your position Symbol Displays the Object Item station s D PRS symbol Latitude Displays the Object Item station s latitude Longitude Displays the Object Item station s longitude GL Displays the grid locator based on the Object Item station s latitude and longitude ALT Displays the Object Item station s altitude DST Displays the Object Item station s distance from your position Object Item name ...

Page 292: ... caller station s area GPS Time Stamp Displays the time that the caller acquired the weather data MEM screen GPS memory alarm position Compass Displays GPS Memory channel s direction from your posi tion Latitude Displays GPS Memory channel s latitude Longitude Displays GPS Memory channel s longitude GL Displays the grid locator based on the latitude and longitude of GPS Memory channel s DST Displa...

Page 293: ...roup Enter a name of up to 16 alphanumeric characters for each GPS group The GPS memory group name can be edited in the QUICK MENU screen p 10 18 GPS memory channels NAME The name of a GPS memory channel Enter a name of up to 16 alphanumeric characters for each GPS memory channel DATE Stored date TIME Stored time LATITUDE Stored location latitude LONGITUDE Stored location longitude ALTITUDE Stored...

Page 294: ...y one memory in the GPS memory is used for the GPS alarm function When the target enters in the active alarm range the GPS alarm sounds The active alarm range is specified in Alarm Area RX Memory p 16 40 Alarm Area Group Default 0 25 GPS GPS Alarm Alarm Area Group When the Alarm Select is set to Group or one of the memory groups set the GPS alarm active range When a target enters in the specified ...

Page 295: ...nsceiver sounds 3 beeps and the GPS alarm icon blinks when the target enters the 1 kilometer range Both The transceiver sounds a beep and the GPS alarm icon blinks when the target enters the 1 kilometer range and sounds 3 beeps and the icon blinks when it enters the 500 meter range When the target exits the 500 meter range but is still in the 1 ki lometer range the icon continues to blink but no b...

Page 296: ...d into the transceiver 2 You must select either Internal GPS or External GPS in GPS select NOTE The log data will be saved on the microSD card The file name is automatically created as shown in the example below Log start date and time 2016 10 1 15 30 00 File name 20161001_153000 log You can select the GPS record sentence for the GPS Logger function Record Interval Default 5sec GPS GPS Logger Reco...

Page 297: ...nal GPS in GPS Select screen and insert a microSD card During the exclusive GPS logger mode the transceiver s transmission and reception are disabled To cancel the exclusive GPS logger mode reboot the transceiver q q Push D pad Ent D pad Ent w w Push D pad to select YES and then push D pad Ent When the GPS logger function is set to ON the GPS logger mode is started im mediately after pushing D pad...

Page 298: ... In the D PRS DV A mode the normal D PRS codes are transmitted to the PC connected to the transceiver D PRS code is based on APRS code APRS Automatic Packet Reporting System NMEA DV G Transmits position data in NMEA format the TX GPS mode is DV G Unproto Address Default API51 DSTAR GPS GPS TX Mode D PRS DV A Unproto Address Enter an unproto address of up to 56 alphanumeric characters Unproto addre...

Page 299: ...l by entering a 2 character symbol code Selecting a symbol with a 2 character symbol code q q Push D pad to select a desired symbol memory between 1 and 4 D pad Ent w w Push QUICK to select Edit Symbol and then push D pad Ent e ePush QUICK again r r Push D pad to select Direct Input and then push D pad Ent t tRotate DIAL to select the first digit Usable characters 0 to 9 A to Z y yPush to select t...

Page 300: ...ateway SSTV Rover Aircraft Small Aircraft Bus Repeater Overlayed WX Station Red Cross ATV Ship powerboat Overlayed Diamond House QTH VHF WX Service Truck 18 wheeler RACES X Helicopter Van Gale Flags Red dot Yacht Yagi QTH Ham Store Fire Person Overlayed Digipeater Work Zone Campground DF station Overlayed Gateway Speedpost Value Signpost Motorcycle Large Aircraft House HF Triangle Railroad Engine ...

Page 301: ...of 1 to 15 to the call sign Even if a call sign includes a space and text it will be automati cally changed to this set numeric ID Example SSID 9 JA3YUA JA3YUA 9 9 is added and used as the SSID JA3YUA A JA3YUA 9 A is changed to 9 and it is used as the SSID A to Z Adds an SSID of A to Z to your call sign Even if a call sign includes a space and a text it will be automati cally changed to this set l...

Page 302: ...tings p 16 48 Data Extension Altitude The number of characters OFF OFF Up to 43 characters Default OFF ON Up to 35 characters Course Speed OFF Up to 36 characters Course Speed ON Up to 28 characters The symbol shows the transmittable comment range Please note that the characters that exceed the range from the symbol will not be transmitted Transmittable comment range display In case of up to 36 ch...

Page 303: ...ddition to position data This Altitude item will be hidden when NMEA DV G or OFF is selected in GPS TX Mode NOTE When ON is selected and Data Extension option is set to OFF the number of Comment characters is limited to 35 When ON is selected and Data Extension option is set to Course Speed the number of Comment characters is limited to 28 Data Extension Default OFF GPS GPS TX Mode D PRS DV A Data...

Page 304: ...tence The Time Stamp is shown based on the UTC Universal Time Coordinated time Sentence Lat Lon Alt GPS Time Stamp UTC Date UTC Status 2D 3D COG True SOG knot RMC GGA GLL VTG GSA GSV Sentence Others RMC Mode Indicator GGA Number of satellites in use HDOP Geoidal separation Age of Differential GPS data GLL Mode Indicator VTG COG Magnetic north SOG km h Mode Indicator GSA ID numbers of satellites us...

Page 305: ...e GPS automatic transmission function This function automatically transmits the current position data received from a GPS receiver as well as any entered GPS message at the selected inter val OFF Turns the function OFF However you can transmit the po sition data manually by pushing PTT 5 sec to 30 min Transmits the current position data at the selected interval 5 10 or 30 seconds or 1 3 5 10 or 30...

Page 306: ...ano repeater JP3YHH B while in the DV mode Before starting to set the call sign set the frequency of your access repeater or du plex direction See pages 5 8 and 15 5 NOTE When the Digital Repeater Setting function is ON the repeater call sign can be automatically set p 16 63 1 Call sign R1 setting q q While in the DV mode push D pad to select R1 and then push QUICK D pad Ent w wPush D pad to selec...

Page 307: ...y CQ and then push D pad Ent e e Push D pad to select 11 Japan repeater group where your destina tion repeater is listed and then push D pad Ent r rPush D pad to select Hamacho430 and then push D pad Ent When you manually enter the call sign push in step q About the YOUR SELECT screen CQCQCQ To select CQCQCQ to make a non call sign specific call Gateway CQ To select Gateway CQ using the Repeater L...

Page 308: ...en RX01 RX50 RX history number CALLER 1 Displays the call sign of the caller station and any note entered after the call sign CALLED 1 Displays the call sign of the called station MESSAGE Displays any message included in the received call if entered RXRPT2 1 Displays the call sign of the repeater you received the call from FREQUENCY Displays the frequency the call was received This item appears on...

Page 309: ...s accessed by the caller station If it was a call through a gateway and the internet this item dis plays the gateway repeater call sign of your local area repeater RXRPT2 1 2 Displays the call sign of the repeater you received the call from RX MESSAGE Displays any message included in the received call if entered RX TIME Displays the date and time the call was received 1 When the caller s TX mode i...

Page 310: ...em station s latitude Longitude Displays the Object Item station s longitude GL Displays the grid locator based on the Object Item station s latitude and longitude ALT Displays the Object Item station s altitude DST DisplaystheObject Itemstation sdistance from your position Object Item name Displays the Object Item station s name Call sign Displays the caller s call sign with SSID COURSE Displays ...

Page 311: ...mple communication when using repeaters The transceiver has a total of 750 repeater memory channels storable in 30 groups 01 to 30 DV repeater DV Simplex FM repeater and FM simplex can be stored Repeater List The sub name regional name of the selected repeater Repeater group where the selected repeater is listed The call sign of the selected repeater Skip setting ON NOTE For easy operation a Repea...

Page 312: ... or Exact LATITUDE Latitude position of the repeater LONGITUDE Longitude position of the repeater UTC OFFSET Time difference between UTC Universal Time Coordinated and the local time NOTE When the repeater is used for a simplex communication refer to the list below to set the settings DV Simplex TYPE DV Simplex NAME Enter the desired name of up to 16 alphanumeric characters SUB NAME Enter the desi...

Page 313: ...n of the FM repeater LONGITUDE Longitude position of the FM repeater UTC OFFSET Time difference between UTC Universal Time Coordinated and the local time FM Simplex TYPE FM Simplex NAME Enter the desired name of up to 16 alphanumeric characters SUB NAME Enter the desired sub name of up to 8 alphanumeric characters GROUP Set the desired repeater group USE FROM Select whether or not to use the acces...

Page 314: ... the Ba sic manual for MY call sign entry To select a different My Call Sign push D pad to select and then push D pad Ent to set TX Message My Station TX Message The transceiver has a total of 5 memories to store short messages for simul taneous transmission in the DV mode Enter a message of up to 20 alphanumeric characters for each memory TX Message edit screen TIP See page 9 2 for TX message ent...

Page 315: ... Bass Boost Turn the DV mode received audio Bass Boost function ON or OFF This function is separate from the Boost setting of the RX Bass OFF Turns the function OFF ON This function boosts the received audio bass to output it from a speaker even if the speaker is small TX Bass Default Normal DV Set Tone Control TX Bass Set the DV mode transmit audio bass filter level to Cut Normal or Boost Cut Cut...

Page 316: ...seconds to receive your position and may be late to send the call When OFF or Manual is set in GPS Select the internal GPS re ceiver is temporarily turned ON When External GPS is set in GPS Select the transceiver transmits your position But if the external GPS receiver is not connected the internal GPS receiver will be activated NOTE The Power Save function is disabled when ON or Voice is selected...

Page 317: ...communication mode and after releasing PTT the transceiver automatically sends the DV data by using the DV Fast Data for this set period OFF After releasing PTT the transceiver returns to receive 1 10sec After releasing PTT the transceiver sends data by using the DV Fast Data for this set period When the TX data is completely sent within this set period the transceiver automatically returns to rec...

Page 318: ...ation call sign into UR OFF Turns the function OFF Auto Automatically sets the call sign of the caller station into UR RX Repeater Write Default OFF DV Set RX Repeater Write Set the repeater call sign automatic write function to Auto or OFF When receiving a call addressed to your own call sign through a repeater in any DV mode except for the DR function this function automatically sets the call si...

Page 319: ...tory is displayed Push D pad to select a call sign to set to TO destination and then push D pad Ent BK Default OFF DV Set BK The BK Break in function allows you to break into a conversation where the two other stations are communicating with call sign squelch enabled OFF Turns the function OFF ON Turns the function ON BK appears on the display NOTE The BK function is automatically turned OFF when ...

Page 320: ...n an EMR communi cation mode signal is received When an EMR signal is received the audio will be heard at the set level or the VOL control level whichever is higher To disable the setting set it to 0 NOTE After an EMR signal disappears the audio level will remain at the EMR level In this case rotate VOL to adjust the audio level Previous view ...

Page 321: ... p 9 17 OFF The station call sign is not announced ON The station call sign is announced NOTE When a call is received during an announcement the received audio will be muted and no audio is recorded onto the microSD card If the call sign is announced while recording the recorded contents are silent during the announcement DIAL SPEECH Default OFF SPEECH DIAL SPEECH Turn the Dial Speech function ON ...

Page 322: ... the operating mode is announced when MODE is pushed SPEECH Language Default English SPEECH SPEECH Language Set the desired speech pronunciation to English or Japanese Alphabet Default Normal SPEECH Alphabet Select either Normal or Phonetic Code to announce the alphabet charac ter Normal Normal code is used for example A as eh B as bee Phonetic Code Phonetic code is used for example A as Alfa B as...

Page 323: ... to d DTMF memory channel list DTMF Speed Default 100ms DTMF T CALL DTMF Speed Select the DTMF transfer speed 100ms Transfer the DTMF codes at about 100 milliseconds per code 5 characters per second 200ms Transfer the DTMF codes at about 200 milliseconds per code 2 5 characters per second 300ms Transfer the DTMF codes at about 300 milliseconds per code 1 6 characters per second 500ms Transfer the ...

Page 324: ... the call was started Frequency 438 010000 438 010000 Operating frequencies When Duplex is set the frequencies of the called are displayed Mode DV DV Operating mode FM FM N DV My Latitude 34 764667 34 764667 Your latitude unit degree North latitude South latitude My Longitude 135 375333 135 375333 Your longitude unit degree East longitude West longitude My Altitude 50 5 50 5 Your altitude unit ft ...

Page 325: ...requency Mode DV Operating mode DV is fixed Caller JA3YUA A Call sign of the caller station ID51 Note after the call sign Called CQCQCQ Call sign of the called station Rx RPT1 JP3YHH G Access repeater call sign of the caller station or the gateway repeater call sign of your local area re peater Rx RPT2 JP3YHJ A Access repeater call sign of the called station Message Hello CQ D STAR Message include...

Page 326: ...ectivity Omni 45 90 135 180 225 270 315 or 360 Object Item Name HAM FES Object name or Item name up to 9 characters Data Type Live Object Data type of Object or Item Live or Kill Temperature 20 5 Temperature unit ç Records to one decimal places Rainfall 253 7 Rainfall unit mm Records to one decimal places Rainfall 24 Hours 253 7 Rainfall 24 Hours unit mm Records to one decimal places Rainfall Midn...

Page 327: ... seconds 50 milliseconds 100 milliseconds 60 seconds 300 milliseconds 900 milliseconds 60 seconds 50 milliseconds 50 milliseconds 50 milliseconds 300 milliseconds 60 seconds 50 milliseconds 600 milliseconds 50 milliseconds 50 milliseconds 50 milliseconds FM FM N DV オー ト 長 FM FM N DV No signal is received for 5 seconds Stand by Reception is disabled No signal is received for 5 seconds Stand by Rece...

Page 328: ... Turns the function OFF ON Turns the function ON Auto Repeater Function Auto Repeater This item appears only in the Korean and USA version transceivers The auto repeater function automatically turns the duplex operation and tone encoder ON or OFF The offset and repeater tone are not changed by the auto repeater function Reset these setting values if necessary For Korean versions OFF Turns the func...

Page 329: ...N Hold down for 1 second to start a scan Push to stop the scan Temporary Skip Push to set the frequency to be skipped during scanning The selected frequencies are temporarily skipped during scan ning for faster scanning RX CS Hold down for 1 second to display the RX history When the RX CS Key item is set to Call Sign Capture after releasing the key the last received call station s call sign is set...

Page 330: ...gardless of the setting the PWR PTT and MENU lock func tion only are still accessible when the lock function is activated PTT Lock Default OFF Function PTT Lock Turn the PTT lock function ON and OFF To prevent accidental transmissions this function disables PTT OFF Turns the function OFF ON Turns the function ON Busy Lockout Default OFF Function Busy Lockout Turn the busy lockout function ON or OF...

Page 331: ...2 Function MIC Gain External Set the external microphone sensitivity to between 1 minimum sensitivity and 4 maximum sensitivity to suit your preference Higher values make the microphone more sensitive to your voice The external microphone is connected to the MIC SP jack Data Speed Default 9600bps Function Data Speed Select the data transmission speed for low speed data communication or between the...

Page 332: ... the transmitter stays ON after you stop speaking before the VOX switches to receive VOX Time Out Timer Default 3min Function VOX VOX Time Out Timer Set the VOX Time Out Timer to 1 2 3 4 5 10 or 15 minutes to prevent an accidental prolonged transmission To disable the function set it to OFF OFF Turns the function OFF 1 2 3 4 5 10 or 15min If a continuous transmission exceeds the set period the tra...

Page 333: ...com standard address in hexadecimal code The ID 51A E s default address is 86 When 2 or more ID 51A Es are controlled through a PC at the same time set a different address for each device between 01h and DFh hexadecimal CI V Baud Rate Default Auto Function CI V CI V Baud Rate Set the CI V data transfer speed to 300 1200 4800 9600 19200 bps or Auto When Auto is selected the baud rate is automatical...

Page 334: ...P If this occurs the Heterodyne function may help The Heterodyne func tion shifts the 1st Local Oscillator frequency to the opposite side of the signal to change the frequency combination Charging Power ON Default OFF Function Charging Power ON When the battery pack is attached and the optional CP 12L CP 19R or OPC 254L external DC power cable is connected this function enables charging the transc...

Page 335: ...ses the Auto setting even if ON or Auto DC IN ON is selected When PWR is pushed the backlight lights for the set period of time set in Backlight Timer when Auto or Auto DC IN ON is selected Backlight Timer Default 5sec Display Backlight Timer Select the backlight lighting time period to between 5 and 10 seconds Depending on the Backlight option the backlight lights for this set period and then aut...

Page 336: ...e setting RX Call Sign Default Auto Display RX Call Sign When a call is received select whether or not to display the call sign of the caller station OFF Turns the function OFF Auto The caller station s call sign automatically scrolls once and then disappears Auto RX Hold The caller station s call sign automatically scrolls once and then remains on the LCD until the signal disappears Example When ...

Page 337: ...atically displayed every 30 seconds until the signal disappears When Auto or Auto RX Hold is selected in RX Call Sign Dis play the message is displayed after displaying the caller station s call sign Example When receiving a message HELLO CQ Reply Position Display Default ON Display Reply Position Display Select whether or not to display the caller s position data when the data is included in the ...

Page 338: ...all Sign Select whether or not to display your own or the destination station s call sign while transmitting OFF Turns the function OFF Your Call Sign Displays and scrolls the destination s call sign When the called station s call sign and name are entered in your memory the transceiver shows the name after the call sign in any DV mode except for the DR function My Call Sign Displays and scrolls y...

Page 339: ...t power ON Depending on the transceiver version Voltage Power ON Default ON Display Voltage Power ON Select whether or not to display the voltage of the battery or external DC power source on the LCD at power ON OFF Turns the function OFF ON When the transceiver is turned ON displays the voltage of the battery or external DC power source on the LCD NOTE When the voltage is above 15 6V external DC ...

Page 340: ...Altitude Distance Select either the meter or feet mile format to display the distance and alti tude Speed Default mph Display Display Unit Speed Select either the km h mph or knots format to display the speed Temperature Default ºF Display Display Unit Temperature Select either the degrees ºC or ºF format to display the temperature Display items Continued The default setting may differ depending o...

Page 341: ... mph Display Display Unit Wind Speed Select between the m s mph and knots format to display the wind speed Display Language Default English Display Display Language This item appears only when the System Language is set to Japa nese See page 16 87 Choose your language carefully about setting cautions Set the screen display language type in the DR function or Menu mode to English or Japanese Displa...

Page 342: ...e capability to display both English and Japanese characters HOWEVER if you select Japanese as the display language p 16 86 all menu items throughout the ID 51A E system will be displayed in only Japa nese characters There will be no English item names Unless you are fluent in reading Japanese characters use this feature with extreme caution If you change the ID 51A E s language to Japanese and ca...

Page 343: ...io Separate is selected The audio output level for A band and B band is set to the selected level in EMR AF Level When Separate is selected Either the audio output level for A band or B band that the signal is received on is set to the selected level in EMR AF Level BC Radio Level Default 0 Sounds BC Radio Level Sets the initial audio output level difference between the BC Radio and the A and B ba...

Page 344: ...etting when the power is turned ON a matched tone signal is received if the pocket beep is activated the transceiver is automatically turned OFF The beep sounds before powering OFF TOT Time Out Timer function is activated Approximately 10 seconds before the Time Out Timer cuts off transmission the cloning read or write operation starts or finishes a received signal stops the scan Scan Stop Beep th...

Page 345: ...ction to sound a beep When a received signal addressed to your call sign disappears a high pitched beep sounds When any other received signal disappears a regular beep sounds ON to me Alarm High Tone Turns ON the function to sound a beep When a received signal addressed to your call sign disappears an alarm sound PiRoPiRoPiRo sounds If you release PTT and or a signal is re ceived within 5 seconds ...

Page 346: ...ted Beep When a signal disappears on the SUB band a beep sounds The beep sounds even if no signal is received on the MAIN band Mute Beep While receiving on the MAIN band the SUB band audio sig nal is muted While receiving on the SUB band and a signal disappears a beep sounds The beep sounds even if no signal is received on the MAIN band Scope AF Output Default ON Sounds Scope AF Output Select the ...

Page 347: ...ct between year month and day to change Cursor e eRotate DIAL to select each number r r Repeat steps w and e to enter the year month and day and then push D pad Ent Setting the time q q Push D pad and then push D pad Ent to select TIME w w Push and to move the cursor and then select between hour and minute to change Cursor e eRotate DIAL to select each number r r Repeat steps w and e to enter the ...

Page 348: ... Auto The function is ON UTC Offset Default 0 00 Time Set UTC Offset Set the time difference between UTC Universal Time Coordinated and the local time to between 14 00 and 14 00 in 00 05 steps Auto Power OFF Default OFF Time Set Auto Power OFF This function automatically turns OFF the power after no operation has not been performed for the preset time OFF Turns the function OFF 30 120 min Select t...

Page 349: ...he Terminal mode Normal Mode is displayed in DV GATEWAY screen To cancel the Terminal mode push D pad Ent TIP You can cancel the Terminal mode on the QUICK Menu screen Access Point Mode DV Gateway Access Point Mode The Access Point mode enables the D STAR transceiver to make a Gateway call through an ID 51A E by connecting the optional OPC 2350LU to a PC Windows or Android device In the Terminal m...

Page 350: ... transceiver Separator Decimal Default Sep Dec SD Card Import Export CSV Format Separator Decimal Select the separator and the decimal character for the CSV format Sep Dec Separator is and Decimal is for the CSV format Sep Dec Separator is and Decimal is for the CSV format Sep Dec Separator is and Decimal is for the CSV format The default value may differ depending on the transceiver version Date ...

Page 351: ... SD Card SD Card Info Displays the SD card s free space and its remaining recording time Format SD Card Format Formats the microSD care deleting all data Unmount SD Card Unmount Electrically unmounts the microSD card while the power is ON Previous view ...

Page 352: ...ional battery case is attached the battery voltage is shown Version Others Information Version Shows the transceiver firmware s version number Clone Mode Others Clone Clone Mode Select to read or write the CS 51PLUS2 data from or to the PC and or to receive data from a Master transceiver See page 17 21 for details Clone Master Mode Others Clone Clone Master Mode Select to write your ID 51A E Maste...

Page 353: ...ow Memory channel contents Scan Edge contents Call channel contents Call sign memories Message data DTMF memory contents GPS Memory contents Repeater List BC Radio Memory q q After selecting Partial Reset the Partial Reset dialog appears Push D pad to select Yes and then push D pad Ent w w The transceiver displays PARTIAL RESET then the partial reset is com pleted Other items Continued Previous vi...

Page 354: ...e Repeater List TIP Before the All resetting we recommend you save the data you pur chased onto a microSD card See page 2 6 for details q qAfter selecting All Reset the All Reset dialog appears Push D pad to select Yes and then push D pad Ent w w The Clears all settings and memories Disables the DR function dialog appears Push D pad to select Yes and then push D pad Ent e e The transceiver display...

Page 355: ... DTMF code 17 9 D D DTMF code transmission 17 10 D D DTMF code transmission Direct Input 17 11 D D Setting DTMF transfer speed 17 12 Tone squelch operation 17 13 D D Tone squelch frequency setting and operation 17 13 DTCS squelch operation 17 15 D D DTCS code setting and operation 17 15 Cloning function 17 17 D D Transceiver to Transceiver cloning using a microSD card 17 17 D D Cloning from a PC u...

Page 356: ...ancelled The maximum record time is 1 minute Hold the microphone 5 to 10 cm 2 to 4 inches from your mouth then speak at your normal voice level Only one announcement can be recorded The current contents will be overwritten if you record again t tPush MENU to exit the MENU screen D D The recorded voice audio playing back The recorded voice audio for the Voice TX function can be played back q qPush ...

Page 357: ...ransmitting the voice audio is completely transmitted One of the following will cancel the transmission Push PTT Turn OFF the power then turn it ON again Push any key except for POWER Rotate DIAL Once the Repeat TX is sent the transceiver pauses until the end of the Repeat Time then transmits again After the second transmission the Repeat TX continues paus ing if receiving a signal even if the Bus...

Page 358: ...ast screen is displayed r r Push D pad to select the repeat interval to be tween 1 and 15 seconds in 1 second steps t tPush MENU to exit the MENU screen D D TX Monitor function Turn the TX Monitor function ON or OFF Default ON q qPush MENU w w Push D pad to select the root item Voice TX and then push D pad Ent to go to the next screen D pad Ent MENU Voice TX TX Set TX Monitor e e Refer to the menu...

Page 359: ...then push D pad Ent to set the Home CH and exit the QUICK Menu While on the DR screen select Set Repeater or while in the Memory mode select Set Channel TIP You can clear the Home CH setting Push D pad to select Clear in the step r as described above and then push D pad Ent Example Set 146 010 MHz frequency in the VFO as the Home CH Select a frequency Push D pad Ent to set the Home CH D D Home CH ...

Page 360: ...e detail settings for the Speech functions You can set the details settings for the Speech func tions in the Menu screen SPEECH Language p 16 67 Set the speech language to English or Japanese MENU SPEECH SPEECH Language Alphabet p 16 67 Select either Normal or Phonetic Code to announce the alphabet character MENU SPEECH Alphabet SPEECH Speed p 16 67 Set the speech speed to Low slow or High fast ME...

Page 361: ... switch is pushed q qPush MENU w w Push D pad to select the root item SPEECH and then push D pad Ent D pad Ent e e Push D pad to select MODE SPEECH and then push D pad Ent r r Push D pad to select ON and then push D pad Ent t tPush MENU to exit the MENU screen FM When pushing MODE after setting the Mode Speech function Speech function Continued Previous view ...

Page 362: ...o set the code Repeat the above step to enter the desired DTMF codes Push D pad to move the cursor forward or backward When the cursor is on the 24th digit the cursor can be moved to backward Push CLR to delete the selected character or hold down CLR to continuously delete the characters first to the right and then to the left of the cursor u uWhen all digits are set push D pad Ent The entered DTM...

Page 363: ...moni tored in DTMF memory screen then push SQL The stored DTMF code sounds DTMF code can also be monitored with the following steps Select the desired DTMF memory channel to be monitored then push QUICK Push D pad to select DTMF Monitor and then push D pad Ent to monitor the selected DTMF code DTMF code sounds SQL Previous view ...

Page 364: ...TMF code The transceiver keeps transmitting until the all pro grammed DTMF code is transmitted even PTT is re leased Example Set the DTMF code 012345 stored in DTMF memory channel d1 for transmission DTMF code to be transmitted DTMF code scrolls during transmission About 1750 Hz tone When T CALL is selected in the DTMF MEMORY screen 1750 Hz tone can be transmitted While holding down PTT push SQL t...

Page 365: ...ired DTMF codes Push D pad to move the cursor forward or backward When the cursor is on the 24th digit the cursor can be moved to backward Push CLR to delete the selected character or hold down CLR to continuously delete the characters first to the right and then to the left of the cursor r rWhen all digits are set push D pad Ent The transceiver automatically transmits the programmed DTMF code Sel...

Page 366: ...ransfer the DTMF tones at about 100 millisec onds per code 5 characters per second 200ms Transfer the DTMF tones at about 200 millisec onds per code 2 5 characters per second 300ms Transfer the DTMF tones at about 300 millisec onds per code 1 6 characters per second 500ms Transfer the DTMF tones at about 500 millisec onds per code 1 character per second t t Push MENU to exit the MENU screen Exampl...

Page 367: ... FM or FM N FM narrow mode e e Rotate DIAL to select a desired operating frequency r rPush MENU to select the MENU list screen t t Push D pad to select the root item DUP TONE and then push D pad Ent D pad Ent y y Push D pad to select TSQL Freq and then push D pad Ent The selected tone squelch frequency is displayed u u Rotate DIAL to select a desired tone squelch fre quency then push D pad Ent Exa...

Page 368: ...nal that includes a matching tone frequency Audio is heard TONE T TSQL R T TSQL appears and T blinks When you transmit the selected subaudible tone is superimposed on your normal signal When you receive the tone squelch opens only for a signal that includes a matching tone frequency Audio is heard 2 Push D pad Ent to set the tone squelch function and then close the QUICK Menu screen 3 Holding down...

Page 369: ...to select the FM or FM N FM narrow mode e e Rotate DIAL to select a desired operating frequency r rPush MENU to select the MENU list screen t t Push D pad to select the root item DUP TONE and then push D pad Ent D pad Ent y y Push D pad to select DTCS Code and then push D pad Ent The selected tone squelch frequency is displayed u u Rotate DIAL to select a desired DTCS code and then push D pad Ent ...

Page 370: ...When you transmit the selected DTCS code is superimposed on your normal signal When you receive the tone squelch opens only for a signal that includes a matching tone frequency Audio is heard 2 Push D pad Ent to set the DTCS squelch function and then close the QUICK Menu screen 3 Holding down PTT and call a desired station Operate in the normal way Continued from step u on the previous page Appear...

Page 371: ...roSD card q qPush MENU w w Push D pad to select the root item SD card and then push D pad Ent D pad Ent e e Push D pad to select Save Setting and then push D pad Ent r r Push D pad to select New File and then push D pad Ent The FILE NAME screen is displayed t t The file name is automatically named in the following format Setyyyymmdd_xx yyyy Year mm month dd day xx serial number Example When the 2n...

Page 372: ...ompleted i i Push MENU to exit the MENU screen 2 Remove the microSD card from the master trans ceiver and then insert it into the sub transceiv er o o Hold down the master transceiver s to turn OFF the power 0 Remove the microSD card from the master trans ceiver as shown to the right 1 Attach the removed microSD card to the sub trans ceiver then hold down the sub transceiver s to turn ON the power...

Page 373: ...nsceiver 7Push D pad Ent The Keep SKIP setting in Repeater List appears 8Push D pad to select YES or No When Yes is selected the skip setting of the Repeater List is retained p 9 39 9Push D pad Ent Load file appears 0 Push D pad to select Yes and then push D pad Ent to start the file check While checking the file FILE CHECKING and a prog ress bar are displayed 1After checking settings data loading...

Page 374: ...LUS2 contained in the CD and the optional data communi cation cable See the CS 51PLUS2 instruction manual contained in the CD and the data communication cable s instruction manual downloaded from the Icom WEB site http www icom co jp world NOTE When using the optional data communica tion cable Before cloning select PTT option in DV Data TX item If Auto is selected the transceiver may trans mit wit...

Page 375: ...t Clone and then push D pad Ent u u Push D pad to select Clone Mode and then push D pad Ent Go to the Clone Mode appears i i Push D pad to select Yes and then push D pad Ent The clone mode screen appears 3 Setting the Master transceiver o o On the master transceiver push MENU 0 Push D pad to select the root item Others and then push D pad Ent to go to the next screen 1 Push D pad to select Clone a...

Page 376: ...controlling a transceivers and receivers Use the cable illustrated to the right No received audio is heard when the supplied control cable that comes with CT 17 is used for the connection CT 17 Power source 9V 15VDC RS 232C cable ID 51A E personal computer GND I O SP SP GND SP I O Connections ID 51A E side No speaker is necessary for the CT 17 side 3 conductor 3 5 d mm plug must be used 2 conducto...

Page 377: ...9 00 Read transceiver ID Cmd Sub cmd Data Description 1B 00 see p 17 24 Send read Repeater tone frequency 01 see p 17 24 Send read Tone squelch frequency 02 see p 17 25 Send read DTCS code and polarity 07 see p 17 25 Send read CSQL code DV mode 1C 00 00 Send read Transceiver s status RX 01 Send read Transceiver s status TX 1F 00 see p 17 25 Send read DV MY call sign 01 see p 17 25 Send read DV TX ...

Page 378: ...OL32 VOL33 VOL34 0192 0197 0198 0204 0205 0210 0211 0217 0218 0223 VOL35 VOL36 VOL37 VOL38 VOL39 0224 0229 0230 0236 0237 0242 0243 0249 0250 0255 q e w X X X X X X 100 Hz digit 100 kHz digit 10 kHz digit 10 MHz digit 1 kHz digit 1 MHz digit q 0 X X X X w e X r t X X X 0 10H zdigit 0 5 according to the 100 Hz digit 1 Hz digit 0 Fixed 1 kHz digit 0 9 100 Hz digit 0 2 5 7 100 kHz digit 0 9 10 kHz di...

Page 379: ...q i q i Your own call sign setting 8 characters o 2 Note setting 4 characters Character s code of the call sign Character ASCII code 0 9 30 39 A Z 41 5A Space 20 2F DV TX message setting Command 1F 02 Set the transmit message of up to 20 characters FF stops sending or reading messages Character ASCII code Character ASCII code A Z 41 5A a z 61 7A 0 9 30 39 Space 20 21 23 24 25 26 5C 3F 22 27 60 5E ...

Page 380: ...mber and description Data number Description 00 D PRS Position 01 D PRS Object 02 D PRS Item 03 D PRS Weather Position X X X X X X X X X X X X X X X X X X X X X X X X X X X X X X X X X X X o 7 q i X X X X X X X X X X X X X X X X X X X X X X X X 0 0 q o 0 1 9 0 1 2 2 6 7 2 3 6 7 8 9 1 2 8 q w GPS D PRS DATA Position Data number Object X X X X X X X X X X X X X X X X X X X X X X X X X X X X X X X X ...

Page 381: ...y Data W m ft dB deg 0 0 3 10 0 Omni direction 1 1 6 20 1 45º NE 2 4 12 40 2 90º E 3 9 24 80 3 135º SE 4 16 49 160 4 180º S 5 25 98 320 5 225º SW 6 36 195 640 6 270º W 7 49 390 1280 7 315º NW 8 64 780 2560 8 360º N 9 81 1561 5120 9 3 1 Name 9 ASCII characters 00h EFh 2 Type 1 Live 0 Killed Item X X X X X X X X X X X X X X X X X X X X X X X X X X X X X X X X 9 X X 2 0 1 2 7 2 3 6 7 9 1 2 8 3 1 8 It...

Page 382: ... X Data number Data number Data number q o Call sign SSID 9 ASCII characters A Z 0 9 space 0 2 Message Up to 43 ASCII characters 00h EFh DV TX data DV RX data transceive Command 22 00 22 01 01 X X X X X X X X X X X X X X X X X X X X X X X X 9 0 1 2 2 6 7 8 GPS D PRS MSG MY POSITION DATA Variable length Variable length X X X X 0 2 X X X X X X X X X X X X 9 0 1 2 6 7 8 X X X X X X X 2 6 7 8 X X X X ...

Page 383: ...ng 18 4 VOX function 18 5 D D Optional unit connection 18 5 D D Selecting the headset type 18 5 D D Turning the VOX function ON or OFF 18 6 D D VOX Level setting 18 7 D D VOX related settings 18 8 SJ 1 silicone jacket 18 8 Using the RS MS1A 18 9 D D Required items 18 9 D D Connection 18 9 D D Download procedures 18 9 Previous view ...

Page 384: ...ate in wet environments BC 202 desktop charger BC 123SA SE ac adapter Rapidly charges the BP 271 li ion battery pack in ap proximately 2 hours Rapidly charges the BP 272 li ion battery pack in ap proximately 3 5 hours CP 12L cigarette lighter cable with noise filter CP 19R cigarette lighter cable with dc dc con verter You can to operate the transceiver through a 12 V cigarette lighter socket You c...

Page 385: ...sing the DV Gateway function See About the DV Gateway function on the Icom WEB site http www icom co jp world for details The OPC 2350LU is required RS MS3A remote control software Free download software Allows using the DV Gateway function See About the DV Gateway function on the Icom WEB site http www icom co jp world for details The OPC 2350LU is required OPC 2218LU data cable Allows DV data co...

Page 386: ... push D pad Ent r r Push D pad to select During RX Standby or During TX and then push D pad Ent Example During RX Standby t t Push D pad to select the desired key and then push D pad Ent Example A y y Push D pad to select the desired key function and then push D pad Ent Example TO DR u u Push MENU to save and exit the MENU screen Key function list for A key TIP Returning to default All key functio...

Page 387: ... up the jack cover e e Connect the HS 94 HS 95 or HS 97 and the OPC 2006LS as illustrated to the right D D Selecting the headset type Before using the VOX function select the headset type q qTurn ON the transceiver w wPush MENU e e Push D pad to select the root item Function and then push D pad Ent to go to the next screen D pad Ent MENU Function VOX Headset Select r r Refer to the menu sequence s...

Page 388: ...n and then push D pad Ent to go to the next screen D pad Ent MENU Function VOX VOX e e Refer to the menu sequence shown directly above and push D pad to select and then D pad Ent to enter one or more times until the last screen is displayed r rPush D pad to select ON t tPush MENU to exit the MENU screen VOX appears Appears Previous view ...

Page 389: ... then D pad Ent to enter one or more times until the last screen is displayed r r While speaking into the headset microphone rotate DIAL to adjust the VOX Level until VOX continu ously appears The VOX Level can be adjusted between 1 minimum and 10 maximum or turned OFF Higher values make the VOX function more sensitive to your voice Default 5 t tPush MENU to exit the MENU screen Appears if you rot...

Page 390: ... the holes on the top of the jacket as shown to the right w w Pull the jacket around the sides and bottom of the transceiver When the belt clip is attached push it out from the hole on back of the jacket To remove q q Remove the jacket from bottom of the transceiver If a belt clip is attached pull the jacket around the bottom of the clip w w Pull the antenna connector and DIAL from the jack et and...

Page 391: ...ays RS MS1A in the application list r rTap t tTap RS MS1A Displays the introduction screen of the RS MS1A y yTap INSTALL u uTap ACCEPT in the App permissions window Installation starts After finishing the installation the RS MS1A icon is dis played on the screen RS MS1A icon Using the RS MS1A The RS MS1A is a freeware application for Android devices With the RS MS1A you can use the extended D STAR...

Page 392: ...19 1 Section 19 SPECIFICATIONS Transceiver 19 2 D D General 19 2 D D Transmitter 19 2 D D Receiver 19 3 BC 202 desktop charger 19 3 Previous view ...

Page 393: ...lectable steps may differ depending on the selected fre quency band or operating mode Frequency stability 2 5 ppm 20 C 60 C 4 F 140 F Power source 10 16 V DC for external DC pow er or specified Icom s battery pack Digital transmission speed 4 8 kbps Voice coding speed 2 4 kbps Current drain with BP 271 TX at 5 W output Less than 2 5 A RX Max output FM Less than 350 mA Internal speaker Less than 20...

Page 394: ...n 0 32 μV WFM 1 kHz 52 5 kHz Dev 12 dB SINAD 76 0 81 9 MHz Less than 3 2 μV 82 0 108 0 MHz Less than 1 8 μV DV PN9 GMSK 4 8 kbps BER 1 137 0 174 0 MHz Amateur band only Less than 0 28 μV 380 0 479 0 MHz Amateur band only Less than 0 28 μV Audio output power at 10 distortion Internal speaker More than 0 4 W into a 16 Ω load External speaker More than 0 2 W into an 8 Ω load Selectivity FM Wide More ...

Page 395: ...for a while and try it again p 9 23 After your call the access repeater replies RPT and its call sign The call sign of the destination repeater is wrong Correctly set the destination repeater call sign p 9 28 Even holding down the DR function is not selected There is no Repeater List in your trans ceiver Reload the Repeater List using the CS 51PLUS2 cloning software on the CD Reload the Repeater L...

Page 396: ... signal is received p 10 2 p 16 32 D D While operating D STAR Continued PROBLEM POSSIBLE CAUSE SOLUTION REF The simplex operation can not be made using the DR function A call sign is programmed in CALL SIGN of the Repeater List Duplex mode DUP DUP is set A repeater frequency is programmed Delete the Call sign in CALL SIGN setting of the Repeater List Select OFF in DUP setting of the Repeater List ...

Page 397: ...quencies are different No station is in range or on the same frequency Set the simplex operation Wait for a while and try again p 15 5 Transmitting using the VOX function is impossible The VOX Level is set to OFF or too low The MIC Gain is too low Set the VOX Level to a suitable level Set the MIC Gain to a suitable level p 16 77 p 16 76 Contacting another station is impossible A different tone or ...

Page 398: ... settings p 5 4 A distorted noise is heard when the earphone is used The earphone mode is OFF Turn ON the earphone mode p 16 88 Charging is impossible at power ON Charging Power ON setting is OFF default Set the Charging Power ON setting to ON in the Function Menu p 16 79 This operation may generate certain spurious signals the S meter appears or noise may be heard Previous view ...

Page 399: ...mory 6 12 Editing a BC radio memory 6 13 FM Antenna 6 17 Listening while monitoring two ham bands 6 3 Rearranging the display order 6 14 Searching for a BC Radio signal 6 5 Selecting the AM FM radio mode 6 5 Selecting the BC radio mode 6 3 Setting a tuning step AM Only 6 8 Setting the squelch level 6 7 Turning ON the BC Radio 6 2 Using the BC Radio Memory 6 9 Using the BC Radio Mode 6 16 Beep Leve...

Page 400: ... Set items 16 60 Is your setting correct 9 48 Repeater List 9 23 16 56 About the Repeater List default values 9 47 Deleting a Repeater List 9 36 Editing a Repeater List 9 35 Entering information into Repeater List 9 24 Entering the repeater group name 9 41 New repeater entry 9 25 Opening the default Repeater List 9 47 Rearranging the repeater display order 9 37 Repeater detail screen 9 42 Repeater...

Page 401: ... Using the Repeater Search function 8 5 Using the TX History 8 7 Front panel 3 2 Function display 3 5 G GPS Add a GPS memory 10 13 Alarm Area Group 16 39 Alarm Area RX Memory 16 40 Caller s TX format 10 5 Changing the Compass Direction 10 10 Changing the GPS memory alarm channel 10 10 Changing the Grid Locator 10 10 Checking GPS Information Sky view screen 10 12 Checking GPS Position 10 3 D PRS 10...

Page 402: ... 16 32 Memory bank Memory bank scan 13 2 13 10 Selecting a Memory bank 12 9 Selecting the bank in the Memory bank mode 6 4 Setting a Memory bank 12 7 Memory mode 5 10 Memory operation Assigning a memory channel to a memory bank 12 7 Clearing a Memory contents 12 13 Copying memory and Call channel contents 12 5 Directly entering into a memory bank 12 8 Entering a memory bank scan name 12 10 Enterin...

Page 403: ... 5 Option list 18 2 OTHER OPTIONS 18 3 P Partial Reset 16 98 Pause Rewind the file 11 5 Fast forward the file 11 5 Pause Timer 16 18 Pause while playing 11 5 Phonetic Code setting for the Speech alphabet character 9 18 Play Files 16 22 16 25 Playing back the recorded audio 11 4 11 17 Playing back the recorded voice audio 9 12 Playing back the voice memory data on a PC 11 23 Playing the next file 1...

Page 404: ...RX REC Condition 16 23 RX Record RPT 16 64 RX Repeater Write 16 63 RX Treble 16 60 S Save Setting 16 95 Saving your own or received position data 10 11 Scan About the scan function 13 2 Clearing the skip setting 13 8 Memory bank scan 13 2 13 10 Memory scan 13 2 13 9 Memory skip scan 13 9 Pause Timer 16 18 Receive mode for a scan 13 3 Scan function during Dualwatch operation 13 4 Scan items 16 18 S...

Page 405: ...ting GPS Logger 20 2 TSQL Freq 16 16 Tuning step 5 7 Selecting a tuning step 5 7 Tuning step for a VFO scan 13 3 TX Bass 16 60 TX Call Sign 16 83 TX format Caller s TX format 10 5 Displayed items 10 6 TX format D PRS Item 10 8 TX format D PRS Object 10 8 TX format D PRS Position Base 10 7 TX format D PRS Position Mobile 10 7 TX format D PRS Weather 10 9 TX mode NMEA 10 9 TX Message 16 59 Deleting ...

Page 406: ...ER screen s description 11 6 Voice Recorder function 11 16 File information 11 21 Voice TX Voice TX function 17 2 Recording 17 2 Repeat Time setting 17 4 The recorded voice audio playing back 17 2 To transmit the recorded voice audio 17 3 Voice TX items 16 28 Voltage 16 97 Voltage Power ON 16 84 Volume Select 6 19 16 88 VOX function 16 76 18 5 Selecting the headset type 18 5 Turning the VOX functi...

Page 407: ...ds 16 90 Bank Link Scan 16 19 Barometric Display Display Unit 16 86 BC Radio Root 16 30 BC Radio Level Sounds 16 88 BC Radio Memory BC Radio 16 30 BC Radio Mode BC Radio 16 31 BC Radio OFF BC Radio 16 31 BC Radio ON BC Radio 16 31 Beep Level Sounds 16 89 Beep Vol Level Link Sounds 16 89 BK DV Set 16 64 Busy LED Display 16 81 Busy Lockout Function 16 75 C Call Sign Root 16 51 Charging Power ON Func...

Page 408: ... T CALL 16 68 DTMF Speed DTMF T CALL 16 68 DTMF T CALL Root 16 68 DUP TONE Root 16 16 During RX Standby Function Remote MIC Key 16 74 During TX Function Remote MIC Key 16 75 DV Auto Detect DV Set 16 63 DV Auto Reply Voice Memo 16 27 DV Data TX DV Set 16 61 DV Fast Data DV Set 16 61 DV Gateway Root 16 94 DV Memory Root 16 56 DV RX Backlight Display 16 83 DV Set Root 16 60 D PRS DV A GPS GPS TX Mode...

Page 409: ...NMEA DV G 16 49 GPS Set GPS 16 32 GPS Time Correct Time Set 16 93 GPS TX Mode GPS 16 43 H Headset Select Function VOX 16 77 Heterodyne Function 16 79 Home CH Beep Sounds 16 89 I Import SD Card Import Export 16 95 Import Export SD Card 16 95 Information Others 16 97 K Key Lock Function 16 75 Key Touch Beep Sounds 16 89 L Latitude Longitude Display Display Unit 16 85 LCD Contrast Display 16 80 LCD D...

Page 410: ...order Recorder Set 16 24 PTT Lock Function 16 75 Q QSO Log QSO RX Log 16 69 QSO Recorder Voice Memo 16 22 QSO RX Log Root 16 69 R Rainfall Display Display Unit 16 86 REC Mode Voice Memo QSO Recorder Recorder Set 16 23 REC Start Voice Memo QSO Recorder 16 22 Record Voice Memo Voice Recorder 16 24 Record Voice TX 16 28 Record Interval GPS GPS Logger 16 41 Recorder Set Voice Memo QSO Recorder 16 23 R...

Page 411: ... Format 16 95 Single TX Voice TX 16 29 Skip Time Voice Memo QSO Recorder Player Set 16 24 Sound Root 16 88 SPEECH Root 16 66 SPEECH Language SPEECH 16 67 SPEECH Level SPEECH 16 67 SPEECH Speed SPEECH 16 67 Speed Display Display Unit 16 85 SSID GPS GPS TX Mode D PRS DV A 16 46 Standby Beep Sounds 16 90 Sub Band Mute Sounds 16 91 System Language Display 16 87 T Temperature Display Display Unit 16 85...

Page 412: ...ot 16 22 Voice Recorder Voice Memo 16 24 Voice TX Root 16 28 Voltage Others Information 16 97 Voltage Power ON Display 16 84 Volume Select Sounds 16 88 VOX Function 16 76 VOX Function VOX 16 76 VOX Delay Function VOX 16 77 VOX Level Function VOX 16 77 VOX Time Out Timer Function VOX 16 77 W Wind Speed Display Display Unit 16 86 Y Your Call Sign DV Memory 16 56 Previous view ...

Page 413: ...1 1 32 Kamiminami Hirano ku Osaka 547 0003 Japan A 7331 3EX 2016 Icom Inc ...

Reviews: