


4-31
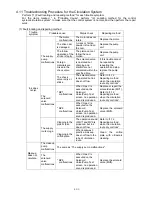
Symptom
Probable cause
Check method
Repairing method
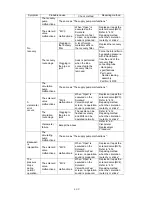
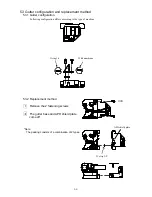
The ink
pressure
does not
increase.
The supply
pump
malfunctions.
The same as
“Ink does not jet".
The solenoid
valve
malfunctions.
* MV1
malfunctions.
When
“Open” is
executed on the
Solenoid Valve/Pump
Test screen, no
operation sound is
produced.
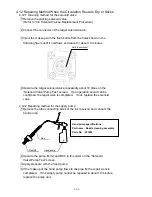
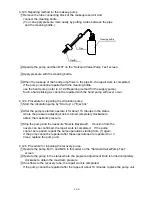
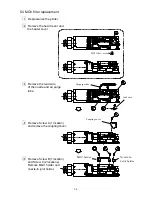
Replace or repair the
solenoid valve (MV1).
Refer to
“4.12 Repairing
method when the
circulation route dry or
sticks
”.
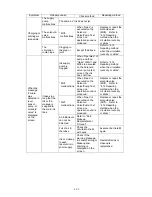
* MV2
malfunctions.
When
“Open” is
executed on the
Solenoid Valve/Pump
Test screen, no
operation sound is
produced.
Replace or repair the
solenoid valve (MV2).
Refer to
“4.12 Repairing
method when the
circulation route dry or
sticks
”.
* MV9
malfunctions.
When
“Open” is
executed on the
Solenoid Valve/Pump
Test screen, no
operation sound is
produced.
Replace the solenoid
valve (MV9).
The pressure
resistance of MV6
is faulty.
When the pump and
then MV1 are turned on,
ink flows to the collation
tube. (Solenoid
Valve/Pump Test
screen)
Replace the solenoid
valve (MV6).
Others
* The pressure
sensor
malfunctions.
Ink jets and printing can
be performed but the
pressure value is
abnormal.
Replace the pressure
sensor.
Ink Over Fill
often
occurs.
The solenoid
valve
malfunctions.
The pressure
resistance of MV7
is faulty.
The makeup in the pipe
N is sucked even during
operation (except at
supply). (Make a check
after removing the tube
connection block of the
makeup reservoir.)
Replace the solenoid
valve (MV7).
The pressure
resistance of MV8
is faulty.
The makeup jets and
cannot be stopped
“at
non-cleaning stop
”.
Replace the solenoid
valve (MV8).
The pressure
resistance of MV2
is faulty.
The ink in the pipe M is
sucked even during
operation (except at
supply). (Make a check
after removing the tube
connection block of the
ink reservoir.)
Replace the solenoid
valve (MV2).
Summary of Contents for IJ RX2
Page 1: ...Service Manual HITACHI Printer Model RX2 Revision Feb 2014 Version A ...
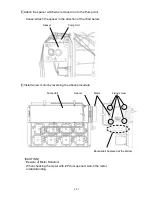
Page 13: ...1 8 2 External views Rear side 1 2 2 Main body internal ...
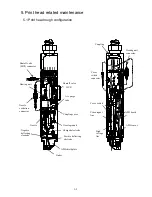
Page 14: ...1 9 1 2 3 Print head ...
Page 101: ...3 26 Circuit diagram of EZJ127A ...
Page 102: ...3 27 Circuit diagram of EZJ127B ...
Page 116: ...3 41 Circuit diagram of EZJ129 ...
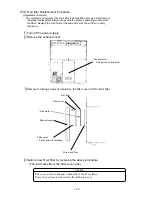
Page 164: ...4 40 5 Reset the time of the R air filter to 0 on the Parts usage time management screen ...
Page 247: ...7 Attached Drawing 7 1 Circulation System Diagram Circulation System Diagram 7 1 ...
Page 249: ...7 3 7 2 2 Electrical Connection Diagram RX2 B Basic model 7 3 ...


