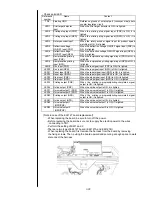
3-30
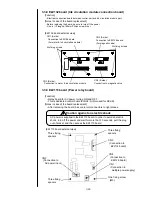
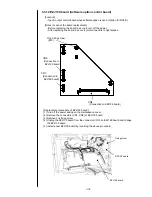
3.3.10 EZJ114 board (LED / SW board)
[Function]
-
LED display of Power, Ready, Fault, Warning, and Start / Stop switch
[Notes in case of the board replacement]
- Before replacing the board, be sure to turn off the power.
-
After replacing the board, be sure to joint connectors to right places.
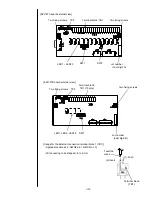
[EZJ114 board external view]
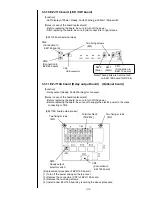
3.3.11 EZJ119A board (Relay output board) (Optional board)
[Function]
-
Relay output (Ready, Fault, Warning) for conveyer.
[Notes in case of the board replacement]
- Before replacing the board, be sure to turn off the power.
-
Before replacing the board, be sure not to supply the electric power to the wires
connecting to TB2.
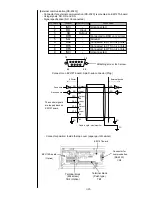
[EZJ119A board external view]
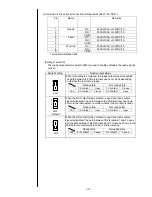
[ Replacement procedure of EZJ119A board ]
(1) Turn off the power and open the top cover.
(2) Remove the connectors (CN7) of EZJ119A board.
(3) Remove the two fixing screws.
(4) Install a new EZJ119A board by reversing the above procedure.
Terminal block:
(TB2: M4)
SW3:
Ready output
selector switch
CN3:
(Connection to
EZJ128 board)
CN2:
(Connection to
EZJ126 board)
CN4:
USB connector
SW2
(Stop)
SW1
(Start)
CN1:
(Connection to
EZJ113 board)
Two fixing screws
(M3)
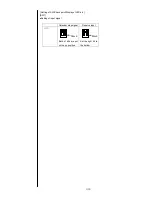
Note) These parts are not mounted
on EZJ114B board for RX2-B
Two fixing screws
(M3)
Two fixing screws
(M3)
CN7:
(Connection to
EZJ126 board)
Summary of Contents for IJ RX2
Page 1: ...Service Manual HITACHI Printer Model RX2 Revision Feb 2014 Version A ...
Page 13: ...1 8 2 External views Rear side 1 2 2 Main body internal ...
Page 14: ...1 9 1 2 3 Print head ...
Page 101: ...3 26 Circuit diagram of EZJ127A ...
Page 102: ...3 27 Circuit diagram of EZJ127B ...
Page 116: ...3 41 Circuit diagram of EZJ129 ...
Page 164: ...4 40 5 Reset the time of the R air filter to 0 on the Parts usage time management screen ...
Page 247: ...7 Attached Drawing 7 1 Circulation System Diagram Circulation System Diagram 7 1 ...
Page 249: ...7 3 7 2 2 Electrical Connection Diagram RX2 B Basic model 7 3 ...

