4-13
4.6
Pressure Sensor Replacement Procedure
1 Perform
“Nozzle Backwash”. (At the end of automatic stop without pouring
the makeup to the gutter)
2 Turn off the power supply.
3 Perform
“4.1.3 Approach to the parts on the rear side of the equipment”.
(The reason is that the connector is provided on the rear side of the equipment.)
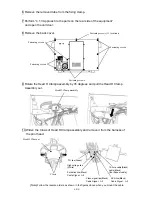
4 Remove the connector of the pressure sensor.
5 Remove the screws (2 positions) that fix the pressure sensor.
The pressure sensor can be removed.
"Caution" Put wiping paper under the solenoid valve to provide for an ink
drip.
Connector for the pressure
sensor
Pressure sensor
Unit door
Fixing screw
Pressure sensor
Summary of Contents for IJ RX2
Page 1: ...Service Manual HITACHI Printer Model RX2 Revision Feb 2014 Version A ...
Page 13: ...1 8 2 External views Rear side 1 2 2 Main body internal ...
Page 14: ...1 9 1 2 3 Print head ...
Page 101: ...3 26 Circuit diagram of EZJ127A ...
Page 102: ...3 27 Circuit diagram of EZJ127B ...
Page 116: ...3 41 Circuit diagram of EZJ129 ...
Page 164: ...4 40 5 Reset the time of the R air filter to 0 on the Parts usage time management screen ...
Page 247: ...7 Attached Drawing 7 1 Circulation System Diagram Circulation System Diagram 7 1 ...
Page 249: ...7 3 7 2 2 Electrical Connection Diagram RX2 B Basic model 7 3 ...


