


___________________________________________________Chapter 6 – Testing and Repair, Page 6-27
Replacing UV Ballast – Cont.
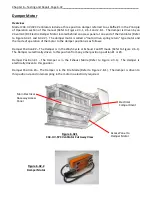
18.
Once all the wires at the left end have been connected, the new Ballast can be installed on the
Ballast Chassis.
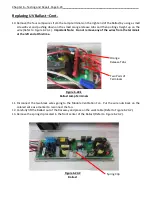
Important Note:
before installing, spread a small amount of thermal transfer grease
(provided with new Ballasts)
on the side of the center heat sink as shown in Figure 6-27-2.
When
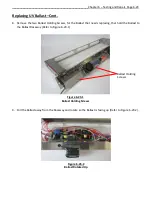
installing back into the chassis, make sure the plastic tab is between the heat sink and the aluminum
angle on the chassis (Refer to Figure 6-28-1 and 6-28-2.
Then slip the Ballast onto the three standoffs
and the stud at the bottom left, and push down until the Ballast snaps into place.
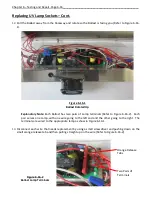
Wire Color
Red
White
Green/Yellow Stripe
Pink
Purple (jumper)
Orange (jumper)
Blue
Purple (jumper)
Orange (jumper)
Wire Terminals
Figure 6-27-1
Ballast Terminal Wire Color
Figure 6-27-2
Applying Thermal Transfer Grease
Apply Thermal
Transfer Grease To
The Heat Sink Here


