Chapter 6 – Testing and Repair, Page 6-54___________________________________________________
Removing the Electrical Chassis
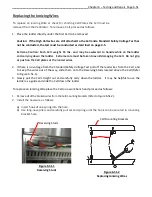
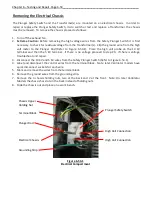
The Plunger Safety Switch and the Transformer(s) are mounted on an electrical chassis. In order to
repair or replace the Plunger Safety Switch, micro switch or test and replace a Transformer, the chassis
must be removed. To remove the chassis proceed as follows:
1.
Turn off the exhaust fan.
2.
Extreme Caution:
Before removing the high voltage wires from the Safety Plunger Switch it is first
necessary to check for residual voltage from the Transformer(s). Clip the ground wire from the high
volt meter to the Plunger Rod (Refer to Figure 6-54-1). Place the high volt probe on the 10 KV
terminal and then the 5 KV terminal. If there is no voltage proceed to step #3. If there is voltage
troubleshoot and repair.
3.
Disconnect the 10 KV and 5 KV wires from the Safety Plunger Switch (Refer to Figure 6-54-1).
4.
Label and disconnect the control wires from the terminal block. Note: later Ventilator models have
quick disconnect sockets for each wire.
5.
Mark and remove the wires from the terminal block.
6.
Remove the ground wires from the grounding strip.
7.
Remove the 4 chassis holding nuts, two at the back and 2 at the front. Note: On later Ventilator
Models the chassis has slots in the back instead of holding nuts.
8.
Slide the chassis out and place on a work bench.
Figure 6-54-1
Electrical Compartment
Chassis Upper
Holding Nut
Electrical Chassis
Plunger Safety Switch
High Volt Connection
Terminal Block
High Volt Connection
Plunger Rod
Grounding Strip

