background image

82

11. Network Viewer

Displaying Image in the FTP Server

Network Viewer can be operated by 1. PJ Controller, 2. Browser, and 3. Projector.

If you operate the Network Viewer from the projector, you have to complete the configuration

of the FTP server by using PJ Controller or Web Browser in advance. 

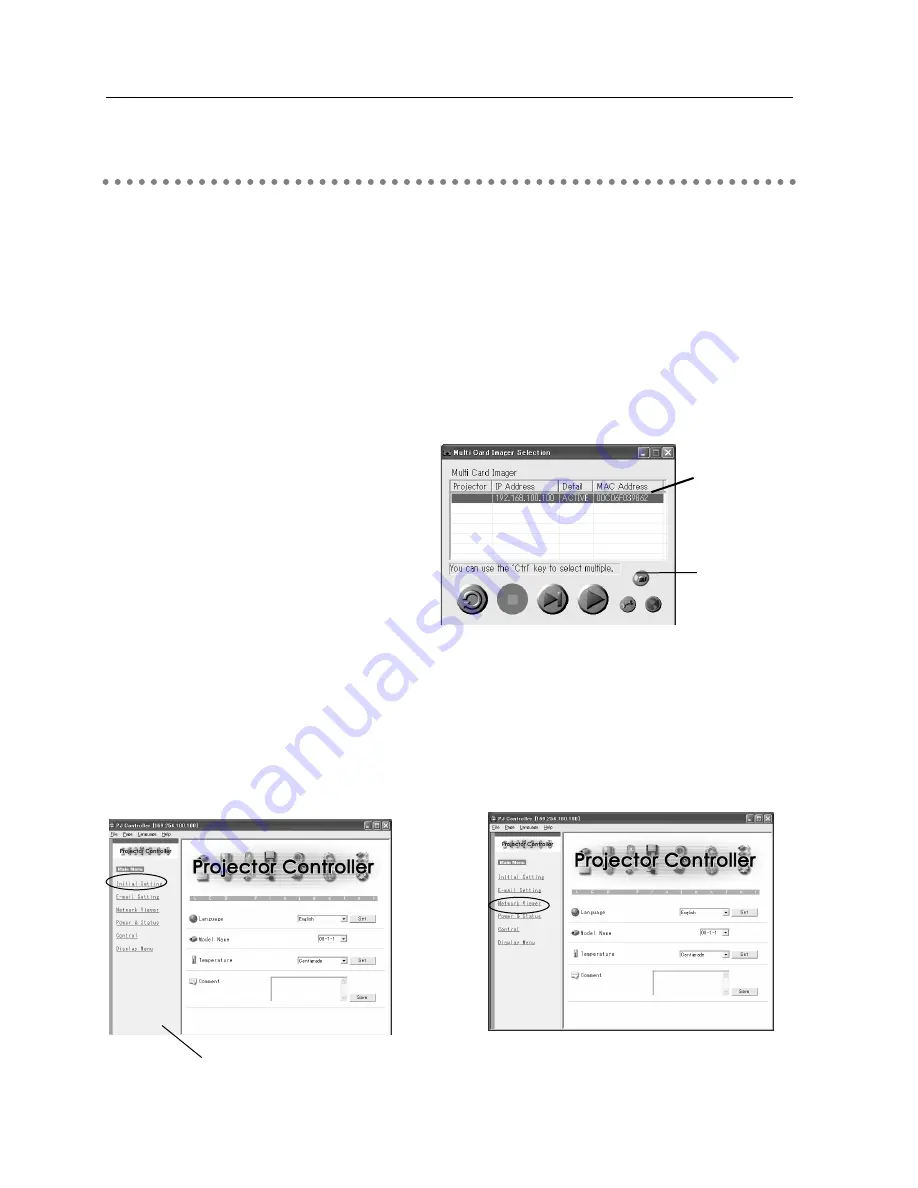
Operation from PJ Controller

1.  Select input source of the projector (Wired/Wireless)

Select "Wireless" for Wireless LAN and "Wired" for Wired LAN for the input source of the

projector. Start up the MCI Client. 

Detected projector names and IP addresses will be displayed.

2. Specify the projector to display the

image

Only one projector can be selected.

3.  Start up PJ Controller

Click the PJ Controller button too show the PJ Controller screen. Select a language and

Model Code at Initial Settings from the main menu.

PJ Controller 

button

4. Select Network Viewer

Select Network Viewer from the Main Menu. Operation window (next page) will be

displayed.

Initial Settings

Network Viewer

Main Menu

Select a
projector

Caution:

Model Code of your projector is shown in the field of Optional Parts list of the owner's manual.

Select the correct code. Should the code be wrong, the projector may not work properly.

Summary of Contents for MCD-100

Page 1: ...ulti Card Director MCD 100 Wired LAN Card CA 20 Wireless LAN Card CA 30 Multi Card Director Owner s Manual Setting and Operation Read this manual first Compact Flash Card CA 10 Sold separately English...

Page 2: ...2...

Page 3: ...ifications should be made you could be required to stop operation of the equipment Model Number MCD 100 Trade Name EIKI Responsible party EIKI International Inc Address 30251 Esperanza Rancho Santa Ma...

Page 4: ...Setting to Factory Default Setting 19 Contents of Factory Default Setting 20 Installation of MCI 21 Mount MCI to the Projector 21 Remove MCI from the Projector 21 Insert Remove Multi Card 22 5 Softwar...

Page 5: ...it Image on the PC screen to the Projector 56 MCI Client Icon in the System Tray 58 About User Right to Login 59 10 PJ Controller 61 Preparation 62 Initial Setting 64 E mail Setting 65 Power Status 67...

Page 6: ...ock fire or cause the unit to malfunction Before operating this unit make sure that no electromagnetic interference is produced Operation of any radio equipment may interfere the functionality of some...

Page 7: ...band as Multi Card Director 2 If any other devices are causing radio interferences change the communication frequency channel or move to other location Trademarks and Copyright Microsoft Windows Wind...

Page 8: ...8 In this owner s manual Multi card Director can be referred to as MCI or Muti Card Imager These names can also appears on the operation screens and relevant descriptions...

Page 9: ...Chapter 1 Functions of Multi Card Director 1 Functions of Multi Card Director are described in this chapter 9 English...

Page 10: ...can be directly connected to LAN line using a LAN cable As the wireless LAN connection it can transmit images to projectors and control or operate them via LAN connection 10BASE T standard TCP IP comm...

Page 11: ...Chapter 11 English 2 Read this chapter first This chapter describes how to setup the Multi Card Director According to the using environment configure your Multi Card Director 2 Setup Procedure...

Page 12: ...Default Setting Installation of MCI Wired LAN connection Insert a wired LAN card CA 20 Wireless LAN Connection Insert a wireless LAN card CA 30 Use MCI as a viewer Insert a compact flash card CA 10 R...

Page 13: ...Chapter 13 English 3 3 Operation of Multi Card Director Operation of Multi Card Director LAN Connection...

Page 14: ...the image to up to five projectors 3 MCI converts the transmitted image data into RGB digital signal and then output it to the DVI input terminal of the projector Since the image is being transmitted...

Page 15: ...e will specify an access point using SSID ESSID a communication mode used in a network environment includes both wireless and wired LAN connection Access Point Computer 1 Wireless LAN compatible compu...

Page 16: ...mouse If your projector is supplied with a remote control unit with a mouse driven function you can operate the computer mouse with this remote control unit Aim the remote control unit towards the pro...

Page 17: ...Chapter 4 Part Names and Functions Factory Default Setting Installation of MCI 4 Read this chapter carefully to handle and install the MCI properly 17 English...

Page 18: ...Card Compact Flash card t Multi Card Slot Multi card insertion slot y Latch Button Used when mounting and removing the unit from the projector u Mounting Screw Used when mounting the unit to the proje...

Page 19: ...Contents of Factory Default Setting on next page Check Factory Default Setting To check the current LAN setting follow the steps below 1 Turn on the projector and select Wireless or Wired for its inp...

Page 20: ...ESS Uppercase ESSID is displayed Uppercase WEP Encryption Disable Disable Disable WIRELESS WEP DISABLE DISABLE DISABLE DNS Domain DNS Address 255 255 255 255 255 255 255 255 255 255 255 255 Contents o...

Page 21: ...on the projector 2 Release your hand from the MCI when the connector is properly mounted to the DVI terminal 3 Tighten the screw with a flathead screwdriver to firmly secure the MCI to the projector 2...

Page 22: ...ushed off Caution Mutli Card indicates Wireless LAN Card CA 30 Wired LAN Card CA 20 and Compact Flash Card CA 10 Do not use undesignated cards which may not properly operate with the MCI and damage th...

Page 23: ...ireless or wired LAN and also control operate a projector In this chapter we will install this application It is also possible to run MCI directly from the CD ROM if you do not wish to install Slide C...

Page 24: ...eration System Windows 98 Me NT4 0 2000 XP Requirements when using Over RAM 64MB main memory More memory will be required Windows 98 Me NT4 0 2000 depending on applications running at the same time Re...

Page 25: ...omatically runs and shows the Select Language screen Select the language you wish to use and press OK button Note If the Language Selection screen does not appear automatically open CD ROM drive of My...

Page 26: ...client directly from the CD ROM select launch MCI Client 5 License Agreement screen will appear Thoroughly read the contents If you agree to the contents of the software license agreement check on the...

Page 27: ...K button 7 Create a shortcut If you do not need a shortcut clear the check box and click Next button Then the software starts copying the files from the CD ROM 8 Finish the Install Wizard When complet...

Page 28: ...Card Imager MCI Client or double click the MCI Client icon on the desktop to start up MCI Client If the screen below is displayed the installation is successfully completed Click button on the top ri...

Page 29: ...iguration 6 This chapter describes how to configurate a wired LAN environment to connect a computer and projectors MCI attached The following wired LAN card will be needed for this connection Wired LA...

Page 30: ...of the projector If Wired is not shown on the menu the wired LAN card may not be properly mounted to the projector Check the attachment once again Caution Confirm if the Power Indicator on the MCI is...

Page 31: ...AN3 At the factory LAN3 is selected For details of factory default setting refer to 4 Factory Default Setting Select the closest configuration you wish to use When you set the IP address manually sele...

Page 32: ...LAN If Troubleshooting dialog appears your computer is not connected to projectors Check the message on the Troubleshooting screen and search again Caution MCI located in the different segment cannot...

Page 33: ...ord when accessing the MCI 1 Select Password from the MCI menu Password setting screen will be displayed 2 Enter password Enter the password using Point up down buttons 4 digit number and then press S...

Page 34: ...34 6 Wired LAN Configuration...

Page 35: ...owing wireless LAN card will be needed for this connection Wireless LAN Card CA 30 When you connect your computer and the projector MCI attached via wireless LAN your computer has to be equipped with...

Page 36: ...l be set on the Projector Menu Detailed setting is available with the browser menu Refer to 8 Configuration with Browser Configuration 1 Select Wireless from the input menu of the projector If Wireles...

Page 37: ...will be displayed Enter the value in each parameter The above diagram is the preset value of LAN 3 How to enter numeric value and characters on the configuration screen Pressing Point left right butt...

Page 38: ...Description IP Address Set the IP address in the environment you wish to use Sub Net Set the Subnet mask in the environment you wish to use Gateway Set the gateway address in the environment you wish...

Page 39: ...y the IP address as following procedure 1 Click Options button Click Options button on the main screen Options screen will be displayed Click Add button to show the IP Address screen 2 Enter IP addres...

Page 40: ...40 7 Wireless LAN Configuration...

Page 41: ...to the projector via wireless or wired LAN Complete the setup of the LAN connection The web browser can set or operate followings LAN setting Configure Wired Wireless LAN environment Email Setting Con...

Page 42: ...ea Network LAN Setup field Click the Details button in the Proxy Server field Input the IP address set on the MCI in the Proxy server is not used at address starting from the following IP address fiel...

Page 43: ...nfiguration screen will appear Items to be configured are shown in MENU on the light side of the screen Note MCI Configuration screen can be also displayed by entering the IP address directly on the b...

Page 44: ...ws SSID set on this system Current Channel Shows the channel through which this system is currently communicating Data Transfer Rate Shows the current wireless communication speed of this system The c...

Page 45: ...t on this page may affect relevant items on the advanced setup If you set the items on the advanced setup page the settings on this page are not necessary Depending on the inserted LAN card wireless o...

Page 46: ...BOOTP this setting is not needed Subnet Mask Set the Subnet mask in the environment you wish to use If IP Configuration Method is set to DHCP or BOOTP this setting may become unnecessary depending on...

Page 47: ...is not needed Subnet Mask Set the Subnet mask in the environment you wish to use If IP Configuration Method is set to DHCP or BOOTP this setting may become unnecessary depending on the settings of DH...

Page 48: ...Open System Enable 128bit Shared Key and Enable 128bit Open System corresponding to this WEP When enabling WEP Encryption the image transfer speed may become slower WEP Key 1 Key 4 Set WEP key in the...

Page 49: ...254 characters Administrator Address Enter the E mail address of administrator Mail Address Enter E mail addresses of users Option When the checked item has occurred the MCI send alert messages Attach...

Page 50: ...ter New Admin Password Re enter the new admin password you wish to set The password you have input is shown like up to ASCII16 Characters APPLY button If the contents you have set on this page are cor...

Page 51: ...you do not need a password enter 0000 Parameter Description Enter New User Password Input a new password you wish to set The password you have input is shown like 4 figures Re enter New User Password...

Page 52: ...le or Disable the interruptive connection to the projector which is connected to other computer when you send images using MCI Client See 9 Display Image via Network for further detail APPLY button If...

Page 53: ...een Depending on the inserted LAN card wireless or wired setting items will be varied Parameter Description LAN1 LAN2 LAN3 Select a LAN setting from LAN1 LAN2 and LAN3 APPLY button If the contents you...

Page 54: ...on this screen To activate the new settings the MCI has to be restarted Click RESTART button to reboot the unit Parameter Description RESTART button Click this button when you restart the MCI after c...

Page 55: ...Chapter 9 Display Image via Network 9 Using MCI Client you can display the image on your computer screen from the projector via network 55 English...

Page 56: ...the icon appears in the system tray For details of this icon refer to MCI Client Icon in the System Tray on P58 Search button Stop Capture button One shot Capture button Real time Capture button Opti...

Page 57: ...uter screen Screen Capture Settings Reflected for Real time Capture 4 Display the image on the computer screen to the MCI Parameter Description Real time Capture button Transmit the image to the proje...

Page 58: ...vate the MCI Client directly from the CD ROM Options settings Connected projectors Transfer mode Real time Capture One shot Capture or Disconnect User Password About MCI Client Show version informatio...

Page 59: ...administrator right and change the IP address of your computer for an accessible system After setting log into your computer with user right 2 Login again with administrator right and change the IP a...

Page 60: ...60 9 Display Image via Network...

Page 61: ...offers the following functions Controlling the projector Monitoring the projector condition E mail function to inform the projector condition to users Operating the projector Operating Network Viewer...

Page 62: ...er cannot connect to the projector installed in the segment beyond the rooter cannot be connected In this case click Options button to show the Options Screen q Click Add button to display the IP Addr...

Page 63: ...activated The screen below will be displayed The left side is Main Menu Select the setting item you wish to control adjust Control items or condition items of the selected setting item are shown on t...

Page 64: ...d One shot Capture are not available with the computer using PJ controller function Parameter Description Language Select a desired language from the pull down menu and click Set button Model Name Sel...

Page 65: ...tly See TCP IP in 8 Configuration with Browser You cannot use this E mail function if the DNS server and SMTP server cannot be used in your network environment If the SMTP server is located in your LA...

Page 66: ...168 0 111 Projector Name It sends you following message The Projector lamp is turned off because projector power circuit is failed Unplug this projector from AC outlet and ask servicing to qualified...

Page 67: ...ooling down to On click ON to turn on the projector Caution about turning on off the projector via network When you wish to turn on off the projector via network preset the projector as follows 1 Sele...

Page 68: ...as follows Normal Temperature Error Power Failure Input Status Displays the following input status Input Displays selected input mode Selection Displays selected input source mode Signal Status Displ...

Page 69: ...further detail refer to the owner s manual of your projector This function is not available if the projector is turned off Input On this screen you can select input source of the projector Check the...

Page 70: ...ion V Position Click 7 8 to adjust the vertical position Clamp Click 7 8 to adjust the clamp level Display Area H Click 7 8 to decrease increase the value to fit resolution of the image Display Area V...

Page 71: ...he screen is varied as below Component Input VIDEO S VIDEO Input Parameter Description System Adjustment Select a scan mode of component signal AUTO Automatically adjust to the scan mode of the input...

Page 72: ...ent Mode Select from Standard Real Cinema Image 1 4 from the pull down list Image 1 4 can be set by users Original Mode Displays the original mode Contrast Click 7 8 to adjust the image contrast Brigh...

Page 73: ...re Screen settings Sound On this screen you can adjust sound volume of the projector Parameter Description Parameter Description Aspect Select Normal or Wide True Provides image in its original size T...

Page 74: ...t the image to show on the starting up display from User Default or OFF Capture Click YES to capture the projected image The captured image can be used for the starting up display Select User for Logo...

Page 75: ...ere you have to change the code of the remote control unit at the same time Key Lock To lock the projector select Projector Keys Locks the top panel operation or Remote Control Locks the remote contro...

Page 76: ...ing Parameter Description Fan Control Speed Select Max or Normal Video System Displays the current video system Horizontal Click 7 8 buttons to adjust horizontal screen size Vertical Click 7 8 buttons...

Page 77: ...to display the value of the set 2 Select Set Number and name the setting Select the Set Number you wish to store the adjustment from the pull down menu Enter the name of the setting in the Memo field...

Page 78: ...rk Click ON of Display Menu item to show the projector menu Use cursor buttons to control the pointer Parameter Description Display Menu Click ON to display the projector menu Click OFF to cancel it C...

Page 79: ...Chapter 11 Network Viewer 11 If you use Network Viewer function you can display the image data stored in the FTP server from the projector 79 English...

Page 80: ...lient is as below About Network Viewer Wireless LAN Infrastructure Mode Wireless LAN AdHoc Mode MCI Client Computer Access Point FTP Server Image data MCI Wireless LAN card Infrastructure Mode Wireles...

Page 81: ...an instruction to display image data to the MCI Then the MCI access to the FTP server to load and display the image data following the instruction System Requirements forThe FTP Server Operation Syste...

Page 82: ...ient Detected projector names and IP addresses will be displayed 2 Specify the projector to display the image Only one projector can be selected 3 Start up PJ Controller Click the PJ Controller button...

Page 83: ...ASCII code in Password field 6 Click Set button Click Set button to set up the server information on the specified projector MCI The configured server information can be stored even if you unplug the...

Page 84: ...on screen for Network Viewer next page will appear Note MCI Configuration screen can be also displayed by entering the IP address directly on the browser s URL eg http 00 00 00 00 4 Specify the FTP se...

Page 85: ...ccording to the Auto Play Setting mode Manual Plays images manually Auto Play Setting Sec Sets time of playing back a image Times Select number of times of play back images Start Starts play back imag...

Page 86: ...t Play Mode and execute the operation Move the red arrow pointer to the item you wish to choose Using Point buttons and SELECT button of the projector configure or execute each item Auto Plays images...

Page 87: ...off the projector while the projector is playing images Disconnect the MCI from the FTP server before removing the MCI from the projector Removing the MCI while it is operating may lock the projector...

Page 88: ...88 11 Network Viewer...

Page 89: ...Chapter 12 Appendix 12 Troubleshooting Terminology Setting up IP Address with arp ping Command Specifications 89 English...

Page 90: ...LAN Configuration Yes LAN setting is not correct Check the following matters Connection between PC and the projector via wireless LAN cannot be established AdHoc Mode When selecting LAN3 factory defau...

Page 91: ...municate via network Some access points may have DHCP function For detail of the settings refer to the owner s manual for the devices or consult a system administrator of the network Is the segment wh...

Page 92: ...not be turned on off by operation with PJ Controller Make sure the settings of the projector are correct to use the MCI with it Refer to Power and Status in 10 PJ Controller Network Viewer does not wo...

Page 93: ...eless fidelity and a marketing brand name for IEEE 802 11b High Rate Only the products that have passed an inter operation test carried by WECA is approved as Wi Fi Any products approved as Wi Fi are...

Page 94: ...rates MAC address of your MCI unit every two characters by hyphen MAC address is indicated on a label attached to the bottom of each unit 3 Next enter ping command as follows Example C ping 169 254 1...

Page 95: ...ther Dimentions 129 W 70 D 27 H mm weight 170g Wireless LAN Card Network Standard IEEE802 11b Network Type 802 11 AdHoc Infrustracture Frequency band 2 412MHz 2 462MHz Channels 1 11 In France 2 457MHz...

Page 96: ...96...

Reviews: